229
How to make a barrel or tub
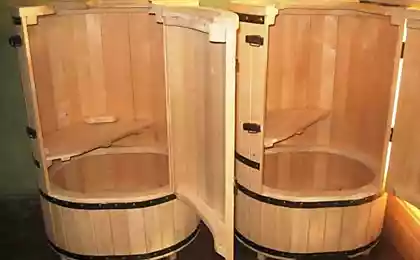
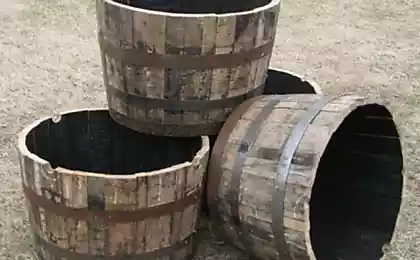
In the household, barrels and tubs are in great demand. They keep in the brine lard, ham, leavened cabbage, wet apples. What can be compared, for example, a cucumber or tomato, salted in an oak tub. And in a linden keg perfectly stored honey, apple juice, it is possible to prepare kvass. Finally, an oak tub with lemon or laurel tree and today will not spoil the interior of even a city apartment. Just do not find these simple products either in the store or in the market. But you can do it yourself, and although this task is not easy, an amateur master is quite capable of coping with it. We will tell you more about the manufacture of these necessary containers in the household.
First of all, you need to choose wood.. For storing honey, oak and pine are unsuitable - in an oak barrel, honey darkens, and in pine it smells of resin. We need linden, aspen, chinar. Poplar, wind, alder will come down. But for pickling, fermenting or urinating, there is nothing better than oak - such a barrel will serve more than one decade. For other needs, you can use osokor, beech, spruce, fir, pine, cedar, larch and even birch.
Determine the size of this table will help you.
External dimensions
Width and depth
duck-groove
Distance from duck groove
end-to-end
Barrel capacity (L)
Height.
Diameter in fart
In my head.
15.
345
295
262
3*3
20.
25.
420.
340
300.
3*3
20.
50.
535.
420.
370
3*3
25.
100.
670
515
450.
3*3
25.
120
770
525
460
3*3
25.
Note, here are the dimensions of the barrels to choose the size for the tub, the height and diameter of the head remains the same. The diameter in the fart of the barrel (diameter in the center) for the tub turns into the diameter of the bottom.
When the size is selected, you need to proceed to the riveting blanks, the main component of the barrel.
I'll give you the rivet sizes.
Capacity
Rivet width
Thickness of riveting
Donya thickness
Width of the donya
15.
40-90
14.
16
50 or more
25.
40-90
14.
16
50 or more
50.
40-90
17.
19.
50 or more
100.
40-100
18.
19.
50 or more
120
40-100
18.
19.
50 or more
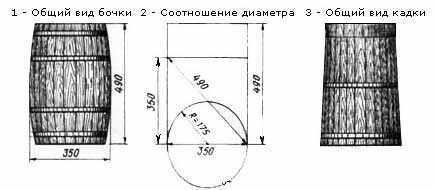
There is another way to determine the size. The ratio of the diameter of the tub or barrel should be in the proportion, for example, 350:490 mm (Figures 1-6). Increasing or decreasing the height, change the diameter of the container. The number of rivets for a barrel or tub is calculated by the formula 2 * Pi * R / Sh, where R is the radius of the tub in the lower section (for a barrel in the middle); Pi is a constant value equal to 3.14; The width of the rivet at the bottom of the tub (for a barrel - in the middle).
Rivets.
Usually on riveting goes the lower part of the trunk of old trees, it is called - "rivet". But a lover of tinkering and from ordinary firewood will choose blanks, and a thin-dimensional trunk will adapt to the case. It is best to make rivets from raw wood. At first, the churka - it should be 5-6 cm longer than the future rivet - is split in half, neatly tapping the log on the edge of the axe. Each half is then stabbed again into two parts and so on, depending on the thickness of the churka, in order to eventually obtain blanks 5-10 cm wide (for a donator - 15 cm) and 2.5-3 cm thick. You just need to try to split was radial - it will save the rivet in the future from cracking.
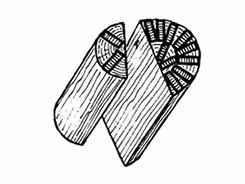
Punctured blanks are dried in a room with natural ventilation for at least a month. A dryer can be used to speed up the process. The dried workpiece is treated with strug or sherhebel and rubank.
Rivet markings.
Take a plaque with a width of 30 to 100 mm, on the outer side a line is drawn that divides the rivet in half in width (for the barrel - and in length). For the cone of the tub (barrel) it is necessary to withstand the cone of the rivet. It should be about 8 degrees. This means that with the width of the rivet at the bottom of the tub (for the barrel - in the middle) 100 mm, at the top it should be 8 mm narrower, i.e. 92 mm. And for the barrel above and below - 92 mm. Fix the established width of the rivet points and connect 4 points with lines - for the tub and 6 points - for the barrel. These are the riveting landmarks that define cone. The plane of the radius segment on the pattern, its orientation to the center together with the already certain slope of the future skeleton of the barrel or tub is the main requirement for adjoining the rivet one to the other during the stitch. Therefore, you need to apply the template more often to the processed rivet, checking the correctness of the planing.
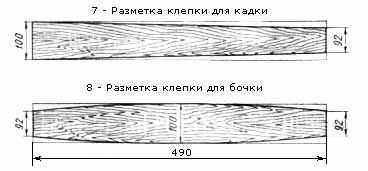
It's a prick.
Strip riveting rubank, fitting each thickness, and immediately determine which side will be external. To do this, half the left and right sides of the rivet along the length. Sherhebel with an oval base and iron is trimmed according to the pattern (Fig. 5) the inner side is clean and a line is drawn with a pencil, dividing the rivet in half along the length. Then stick the rivet along the length with a hacksaw and take the dividing line to the ends. A half-fugand (fugand) is treated cleanly with the outer and lateral sides of the rivet, the correctness of the planing is checked with a template. It is made on the radius of the assembly hoop for the tub, and for the barrel - on the radius of the umbilical hoop, made in advance. For a barrel with two donas, two pairs of hoops are harvested - 2 persistent and 2 navel. The umbilical hoop should pass freely through the stubborn.
Especially carefully check the correctness of the sharps of the sides of the rivet for the barrel. The pattern should fit tightly to the side and outer sides of the rivet, especially at the middle line dividing the rivet in half along the length. When plotting the sides, deviations from the line drawn on the end and dividing the rivet in half should not be allowed.

WRONG
Barrel hoops are made of wood or steel. Wood is not so strong, and the hassle is a hundred times more, so it is better to use steel. On the hoops is hot-rolled steel tape thickness of 1.6-2.0 mm and a width of 30-50 mm.
Measuring the barrel at the place of the hoop stretch, we add to this size a double width of the strip. With hammer blows, we bend the workpiece into a ring, punch or drill holes and put rivets of soft steel wire with a diameter of 4-5 mm. One inner edge of the hoop should be rolled with blows of the pointed end of the hammer on a massive steel stand.
Assembling the skeleton.
The assembly hoop is made medium between the top and bottom of the tub and slightly smaller diameter along the middle line for the barrel. On a clean wooden base, put a vertically assembled hoop and put 5-6 rivets inside it with the outside to the hoop. On the left, one of the rivets and hoops is clamped with a string. Let's lift the hoop a little bit and spread the rest of the rivets. Hold the hoop. The tight fit of rivets along the entire length (for the tub) and up to the middle line (for the barrel) is the result of careful sharpening and fitting. In the same way, we collect the skeleton for the barrel, but here we remove the assembly hoop after the nozzle of the umbilical hoop, then fill the stubborn hoop. If it is stuffed tightly, then we correctly plotted and correctly selected the last rivet in width.
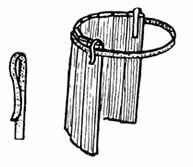
The frame for the barrel from the middle or slightly higher fanlikely diverges to its bottom. To tighten the loose end of the frame, various methods and devices are used. The end of a steel multicore cable with a diameter of 6-8 mm is fixed for a fixed support. The second end is thrown on a hot, steamed loose skeleton, worn on a ledge of a pillar of earth dug for this purpose, or a raised part of the log and by the method of "shocking", with the help of a strong stake inserted into the loop at the end of the cable, "twisted" the skeleton and put on the umbilical, and then stubborn hoops.
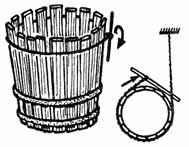
After assembly, the skeletons are checked for horizontality and verticality and finally deposit all the hoops. From the inside of the frame (barrels or tubs) clean the saddle, and at the ends of the rivets are cut by 1/3 thickness (Fig. 6) and 2-3 mm from the outside. Finally clean the outer and inner sides of the skeleton, half-land the upper and lower ends.
Installation of Dons in the shell.
For this, several operations are performed.
1. Slicing a duck groove in the back. We'll cut the groove on Friday. The width of the divorce of the teeth of the steel file is 4-5 mm. Therefore, the width of the cut chick groove should be 4-5 mm. The cake protrudes from a half-capped matinee bar by 4-5 mm. Therefore, the depth of the groove of the urine cannot be different. The thickness of the matinee bar is the limiter of the distance of the chime cutting from the top of the skeleton to the bottom of the plank on which the bar is fixed, i.e. 40-50 mm. Be sure to remove the chamfers 2-3 mm or a little more from both sides of the duck groove to prevent the rivet riveting of the skeleton when inserting the doñas and compressing them with hoops.

2. Bottom shield assembly. They are collected on wooden or metal (preferably stainless) studs-nails from 4-6 boards. The extremes are called shoals, the middle ones are called aunts. There's a bigger plank on the joints. We don't know the diameter of the circumference yet. Take the compass (Fig. 4) and spread its legs about the radius of the estimated circumference on the chime, insert the tip of the compass leg into the chime, divide the circle into 6 parts. In this way, we will determine the radius of the circle by the urine for the don. We transfer the radius to the bottom shield and draw a circle.
3. Drinking the Dons. With a beam saw or a curled hacksaw, we saw out the required donza. At the same time, the saw should be on the inner side of the line drawn by a circle during the divorce of the saw teeth 2-2.5 mm. This reduces the diameter of the circle by 0.14 constant value Pi.
4. Handling Dons. Let's put the Donze-circle on the workbench, clean on both sides sharpen, on the end of the pencil in the middle we draw a line 3-4 mm thick. With a radius of 25-30 mm less than the donze, we draw on its two sides a circle. It's the boundaries of beaming. Stameska or Rubank we remove the chamfers and make sure that the dodgy groove and the removed masks of the donets fit well. The line at the end of the don is left intact.
5. Installation of Dons. This is the final operation for the manufacture of a barrel or tub. Turn the frame of the tub wide part up and slightly knock down the lower hoop. At the barrel, we knock down a stubborn one, and the umbilical hoop is shifted so much that the donze enters the groove. To keep the donze in a horizontal position when installed in the chimes will help capron thread, cross-tipping the donze. When the donce is set in a chill, the thread is pulled out, the hoops are put in place. Before installing the second bottom in the skeleton of the barrel, it drills two spoon holes opposite each other and 4-5 cm from the inner side of the skeleton with a diameter of 20-25 mm, in which the spoons are put so that garbage does not get into the barrel. After installing the second donets, the hoops are finally stuffed and make sure that the don is riveted with rivets in the chills, and the rivets among themselves would not have gaps. If you correctly riveted the rivets and withstood the slope according to the pattern, sawed carefully the don, the product will be of high quality.
Take note.
1. Before assembling the skeletons for the barrel or tub, the completely treated rivet should be dried to 17-20% humidity.
2.You need to soak oak, spruce, pine, aspen barrels and tubs for at least 10 days, changing the water after 2-3 days. At the same time, shoals and boards are soaked, which press the sourdoughed products.
3.To reduce the formation of mold on the rivets of the tub when stored in the cellar, it is wiped with a tampon soaked in calcined vegetable oil. Jambs, boards and pressure stone once a week washed with hot water.
How many barrels to serve
First of all, it depends on the operating conditions. But it is important to remember that you should not paint filling containers with oil paint: it clogs the pores, which contributes to the rotting of the wood. It is desirable to paint hoops - they will not rust. For decorative purposes, the barrel, flower coil can be treated with herbs.
Brown oak color gives quenched lime in a mixture with a 25% solution of ammonia. Black solution of iron sulfur or infusion for 5-6 days of iron sawdust in vinegar.
A decoction of rhizomes of scented oxen (Asperula odo-rata) paints linden and aspen in red. Red-brown color gives a decoction of onion husks, brown - a decoction of slain walnuts. These dyes are both brighter chemically and more resistant.
It should be remembered that wood is better preserved at a constant humidity regime. Therefore, dry products should always be kept dry, and bulk - filled with liquid. Both cannot be placed directly on the ground. It is better to substitute a brick or board under the barrel than subsequently get rid of rot, cutting the chills.
But no matter how much the barrel is made with your own hands, all this time it will be a pleasant reminder to the owner of the overcome difficulties in understanding the secrets of the ancient craft of bondar. published
P.S. And remember, just by changing our consumption – together we change the world!
Join us on Facebook, VKontakte, Odnoklassniki
Source: bondar.at.ua/
First of all, you need to choose wood.. For storing honey, oak and pine are unsuitable - in an oak barrel, honey darkens, and in pine it smells of resin. We need linden, aspen, chinar. Poplar, wind, alder will come down. But for pickling, fermenting or urinating, there is nothing better than oak - such a barrel will serve more than one decade. For other needs, you can use osokor, beech, spruce, fir, pine, cedar, larch and even birch.
Determine the size of this table will help you.
External dimensions
Width and depth
duck-groove
Distance from duck groove
end-to-end
Barrel capacity (L)
Height.
Diameter in fart
In my head.
15.
345
295
262
3*3
20.
25.
420.
340
300.
3*3
20.
50.
535.
420.
370
3*3
25.
100.
670
515
450.
3*3
25.
120
770
525
460
3*3
25.
Note, here are the dimensions of the barrels to choose the size for the tub, the height and diameter of the head remains the same. The diameter in the fart of the barrel (diameter in the center) for the tub turns into the diameter of the bottom.
When the size is selected, you need to proceed to the riveting blanks, the main component of the barrel.
I'll give you the rivet sizes.
Capacity
Rivet width
Thickness of riveting
Donya thickness
Width of the donya
15.
40-90
14.
16
50 or more
25.
40-90
14.
16
50 or more
50.
40-90
17.
19.
50 or more
100.
40-100
18.
19.
50 or more
120
40-100
18.
19.
50 or more
There is another way to determine the size. The ratio of the diameter of the tub or barrel should be in the proportion, for example, 350:490 mm (Figures 1-6). Increasing or decreasing the height, change the diameter of the container. The number of rivets for a barrel or tub is calculated by the formula 2 * Pi * R / Sh, where R is the radius of the tub in the lower section (for a barrel in the middle); Pi is a constant value equal to 3.14; The width of the rivet at the bottom of the tub (for a barrel - in the middle).

Rivets.
Usually on riveting goes the lower part of the trunk of old trees, it is called - "rivet". But a lover of tinkering and from ordinary firewood will choose blanks, and a thin-dimensional trunk will adapt to the case. It is best to make rivets from raw wood. At first, the churka - it should be 5-6 cm longer than the future rivet - is split in half, neatly tapping the log on the edge of the axe. Each half is then stabbed again into two parts and so on, depending on the thickness of the churka, in order to eventually obtain blanks 5-10 cm wide (for a donator - 15 cm) and 2.5-3 cm thick. You just need to try to split was radial - it will save the rivet in the future from cracking.

Punctured blanks are dried in a room with natural ventilation for at least a month. A dryer can be used to speed up the process. The dried workpiece is treated with strug or sherhebel and rubank.
Rivet markings.
Take a plaque with a width of 30 to 100 mm, on the outer side a line is drawn that divides the rivet in half in width (for the barrel - and in length). For the cone of the tub (barrel) it is necessary to withstand the cone of the rivet. It should be about 8 degrees. This means that with the width of the rivet at the bottom of the tub (for the barrel - in the middle) 100 mm, at the top it should be 8 mm narrower, i.e. 92 mm. And for the barrel above and below - 92 mm. Fix the established width of the rivet points and connect 4 points with lines - for the tub and 6 points - for the barrel. These are the riveting landmarks that define cone. The plane of the radius segment on the pattern, its orientation to the center together with the already certain slope of the future skeleton of the barrel or tub is the main requirement for adjoining the rivet one to the other during the stitch. Therefore, you need to apply the template more often to the processed rivet, checking the correctness of the planing.

It's a prick.
Strip riveting rubank, fitting each thickness, and immediately determine which side will be external. To do this, half the left and right sides of the rivet along the length. Sherhebel with an oval base and iron is trimmed according to the pattern (Fig. 5) the inner side is clean and a line is drawn with a pencil, dividing the rivet in half along the length. Then stick the rivet along the length with a hacksaw and take the dividing line to the ends. A half-fugand (fugand) is treated cleanly with the outer and lateral sides of the rivet, the correctness of the planing is checked with a template. It is made on the radius of the assembly hoop for the tub, and for the barrel - on the radius of the umbilical hoop, made in advance. For a barrel with two donas, two pairs of hoops are harvested - 2 persistent and 2 navel. The umbilical hoop should pass freely through the stubborn.
Especially carefully check the correctness of the sharps of the sides of the rivet for the barrel. The pattern should fit tightly to the side and outer sides of the rivet, especially at the middle line dividing the rivet in half along the length. When plotting the sides, deviations from the line drawn on the end and dividing the rivet in half should not be allowed.

WRONG
Barrel hoops are made of wood or steel. Wood is not so strong, and the hassle is a hundred times more, so it is better to use steel. On the hoops is hot-rolled steel tape thickness of 1.6-2.0 mm and a width of 30-50 mm.
Measuring the barrel at the place of the hoop stretch, we add to this size a double width of the strip. With hammer blows, we bend the workpiece into a ring, punch or drill holes and put rivets of soft steel wire with a diameter of 4-5 mm. One inner edge of the hoop should be rolled with blows of the pointed end of the hammer on a massive steel stand.
Assembling the skeleton.
The assembly hoop is made medium between the top and bottom of the tub and slightly smaller diameter along the middle line for the barrel. On a clean wooden base, put a vertically assembled hoop and put 5-6 rivets inside it with the outside to the hoop. On the left, one of the rivets and hoops is clamped with a string. Let's lift the hoop a little bit and spread the rest of the rivets. Hold the hoop. The tight fit of rivets along the entire length (for the tub) and up to the middle line (for the barrel) is the result of careful sharpening and fitting. In the same way, we collect the skeleton for the barrel, but here we remove the assembly hoop after the nozzle of the umbilical hoop, then fill the stubborn hoop. If it is stuffed tightly, then we correctly plotted and correctly selected the last rivet in width.

The frame for the barrel from the middle or slightly higher fanlikely diverges to its bottom. To tighten the loose end of the frame, various methods and devices are used. The end of a steel multicore cable with a diameter of 6-8 mm is fixed for a fixed support. The second end is thrown on a hot, steamed loose skeleton, worn on a ledge of a pillar of earth dug for this purpose, or a raised part of the log and by the method of "shocking", with the help of a strong stake inserted into the loop at the end of the cable, "twisted" the skeleton and put on the umbilical, and then stubborn hoops.

After assembly, the skeletons are checked for horizontality and verticality and finally deposit all the hoops. From the inside of the frame (barrels or tubs) clean the saddle, and at the ends of the rivets are cut by 1/3 thickness (Fig. 6) and 2-3 mm from the outside. Finally clean the outer and inner sides of the skeleton, half-land the upper and lower ends.
Installation of Dons in the shell.
For this, several operations are performed.
1. Slicing a duck groove in the back. We'll cut the groove on Friday. The width of the divorce of the teeth of the steel file is 4-5 mm. Therefore, the width of the cut chick groove should be 4-5 mm. The cake protrudes from a half-capped matinee bar by 4-5 mm. Therefore, the depth of the groove of the urine cannot be different. The thickness of the matinee bar is the limiter of the distance of the chime cutting from the top of the skeleton to the bottom of the plank on which the bar is fixed, i.e. 40-50 mm. Be sure to remove the chamfers 2-3 mm or a little more from both sides of the duck groove to prevent the rivet riveting of the skeleton when inserting the doñas and compressing them with hoops.

2. Bottom shield assembly. They are collected on wooden or metal (preferably stainless) studs-nails from 4-6 boards. The extremes are called shoals, the middle ones are called aunts. There's a bigger plank on the joints. We don't know the diameter of the circumference yet. Take the compass (Fig. 4) and spread its legs about the radius of the estimated circumference on the chime, insert the tip of the compass leg into the chime, divide the circle into 6 parts. In this way, we will determine the radius of the circle by the urine for the don. We transfer the radius to the bottom shield and draw a circle.
3. Drinking the Dons. With a beam saw or a curled hacksaw, we saw out the required donza. At the same time, the saw should be on the inner side of the line drawn by a circle during the divorce of the saw teeth 2-2.5 mm. This reduces the diameter of the circle by 0.14 constant value Pi.
4. Handling Dons. Let's put the Donze-circle on the workbench, clean on both sides sharpen, on the end of the pencil in the middle we draw a line 3-4 mm thick. With a radius of 25-30 mm less than the donze, we draw on its two sides a circle. It's the boundaries of beaming. Stameska or Rubank we remove the chamfers and make sure that the dodgy groove and the removed masks of the donets fit well. The line at the end of the don is left intact.
5. Installation of Dons. This is the final operation for the manufacture of a barrel or tub. Turn the frame of the tub wide part up and slightly knock down the lower hoop. At the barrel, we knock down a stubborn one, and the umbilical hoop is shifted so much that the donze enters the groove. To keep the donze in a horizontal position when installed in the chimes will help capron thread, cross-tipping the donze. When the donce is set in a chill, the thread is pulled out, the hoops are put in place. Before installing the second bottom in the skeleton of the barrel, it drills two spoon holes opposite each other and 4-5 cm from the inner side of the skeleton with a diameter of 20-25 mm, in which the spoons are put so that garbage does not get into the barrel. After installing the second donets, the hoops are finally stuffed and make sure that the don is riveted with rivets in the chills, and the rivets among themselves would not have gaps. If you correctly riveted the rivets and withstood the slope according to the pattern, sawed carefully the don, the product will be of high quality.
Take note.
1. Before assembling the skeletons for the barrel or tub, the completely treated rivet should be dried to 17-20% humidity.
2.You need to soak oak, spruce, pine, aspen barrels and tubs for at least 10 days, changing the water after 2-3 days. At the same time, shoals and boards are soaked, which press the sourdoughed products.
3.To reduce the formation of mold on the rivets of the tub when stored in the cellar, it is wiped with a tampon soaked in calcined vegetable oil. Jambs, boards and pressure stone once a week washed with hot water.
How many barrels to serve
First of all, it depends on the operating conditions. But it is important to remember that you should not paint filling containers with oil paint: it clogs the pores, which contributes to the rotting of the wood. It is desirable to paint hoops - they will not rust. For decorative purposes, the barrel, flower coil can be treated with herbs.
Brown oak color gives quenched lime in a mixture with a 25% solution of ammonia. Black solution of iron sulfur or infusion for 5-6 days of iron sawdust in vinegar.
A decoction of rhizomes of scented oxen (Asperula odo-rata) paints linden and aspen in red. Red-brown color gives a decoction of onion husks, brown - a decoction of slain walnuts. These dyes are both brighter chemically and more resistant.
It should be remembered that wood is better preserved at a constant humidity regime. Therefore, dry products should always be kept dry, and bulk - filled with liquid. Both cannot be placed directly on the ground. It is better to substitute a brick or board under the barrel than subsequently get rid of rot, cutting the chills.
But no matter how much the barrel is made with your own hands, all this time it will be a pleasant reminder to the owner of the overcome difficulties in understanding the secrets of the ancient craft of bondar. published
P.S. And remember, just by changing our consumption – together we change the world!
Join us on Facebook, VKontakte, Odnoklassniki
Source: bondar.at.ua/
