672
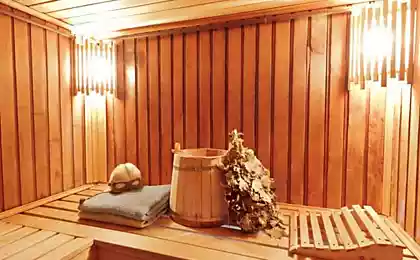
How to build a timber frame bath with his hands
Frame bath with their hands: step by step instructions
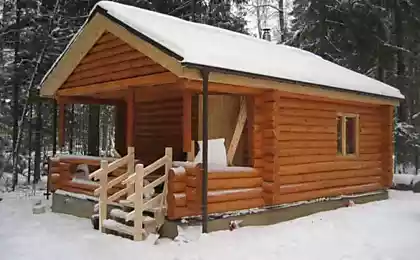
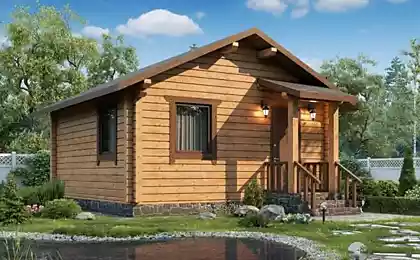
Traditionally in our country, build chopped baths. Such facilities have many advantages but are very expensive. So today, gaining increasing popularity of frame -panel bath. They are built much faster chopped and pavestone, not shrink, and is much more economical in terms of costs.
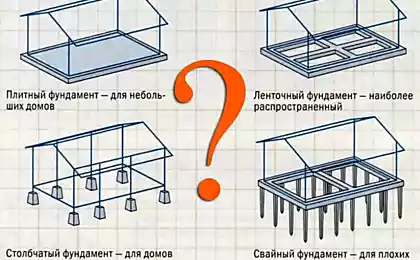
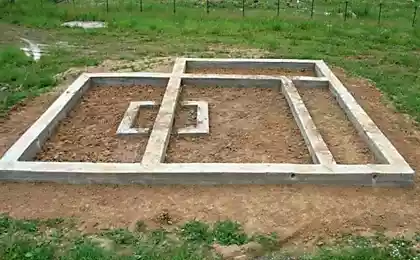
The construction of the Foundation Let's start with how to build the Foundation for frame bath. As the construction is very light, it is possible to use a cheap pier Foundation. If you are staying on the pier Foundation and do not intend to fill the grid, the lower harness is to make the beam thicker (up to 200mm).
Forty two million seven hundred ninety four thousand five hundred two
Discharge unit
Such a structure, a room, of course, requires a drain. Your hands to arrange it is not difficult. Even before pouring the Foundation it is necessary to dig a trench for a pipe and a structure of the receiver. The concrete base under the floor poured with a slope to the site of its release (where dig a little receiver tray of water).
When pouring, the floor can further insulate. For this first compacted soil (weathering gradient), placed in the trench pipe and fill it. Poured on top of crushed stone in 20cm and pour the concrete floor in 3 see
Council: Arranging the concrete base under the floor, don't forget to leave room for the Foundation of the heater.
Further, the screed is poured concrete block. On top of it lay the waterproofing. Further, all poured concrete layer of 5cm, with reinforcement of the entire structure with netting.
Fifty eight million six hundred eighty six thousand nine hundred eighty two
The Assembly of frame walls and roof
The bottom rail is attached to the pillars of the Foundation with anchor bolts with hex nuts and wide washers (learn more about installation of the waist see here). At each pole, depending on the distance between them is used at 1-2 bolt. In the next stage, set corner posts. Attach them to the steel angles. Then proceed to install the intermediate posts. The step between them is usually 0.6 m. Then, attach the top rail and fixed jib on the inner side of the bath (four per rack). Step by step instructions on the construction of timber frame walls can be seen here.
In the next step to trim the top corners or cutting fixed beams. Next on the anchor with additional mounting brackets install the truss legs.
Insulation of walls of frame baths Building frame the bath, attention should be paid, including insulation of walls. This operation is performed in several stages:
1. Between the uprights are mounted plate glass.
2. On the rack bars fixed waterproofing membrane.
3. On the bars is attached to the blockhouse.
4. Inside the bath on stand is also mounted cubes paroizolyator.
5. Perform the internal paneling boards, or paneling.
Importantly: Painted Board, used for upholstery is impossible. Do not use and patent lining.
Before wall insulation the need to insulate the roof. On the rafters first stretched waterproofing membrane. Attach it with a slight SAG. Then stuffed the crate and installed roofing material.
Eighty six million seventy seven thousand four hundred eighty two
Insulating the ceiling
The ceiling frame of the bath insulates about as well as the walls. Here is the exact step by step instructions:
1. On beams attached paroizolyator.
2. Sheathe the ceiling or lining boards.
3. Placed on top of the insulator.
4. Sew the floor of the attic.
At the final stage, concrete floor baths overlaid with tiles. Next, mount the Windows and doors. The bath construction is complete. You can start the construction of the heater Assembly shops, etc.
Ninety four million one hundred one thousand three hundred ninety four
P. S. And remember, just changing your mind - together we change the world! ©
Source: vk.com/dacha.life?w=wall-83256656_33894
Traditionally in our country, build chopped baths. Such facilities have many advantages but are very expensive. So today, gaining increasing popularity of frame -panel bath. They are built much faster chopped and pavestone, not shrink, and is much more economical in terms of costs.
The construction of the Foundation Let's start with how to build the Foundation for frame bath. As the construction is very light, it is possible to use a cheap pier Foundation. If you are staying on the pier Foundation and do not intend to fill the grid, the lower harness is to make the beam thicker (up to 200mm).
Forty two million seven hundred ninety four thousand five hundred two
Discharge unit
Such a structure, a room, of course, requires a drain. Your hands to arrange it is not difficult. Even before pouring the Foundation it is necessary to dig a trench for a pipe and a structure of the receiver. The concrete base under the floor poured with a slope to the site of its release (where dig a little receiver tray of water).
When pouring, the floor can further insulate. For this first compacted soil (weathering gradient), placed in the trench pipe and fill it. Poured on top of crushed stone in 20cm and pour the concrete floor in 3 see
Council: Arranging the concrete base under the floor, don't forget to leave room for the Foundation of the heater.
Further, the screed is poured concrete block. On top of it lay the waterproofing. Further, all poured concrete layer of 5cm, with reinforcement of the entire structure with netting.
Fifty eight million six hundred eighty six thousand nine hundred eighty two
The Assembly of frame walls and roof
The bottom rail is attached to the pillars of the Foundation with anchor bolts with hex nuts and wide washers (learn more about installation of the waist see here). At each pole, depending on the distance between them is used at 1-2 bolt. In the next stage, set corner posts. Attach them to the steel angles. Then proceed to install the intermediate posts. The step between them is usually 0.6 m. Then, attach the top rail and fixed jib on the inner side of the bath (four per rack). Step by step instructions on the construction of timber frame walls can be seen here.
In the next step to trim the top corners or cutting fixed beams. Next on the anchor with additional mounting brackets install the truss legs.
Insulation of walls of frame baths Building frame the bath, attention should be paid, including insulation of walls. This operation is performed in several stages:
1. Between the uprights are mounted plate glass.
2. On the rack bars fixed waterproofing membrane.
3. On the bars is attached to the blockhouse.
4. Inside the bath on stand is also mounted cubes paroizolyator.
5. Perform the internal paneling boards, or paneling.
Importantly: Painted Board, used for upholstery is impossible. Do not use and patent lining.
Before wall insulation the need to insulate the roof. On the rafters first stretched waterproofing membrane. Attach it with a slight SAG. Then stuffed the crate and installed roofing material.
Eighty six million seventy seven thousand four hundred eighty two
Insulating the ceiling
The ceiling frame of the bath insulates about as well as the walls. Here is the exact step by step instructions:
1. On beams attached paroizolyator.
2. Sheathe the ceiling or lining boards.
3. Placed on top of the insulator.
4. Sew the floor of the attic.
At the final stage, concrete floor baths overlaid with tiles. Next, mount the Windows and doors. The bath construction is complete. You can start the construction of the heater Assembly shops, etc.
Ninety four million one hundred one thousand three hundred ninety four
P. S. And remember, just changing your mind - together we change the world! ©
Source: vk.com/dacha.life?w=wall-83256656_33894