511
Building the cellar properly
Few modern gardeners have on their cellar area – build it troublesome, many people think even impossible. Is it really so? And does it make sense to spend time, money and area of land for this construction?
If You have any such question, imagine how You treat friends pickled cucumbers in late autumn, or their own apples in the winter. Like it? Then lets proceed through the stages of building a cellar, nuances and design features.
THE DEVELOPMENT OF THE PROJECT
Fortunately, the construction of the cellar does not require permission of the relevant authorities. But you would initially need to develop the project, to consider where the building will be located. Choose a location away from trees and from the accumulation of moisture. And another thing: if you build a wall with the entrance door "face" to the North, in the cellar even in the hottest time of the year will be a little cooler. We invite you to consider phased construction of the cellar, pictured below.
STEP 1. PIT
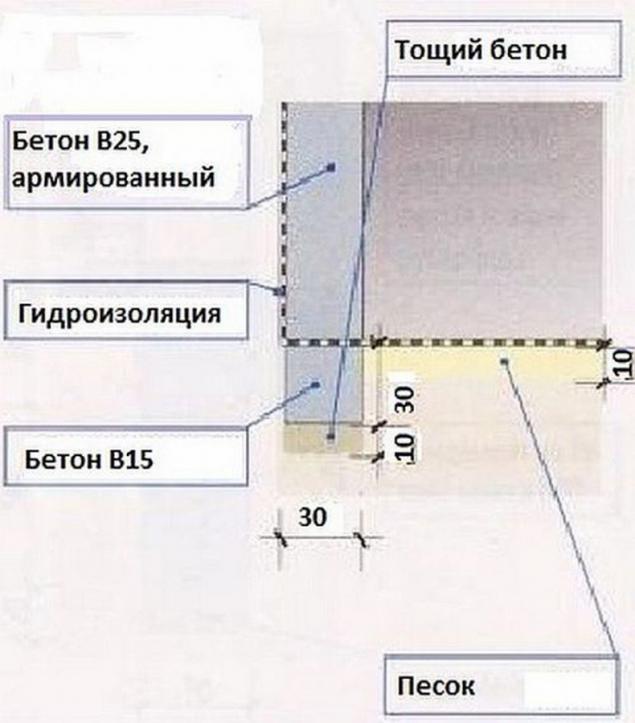
When You have decided on the location for the cellar, proceed to the digging pit. There are some nuances:
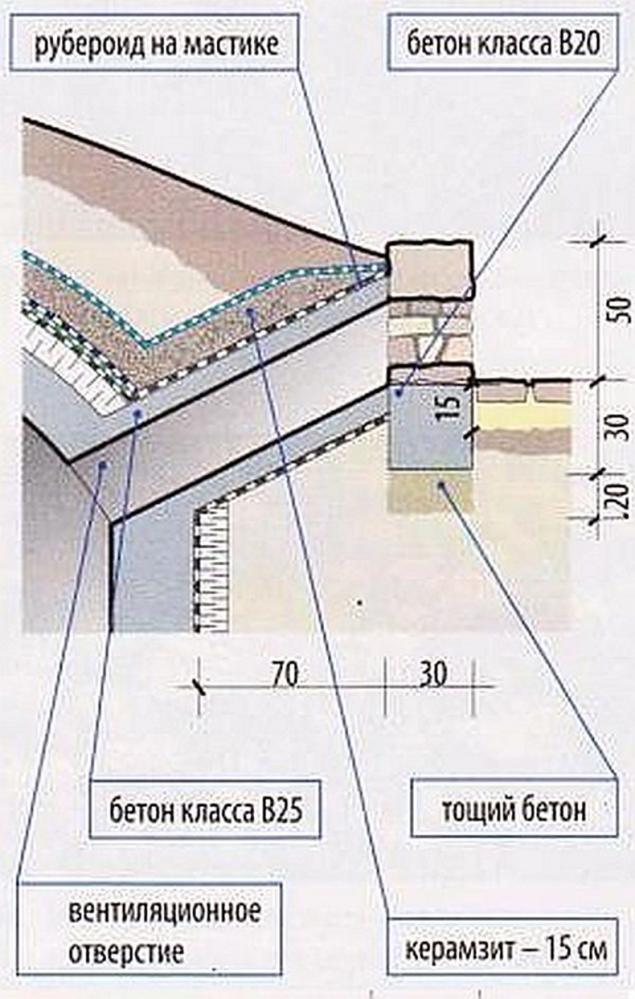
Where You will have Foundation piles, it is necessary to lay lean concrete (10 cm). After it dries do the formwork for the pillars and poured concrete B15. When base columns are ready, the space between them filled with sand, tamping it thoroughly.
Now the resulting layer to cover the waterproofing. For these purposes use roofing (you can instead use a special film). Material trail overlap at 5 cm, proKLIMA hot bitumen. Subsequently, the waterproofing of floors and walls connect.
STEP 3. WALL
To pour concrete wall thickness of 0.3 m doing formwork and reinforced wall mesh with diameter of bars 16 mm and cells 40x40 cm
Now we have to pour concrete formwork. This should be done with layers, tamping each one.
Please note: wall fittings will be connected to the reinforcement of the ceiling, so when casting concrete walls, leave free the ends of the rods. The concrete hardens in approximately a month. After this period, you can remove the formwork and to proceed with further work. Namely:
STEP 4. THE STRUCTURE OF THE STAIRCASE AND THE FLOOR
Planning for these elements should be consider to calculate the height and number of steps. At the initial stage of building stairs, by incorporation of its Foundation, it should be noted that the steps will be filled with mortar and then faced with stone. That is the thickness of the concrete layer and the cladding should be taken from the planned step height to obtain the height of the Foundation stage.
Thus, the order of devices stairs:
The floor in the cellar and the vestibule is better to cover with paving stones. This material is deposited on four-inch layer of sand.
STEP 5. OVERLAP
One of the most difficult and critical moments in the construction of the cellar – device overlap.
Consider the process in stages:
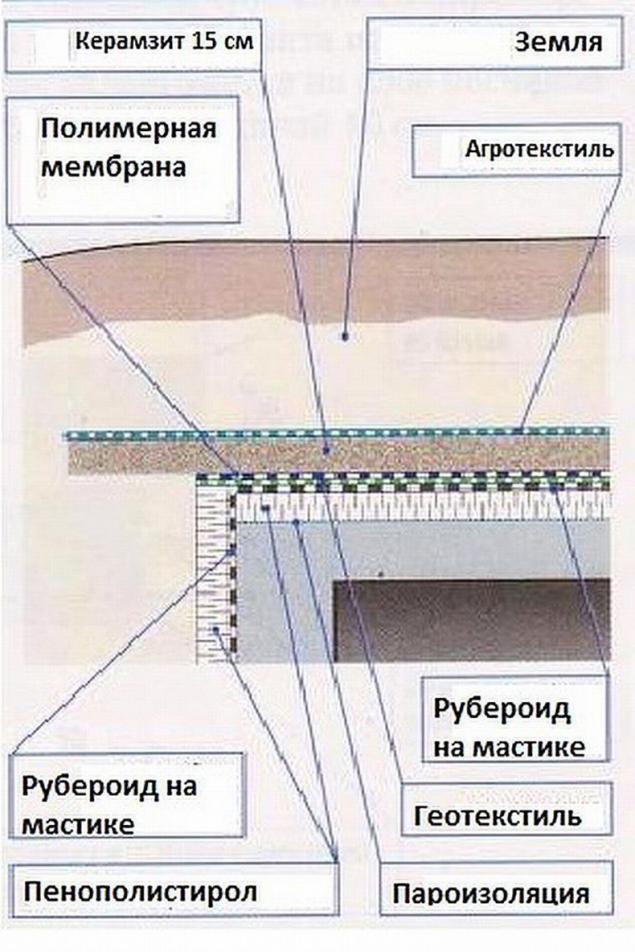
STEP 6. INSULATION OF WALLS AND CEILINGS
When the solution forming the slab hardens, proceed to the insulation outer surface. To do this, align the walls and ceiling with a special mass, then the primer.
Next, the walls are covered with tar paper for waterproofing, and Styrofoam for insulation.
Overlap is a little more complicated due to the large loads: insulation, waterproofing, and then a protection layer (geotextile, plastic membrane). At the end of the drainage and agrotekstil ' as a filter layer. Thus, after the falling asleep of the earth you will receive a place for a kind of flower-beds in the cellar.
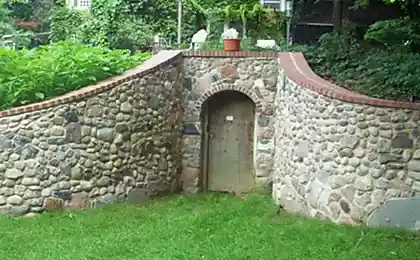
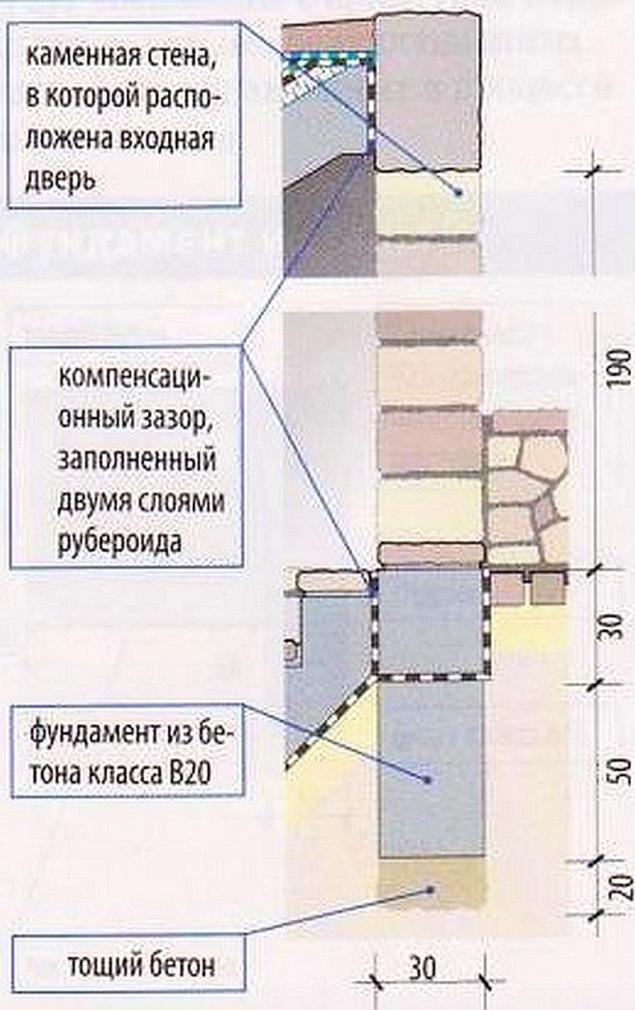
STEP 7. THE WALL TO THE FRONT DOOR
The front wall we offer to execute the of crushed stone. This will require a substantial Foundation to a depth of 1 m. After its solidification can proceed to the construction of the wall.
The stones need to be put on the solution, not forgetting elements such as the design of seams, cracks between the wall and concrete structure of the cellar. The latter is necessary to prevent cracking during seasonal ground movements. These cracks (expansion joints), of course, you will need to seal the waterproofing material (roofing material on bitumen mastic).
STEP 8. DO THE VENTILATION
As You may have guessed, the question of ventilation we start to do only after decorated the walls and the ceiling, and the soil compacted around the walls. Make a hole for ventilation, set the formwork and rebar.
Using concrete B25 formed wall vents, protected by its isolation. Outer side made out of wall ventilation crushed stone. For isolation, choose plastic material, it will fall on a curved surface. For example, expanded clay granules.
By the way: with the onset of autumn ventilation closed to prevent the penetration of cold inside. You can do it the old fashioned way – with a straw, and can be a polystyrene in wooden boxes.
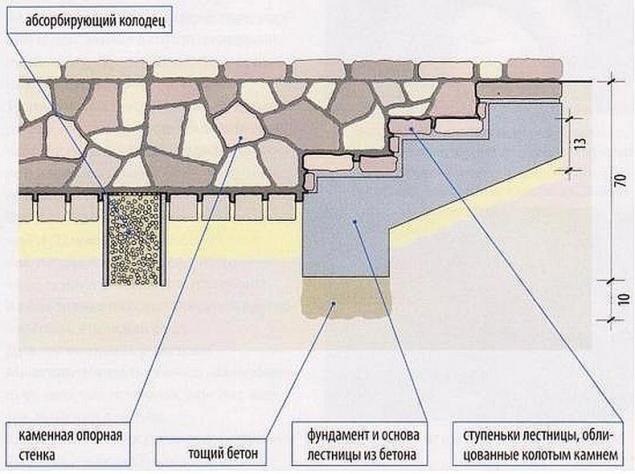
STEP 9. STAIRS AND RECESSED AREA OUTSIDE THE CELLAR
As can be seen from the figure, the entrance to the cellar is located in a small cavity. To place so the front of the building, it is necessary to make steps and a kind of wall around the sunken platform. The walls and steps put as a wall – stone, and the site with paving stones. Don't forget about water drainage. To do this, a special well-protected grid. Its depth will depend on soil type, amount and level of groundwater.
STEP 10. FINISH CELLAR
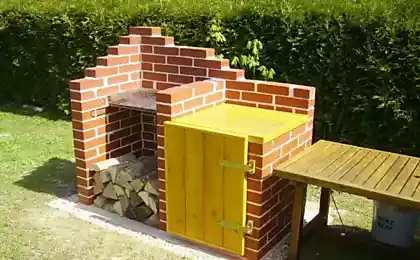
If You are looking to build not only functional but beautiful space in which it will be pleasant to enter, think of the walls inside will look nice the surface of the stone. The door must first be closed tightly without forming cracks and gaps. Otherwise, at the slightest temperature fluctuations outside, the atmosphere in the cellar will also change.
The final stage is a coating of the cellar with earth. The layer should be at least 60 cm, sprinkle on top of the fertile earth, stamping it in the process of laying.
That's it – cellar built and ready for use. Left best to plant beautiful plants and set on the shelves prepared for winter treats.
A bit more about the use of plants in the cellar
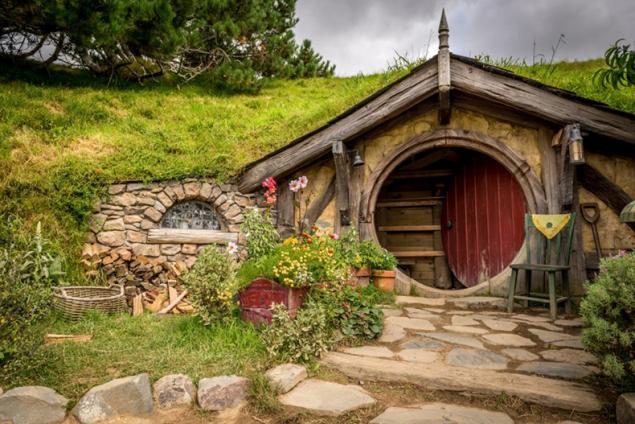
The overlap of the cellar a cursory look at a plot reminiscent of a picturesque hill. Planted with flowers, it really is a decoration for your site. But is it only a decorative function will carry out the plants in the cellar? In fact, they protect the ground from leaching, cellar – from the summer heat.
Planting cellar should be such plants that are not afraid of drought, resistant to heat and are capable of proliferation to form a kind of carpet with a strong root system. published


P. S. And remember, only by changing their consumption — together we change the world! ©
Join us in Facebook , Vkontakte, Odnoklassniki
Source: vk.com/pervorod?w=wall-48124846_31858
If You have any such question, imagine how You treat friends pickled cucumbers in late autumn, or their own apples in the winter. Like it? Then lets proceed through the stages of building a cellar, nuances and design features.

THE DEVELOPMENT OF THE PROJECT
Fortunately, the construction of the cellar does not require permission of the relevant authorities. But you would initially need to develop the project, to consider where the building will be located. Choose a location away from trees and from the accumulation of moisture. And another thing: if you build a wall with the entrance door "face" to the North, in the cellar even in the hottest time of the year will be a little cooler. We invite you to consider phased construction of the cellar, pictured below.
STEP 1. PIT
When You have decided on the location for the cellar, proceed to the digging pit. There are some nuances:
- The Foundation must be buried at least 0.3 m from the ground surface;
- Dig a pit larger than the estimated area of the cellar;
- The ground can crumble from the walls of the pit. To avoid this, make them under the tilt or pitch the formwork.
- Not stand far away the top layer of soil from the excavation – it will be useful for design of buildings: to the cellar did not disturb the overall design of your site, it is usually planted with plants or grass.
Where You will have Foundation piles, it is necessary to lay lean concrete (10 cm). After it dries do the formwork for the pillars and poured concrete B15. When base columns are ready, the space between them filled with sand, tamping it thoroughly.
Now the resulting layer to cover the waterproofing. For these purposes use roofing (you can instead use a special film). Material trail overlap at 5 cm, proKLIMA hot bitumen. Subsequently, the waterproofing of floors and walls connect.
STEP 3. WALL
To pour concrete wall thickness of 0.3 m doing formwork and reinforced wall mesh with diameter of bars 16 mm and cells 40x40 cm
Now we have to pour concrete formwork. This should be done with layers, tamping each one.
Please note: wall fittings will be connected to the reinforcement of the ceiling, so when casting concrete walls, leave free the ends of the rods. The concrete hardens in approximately a month. After this period, you can remove the formwork and to proceed with further work. Namely:
STEP 4. THE STRUCTURE OF THE STAIRCASE AND THE FLOOR
Planning for these elements should be consider to calculate the height and number of steps. At the initial stage of building stairs, by incorporation of its Foundation, it should be noted that the steps will be filled with mortar and then faced with stone. That is the thickness of the concrete layer and the cladding should be taken from the planned step height to obtain the height of the Foundation stage.
Thus, the order of devices stairs:
- Make a base for the stairs;
- Constructed formwork;
- The poured concrete B20;
- When the concrete is contacted, is coated staircase with stone.
The floor in the cellar and the vestibule is better to cover with paving stones. This material is deposited on four-inch layer of sand.
STEP 5. OVERLAP
One of the most difficult and critical moments in the construction of the cellar – device overlap.
Consider the process in stages:
- Forest installed to support formwork;
- Do the formwork;
- Install rebar(o16 mm, 20?20);
- The fastening of the rebars of the slab with the reinforcement wall;
- Pour the floor with concrete, tamping it carefully;
- Waiting for curing of concrete (depending on weather conditions about a month).
STEP 6. INSULATION OF WALLS AND CEILINGS
When the solution forming the slab hardens, proceed to the insulation outer surface. To do this, align the walls and ceiling with a special mass, then the primer.
Next, the walls are covered with tar paper for waterproofing, and Styrofoam for insulation.
Overlap is a little more complicated due to the large loads: insulation, waterproofing, and then a protection layer (geotextile, plastic membrane). At the end of the drainage and agrotekstil ' as a filter layer. Thus, after the falling asleep of the earth you will receive a place for a kind of flower-beds in the cellar.
STEP 7. THE WALL TO THE FRONT DOOR
The front wall we offer to execute the of crushed stone. This will require a substantial Foundation to a depth of 1 m. After its solidification can proceed to the construction of the wall.
The stones need to be put on the solution, not forgetting elements such as the design of seams, cracks between the wall and concrete structure of the cellar. The latter is necessary to prevent cracking during seasonal ground movements. These cracks (expansion joints), of course, you will need to seal the waterproofing material (roofing material on bitumen mastic).
STEP 8. DO THE VENTILATION
As You may have guessed, the question of ventilation we start to do only after decorated the walls and the ceiling, and the soil compacted around the walls. Make a hole for ventilation, set the formwork and rebar.
Using concrete B25 formed wall vents, protected by its isolation. Outer side made out of wall ventilation crushed stone. For isolation, choose plastic material, it will fall on a curved surface. For example, expanded clay granules.
By the way: with the onset of autumn ventilation closed to prevent the penetration of cold inside. You can do it the old fashioned way – with a straw, and can be a polystyrene in wooden boxes.
STEP 9. STAIRS AND RECESSED AREA OUTSIDE THE CELLAR
As can be seen from the figure, the entrance to the cellar is located in a small cavity. To place so the front of the building, it is necessary to make steps and a kind of wall around the sunken platform. The walls and steps put as a wall – stone, and the site with paving stones. Don't forget about water drainage. To do this, a special well-protected grid. Its depth will depend on soil type, amount and level of groundwater.
STEP 10. FINISH CELLAR
If You are looking to build not only functional but beautiful space in which it will be pleasant to enter, think of the walls inside will look nice the surface of the stone. The door must first be closed tightly without forming cracks and gaps. Otherwise, at the slightest temperature fluctuations outside, the atmosphere in the cellar will also change.
The final stage is a coating of the cellar with earth. The layer should be at least 60 cm, sprinkle on top of the fertile earth, stamping it in the process of laying.
That's it – cellar built and ready for use. Left best to plant beautiful plants and set on the shelves prepared for winter treats.
A bit more about the use of plants in the cellar
The overlap of the cellar a cursory look at a plot reminiscent of a picturesque hill. Planted with flowers, it really is a decoration for your site. But is it only a decorative function will carry out the plants in the cellar? In fact, they protect the ground from leaching, cellar – from the summer heat.
Planting cellar should be such plants that are not afraid of drought, resistant to heat and are capable of proliferation to form a kind of carpet with a strong root system. published


P. S. And remember, only by changing their consumption — together we change the world! ©
Join us in Facebook , Vkontakte, Odnoklassniki
Source: vk.com/pervorod?w=wall-48124846_31858