1837
How to build a cellar from a brick with your hands
The modern cellar allows to create an optimal climate for storing fresh vegetables and produce home canning. For the construction of cellars use different materials: stone, metal, concrete blocks. However, the most popular, heat-saving and environmentally friendly building material is an ordinary red brick.
To make a cellar out of bricks do not have to be a professional. You will be quite enough knowledge of basic construction and basic skills with tools. Adhering to the principles of construction of a brick cellar in this article, you can own hands to create a sturdy and durable structure that will ensure the safety of your products and billets for the year.

In a properly constructed cellar should be made of good heat - and waterproofing, and organized a constant flow of fresh air. This will allow to maintain the desired temperature and humidity. Under such circumstances, the products stay fresh longer, do not rot and retains its taste.The choice of location for the construction ofthe Choice of location for the construction of cellars is the first and most important stage of construction. You can place the cellar of the brick under the existing structure or to store it separately. As a rule, to the construction phase, many are already having defined the place in the cellar, however, suggest that before you start excavation, to draw attention to several important points.
The size of the cellar. They depend on the needs of your family and what you plan to store in it. Also this factor is important to consider to calculate amount of materials. The topography of the site. If the area where you plan to place cellar allows you to place it on the hillside – it is better to use this natural advantage. This will greatly reduce the amount of earthwork. The type of soil. Different type of soil means various slopes during excavation. The type of soil determines its drainage properties. The level of groundwater. The depth of the cellar count so that its lower border was 50 cm above this level. The depth of soil freezing in winter. If you don't have all the necessary information, be sure to check the above points. This will avoid unpleasant surprises during construction and during the operation of the future cellar.
It is recommended for the construction of the cellar with their hands to select the most sublime and dry place. In that case, if you do not cellar under the house or garage, and separately – do not build it close to other farm buildings. This will help to prevent their possible collapse caused by construction works.The best time to build the cellar is considered summer. In the summer groundwater is as far as possible to simplify the construction.
Before you start digging, consider the internal arrangement of your cellar. Plan where and how to accommodate shelving, compartment for potatoes and other root vegetables. It should all fit in a future cellar given the fact that there should be convenient and comfortable to be human. The height of the ceiling it is desirable to make not less than 2.3 meters. Also, some space will take the stairs. Probably, after all this planning you take the decision to increase the size of the pit. This, in turn, will affect the number of brick and other materials.
Building materials and toolsTo perform work associated with the construction of a brick cellar, you'll need the following equipment and tools:
Standard tool kit (hammer, screwdrivers, nails, screws, measuring tape, etc.). Screwdriver, chainsaw and other tools will greatly save your time and facilitate the manual labor. Trowel, level and square (requires masonry). Shovels in accordance with the number of employees (you may need a pickaxe or a crowbar). Specific:
A metal trough or a concrete mixer for mortar mixing. Welding machine (in the case of self-reinforcement beams). Construction materials:
Brick in the estimated number of (ideally red). Cement, gravel, sand, greasy clay. Wood planks. Two plastic or asbestos cement pipes with a diameter of 20 cm for ventilation. Channels and metal fittings. Dig the pitonce you have decided on the location of the building, we can commence earthworks. Depending on the size of future cellars and the proximity of neighboring buildings, you can take the advantage of the excavator or to dig a pit shovel with his hands.
Cellar located under the house or outbuildings, it is best to provide immediately at the stage of construction of the Foundation. If you haven't done so, you'll need to work a jackhammer.
In General, the principle of construction of the cellar is reminiscent of the technology of construction of the house. After the completion of the excavation you have to do the floor, build walls, build floors and to organise a system of ventilation.
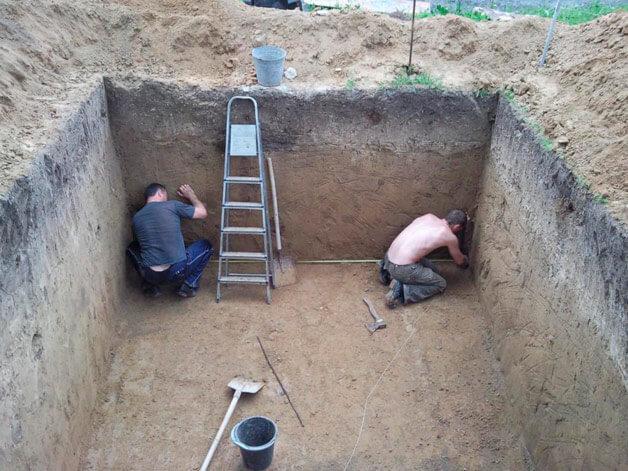
When digging it is necessary to consider the type of soil to calculate the steepness of the slopes.
Do the floorWhen the pit is ready, you can proceed to unit floor. The floor should be well protect the interior from moisture, and be smooth and comfortable. The bottom of the pit before laying the floor must carefully align with a shovel. At the junction of the floor and walls must be crumbled earth.
To drain excess moisture from the cellar the bottom of the pit is filled with 20-cm layer of crushed stone or gravel chips. Then you need to mix fat clay with water until a homogeneous consistency. The clay is gently poured on the gravel. The clay layer must uniformly cover the drainage pillow.
If you have a small cellar, the soil is dry, and the ground water table is quite deep, a clay floor would be sufficient. But if you want to build will serve you for many years and most effectively protect your crop from moisture and damage, recommend further fill the floor with concrete and, if necessary, to reinforce that also, it is easy to do with their hands. A concrete floor will provide a solid and reliable Foundation for masonry walls.
Mixing concrete and mortar take the cement and aggregate from stone or sand in the ratio one to five. As the cement is of various grades, in the preparation of the concrete mix is best to focus on the instructions for kneading, which is always there on the pack with the material. To prepare the solution you will need a mixer. The volume of a standard cement mixer is equal to 200 liters.If you wish, you can use a floor covering over a concrete base. But this is only appropriate in the case that your cellar is large in size and performs not only the function of a vegetable store, but is also used as a multi-functional basement. The flooring is done after the walls and ceiling, in order to avoid spoilage or damage.
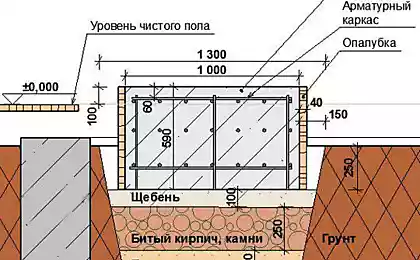
After pouring the floor, you must wait 1-2 weeks before complete drying of the concrete and prepare the formwork boards for the Foundation for future walls. Width of masonry in our case will amount to 1-1,5 bricks. From the same concrete that was used to fill the floor, you need to form a simple strip Foundation. The height of the Foundation must be above the floor level by 20 cm If the cellar is deep and the load on the Foundation will be significant, you can add in the concrete mixture is still filler.
The Foundation should also be allowed to dry after which proceed to masonry.
Before erecting masonry with their hands it is necessary to carefully align the earthen walls of the pit. They should not be exposed hillocks and protruding roots. In particular, this advice is relevant if excavation were used excavator. The protruding region can be cut with a shovel and level with a trowel. After aligning the walls and collect dust from the pit all showered the ground. Be sure to clean the Foundation.
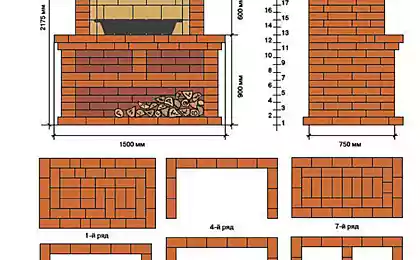
In fact, calculations of the walls of the cellar used red brick. Solid walls of the cellar must be strong and durable. In addition, red brick is an environmentally friendly material with excellent thermal insulation properties. Because of its use in the cellar creates optimal microclimate conditions for the storage of fresh vegetables, and domestic preparations.The brick is laid out simple brickwork in a checkerboard pattern. In other words, if the first number you started with the whole brick, the second should begin with a half brick, with a third again and so on. The width of the masonry is one–half brick. Solution for a strong coupling of the brickwork is prepared from a mixture of cement and sand in the ratio of 1 to 4. The cement for such work it is better to choose the M400.
Immediately prepare a semi-fluid solution of a fatty clay. They will you fill the space between the brick masonry and earthen wall. This so-called "clay castle", which further protects the walls from excessive moisture. Lay the clay is in process of erection of the wall.
Think in advance about where you will be located the ventilation pipe, so as to lay they need immediately. Read more about ventilation device with their hands read on in the article.
The technology of masonry brick wall with the following:
Once you have finished to erect the walls and columns, pause until complete drying of the solution. Masonry must stand and firmly to adhere. Brick wall is good because that can easily last for several decades without requiring any major repairs.
After completing this stage of construction we can say that our brick cellar is ready by two-thirds. Will only do overlap and form an entrance with steps or stairs.
http://thesame.tv/embed/54485.582536c0defc9b835feddaa377d3?width=640&height=360
http://thesame.tv/embed/95845.92f9e51104eb811b73a0c355a1cb?width=640&height=360
Ceiling in the cellar – constructed ceilingCeiling in the brick cellar perform the functions of ceiling and floor for the premises located above, if any. Ceiling needs to be reliable and durable as the rest of the design.
For the construction of slabs with their hands can use a sturdy wooden beam or metal u-shaped profile or channel. We consider the second option.
For laying of channels in the upper row of bricks need to be sealed. It is possible to make the reinforcement and pour the top row of the wall with concrete. After drying of the concrete can be placed channels. The distance between the channels should be set to 0.5 meter. If the wall of the cellar provided the door, the direction of stacking of channels to be perpendicular to it. The doorway in this case is strengthened by more robust fittings.
Metal channels for ceilings. Then on top of channels should be laid rebar. Reinforced rods cm diameter are placed perpendicular to the channels at a distance of 20 centimeters from each other. All this metal structure is sealed together with hot welding. Over the first reinforcement layer and perpendicular to it the second spread is exactly the same layer and weld.
Channels placed on top of the valves.
If the location of the door or hatch to the cellar you have planned from the top, provide the appropriate opening in the reinforced structure. Also note that you will have two vent pipes.
You now need to concrete the metal frame ceiling. To do this the formwork. Of chipboard sheets constructed bottom, which should be propped from below to the inside of the cellar. The support should be durable enough to withstand the weight of concrete that you pour on top. Wooden boards make the outer formwork wall and a doorway, if he is on top. Formwork height shall be above the level of the metal frame.
Metal frame encased in concrete.
Components for the preparation of concrete mortar is taken in the same proportions that were used to fill the floor of the cellar. The concrete layer should completely cover the metal frame. The thickness of the ceiling will get about twenty centimeters. This will be enough to provide good surface moisture and thermal insulation in winter, in the case of separately constructed cellar. If you do cellar under the house or garage, this overlap will serve as a solid and safe floor.
In order to completely dry the concrete will take several days. Once the ceiling is firmly grasped and solidified, bearings mounted at the bottom and chipboard are removed together with the formwork. Congratulations – the ceiling of the cellar is ready.
To protect free-standing cellar from the cold in winter, it is necessary to provide additional insulation of the ceiling. If a cellar is built under the house or cottage, insulation is, by contrast, is designed to protect your stocks from excessive heat.You can fill up the cellar the top layer of expanded clay or earth, or insulate it with mineral wool or fiberglass. Methods of insulation may vary depending on the area in which you live and its climate conditions. After completion of the ceiling the time to build an entrance to the cellar and to build stairs. If the cellar is located under the garage, think about the good sealing of the hatch to automotive technical gases and odors do not penetrate to your products.
If you are confused by the volume of works on reinforcing and concreting of the ceiling, you can do easier. When designing a cellar consider the length of its walls is a multiple of the size of the concrete slab. In fact, this plate is ready-made overlap. Just put the desired number of slabs on brick walls and support columns. The gap between the plates will need to be concreted or sealed with sealant.
If the entrance to the cellar is provided in the side wall (which is important when the location of cellars on the hillside or incomplete penetration into the ground), you can with your hands to form concrete stairs. The layout of the space under the stage is to be done at the stage of pouring the floor, but to their production, to begin only after the construction of the walls and ceilings. The height of the steps, of course, must be the same, otherwise you will be uncomfortable for them to go. The formwork is made of boards and filled with concrete. A few days later the concrete dries and the formwork is removed. Please note, concrete is poured into the formwork, starting with the bottom step.
Ventilation in the cellar, the ventilation System is designed at once, together with the construction of the cellar. Without the inflow of fresh air being in the cellar is dangerous to human life. Vegetables and plants during storage release carbon dioxide, which without proper ventilation is accumulated in the cellar, making it unusable. Also, without proper ventilation of the cellar in the air will accumulate moisture on the walls and ceiling to settle the condensate.
In order to avoid all these troubles when you use brick cellars, it is necessary to arrange the ventilation system. The easiest option is the usual air handling system.
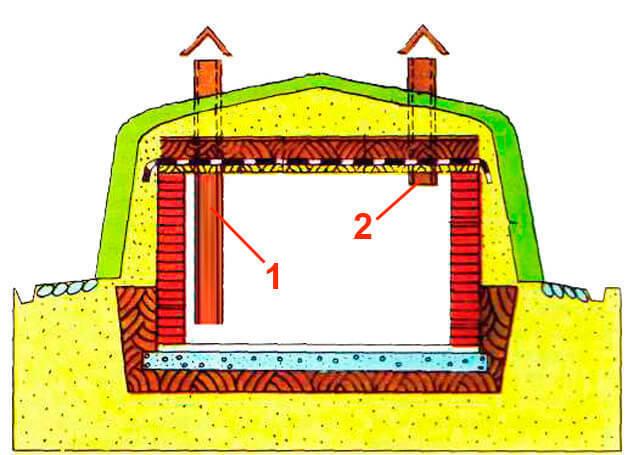
Supply and exhaust ventilation system: 1 - supply pipe 2 and exhaust pipe.
For her organization will need two plastic pipes. Unlike metal, polyethylene pipe will not rust and are not destroyed under the influence of moisture and temperature changes.
The output supply pipe must be placed above the floor of the cellar at a height of not more than half. That pipe in the cellar will do fresh air. Removal of carbon dioxide used exhaust pipe. Its output is under the ceiling in the opposite direction from the supply pipe corner of the cellar. On the surface of the pipe is removed through the ceiling.
On top of the pipes are mounted regulating valves and are made special caps that protect from moisture. During the severe frosts of the pipe should be closed with felt. The height of their lifting above the surface – about a meter.
The arrangement is ready cellarAfter cellar, built of brick should do his interior decoration and furnishing. Brick walls from the inside can be of whitewash with lime.
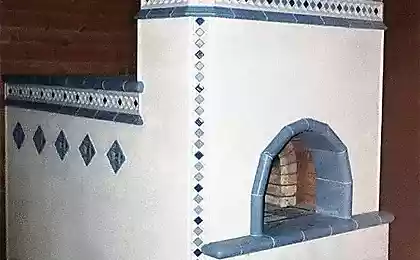
In advance provide the right amount of shelves and racks, compartment for potatoes and root crops. Spend electricity and make the lights if required. From outside the building can be designed in any style, for example, under medieval building.
Built with his own hands, and all the rules of brick cellar will serve you for many years without requiring repair and additional investments. published
SUBSCRIBE to OUR youtube channel that allows you to watch online, download from YouTube free video about the recovery, the rejuvenation of man. Love for others and ourselves, as the feeling of high vibrations — an important factor for improvement .
http://thesame.tv/framevideo/92531.995aca9f41bcaa379449ebd07298?i=w-TTJ3FFusE&index=3&version=2&&bla
Put LIKES and share with your FRIENDS!
www.youtube.com/channel/UCXd71u0w04qcwk32c8kY2BA/videos
Subscribe -https://www.facebook.com//
P. S. And remember, only by changing their consumption — together we change the world! ©
Source: podvaldoma.ru/stroitelstvo/pogreb/iz-kirpicha-svoimi-rukami.html
To make a cellar out of bricks do not have to be a professional. You will be quite enough knowledge of basic construction and basic skills with tools. Adhering to the principles of construction of a brick cellar in this article, you can own hands to create a sturdy and durable structure that will ensure the safety of your products and billets for the year.

In a properly constructed cellar should be made of good heat - and waterproofing, and organized a constant flow of fresh air. This will allow to maintain the desired temperature and humidity. Under such circumstances, the products stay fresh longer, do not rot and retains its taste.The choice of location for the construction ofthe Choice of location for the construction of cellars is the first and most important stage of construction. You can place the cellar of the brick under the existing structure or to store it separately. As a rule, to the construction phase, many are already having defined the place in the cellar, however, suggest that before you start excavation, to draw attention to several important points.
The size of the cellar. They depend on the needs of your family and what you plan to store in it. Also this factor is important to consider to calculate amount of materials. The topography of the site. If the area where you plan to place cellar allows you to place it on the hillside – it is better to use this natural advantage. This will greatly reduce the amount of earthwork. The type of soil. Different type of soil means various slopes during excavation. The type of soil determines its drainage properties. The level of groundwater. The depth of the cellar count so that its lower border was 50 cm above this level. The depth of soil freezing in winter. If you don't have all the necessary information, be sure to check the above points. This will avoid unpleasant surprises during construction and during the operation of the future cellar.
It is recommended for the construction of the cellar with their hands to select the most sublime and dry place. In that case, if you do not cellar under the house or garage, and separately – do not build it close to other farm buildings. This will help to prevent their possible collapse caused by construction works.The best time to build the cellar is considered summer. In the summer groundwater is as far as possible to simplify the construction.
Before you start digging, consider the internal arrangement of your cellar. Plan where and how to accommodate shelving, compartment for potatoes and other root vegetables. It should all fit in a future cellar given the fact that there should be convenient and comfortable to be human. The height of the ceiling it is desirable to make not less than 2.3 meters. Also, some space will take the stairs. Probably, after all this planning you take the decision to increase the size of the pit. This, in turn, will affect the number of brick and other materials.
Building materials and toolsTo perform work associated with the construction of a brick cellar, you'll need the following equipment and tools:
Standard tool kit (hammer, screwdrivers, nails, screws, measuring tape, etc.). Screwdriver, chainsaw and other tools will greatly save your time and facilitate the manual labor. Trowel, level and square (requires masonry). Shovels in accordance with the number of employees (you may need a pickaxe or a crowbar). Specific:
A metal trough or a concrete mixer for mortar mixing. Welding machine (in the case of self-reinforcement beams). Construction materials:
Brick in the estimated number of (ideally red). Cement, gravel, sand, greasy clay. Wood planks. Two plastic or asbestos cement pipes with a diameter of 20 cm for ventilation. Channels and metal fittings. Dig the pitonce you have decided on the location of the building, we can commence earthworks. Depending on the size of future cellars and the proximity of neighboring buildings, you can take the advantage of the excavator or to dig a pit shovel with his hands.
Cellar located under the house or outbuildings, it is best to provide immediately at the stage of construction of the Foundation. If you haven't done so, you'll need to work a jackhammer.
In General, the principle of construction of the cellar is reminiscent of the technology of construction of the house. After the completion of the excavation you have to do the floor, build walls, build floors and to organise a system of ventilation.

When digging it is necessary to consider the type of soil to calculate the steepness of the slopes.
Do the floorWhen the pit is ready, you can proceed to unit floor. The floor should be well protect the interior from moisture, and be smooth and comfortable. The bottom of the pit before laying the floor must carefully align with a shovel. At the junction of the floor and walls must be crumbled earth.
To drain excess moisture from the cellar the bottom of the pit is filled with 20-cm layer of crushed stone or gravel chips. Then you need to mix fat clay with water until a homogeneous consistency. The clay is gently poured on the gravel. The clay layer must uniformly cover the drainage pillow.
If you have a small cellar, the soil is dry, and the ground water table is quite deep, a clay floor would be sufficient. But if you want to build will serve you for many years and most effectively protect your crop from moisture and damage, recommend further fill the floor with concrete and, if necessary, to reinforce that also, it is easy to do with their hands. A concrete floor will provide a solid and reliable Foundation for masonry walls.
Mixing concrete and mortar take the cement and aggregate from stone or sand in the ratio one to five. As the cement is of various grades, in the preparation of the concrete mix is best to focus on the instructions for kneading, which is always there on the pack with the material. To prepare the solution you will need a mixer. The volume of a standard cement mixer is equal to 200 liters.If you wish, you can use a floor covering over a concrete base. But this is only appropriate in the case that your cellar is large in size and performs not only the function of a vegetable store, but is also used as a multi-functional basement. The flooring is done after the walls and ceiling, in order to avoid spoilage or damage.
After pouring the floor, you must wait 1-2 weeks before complete drying of the concrete and prepare the formwork boards for the Foundation for future walls. Width of masonry in our case will amount to 1-1,5 bricks. From the same concrete that was used to fill the floor, you need to form a simple strip Foundation. The height of the Foundation must be above the floor level by 20 cm If the cellar is deep and the load on the Foundation will be significant, you can add in the concrete mixture is still filler.
The Foundation should also be allowed to dry after which proceed to masonry.
Before erecting masonry with their hands it is necessary to carefully align the earthen walls of the pit. They should not be exposed hillocks and protruding roots. In particular, this advice is relevant if excavation were used excavator. The protruding region can be cut with a shovel and level with a trowel. After aligning the walls and collect dust from the pit all showered the ground. Be sure to clean the Foundation.
In fact, calculations of the walls of the cellar used red brick. Solid walls of the cellar must be strong and durable. In addition, red brick is an environmentally friendly material with excellent thermal insulation properties. Because of its use in the cellar creates optimal microclimate conditions for the storage of fresh vegetables, and domestic preparations.The brick is laid out simple brickwork in a checkerboard pattern. In other words, if the first number you started with the whole brick, the second should begin with a half brick, with a third again and so on. The width of the masonry is one–half brick. Solution for a strong coupling of the brickwork is prepared from a mixture of cement and sand in the ratio of 1 to 4. The cement for such work it is better to choose the M400.
Immediately prepare a semi-fluid solution of a fatty clay. They will you fill the space between the brick masonry and earthen wall. This so-called "clay castle", which further protects the walls from excessive moisture. Lay the clay is in process of erection of the wall.
Think in advance about where you will be located the ventilation pipe, so as to lay they need immediately. Read more about ventilation device with their hands read on in the article.
The technology of masonry brick wall with the following:
- To start the brick row from the corner or door (if the entrance to the cellar is on the side).
- Take the trowel portion of the solution, apply on the Foundation and lay on top the bricks.
- Pristuknite brick on top of the handle of the trowel and, if necessary, the same shock will bring it close to the previous brick or corner. Walls should be smooth and dense.
- On completion of brick number of well-fill with clay between the bricks and earthen wall. On top of the bricks the clay should not hit. If the gaps are large enough, the clay, you can add broken brick.
- The following brick row should start on the same side as the previous one, but not with the whole brick and a half. The checkerboard pattern of the brickwork, ensuring high strength of the future wall.
- Each number of a laying should check the building level. The upper edge of the brick wall should be completely smooth, without distortions.
Once you have finished to erect the walls and columns, pause until complete drying of the solution. Masonry must stand and firmly to adhere. Brick wall is good because that can easily last for several decades without requiring any major repairs.
After completing this stage of construction we can say that our brick cellar is ready by two-thirds. Will only do overlap and form an entrance with steps or stairs.
http://thesame.tv/embed/54485.582536c0defc9b835feddaa377d3?width=640&height=360
http://thesame.tv/embed/95845.92f9e51104eb811b73a0c355a1cb?width=640&height=360
Ceiling in the cellar – constructed ceilingCeiling in the brick cellar perform the functions of ceiling and floor for the premises located above, if any. Ceiling needs to be reliable and durable as the rest of the design.
For the construction of slabs with their hands can use a sturdy wooden beam or metal u-shaped profile or channel. We consider the second option.
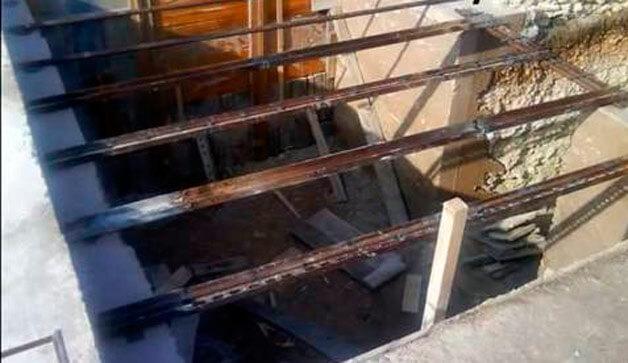
For laying of channels in the upper row of bricks need to be sealed. It is possible to make the reinforcement and pour the top row of the wall with concrete. After drying of the concrete can be placed channels. The distance between the channels should be set to 0.5 meter. If the wall of the cellar provided the door, the direction of stacking of channels to be perpendicular to it. The doorway in this case is strengthened by more robust fittings.

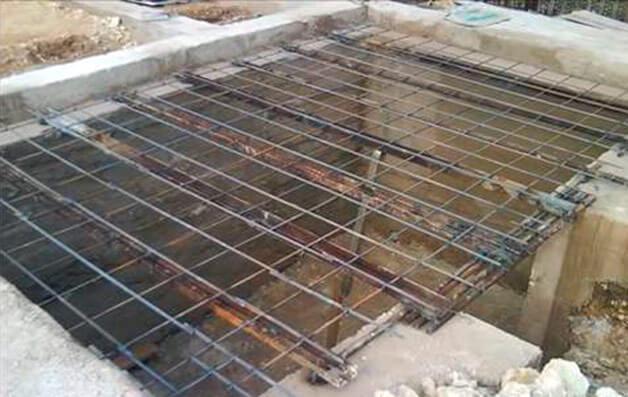
Metal channels for ceilings. Then on top of channels should be laid rebar. Reinforced rods cm diameter are placed perpendicular to the channels at a distance of 20 centimeters from each other. All this metal structure is sealed together with hot welding. Over the first reinforcement layer and perpendicular to it the second spread is exactly the same layer and weld.

Channels placed on top of the valves.
If the location of the door or hatch to the cellar you have planned from the top, provide the appropriate opening in the reinforced structure. Also note that you will have two vent pipes.
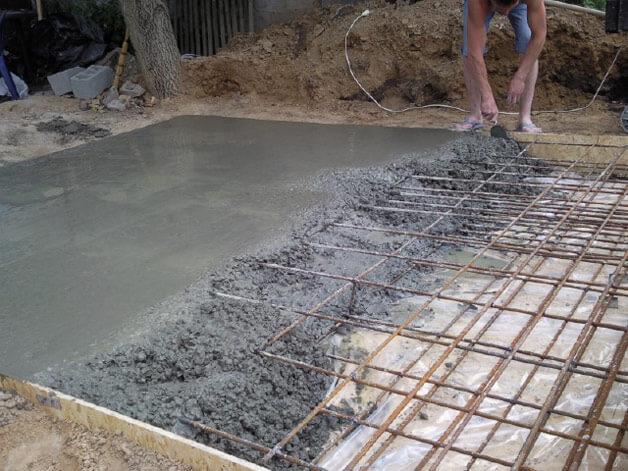
You now need to concrete the metal frame ceiling. To do this the formwork. Of chipboard sheets constructed bottom, which should be propped from below to the inside of the cellar. The support should be durable enough to withstand the weight of concrete that you pour on top. Wooden boards make the outer formwork wall and a doorway, if he is on top. Formwork height shall be above the level of the metal frame.

Metal frame encased in concrete.
Components for the preparation of concrete mortar is taken in the same proportions that were used to fill the floor of the cellar. The concrete layer should completely cover the metal frame. The thickness of the ceiling will get about twenty centimeters. This will be enough to provide good surface moisture and thermal insulation in winter, in the case of separately constructed cellar. If you do cellar under the house or garage, this overlap will serve as a solid and safe floor.
In order to completely dry the concrete will take several days. Once the ceiling is firmly grasped and solidified, bearings mounted at the bottom and chipboard are removed together with the formwork. Congratulations – the ceiling of the cellar is ready.
To protect free-standing cellar from the cold in winter, it is necessary to provide additional insulation of the ceiling. If a cellar is built under the house or cottage, insulation is, by contrast, is designed to protect your stocks from excessive heat.You can fill up the cellar the top layer of expanded clay or earth, or insulate it with mineral wool or fiberglass. Methods of insulation may vary depending on the area in which you live and its climate conditions. After completion of the ceiling the time to build an entrance to the cellar and to build stairs. If the cellar is located under the garage, think about the good sealing of the hatch to automotive technical gases and odors do not penetrate to your products.
If you are confused by the volume of works on reinforcing and concreting of the ceiling, you can do easier. When designing a cellar consider the length of its walls is a multiple of the size of the concrete slab. In fact, this plate is ready-made overlap. Just put the desired number of slabs on brick walls and support columns. The gap between the plates will need to be concreted or sealed with sealant.
If the entrance to the cellar is provided in the side wall (which is important when the location of cellars on the hillside or incomplete penetration into the ground), you can with your hands to form concrete stairs. The layout of the space under the stage is to be done at the stage of pouring the floor, but to their production, to begin only after the construction of the walls and ceilings. The height of the steps, of course, must be the same, otherwise you will be uncomfortable for them to go. The formwork is made of boards and filled with concrete. A few days later the concrete dries and the formwork is removed. Please note, concrete is poured into the formwork, starting with the bottom step.
Ventilation in the cellar, the ventilation System is designed at once, together with the construction of the cellar. Without the inflow of fresh air being in the cellar is dangerous to human life. Vegetables and plants during storage release carbon dioxide, which without proper ventilation is accumulated in the cellar, making it unusable. Also, without proper ventilation of the cellar in the air will accumulate moisture on the walls and ceiling to settle the condensate.
In order to avoid all these troubles when you use brick cellars, it is necessary to arrange the ventilation system. The easiest option is the usual air handling system.

Supply and exhaust ventilation system: 1 - supply pipe 2 and exhaust pipe.
For her organization will need two plastic pipes. Unlike metal, polyethylene pipe will not rust and are not destroyed under the influence of moisture and temperature changes.
The output supply pipe must be placed above the floor of the cellar at a height of not more than half. That pipe in the cellar will do fresh air. Removal of carbon dioxide used exhaust pipe. Its output is under the ceiling in the opposite direction from the supply pipe corner of the cellar. On the surface of the pipe is removed through the ceiling.
On top of the pipes are mounted regulating valves and are made special caps that protect from moisture. During the severe frosts of the pipe should be closed with felt. The height of their lifting above the surface – about a meter.
The arrangement is ready cellarAfter cellar, built of brick should do his interior decoration and furnishing. Brick walls from the inside can be of whitewash with lime.
In advance provide the right amount of shelves and racks, compartment for potatoes and root crops. Spend electricity and make the lights if required. From outside the building can be designed in any style, for example, under medieval building.
Built with his own hands, and all the rules of brick cellar will serve you for many years without requiring repair and additional investments. published
SUBSCRIBE to OUR youtube channel that allows you to watch online, download from YouTube free video about the recovery, the rejuvenation of man. Love for others and ourselves, as the feeling of high vibrations — an important factor for improvement .
http://thesame.tv/framevideo/92531.995aca9f41bcaa379449ebd07298?i=w-TTJ3FFusE&index=3&version=2&&bla
Put LIKES and share with your FRIENDS!
www.youtube.com/channel/UCXd71u0w04qcwk32c8kY2BA/videos
Subscribe -https://www.facebook.com//
P. S. And remember, only by changing their consumption — together we change the world! ©
Source: podvaldoma.ru/stroitelstvo/pogreb/iz-kirpicha-svoimi-rukami.html


How to cure diabetes methods of Tibetan medicine
Error unacceptable when working with electrical appliances