941
Brick oven with his own hands
Russian stove is unique in its essence. There was a Russian stove in Russia at the turn of XVII – XVIII centuries. Being a very important element of life, Russian stove has rightfully taken its rightful place in history. Very often Russian stove with bench featured in folk tales, epics. It "animate", giving different human qualities.
Interesting facts from otoriyose always been famous craftsmen in many areas, and the furnace business was no exception. Documented the fact that during the XVIII – XIX century Russia was a leader in the heater art. Russian stove in demand in Germany, England, France and many other major countries. Old Russian stove (oven without a chimney), used in Ancient Russia for a long time was the prototype of the famous "Russian stove". Your contribution to the development of furnace case was made by Peter I. In 1718, a decree was issued prohibiting the construction in St. Petersburg of homes with old ovens. Later, in 1722, the validity of this decree was extended to the construction of the smoky stoves in Moscow. This decree served as a powerful impetus for architects and builders, who have to invent new solutions for home heating. A new stove had to meet all modern requirements. Architect N.. Lions and I. Sviyazev invested significant contribution to the development and improvement of kilns. In 1867 was published the book "Theoretical foundations of furnace of art." This book was a reader for many stove-makers.
Russian stove their rugaminte make masonry Russian stoves with their hands to understand the principle of operation and the device of the Russian stove. In different parts of Russia, the Russian stove had a different form, sometimes met in very unusual instances, but the basic dimensions are still adhered to quite strictly. The average Russian stove had the following dimensions:
- width the Russian oven was 2 arshins (about 142 cm)
- length – 3 feet (about 213 cm)
- and the height from the floor to the cot – 2.5 feet (about 180 cm)
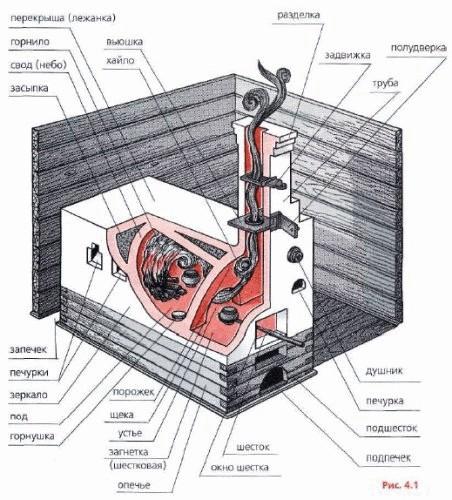
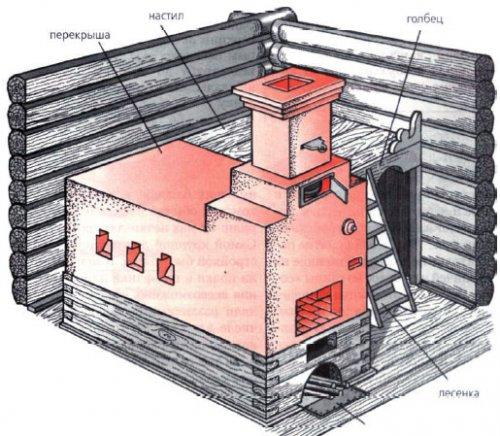
The unit of the Russian furnace described in figure 4.1. Russian stove the above sizes could heat a room of 30 square meters. Usually a Russian stove was placed in the corner next to the door. Masonry Russian stove did on the Foundation of stones or broken bricks. And in the old Russian times to the Foundation of thick coniferous or oak logs. On the Foundation laid the basis of Russian stove. The quality material used available at that time, wild stones, bricks, clay, wood. Every Russian stove was podpack – designated areas for furnace equipment. To Russian stove longer retains heat between furnace wall and arches stacked heat capacity of different materials.
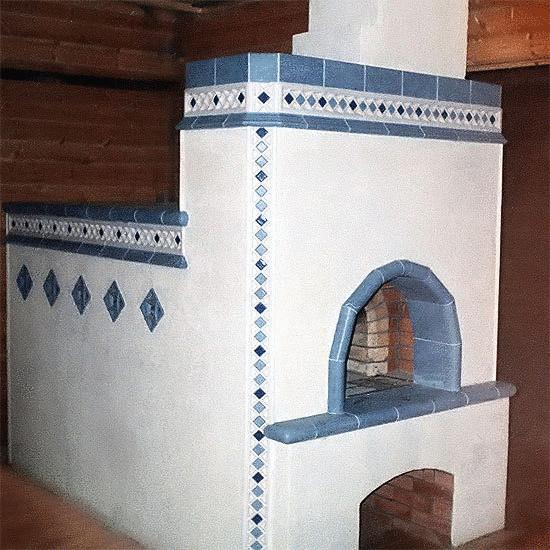
During the construction of the Russian stove made of brick bonding and mortar. Often used a red ceramic brick, obtained by firing of conventional bricks. After firing, the bricks become more solid. Sometimes masonry Russian stove has done and from the raw (unbaked brick). Did this mostly poor peasants. In rare cases it was possible to meet Russian stove from the raw kings ' palaces, and those stoves that have met, was necessarily decorated with tiles.
A Russian stove was loved not only for what she had given warmth. Russian stove with the bed served as an excellent place to stay. Heat the Russian stove had a positive impact on the entire human body. So on a cold Russian people never complained. A Russian steam bath and heat the Russian stove tempered person.
Cooking in the Russian oven. Design Russian furnace was allowed to cook on it not only porridge, but also to bake bread, pies, dried mushrooms and berries.
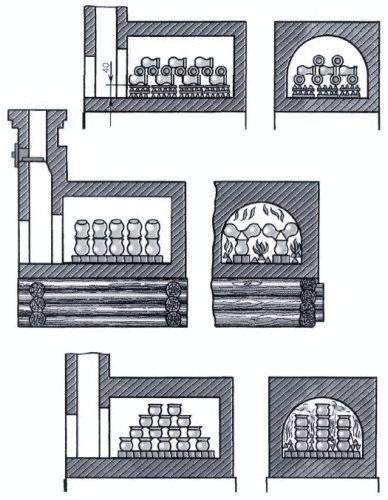
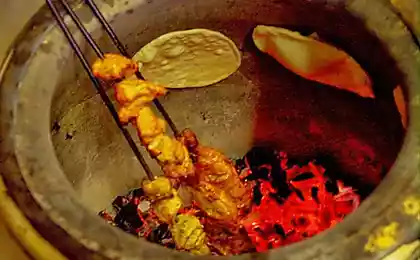
Roasting in a traditional oven. In the Russian oven fired pottery. Did it according to the following scheme. First, I stacked firewood, and on top of the wood (or on the previously stacked bricks) were placed the dishes destined for roasting. Stoked the furnace until the furnace temperature reached 900 degrees Celsius. Then stop flushing and waiting until the stove has cooled down (it was only the next day). In the Russian stove burned not only dishes, but also toys. And toys were burnt, usually during normal furnace.
Interestingly,... a Very interesting way the peasants were determined the temperatures of the Russian stove. This used a small piece of paper. Put it in the oven and waited until the paper will char. If it occurred immediately, the temperature in the Russian oven above 300 degrees Celsius, if with a delay of 5 seconds, the oven temperature is 270 degrees, 15 sec – 250°, 30 sec at 230 degrees, 1 min, 200 degrees, 5 minutes – 180 degrees, 10 min – 150 degrees. If the paper is not charred, so the temperature in the Russian oven is less than 150 degrees.
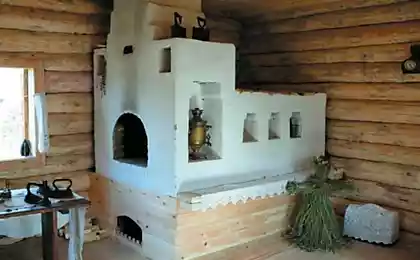
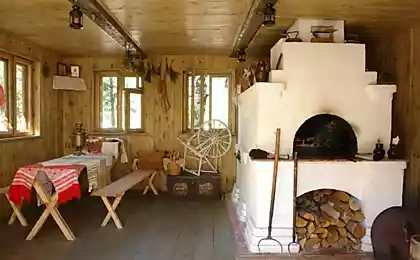
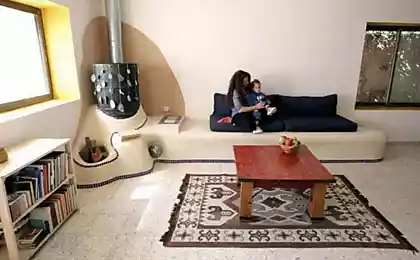
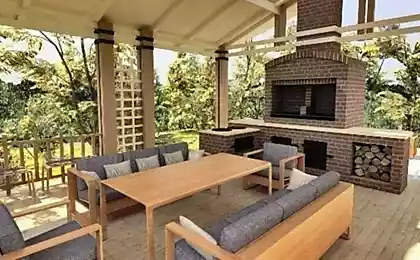
The figure shows the famous Russian stove with stove bench.
Russian stove was indispensable. The life of the Russian people has been closely associated with this unique structure.
Drawing and design description
About the device and principle of operation of a simple Russian furnace has already been described in detail previously.
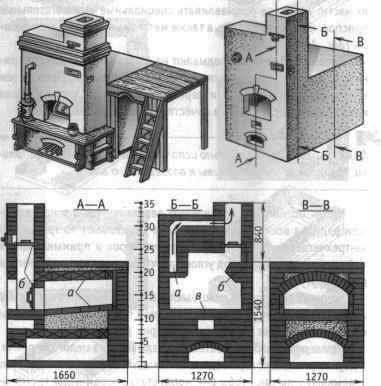
For the manufacture of Russian stoves will require 1650 bricks, a view with poludverki, a valve (with a hole 260 x 240 mm), and clay and sand 70-80 buckets of solution.
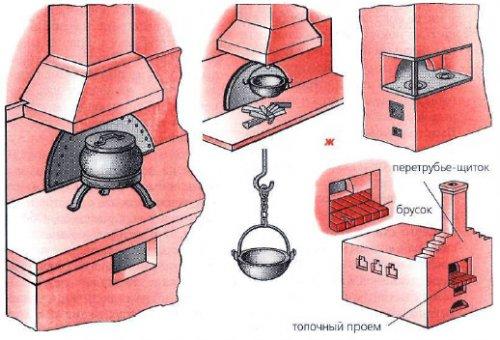
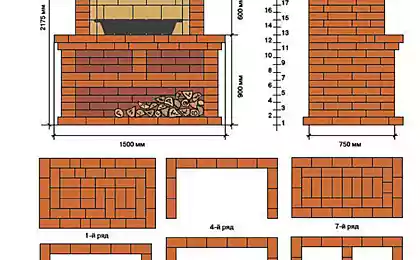
Listed in the book drawings, you can proceed to the masonry of the furnace. In the drawings shows an external view of the furnace and three of its main section, allowing to obtain a complete picture of its structure (Fig. 23). On the section a—A clearly shows that under the vault of the crucible should be tilted towards the mouth, shows the location of the main furnace appliances — view of poludverki and valves. Section b—B gives the opportunity to see a chimney which carries the smoke from the samovar. Here is seen a special nut-ledge, which prevents sparks from the crucible furnace into the pipe, and collects effluent from the furnace soot. When looking at the third section In iceclad can get an idea of the shape of the arches of the firebox and popecia. In addition, all cuts listed overall dimensions of the furnace and a special scale, showing the level of each brick row.
However, direct masonry stoves assistants are horizontal slits, that is, porjadovki. They give full idea of how to lay out the next row, when to use whole bricks or parts thereof; how and where to install specific assistive devices from wood, metal furnace devices (see the link at the top of the page).
Description and diagram of the lead
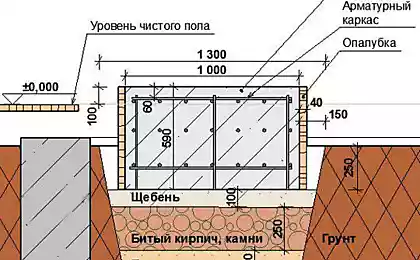
The first row of the oven spread on a Foundation of rough stones or bricks bonded with cement mortar. Before you start to lay the bricks of the first row, lay the sheets of roofing or roofing material that serve as waterproofing.
For the first row perekalennoe it is desirable to use bricks which are more resistant to moisture.
To ensure proper bandaging of seams in the next row, in all the corners of the first row are placed at three Kearney-cha-trehchetvertki (1, a). One of trehchetvertok and the adjacent brick is cut at an angle so that they fit tightly to each other (1, b).
Starting from the second row, lay out the walls opicka. To avoid matching seams on the front wall opicka in the third row use four trehchetvertki (2).
The fourth row is completely spread out the whole brick. The two bricks, which must be at the entrance to podpeche, chop off the corners so that they may become supports, or so-called toe of the future arch.
In the opening of potpecka set wooden formwork and laying out the arch, start laying the fifth row. The joints of two adjacent rows do not coincide at the corners put three trehchetvertki (as in the first row). The peculiarity of this number is that 20 bricks of the side walls split off at an angle, to turn them into five — pillars of the future arch podpeca.
In the sixth row of the side wall opicka spread a thick one, and the back and front — two brick. Then between the inner walls opicka insert the formwork with a semicircular top corresponding to the shape of the future arch podpeca. The formwork is made in advance in such a way that it could after use easily dismantled into separate parts and then out through podpack, there is an opening leading into podpeche. Collapsible formwork consists of two side frames (a) pins (b) which are based kruzhala — two boards with rounded top edges (b). To frame tightly to the walls of podpeca, between them, put one or two spacers (a). On top of the centres, put the flooring is of narrow boards, fastened together with two or three straps, made of any flexible material.
After installing the formwork proceed to the masonry arch. Early brick factories released a special wedge-shaped bricks, of which it was possible to lay out the arch, with subtle seams and a smooth surface, and high strength. Such bricks can be obtained by chipping, and then trimming North and South America of their faces. However, for such treatment suitable only moderately fired bricks with uniform structure and without cracks. Often, this material cannot be found, therefore, the arch spread out as much as conventional bricks. The lower Usenko (edges) of the bricks set on edge, should tightly contact with each other, and between the upper edges of the same do gaps, which is filled with mortar. The strength of such a set is much increased if the gaps between the bricks push the suitable size fragments of brick.
After laying the eggs podpeca arch, lay the next seventh row of bricks. To ligation was correct, at each corner using four bricks-trehchetvertki. After the seventh put the eighth row. It is composed entirely of whole brick. At the same time spread a platform for cold samples (a).
Starting from the ninth row, lay out the walls of the stove. To make the correct bandaging of seams on the corners apply trehchetvertki and loose bricks. The tenth number spread fully from the whole brick. Then between the walls of the furnace up to the top filled with a dry sand. The eleventh number of bricks completely cover the stove and cool the filling.
In the twelfth row of the spread on the hearth and under the furnace.
All the bricks held together by mortar except those which are arranged under.
Bounding under the bricks in a masonry chimney on an edge. Hearth bricks are laid without mortar, and the cracks between them filled with sand. During firing of the furnace the sand is mixed drevesnoj ash and fills the gaps between the bricks with a dense mass. In the left corner hearth make a little hole, designed to hold hot coals — pornushka or porson. Posted under carefully align, polishing it half or a quarter of a red brick.
Starting with the thirteenth series, laying wall furnace (cooking chamber) and a hearth. At the same time between the hearth and crucible of the arc set of strips of metal corresponding to the shape and size of the future mouth of the furnace. In her pre-drilled at some distance from each other a few holes. They stick annealed steel wire, which is then fixed in the masonry of the furnace.
Laying out the fourteenth, fifteenth and sixteenth rows, continue to build up the walls of the hearth and crucible.
In the seventeenth row in a wall furnace stack of eight bricks, specially shot up and shaved. These bricks, called gliders, will serve as stops when the masonry of the arch of the furnace. After this preliminary training in the crucible is lowered a wooden formwork. Before the laying of the arch over the mouth, put the arch of half bricks.
The masonry of the vault of the crucible is no different from masonry arch opicka.
When the arch is finished, put the eighteenth row of bricks. The edges shelkovogo window is fixed two feet, which will draw a small arch, which is placed using a wooden formwork.
Laying out the arch, proceed to the nineteenth and then the twentieth rows of bricks. In the space formed by the furnace wall and arch, poured dry sand, mixed with fragments of bricks, glass and rubble. Over the last leave an open doorway for peretrubja.
Twenty-first row of bricks tightly closes the crucible together with the filling. Following the twenty-second row makes this overlap more dense and durable. Call it peritricha. It is arranged pracrise Russian bench oven.
Next, twenty-third, a number continue to build up the walls of the shield or peretrubja, which strengthen the dushnik for a samovar (a). On the right side peretrubja arrange the opening to clean the soot covering him set on edge half brick (b). When after numerous furnaces furnace soot will accumulate in a special area, brick kick and sweep. After cleaning, the bricks were soaked in water, coated with mortar, and they close the hole until the next cleaning. The indentation that remains on the surface of the furnace at any time easily and quickly find a place of cleansing. Sometimes, instead of a brick insert a special metal plugs.
When laying twenty-fourth, twenty-fifth and twenty-sixth rows of the block peretrube gradually, leaving only two holes: one for samovar chimney, and another for the view (b).
Laying the two subsequent series, i.e. the twenty-seventh and twenty-eighth, in the opening opposite views strengthen the so-called poludverki, that is, a narrow door, through which close and open the damper (a).
In the twenty-ninth and thirtieth rows continue to build walls peretrubja. Do not forget to follow the rules of bandaging of seams.
In the thirty-first row, near one of the walls lay an additional row of three bricks to through the remaining narrow channel the smoke from the dushnik passed into the pipe. After that, peretrube in the thirty-second row overlaps the solid layer of whole bricks. Just right in peretrube leave the hole, on which is fixed the valve. Since the thirty-third row up increasing only a single chimney, each series of which shall consist of six bricks.
Directly at the ceiling doing the butchering slouchy bricks. Cutting allows you to remove the pipe from the wooden parts of the ceiling, at the same time tightly close the ceiling opening. In addition, the cutting, no doubt, adorns the oven. So potters often use this technique not only during the pipe laying. Cutting is done during a laying of the furnace in places of transition opechki to the crucible, but most often at the top of the flap. However, the use of cutting is not always the desire of stove for embellishment.
Due to the increased cutting surface of the furnace, and thus increases heat transfer.
This principle is used in modern Central heating radiator. This confirms an old truth that a good master beauty and usefulness are inseparable from each other.

_________________________________
Russian stove "Housekeeper"
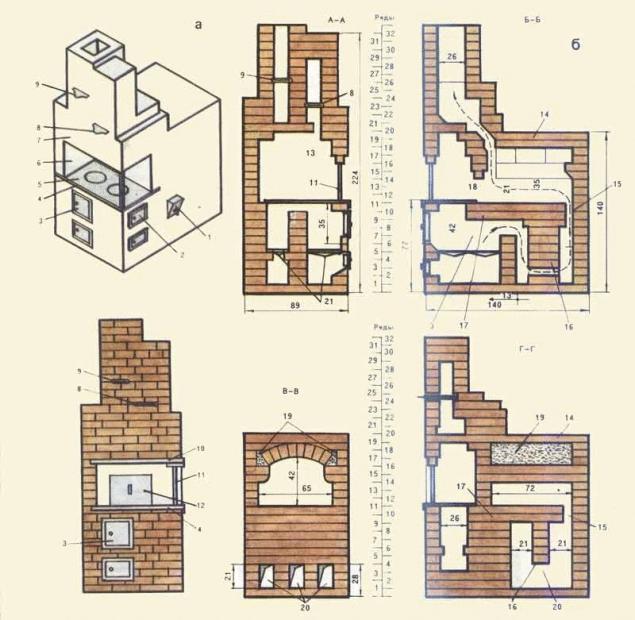
a — appearance; b — the unit furnaces (1 — a hot water box, 2 — small firebox, 3 — large firebox, 4 — "earthenware", 5 — cast iron stove 6 — perch 7 — peretrube, 8 — vent valve, 9 — in flue damper, 10 — strip or angle steel, 11 — stand, 12 — valve, 13 — ventilation channel 14 — pareklisha, 15 — a crack in the hearth, a 16 — brick wall, 17 under the cooking chamber, 18 — hole at the top of the hearth, 19 — glinobit, 20 — hole-Podgorski, 21 — grates)
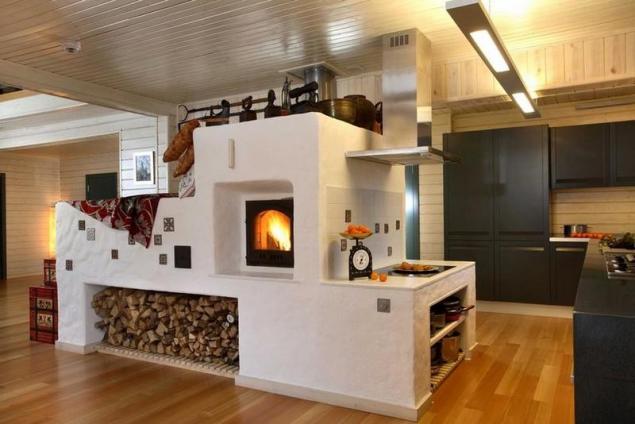
In houses old and new buildings in rural areas often arrange a typical Russian stove. It is an improved model of the Russian stove "Housekeeper" (Fig. 4). It has a small dimension (mm): 890 width, length 1400, height to pipe 2240, from the floor to the hearth — 770 and from the floor to the couches — 1400. It is characterized by a specific way of movement of flue gases, heat from the bottom to the top, two of the firebox is the main (big) and secondary (small), the use of a variety of solid fuels.
Oven can drown in Russian (fuel burn in the cooking chamber or crucible). This oven is simple, economical, used for space heating, cooking, baking bakery products.
The furnace consists of two chambers: the lower (heating) and the upper (cooking). The heating chamber is in podpeche, the air located above it. Under separating them, lay out two layers of brick laid flatwise. The height of all the parts of the furnace is the same, can be equipped with a water-heating box.
The large firebox is located on the front side of the furnace, ash pit laid for him from the 2nd row. Small firebox arrange on the right side of the furnace ash pit for him spread starting from 4th row. Both the firebox block a single cast-iron stove with two burners. The large burner needs to be over a large firebox. Small hot gases from firebox are directed first into a large firebox, it comes through the slot into the heating chamber, thence into the cooking chamber, and then into the pipe.
In warm time of the year to cook food and bake cakes in the cooking chamber, burning fuel. In the winter the furnace is carried out only through a large firebox. The small firebox is used to heat food or otaplivaya furnace at strong frosts. In a small firebox well burns any fuel, including raw.
________________________
Simple Russian stove
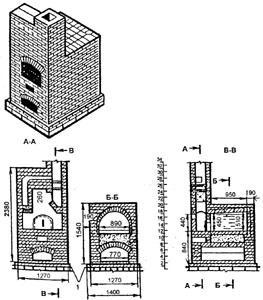
Simple Russian stove is simple in structure and maintenance. Put it red brick or made of clay (mud) using two devices — dampers and smoke damper. The simplest furnace (Fig. 87, "an ordinary Russian stove", 1 — hydro; 2 — gravel and river sand, mixed with broken glass) has dimensions:
width — 1270мм
length — 1650
height — to ceiling 2380
the height of the shelf (peritricha furnace) — 1540 mm
Heat furnace: when a furnace is 2100 kcal/h, with two furnaces — 3000 kcal/h Rear and side walls in a furnace gives you 1200 kcal/h, the front wall is 400 kcal/h and the overlap is 500 kcal/h. With two furnaces, respectively: 1750, 550, and 700 kcal/h Under the furnace hearth has podpeche storage seized on, pokers, shovel and other accessories of the furnace. Oven can heat a room of 30 m2.
Materials:
brick — 1610 pieces
clay — 66 buckets
sand — 60 buckets
Devices:
flue damper 300х150 mm (it is better to put two)
samovarnik — 130x130 mm, flap — 430х340 mm
Put the oven should be strictly for the lead, with careful ligation sutures (Fig. 87a, "the Lining of masonry Russian stoves"). Brick pre-selected and the best use for the arch, the walls of the crucible and hearth. The first row are placed from the whole brick. The second number spread as well, necessary for the formation of podpeca. Third, fourth and fifth rows similar to the second, with observance of bandaging of seams. Arch lay with the fifth series continued up to the eighth row, with the obligatory vytesyvajut toe, set the formwork and fully lay out the arch, leaning its front and rear sides of the wall. Eighth, ninth and tenth rows show the masonry walls of the furnace with the device cold stove in the ninth and tenth ranks. The eleventh number is similar to the previous one, is performed with observance of bandaging of seams. He shuts off the stove. Well over the arch are filled with backfill, which is leveled and compacted so that it can rise from the hearth to the back wall of the firebox or furnace. The twentieth line shows the laying of the hearth with a brick laying on the sand without a clay solution. To under was smoother, it is sprinkled with sand and rubbing, as if polished, the brick, removing all burrs from the brick hearth and making it more smooth, best used brick hearth.
The thirteenth to sixteenth rows show the laying of the hearth, the mouth of the furnace and the cooking chamber of the crucible. The masonry of the walls is performed in three quarters of bricks — 190mm (half and quarter bricks). They are not associated with each other, and only tie up the seams. It also shows the order in which the device locks at the mouth of the furnace (the ends of the bricks cut at an angle 45њ). Under has a lift of 30 mm from the mouth to the back of the furnace. Seventeenth row completely forms the back wall and the mouth in the form of a hearth. On the side walls of the clutch in a quarter of a brick stesyvajut on top to form the toe. Put the formwork on which to give a set based on a previously completed wall. Often with this series finishing the brickwork of the arch. In the eighteenth row is shown completely finished the arch, which is put with careful ligation sutures and staging the castle of brick and put wall. Nineteenth row, laid out in the form of an arch, spans the opening above the hearth. At the same time put the furnace wall, thereby aligning the masonry arch. Twentieth row are placed with decreasing hole above the hearth with the alignment of the walls of the furnace. Twenty-first row start to lay as the nineteenth, with observance of bandaging of seams.
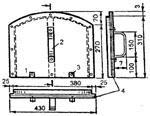
Twenty-second row completely lines the masonry over the arch and further reduces the hole above the hearth. In this series lay samovarnik. The brick on the right side peretrubja stesyvajut, to ensure the best movement of gases. Here lay box for collecting soot, stesyvaja brick as shown in the section A-A. the twenty-third to thirty-second row shows the masonry peretrubja. In the twenty-third row to finish the laying of samovarnika and box Assembly black. All series perform according to the lead, setting two valves and the device channel of the chimney of size 26x26 cm. Above the thirty-second number put the pipe. Design of the damper shown in figure 88 (a"Flap", 1 — a sheet of roofing steel 2 — handle from a strip of steel; 3 — section from a strip of steel for the stability of the flap; 4 — frame of angle steel 25x25x3 mm). Note that the frame for the damper to do from the angle steel 25x25x3 mm. it is Highly desirable to also make a frame of strip or angle steel, and inserted into the masonry of the mouth, consequently securing. In this case it will act as formwork when running arch.
________________________________
Another scheme
Russian stove, in addition to a number of advantages, has the disadvantage as preferential heating of only the upper layers of air. However, it remains one of the most popular types of ovens that combine heating and cooking functions.
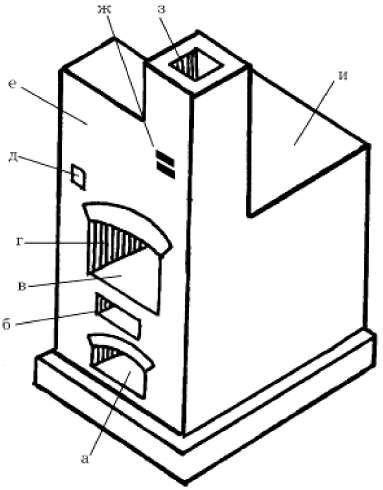
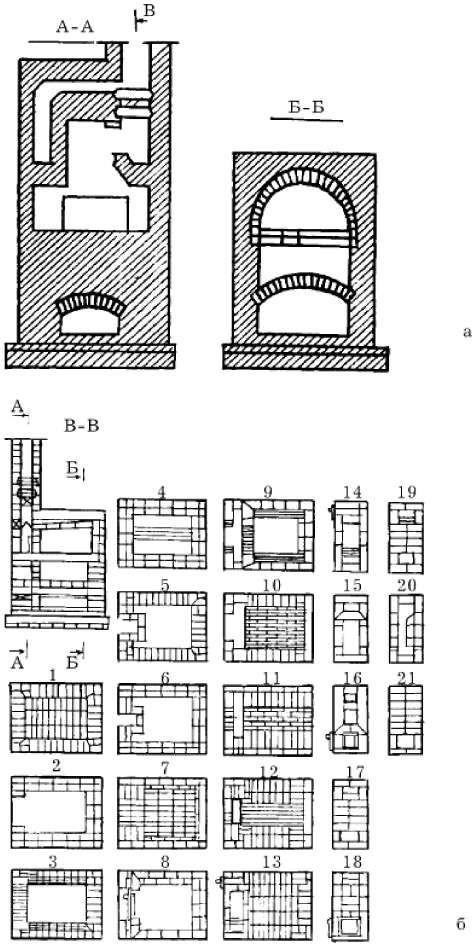
The device of the Russian stove: a — podpeche; b — niche; at the hearth; d, the furnace; d — dushnik; e — panel; g — gate; s — a chimney; and — peritricha crucible.
The constituent elements of the ordinary Russian furnace is shown in figure 63. Russian stoves are big, medium and small. Here we consider construction of a small furnace having a size of 1270 x 650 x 2380 mm. To do this, you will need the following materials:
— ordinary brick — 1610 PCs.;
— a solution of clay — 1200 l;
— damper steel sheet 430 x 340 mm — 1 piece.
— catch Pushechnaya 300 x 300 mm — 2 PCs.;
— samovarnik 140 x 140 mm — 1 PC.
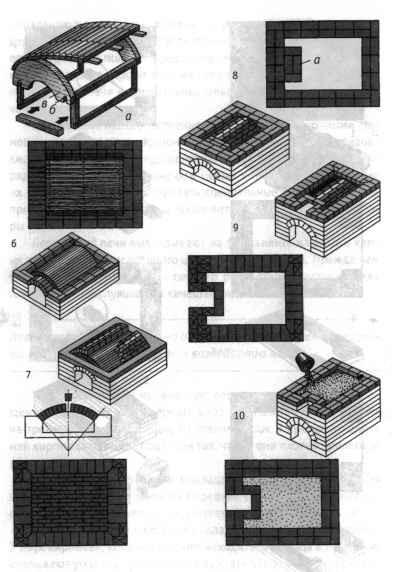
The sequence of masonry shown in the picture

The sequence of masonry Russian stove: a — General view; b — the sequence of masonry.
1st row- putting some podpeca. The laying is carried out mainly from a brick on a solution intended for the Foundation.
2-4-th series — masonry well with the obligatory ligation sutures. On the one hand it is necessary to leave a hole for podpeca.
5th row- the beginning of masonry arch over podpeche. The side rows are laid heels to support the arch, they erect formwork.
6th and 7th rows — a set that overlaps podpeche.
8th row- lock arch.
9-th and 10-th series — masonry one brick.
11th row — placing the slab "cold stove", located on podpeche. The space inside the masonry poured and leveled with a slope from the rear wall of the cooking chamber to the hearth.
12th row — masonry hearth, which is usually carried out from a special brick hearth. Under sprinkle fine-grained sand and even bricks.
13th row- the first row of the cooking chamber, is laid out in 3/4 brick. The corner bricks of the front wall must be otesat at an angle of 450 and fasten into the lock. In this series masonry is not bound, bandaging of seams required.
14-16-th series — laying the same as the 13th row.
17th row- laying arch mouth and laying toe under the arch of the cooking chamber. For masonry toe is used a flattened brick put on an edge.
18th row — masonry walls of the furnace and heaters. As an alternative, you can fill the space between the arch of the cooking chamber and the walls with sand or clay mortar with brick rubble as filler.
19th row — putting some of the walls of the vault, the device arched ceiling hole above the hearth.
20th row-lopped using bricks, reduce the hole above the hearth (peretrube) and also make the ceiling over the channel for samovarnika.
21 th row- the alignment of walls and reduction peretrubja.
22nd row — reduction peretrubja. Bookmark channel samovarnika. The brick on the right side peretrubja stesyvajut, the masonry above the arch level. Spread the box of soot.
23rd row- arranged samovarnik, which is closed by a lid.
24-32-th series — set pushechnyi valves.
With 32-row to begin laying pipe with a cross section of the flue 2 bricks.
P. S. And remember, only by changing their consumption — together we change the world! ©
Source: green-dom.info/%D0%BE%D1%82%D0%BE%D0%BF%D0%BB%D0%B5%D0%BD%D0%B8%D0%B5-%D0%B2%D0%BE%D0%B4%D0%BE%D1%81%D0%BD%D0%B0%D0%B1%D0%B6%D0%B5%D0%BD%D0%B8%D0%B5-%D0%BA%D0%BE%D0%BC%D0%BC%D1%83%D0%BD%D0%B8%D0%BA%D0%B0%D1%86/%D1%80%D1%83%D1%81%D1%81%D0%BA%D0%B0%D


Diet famous surgeon Professor Uglova
Time is a relative concept or the end of the sheet is already visible