161
The Secrets of Properly Beating Eggs
“Break eggs in a strong foam” is a phrase that can be found in almost every cooking recipe. For some, nothing special, and for some, this line begins real suffering. It seems that you do everything according to the recipe, and “stubborn” eggs are whipped, then no.

To help the desperate hostess "Site" Gathered together all the secrets of lush egg foam. To make sure your pastries are always amazingly airy, read and remember.
Whipped eggs of Dishes, for the preparation of which the hostess beat the eggs well, are more tender, tastier, airier. Let's see. how to beat eggs properly.
Preparation for whipping
The whipping process
What to do if the proteins are not whipped Perhaps the eggs caught stale or, conversely, very fresh. Maybe you didn’t have enough sugar, or you added too much. What to do if not a drop of yolk, water and fat got into the protein, the dishes were dry and clean, the eggs were fresh, and stable peaks still do not work?

Try cooling the mass. Put it in the fridge for 20 minutes. Then add a drop of lemon juice and beat everything at high speed. We hope our advice will help. If you did everything right from the start, you probably won’t need it.
Are eggs a natural and affordable protein product or a cholesterol time bomb? Find out who they are contraindicated and what will happen to your body if you eat one egg every day.
In order not to choose between taste and benefit, eat eggs in combination with broccoli, herbs and vegetables that do not contain starch. Let your favorite dishes bring benefits, not discomfort in the stomach and extra pounds.
The main criterion for assessing eggs is, of course, their freshness! But how do you test it? To answer this question and preserve the health of the family you will help a simple experiment.

To help the desperate hostess "Site" Gathered together all the secrets of lush egg foam. To make sure your pastries are always amazingly airy, read and remember.
Whipped eggs of Dishes, for the preparation of which the hostess beat the eggs well, are more tender, tastier, airier. Let's see. how to beat eggs properly.
Preparation for whipping
- The dishes.
An important point is the dishes in which the eggs will be whipped. Copper is ideal, it is in it that the thickest and most stable foam is obtained. For lack of copper can be replaced with glass or stainless steel.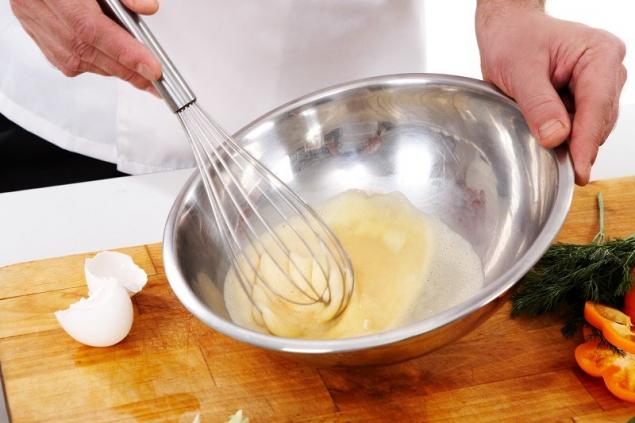
But plastic dishes are not suitable categorically. Due to the fatty film formed on the porous surface of the plastic, proteins cannot reach the maximum volume. Aluminum utensils don't work either. The egg mass in it can acquire a grayish tint.
One of the most insidious mistakes that prevent inexperienced housewives from whipping eggs is greasy or wet dishes. Even a drop of fat can prevent the formation of protein bonds in egg foam, and the proteins will rise only a third of the maximum volume.
Before whipping the bowl and nozzles for the mixer should be thoroughly washed and dried. Sometimes it is advised to additionally wipe them with lemon juice to defat. - Choice of eggs
An experienced hostess can beat almost any egg, but it should be remembered that fresh eggs have a thick protein and it can take longer to beat them. Eggs from two or three days ago are best.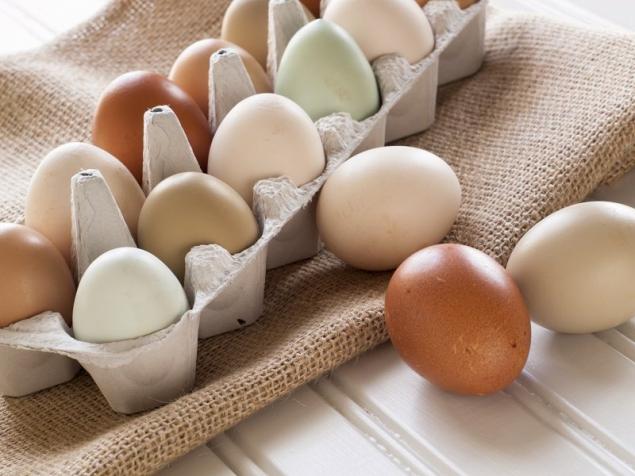
It is believed that eggs with brown shells are better whipped and ideal for baking. There is no difference between white and brown eggs. Fresh and homely ones are better. - Yellow and squirrel
Experienced cooks assure that the separate whipping of proteins and yolks with their subsequent connection gives a more lush dough than when whipping eggs whole. This nuance can be useful if you want to bake a completely airy biscuit.


The whipping process
- Whipping stages
Recipes often indicate to what state to beat proteins. To understand how long you need to whip to soft or hard peaks, it is not superfluous to know what they look like.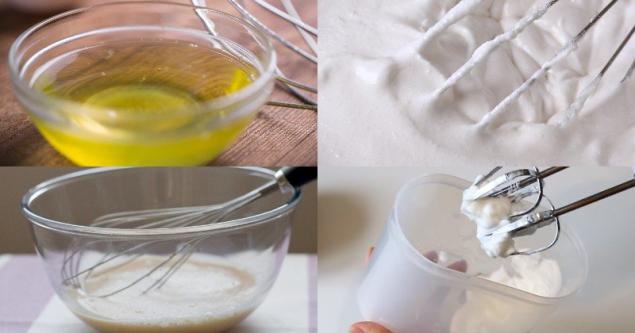
foam Proteins are already airy and have many bubbles, but are still liquid.
Soft peaks - the proteins become white, the bubbles almost disappear, but if you get a corolla, the cream does not hold the shape and drains.
Hard peaks - proteins acquire a cream-like appearance, and if you get a corolla, the foam stretches after it, forming a stable form of an acute peak. - Egg temperature
Contrary to the opinion of a huge number of housewives that it is better to whip eggs chilled, experts still advise whipping eggs at room temperature. They have less surface tension, which facilitates the formation of bubbles. But it is easier to separate the protein from the yolk while the egg is cooled. - Separation of protein and yolk
Carefully separate the proteins from the yolks so that even a drop of the yolk does not get into the protein. Use three bowls when splitting: one for separation, another for proteins, a third for yolks.
If in the process of separating another egg, the yolk falls into the protein, then you will not spoil the already separated proteins. Do not use for whipping the proteins in which the yolk fell - leave them for scrambled eggs or omelets. - Stage of foam
Start whipping proteins at minimum speed, gradually increasing it. Make sure the mixer nozzles move around the circumference of the bowl all the time.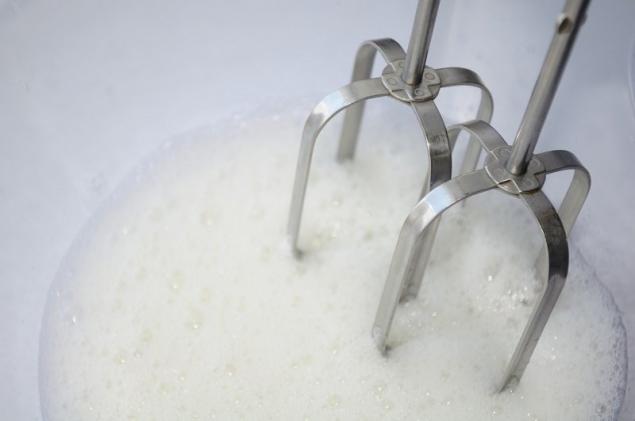
Speed up the process, increase the volume and stabilize the air mass will help lemon juice. Once the protein starts to foam, add a few drops of lemon juice or citric acid at the tip of the knife.
Beating the protein, make sure that it is all involved in the whipping process, that is, that the stirrer reaches the bottom of the dishes, otherwise at the bottom or from some edge the protein may remain liquid. - Soft peaks
At this stage, it is time to start adding sugar. Perfect for powdered sugar, which dissolves the fastest. It is important to add sugar gradually, otherwise the mass will turn white, but you will not be able to get a lush volume.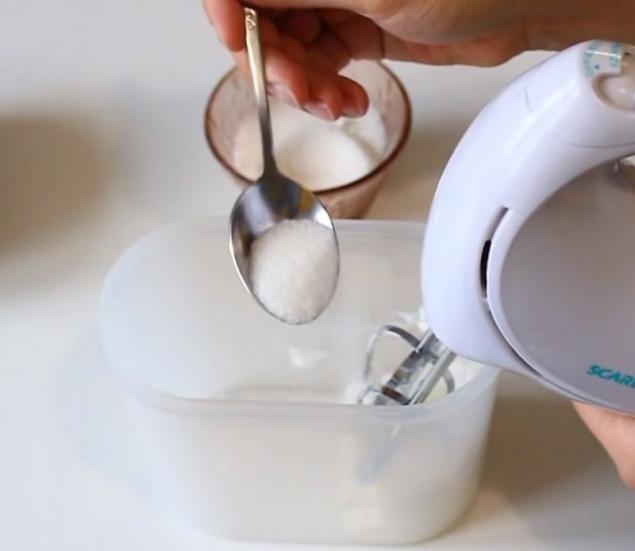
A single addition of sugar when whipped should not exceed a teaspoon. At the same time, you need to pour it not in the center, but slowly along the edge of the bowl or bowl in which you whip. - Sustainable peaks
With the addition of sugar to proteins, the mass will gradually become very dense and very stable. Stop the mixer and get the wreath, if the foam is stretching and retains shape, then it's them. steady-peak.
- Add the yolk
In addition to protein, many recipes need a yolk. We add it to the already whipped protein. Starting to beat the yolk with a mixer, immediately add sugar to it, otherwise the mixture will turn out with lumps.


What to do if the proteins are not whipped Perhaps the eggs caught stale or, conversely, very fresh. Maybe you didn’t have enough sugar, or you added too much. What to do if not a drop of yolk, water and fat got into the protein, the dishes were dry and clean, the eggs were fresh, and stable peaks still do not work?

Try cooling the mass. Put it in the fridge for 20 minutes. Then add a drop of lemon juice and beat everything at high speed. We hope our advice will help. If you did everything right from the start, you probably won’t need it.
Are eggs a natural and affordable protein product or a cholesterol time bomb? Find out who they are contraindicated and what will happen to your body if you eat one egg every day.
In order not to choose between taste and benefit, eat eggs in combination with broccoli, herbs and vegetables that do not contain starch. Let your favorite dishes bring benefits, not discomfort in the stomach and extra pounds.
The main criterion for assessing eggs is, of course, their freshness! But how do you test it? To answer this question and preserve the health of the family you will help a simple experiment.