188
Neighbors attack on the topic of a shower corner in a wooden house, answering the most frequent questions
Hey, everybody! In this article I want to talk about how to arrange a shower in a wooden house. Installation of shower corner It is not a simple, but not too difficult task to cope with on your own. This article is useful for those who are going to build a shower in the country or in a private wooden house.

I have an old bathroom on the second floor. I wanted to update it a bit, make a little repair. I always thought there was a shortage of showers, and all the necessary resources and communications were available. After consulting with my friend-builder, I took up the arrangement of a shower corner in the country. Next, I will tell you what the components of the shower are, as well as what you should pay attention to during installation.

The shower cabin consists of three main parts. These are side and ceiling panels, a drain pallet and a water supply system. By the way, I've heard before that installing such a shower in the house is not worth it because it can rot the floor. However, this shower has been in my house for 4 years and the floor is fine. The main thing is to install the shower correctly, then there will be no problems. And, of course, carry out regular preventive measures.
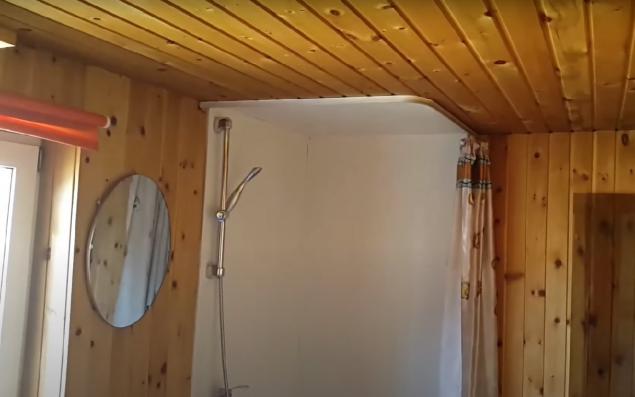
Choosing the material, I paid attention to the fact that it was as strong and moisture resistant as possible. I was approached by a material called CML - glass-magnesium sheet. For a shower cabin, it is perfect. This material is environmentally friendly: it has a good effect on health and is absolutely harmless to the environment. It is also very durable, resistant to rust and does not pass water. The material is simply attached and not destroyed.

I applied this material to the side panels. He nailed not directly to a tree, but on special beacons to which he attached panels to the most ordinary screws. I strengthened the joint between the panels with a tile corner. It's fine, water's not coming in. Also fastened the pallet with plates using plastic boards. Filled them with sealant - held well.

I sealed the ceiling and edges of the side panels with a protruding profile. I used the same pattern as the plinth. By the way, I used a silicone sealant, in almost every seam of shower design. I bought a pallet in the store - I found a durable and high-quality option. Set it below the floor level so that there were no problems with the drain. I also insulated the pallet with a sheet of foam and covered it with a sheet of fiberboard.

The shower drains everything into a septic tank with a drain channel, which I firmly fixed and poured with montage foam. For the fifth year, the shower is in the country – I periodically check the floor, while everything is fine. I also poured silicone sealant all the joints between the wooden floor and the shower. Thus, the water drains only into the pallet and does not fall into the seams of the floor.

My water supply system is the simplest. I put a shower waterer, two taps, sealed and hid all the eyeliner behind the shower wall. The system is connected to a water pumping station that supplies both hot and cold water. In winter, this system does not freeze over, we use showers all year round. I also set up a profile I found at the plumbing store. It already had a curved shape and was perfect for a shower. I attached a curtain to it - it was the final stage of building a shower. I hope this article will be useful to you. If you are going to build a shower in the country, you will know which direction to go. Good luck!

I have an old bathroom on the second floor. I wanted to update it a bit, make a little repair. I always thought there was a shortage of showers, and all the necessary resources and communications were available. After consulting with my friend-builder, I took up the arrangement of a shower corner in the country. Next, I will tell you what the components of the shower are, as well as what you should pay attention to during installation.

The shower cabin consists of three main parts. These are side and ceiling panels, a drain pallet and a water supply system. By the way, I've heard before that installing such a shower in the house is not worth it because it can rot the floor. However, this shower has been in my house for 4 years and the floor is fine. The main thing is to install the shower correctly, then there will be no problems. And, of course, carry out regular preventive measures.

Choosing the material, I paid attention to the fact that it was as strong and moisture resistant as possible. I was approached by a material called CML - glass-magnesium sheet. For a shower cabin, it is perfect. This material is environmentally friendly: it has a good effect on health and is absolutely harmless to the environment. It is also very durable, resistant to rust and does not pass water. The material is simply attached and not destroyed.

I applied this material to the side panels. He nailed not directly to a tree, but on special beacons to which he attached panels to the most ordinary screws. I strengthened the joint between the panels with a tile corner. It's fine, water's not coming in. Also fastened the pallet with plates using plastic boards. Filled them with sealant - held well.

I sealed the ceiling and edges of the side panels with a protruding profile. I used the same pattern as the plinth. By the way, I used a silicone sealant, in almost every seam of shower design. I bought a pallet in the store - I found a durable and high-quality option. Set it below the floor level so that there were no problems with the drain. I also insulated the pallet with a sheet of foam and covered it with a sheet of fiberboard.

The shower drains everything into a septic tank with a drain channel, which I firmly fixed and poured with montage foam. For the fifth year, the shower is in the country – I periodically check the floor, while everything is fine. I also poured silicone sealant all the joints between the wooden floor and the shower. Thus, the water drains only into the pallet and does not fall into the seams of the floor.

My water supply system is the simplest. I put a shower waterer, two taps, sealed and hid all the eyeliner behind the shower wall. The system is connected to a water pumping station that supplies both hot and cold water. In winter, this system does not freeze over, we use showers all year round. I also set up a profile I found at the plumbing store. It already had a curved shape and was perfect for a shower. I attached a curtain to it - it was the final stage of building a shower. I hope this article will be useful to you. If you are going to build a shower in the country, you will know which direction to go. Good luck!
Royal cheesecake from friends from Kazakhstan, for which guests are drawn instinctively
What the spouse justifies his trips “left” and how to understand it


