790
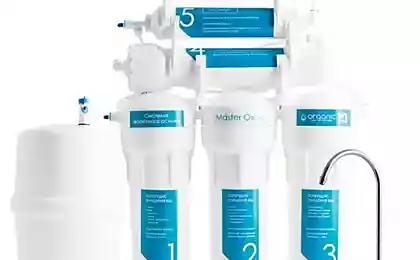
The reverse osmosis unit for fine purification of tap water
Tap water is almost universally undrinkable and requires preliminary preparation. Boiling and settling methods are simple, but not too effective. Household filters cope with this task much better, but the highest degree of cleaning gives reverse osmosis. The method is expensive but completely worth the investment.
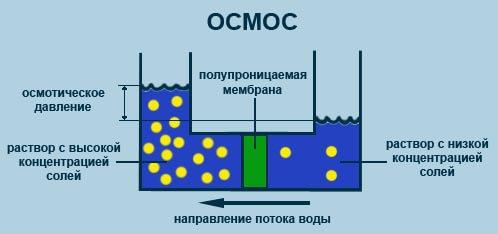
How does reverse osmosis
Reverse osmosis is the process in which the water flow is divided into two unequal parts with different density. One part represents pure water and the second water with lots of contaminants. For this separation uses a special membrane with very small holes. Their size is 0.0001 micron.
Reverse osmosis is used in fine cleaning at the molecular level, allowing the use of water without preparation by boiling. Separating the two environments, the membrane is able not only to retain particulate contamination, but not to transmit viruses and bacteria
Through the pores of the membrane can penetrate only particles whose size corresponds to the size of a water molecule or smaller. Large particles through the membrane barrier does not penetrate, but they are able to clog those small pores, therefore, before subjecting the water to the reverse osmosis procedure, it is necessary to prepare.
For mechanical removal of contaminants using two filters with holes in, respectively, five and one micron. Between these two filters, plant another — with carbon filler. He holds the molecules of various chemical substances dissolved in water: iron, chlorine compounds, heavy metals, etc.
Molecules of some substances are smaller than water molecules. If pre-treatment is absent, they can permeate through the membrane and contaminate the water. The products obtained as a result of reverse osmosis, is called permeate and concentrate. The last is the part of the water in which concentrated pollution. This part is usually about 60-65% water, it is utilized in the sewer.
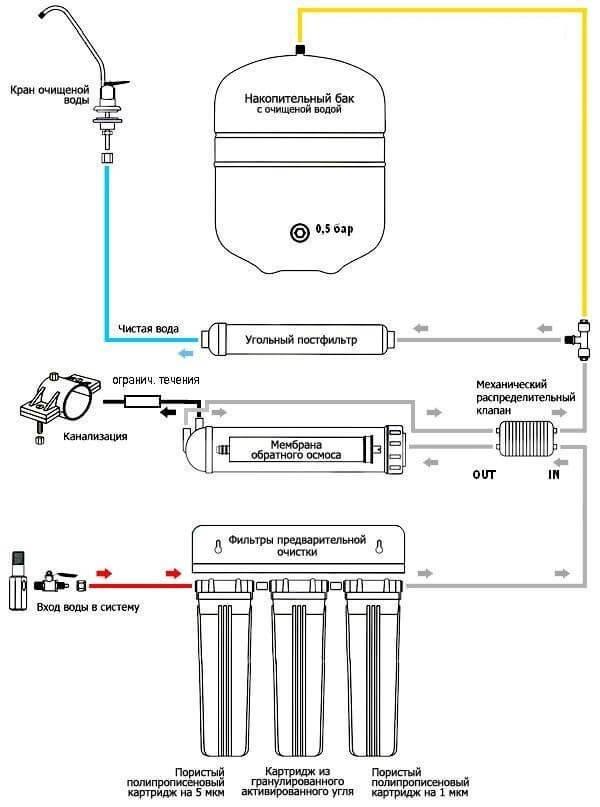
In this diagram, the detailed connection procedure and operation of the reverse osmosis system and identifies all its main elements
Permeate is very pure water, purification degree reaches 98%. Along with harmful contaminants, the membrane and the filters cut off also many useful substances that give natural drinking water of unique taste and properties.
To correct this small flaw, the permeate is passed through another filter. To enrich the purified water with minerals, use a mineralizer. Bioceramic filter with tourmaline allows you to bring structure to permeate to the natural state. There are also postfilter with the ability to expose the water to UV radiation.
The easiest post-filter contains activated carbon and coconut shell. With its help, the permeate is subjected to additional cleaning and give it a pleasant natural taste. If desired, these modules can refuse, but then the water obtained from reverse osmosis system won't be tasty and healthy.
What's included
Typically, reverse osmosis systems are supplied in kit form with everything you need, even fasteners. The equipment list may vary depending on the model and include the following elements:
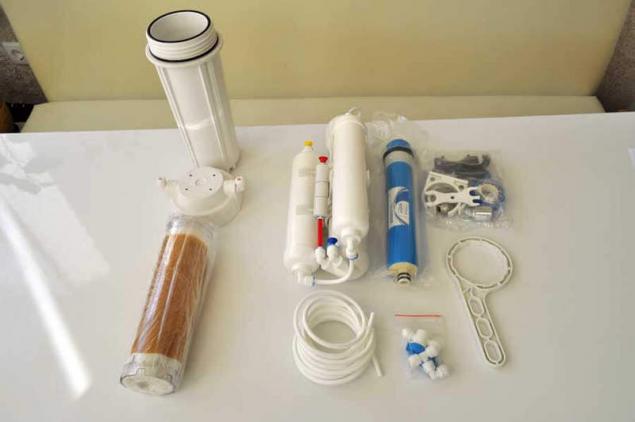
Before installation, reverse osmosis systems it is necessary to check completeness of the set. Usually there are all the necessary elements for work
Immediately, you should choose the installation place is actually reverse osmosis systems and drinking tap water. Most often, this element is put on the kitchen sink, which in her case bore a small hole. If desired, the location of the drinking water tap can be changed.
But then be sure to provide access to sanitation to randomly perelivania over the edge of the container and don't spill water all over the kitchen. In the spacious kitchen you can put another small sink specifically for drinking water, but it is extremely rare.
It is most convenient to set the elements of the system near drinking water tap and from each other. The shorter the hoses, which moves the water, the better the system works. Traditionally the system is installed in the same place where household filters, ie under the sink. The size of the storage tank and unit with filters to achieve this.
Choosing a reverse osmosis system, should pay attention to the dimensions of its elements. Often popular models have standard sizes. This allows the replacement of membranes or filters to select suitable options for the production of different firms. But if the size of the model is unique, you may need to install special proprietary cartridges, but it is not always advantageous and convenient.
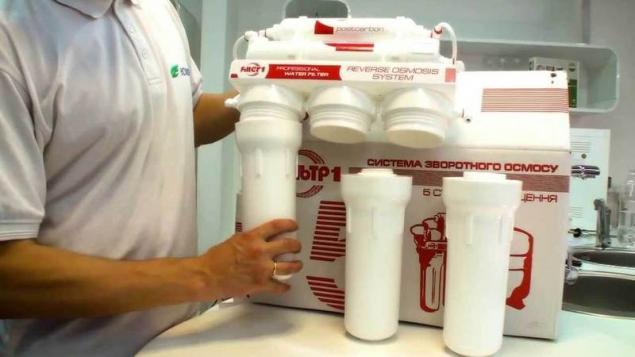
The pre-filters are in the three flasks. Usually put a mechanical filter to 5 microns, then a carbon filter, and in the end, another mechanical filter at 1 micron, but this set can be modified depending on water quality
Before installing does not hurt to understand exactly how the liquid moves through the system. First you need to do insert in a water pipe to connect the hose connecting the water supply with filters preparation. The water goes through these filters, leaving them in the cartridge of particles of chemical and mechanical contaminants.
Next, the flow moves to the membrane and passes through her body. From the membrane unit moves two hoses. One of them is to concentrate and connected to the sewer system. With this hose contamination utilized. On the second hose permeate, i.e. treated water, flows to the expansion tank.
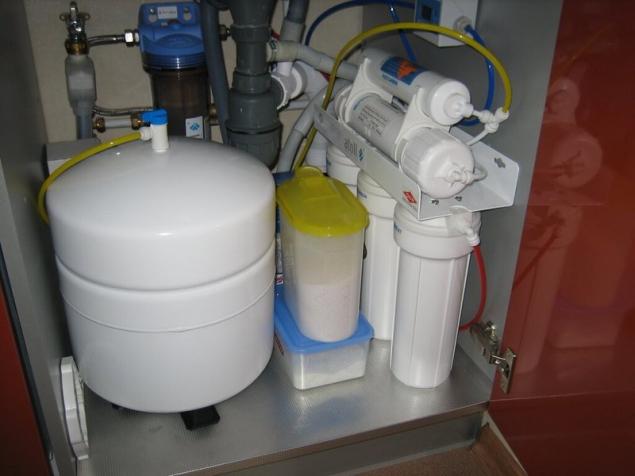
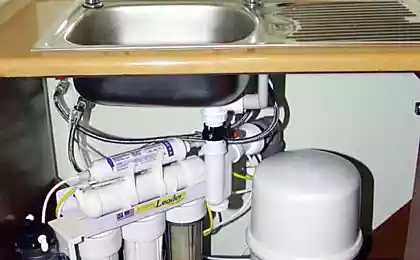
The elements of the reverse osmosis system is quite compact in size, so they are not hard to install in the space under the kitchen sink
Here the water accumulates and stored. To do without such capacity and to ensure the normal operation of the reverse osmosis system is almost impossible. The fact that the average performance household membrane is usually about seven liters per hour. For domestic use this slow flow at some point may not be enough.
Storage tank completely solves the problem. It holds a sufficient amount of clean water, which is constantly updated with descending liquid. After the expansion tank the water can be fed directly to a tap for drinking water, but do so rarely.
If it is decided to provide a home for high-quality water, it makes sense to pay for quality post-filter, mineralizer or other similar device. Some prefer to use several of these blocks. In this case, you need to choose the drinking valve with two valves. It is connected so that one valve was supplied purified water, and another enriched with minerals.
This is done in order to not use or mineralized structured water for cooking because boiling this effect will simply disappear. Thus, the use of a crane with two valves allows to increase the service life of the mineralizer.
Installation reverse osmosis system
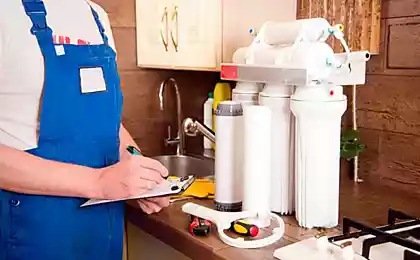
To install such a system is relatively difficult, especially since the manufacturer typically supplies with each set of detailed and clear instruction. Before starting work it is recommended to free up space under the sink, clean it. Because the process works may spill water, it will not hurt to have on hand a container, e.g., bucket, and rag.
The procedure looks something like this:
First frame in the water. Then install a tap for drinking water. Then mount the connection to the Sewerage system. Then install a storage tank. Collect and consolidate block pre-filter, membrane and postfilter. All elements connect the hoses. Perform system start-up. Before installing the reverse osmosis water system to unpack, to inspect, to study the manual. Also need to check the equipment of the reverse osmosis system. If any items are missing or require replacement, you should deal with these problems in advance.
The process of tapping into water supply
Typically, the reverse osmosis system includes the components needed to connect to the water pipe: half-inch tee type “father-mother”, as well as tap a quarter of an inch, which in the future will be connected to the hose. First, of course, necessary to close the cold water supply.
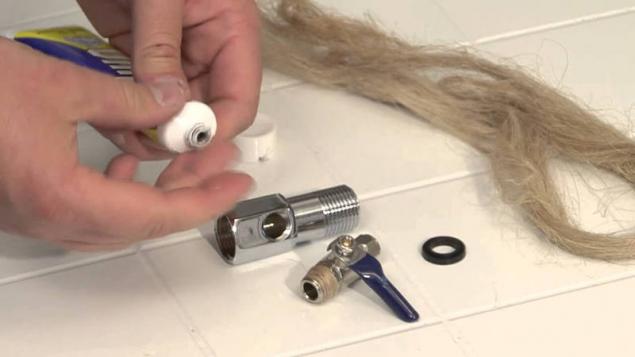
When connecting the reverse osmosis system to the water supply using a special tee. All fittings are o-linen thread or of a fluoroplastic tape
Then install the tee. To do this, Unscrew the flexible hoses to the cold water valve and connect the tee between the hoses and valve. All fittings are carefully compacted FUM-tape. Then to a tee attached to the stopcock.
Drinking water tap
If the sink already has an extra hole, for example, for dosing of liquid detergent, it can be used for drinking faucet reverse osmosis system. If such holes are not available, it will have to be done independently. Special caution should be exercised when working with enameled surface to avoid damage to the protective layer.
In this case, first remove the layer of enamel using a drill 13 mm with a diamond coating. Enamel need to be completely removed to reveal the metal base. Then you need to make a hole in the metal using the drill for 7 mm at lower rpm. Some experts also recommend adding in place of drilling a couple of drops of machine oil. After that, drilling is performed again, but with a drill of 13 mm.
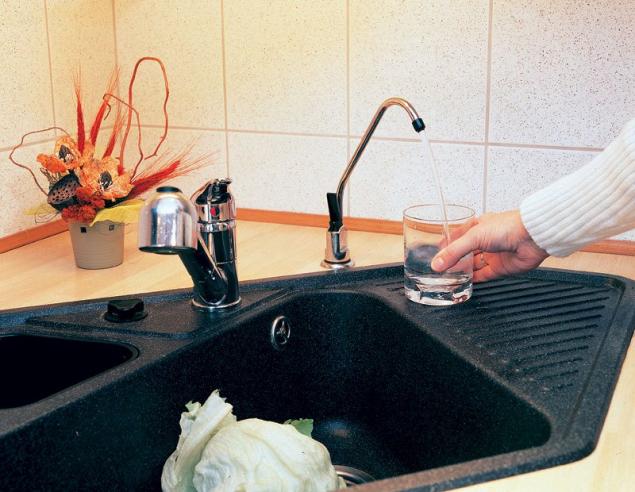
Drinking water tap reverse osmosis system is often put on the sink. The sleek design will fit almost any interior
After that faucet drinking water is combined with a decorative panel, which will hide the hole, and a gasket, and then installed in the completed hole. The bottom of the device tighten the special locking nut, simultaneously holding his hand or key.
The connection to the Sewerage system
To connect to the sewer, use the special drain clamp. The location of the tie should be at a level above the water trap, i.e. the trap. First in the pipe make a hole with a diameter of seven millimeters. Place the inset strengthen special gasket, which is placed around the hole.
Now we need to assemble a support clamp in the hole so that the openings of these two elements coincided. The easiest way to do it, if you stick in both holes is the drill, which was carried out the work. Now it is necessary to alternately and evenly tighten both screws on the clamp. Item should fit snugly to the pipe, but do not overtighten fasteners.
How to install a storage tank
Usually the drive is installed vertically on a special stand. But if the need arises, it can be put horizontally or mounted on brackets. If space under the sink is not enough, the storage tank put anywhere near, for example, in a nearby kitchen cupboard. Hose have to do small holes in the walls of the kitchen furniture.
The tank before the installation you must prepare — for threaded connection to attach the plastic tap. To do this, thread seal Teflon tape. Another important point — the pressure in the tank. In the absence of water it should be about 0,54-0,95 ATM. The pressure is measured by pressure gauge and, if necessary, to pump up the air tank.
Podkluchenie filters and membranes
Flasks pre-filters mounted on a special bracket, which can be hung on the wall of the cupboard under the sink. The place should be easily accessible to make it easy to replace used cartridges. To access the bulb, you should use a special key.
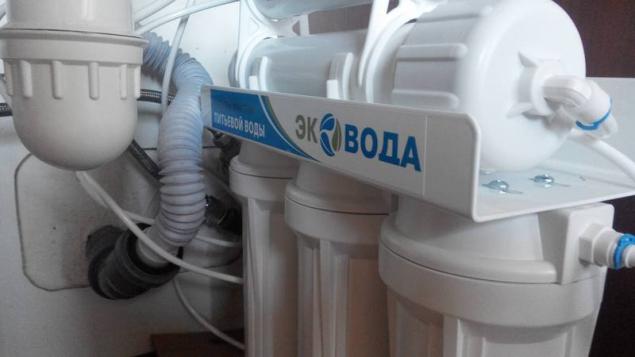
Flasks with pre-filters mounted on a special stand, which hang on the wall. It is important to provide free access to these elements to perform the replacement cartridges
After the filters are installed on top of special holders set the case in which the reverse osmosis membrane. Over the membrane is fixed and the post filter mineralizer or other modules. After that, all the elements of the system are connected by hoses, which are secured with special clamps.
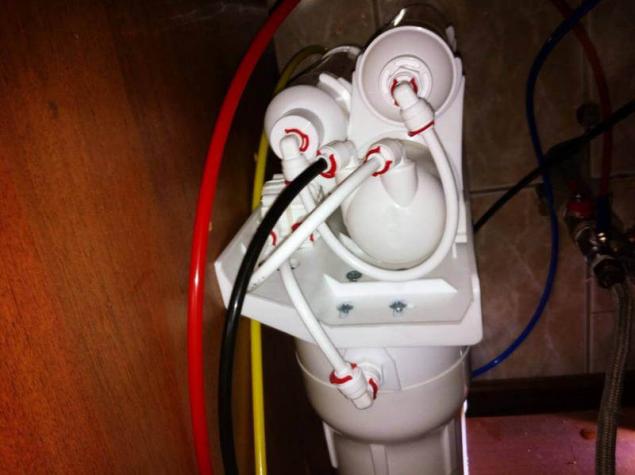
The holes for the hoses in the reverse osmosis system protected by transport plugs. These plugs should only be removed when connecting hoses
The join order is typically described in the instructions. Need to connect the water pipe with pre-filter. Bring water filters with a membrane, and then from the membrane to hold the two hoses to the sewer and to the accumulation of Baku. The crane drive is removed the hose to the postfilter, and then to the faucet drinking water. Another hose is passed through a mineralizer.
The start-up of reverse osmosis system
After the installation of water treatment type reverse osmosis is collected, it must be started correctly. To start open the tap water to check for leaks. Now tap on the storage tank cover and wait for receipt of the drinking water through the faucet on the sink. The water should slowly drip, it's normal.
The system is left in that position for about a quarter of an hour. It is necessary to rinse the charcoal filter. Now you need to open the tap of the storage tank and close the drinking valve. Starts the process of collecting water in the tank. The system should be left without interference for about a half to three hours.
Accumulated in the primary tank water should be completely drained into the sewer. After that, the water is open again for cleaning. When the tank is full, you can begin to use reverse osmosis system in normal mode.
Some useful tips
If after starting the system drinking water has a milky appearance and contains small air bubbles, don't worry. It is the influence of dissolved air, it is not dangerous. This effect will disappear after a few days or weeks.
Too rapid contamination of the pre-filters, and the presence of mucus on the cartridges can be a symptom of low pressure in the water network. The problem is usually solved with a pump.
Sometimes the flushing of the carbon filter may cause contamination of the third filter immediately after installation. To avoid this, the third filter is better to install after it is rinsed carbon cartridge. But do not try to wash the carbon filter under running water, so it can spoil.
Do not neglect the washing of the coal of the cartridge as it may cause rapid clogging of the membrane. The same effect can produce too high pressure in the water system, too rare to replace the pre-filters or use low quality cartridges, clogging the drain.
If by boiling water in a teapot, a scale, test the connection procedure. Perhaps the drinking faucet connected to the hose that goes to the concentric system and the purified water goes down the drain.
If purified water has become not distinctive odor and taste, it is necessary to check the pre-filters. Perhaps their resource is exhausted, need a replacement. Also this phenomenon may indicate the presence of bacterial contamination.
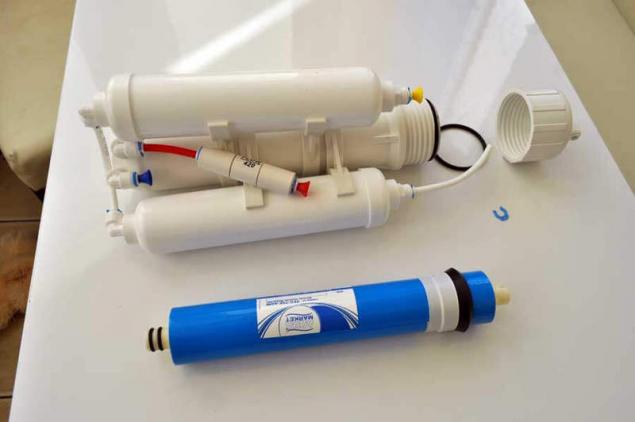
Cartridge membrane of a reverse osmosis system is located in a plastic housing. It needs to be replaced every 3-5 years depending on the salt content in purified water
The pre-treatment cartridge should be replaced every six months or more. A new membrane typically need to put every three to five years. Annually you should check the status of purified water. If the salt content exceeds 20 mg/l, the membrane must be replaced.
Reverse osmosis systems: interesting video
Detailed instructional video for installing a reverse osmosis system “Genzer Prestige” presented here:
This video provides useful information on the replacement of pre-filters:
Install a reverse osmosis system is not too difficult. You need to carefully study the manual and will follow the recommendations of the manufacturer. And timely system maintenance and replacement of worn elements will provide the house with quality drinking water. published
P. S. And remember, only by changing their consumption — together we change the world! ©
Source: //sovet-ingenera.com/vodosnab/filtr-schet/ustanovka-obratnogo-osmosa.html

How does reverse osmosis
Reverse osmosis is the process in which the water flow is divided into two unequal parts with different density. One part represents pure water and the second water with lots of contaminants. For this separation uses a special membrane with very small holes. Their size is 0.0001 micron.
Reverse osmosis is used in fine cleaning at the molecular level, allowing the use of water without preparation by boiling. Separating the two environments, the membrane is able not only to retain particulate contamination, but not to transmit viruses and bacteria
Through the pores of the membrane can penetrate only particles whose size corresponds to the size of a water molecule or smaller. Large particles through the membrane barrier does not penetrate, but they are able to clog those small pores, therefore, before subjecting the water to the reverse osmosis procedure, it is necessary to prepare.
For mechanical removal of contaminants using two filters with holes in, respectively, five and one micron. Between these two filters, plant another — with carbon filler. He holds the molecules of various chemical substances dissolved in water: iron, chlorine compounds, heavy metals, etc.
Molecules of some substances are smaller than water molecules. If pre-treatment is absent, they can permeate through the membrane and contaminate the water. The products obtained as a result of reverse osmosis, is called permeate and concentrate. The last is the part of the water in which concentrated pollution. This part is usually about 60-65% water, it is utilized in the sewer.

In this diagram, the detailed connection procedure and operation of the reverse osmosis system and identifies all its main elements
Permeate is very pure water, purification degree reaches 98%. Along with harmful contaminants, the membrane and the filters cut off also many useful substances that give natural drinking water of unique taste and properties.
To correct this small flaw, the permeate is passed through another filter. To enrich the purified water with minerals, use a mineralizer. Bioceramic filter with tourmaline allows you to bring structure to permeate to the natural state. There are also postfilter with the ability to expose the water to UV radiation.
The easiest post-filter contains activated carbon and coconut shell. With its help, the permeate is subjected to additional cleaning and give it a pleasant natural taste. If desired, these modules can refuse, but then the water obtained from reverse osmosis system won't be tasty and healthy.
What's included
Typically, reverse osmosis systems are supplied in kit form with everything you need, even fasteners. The equipment list may vary depending on the model and include the following elements:
- the reverse osmosis membrane;
- block with flasks pre-treatment, which includes three filters: two mechanical and one coal;
- the post filter;
- the mineralizer;
- tap for drinking water;
- key for filter replacement;
- the key for the body of the membrane;
- set of tees connectors;
- the mounting plate for crane;
- set of flexible hoses, etc.

Before installation, reverse osmosis systems it is necessary to check completeness of the set. Usually there are all the necessary elements for work
Immediately, you should choose the installation place is actually reverse osmosis systems and drinking tap water. Most often, this element is put on the kitchen sink, which in her case bore a small hole. If desired, the location of the drinking water tap can be changed.
But then be sure to provide access to sanitation to randomly perelivania over the edge of the container and don't spill water all over the kitchen. In the spacious kitchen you can put another small sink specifically for drinking water, but it is extremely rare.
It is most convenient to set the elements of the system near drinking water tap and from each other. The shorter the hoses, which moves the water, the better the system works. Traditionally the system is installed in the same place where household filters, ie under the sink. The size of the storage tank and unit with filters to achieve this.
Choosing a reverse osmosis system, should pay attention to the dimensions of its elements. Often popular models have standard sizes. This allows the replacement of membranes or filters to select suitable options for the production of different firms. But if the size of the model is unique, you may need to install special proprietary cartridges, but it is not always advantageous and convenient.

The pre-filters are in the three flasks. Usually put a mechanical filter to 5 microns, then a carbon filter, and in the end, another mechanical filter at 1 micron, but this set can be modified depending on water quality
Before installing does not hurt to understand exactly how the liquid moves through the system. First you need to do insert in a water pipe to connect the hose connecting the water supply with filters preparation. The water goes through these filters, leaving them in the cartridge of particles of chemical and mechanical contaminants.
Next, the flow moves to the membrane and passes through her body. From the membrane unit moves two hoses. One of them is to concentrate and connected to the sewer system. With this hose contamination utilized. On the second hose permeate, i.e. treated water, flows to the expansion tank.

The elements of the reverse osmosis system is quite compact in size, so they are not hard to install in the space under the kitchen sink
Here the water accumulates and stored. To do without such capacity and to ensure the normal operation of the reverse osmosis system is almost impossible. The fact that the average performance household membrane is usually about seven liters per hour. For domestic use this slow flow at some point may not be enough.
Storage tank completely solves the problem. It holds a sufficient amount of clean water, which is constantly updated with descending liquid. After the expansion tank the water can be fed directly to a tap for drinking water, but do so rarely.
If it is decided to provide a home for high-quality water, it makes sense to pay for quality post-filter, mineralizer or other similar device. Some prefer to use several of these blocks. In this case, you need to choose the drinking valve with two valves. It is connected so that one valve was supplied purified water, and another enriched with minerals.
This is done in order to not use or mineralized structured water for cooking because boiling this effect will simply disappear. Thus, the use of a crane with two valves allows to increase the service life of the mineralizer.
Installation reverse osmosis system
To install such a system is relatively difficult, especially since the manufacturer typically supplies with each set of detailed and clear instruction. Before starting work it is recommended to free up space under the sink, clean it. Because the process works may spill water, it will not hurt to have on hand a container, e.g., bucket, and rag.
The procedure looks something like this:
First frame in the water. Then install a tap for drinking water. Then mount the connection to the Sewerage system. Then install a storage tank. Collect and consolidate block pre-filter, membrane and postfilter. All elements connect the hoses. Perform system start-up. Before installing the reverse osmosis water system to unpack, to inspect, to study the manual. Also need to check the equipment of the reverse osmosis system. If any items are missing or require replacement, you should deal with these problems in advance.
The process of tapping into water supply
Typically, the reverse osmosis system includes the components needed to connect to the water pipe: half-inch tee type “father-mother”, as well as tap a quarter of an inch, which in the future will be connected to the hose. First, of course, necessary to close the cold water supply.

When connecting the reverse osmosis system to the water supply using a special tee. All fittings are o-linen thread or of a fluoroplastic tape
Then install the tee. To do this, Unscrew the flexible hoses to the cold water valve and connect the tee between the hoses and valve. All fittings are carefully compacted FUM-tape. Then to a tee attached to the stopcock.
Drinking water tap
If the sink already has an extra hole, for example, for dosing of liquid detergent, it can be used for drinking faucet reverse osmosis system. If such holes are not available, it will have to be done independently. Special caution should be exercised when working with enameled surface to avoid damage to the protective layer.
In this case, first remove the layer of enamel using a drill 13 mm with a diamond coating. Enamel need to be completely removed to reveal the metal base. Then you need to make a hole in the metal using the drill for 7 mm at lower rpm. Some experts also recommend adding in place of drilling a couple of drops of machine oil. After that, drilling is performed again, but with a drill of 13 mm.

Drinking water tap reverse osmosis system is often put on the sink. The sleek design will fit almost any interior
After that faucet drinking water is combined with a decorative panel, which will hide the hole, and a gasket, and then installed in the completed hole. The bottom of the device tighten the special locking nut, simultaneously holding his hand or key.
The connection to the Sewerage system
To connect to the sewer, use the special drain clamp. The location of the tie should be at a level above the water trap, i.e. the trap. First in the pipe make a hole with a diameter of seven millimeters. Place the inset strengthen special gasket, which is placed around the hole.
Now we need to assemble a support clamp in the hole so that the openings of these two elements coincided. The easiest way to do it, if you stick in both holes is the drill, which was carried out the work. Now it is necessary to alternately and evenly tighten both screws on the clamp. Item should fit snugly to the pipe, but do not overtighten fasteners.
How to install a storage tank
Usually the drive is installed vertically on a special stand. But if the need arises, it can be put horizontally or mounted on brackets. If space under the sink is not enough, the storage tank put anywhere near, for example, in a nearby kitchen cupboard. Hose have to do small holes in the walls of the kitchen furniture.
The tank before the installation you must prepare — for threaded connection to attach the plastic tap. To do this, thread seal Teflon tape. Another important point — the pressure in the tank. In the absence of water it should be about 0,54-0,95 ATM. The pressure is measured by pressure gauge and, if necessary, to pump up the air tank.
Podkluchenie filters and membranes
Flasks pre-filters mounted on a special bracket, which can be hung on the wall of the cupboard under the sink. The place should be easily accessible to make it easy to replace used cartridges. To access the bulb, you should use a special key.

Flasks with pre-filters mounted on a special stand, which hang on the wall. It is important to provide free access to these elements to perform the replacement cartridges
After the filters are installed on top of special holders set the case in which the reverse osmosis membrane. Over the membrane is fixed and the post filter mineralizer or other modules. After that, all the elements of the system are connected by hoses, which are secured with special clamps.

The holes for the hoses in the reverse osmosis system protected by transport plugs. These plugs should only be removed when connecting hoses
The join order is typically described in the instructions. Need to connect the water pipe with pre-filter. Bring water filters with a membrane, and then from the membrane to hold the two hoses to the sewer and to the accumulation of Baku. The crane drive is removed the hose to the postfilter, and then to the faucet drinking water. Another hose is passed through a mineralizer.
The start-up of reverse osmosis system
After the installation of water treatment type reverse osmosis is collected, it must be started correctly. To start open the tap water to check for leaks. Now tap on the storage tank cover and wait for receipt of the drinking water through the faucet on the sink. The water should slowly drip, it's normal.
The system is left in that position for about a quarter of an hour. It is necessary to rinse the charcoal filter. Now you need to open the tap of the storage tank and close the drinking valve. Starts the process of collecting water in the tank. The system should be left without interference for about a half to three hours.
Accumulated in the primary tank water should be completely drained into the sewer. After that, the water is open again for cleaning. When the tank is full, you can begin to use reverse osmosis system in normal mode.
Some useful tips
If after starting the system drinking water has a milky appearance and contains small air bubbles, don't worry. It is the influence of dissolved air, it is not dangerous. This effect will disappear after a few days or weeks.
Too rapid contamination of the pre-filters, and the presence of mucus on the cartridges can be a symptom of low pressure in the water network. The problem is usually solved with a pump.
Sometimes the flushing of the carbon filter may cause contamination of the third filter immediately after installation. To avoid this, the third filter is better to install after it is rinsed carbon cartridge. But do not try to wash the carbon filter under running water, so it can spoil.
Do not neglect the washing of the coal of the cartridge as it may cause rapid clogging of the membrane. The same effect can produce too high pressure in the water system, too rare to replace the pre-filters or use low quality cartridges, clogging the drain.
If by boiling water in a teapot, a scale, test the connection procedure. Perhaps the drinking faucet connected to the hose that goes to the concentric system and the purified water goes down the drain.
If purified water has become not distinctive odor and taste, it is necessary to check the pre-filters. Perhaps their resource is exhausted, need a replacement. Also this phenomenon may indicate the presence of bacterial contamination.

Cartridge membrane of a reverse osmosis system is located in a plastic housing. It needs to be replaced every 3-5 years depending on the salt content in purified water
The pre-treatment cartridge should be replaced every six months or more. A new membrane typically need to put every three to five years. Annually you should check the status of purified water. If the salt content exceeds 20 mg/l, the membrane must be replaced.
Reverse osmosis systems: interesting video
Detailed instructional video for installing a reverse osmosis system “Genzer Prestige” presented here:
This video provides useful information on the replacement of pre-filters:
Install a reverse osmosis system is not too difficult. You need to carefully study the manual and will follow the recommendations of the manufacturer. And timely system maintenance and replacement of worn elements will provide the house with quality drinking water. published
P. S. And remember, only by changing their consumption — together we change the world! ©
Source: //sovet-ingenera.com/vodosnab/filtr-schet/ustanovka-obratnogo-osmosa.html
