948
Begin to fly
In this post I want to share with you not less than inspiring the process of creating an aircraft based on the theme "Do it yourself".
Not so long ago, somewhere in half a year ago, I wanted to "make something" straight longed. Rather idleness so affected. All sorts of robots on the Arduino is not inspired. I wanted something even more complex, but more exciting ... mm, that is. And at this time I came to the forum community radio-controlled models, where people were making their own hands aircraft. At first I was surprised: "Wow, people make airplanes, but they then another and fly!". In this forum (by the way, references to all-all-all the ladies at the end of the topic), I spent 3-4 hours, looking at the theme of how the pieces of plywood or ceiling tiles with plastic bottles are converted into gunships years of World War II and then perform aerobatic flying in the air ... That's what inspired! But I still thought that all this is difficult, it is not for me, I have nothing like this will not work, and so on. But it continues to inspire. Then I remembered what way, I found myself at all in this forum, I was looking for and what he wanted. Half a second to think it took a clean sheet of paper and began to draw up a plan of construction of one of the simplest models. And then it started ...
I just want to decide on some few details:
I am a novice in this business
My approaches / solutions / suggestions do not claim to be the only true
I did not pioneer
I did not invent the wheel
I'm just sharing my experience in this matter
Plan. What you need to decide immediately
So there you go. The first and the last, which is important at an early stage in the construction of aircraft, it is to decide on its size and weight. It depends on it all: the choice of materials, electronics, technology, let's just all. At this point, I seriously missed. With the material choice was made at once - ceiling tile (yes, the one that many people glued to the ceiling in the hallways and in the kitchen). This is the easiest-to-use material after paper airplanes. Then I estimated the size of the plane, looked a weight, on average, produced aircraft of this size. And, on the basis of these data (mainly data on average weight), immediately ordered the electronics from China.
Planes come in different types: gliders, trenenry, acrobats, impeller, 3D. Fly can do everything, but each of them has its own purpose. It is intuitively clear from the names of these groups. I, of course, did the coach. This type of aircraft the most lenient in the management and fly at lower speeds. This theory. And in fact, it all depends on how you do it!
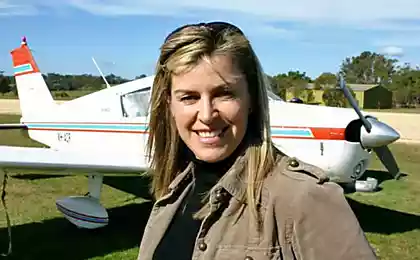
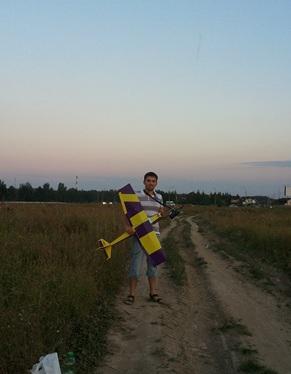
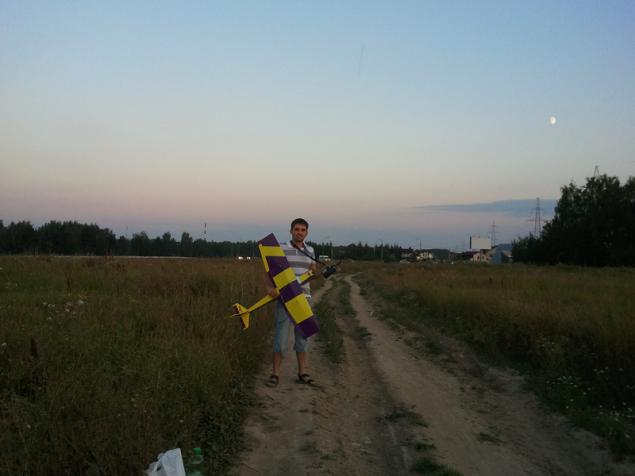
Then, while driving on the construction market, choosing a ceiling tile, completely determine the size. I did not want to do a little (in half a meter) plane immediately wanted something really tangible. Therefore, the size I had about 950mm in length and 1150mm wingspan. In the photo to the topic I (my height 1850mm), so that the plane was really appreciable size.
A mistake was the fact that for the average weight I took the weight of the aircraft (by the way, it was the famous Cessna 150⇗) with approximately the same dimensions (range 1-1.2 meters). But I did not realize that those planes did people already know a good judge. And usually they have weight obtained 1.5 - 2 times less than the newcomers. Enumerating accumulated weight is not only due to the surplus of the material used (say too thick layer of adhesive may be added up to 15% by weight), but also because of the choice of electronics. For example, I bought two batteries, larger capacity, and weight, respectively. I thought that would fly them longer - bummer, it's not. In general, for the estimated weight, I rolled out of interest on 30%. Is going to build a model weighing about 650 grams, it received nearly 900 aircraft for this critical. Highly. Although, I'll tell you that he raised up in the air, not only your weight but also the wrench on the board! This paper is not an instruction on manufacturing, but rather a tale about what steps need to be performed on the way of building aircraft, and of a series of photographs of the process.
Electronics
This is one of the most difficult moments. I think the plane was easier to do than pick electronics. Variants as there is not enough free time to reconsider all, re-read and compare. I've consulted with community activists and RC Design RC Aviation. Basically there to me and suggested my final set of electronics. And of course in which I like the most intelligent, changed batteries on a capacitive (almost twice). What is the minimum set of electronics is needed to raise the sky packaging ceiling tiles, 2 meters of wire, 2 square meters of film and 100 grams of glue? I had to buy:
Radio equipment upravleniya⇗
Brushless motor⇗
Regulator skorosti⇗
Battery (x2) ⇗
Battery ustroystvo⇗
Propeller (x6 different) ⇗
Servo privody⇗
(Pictures for informational purposes only, I bought a little more detail ...)
All but the equipment I ordered from China. The equipment that I wanted it for a long time to wait before the order, so found it in Moscow. Although 150% of the Chinese prices. It reaches all, as usual, in the past month. Box badly crumpled, but the insides are safe and sound.
First I would like to describe some of the intricacies of selection of electronics (having experienced it on their experiences), but thought that it is not necessary to clutter up the topic. I will give all the links where you can find all the details about it. There are even calculators (the easiest nih⇗).
Basically what you need to know to take this electronically, so it is:
Never, under any circumstances (!) Do not run is not attached properly electric motor with a propeller! Loose - means being on the table, in the hands (as far as much as you do not clamped - he will break !, tested on myself, but fortunately he flew off to the side and stopped hitting the wall)! Even after installing it on the plane if it can easily move his hands - he will break!
Never charge batteries unattended. Especially if the charger for their cheap
Do not recharge the batteries and discharge them below a certain threshold - otherwise you'll have to throw
In storage mode all electronics must be de-energized. De-energized - so disconnected from the battery, not just disabled
Selection of materials
For me, the choice of material was very simple. Ceiling tiles, period. Aircraft from it not only beginners build model airplanes, but have already learned a lot about this. Did I mention that this stuff is very easy to work with. It's easy. Aircraft from it is very easy to repair, which is very important for beginners (if you really really bad it was - you can cut a piece of the victim and the place to paste a new).
I went to the nearest hardware store and bought:
Simple packing (no texture) ceiling tiles 500h500mm
Packaging level, but not simple (understand more) tiles 200h1000mm
Clay TITAN
It has done it all about 300-350 rubles.
There are no tricks in buying a ceiling tile, in principle, not, choose flat (without relief) tile thickness of 4-5 mm, and carry on the cash register. But with the choice of adhesive experienced pilots only not advised. There's a whole lot of parameters that must be selected. Up to the fact that in different parts of the bonding sites of the aircraft used a different adhesive. I strongly hammer head does not become and decided to take it somewhere - TITAN. It is an inexpensive, well-washed from hands and none of the glued parts can not fall off. About the choice of adhesive can read zdes⇗.
About materials even note of what else doing good model. From plastic butylok.⇗ Tetris tehnologiya.⇗ Just cutting special aircraft plywood (or balsa) CNC.
Construction
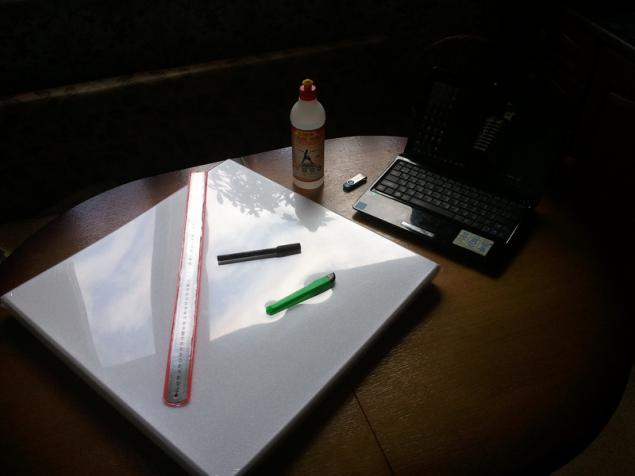
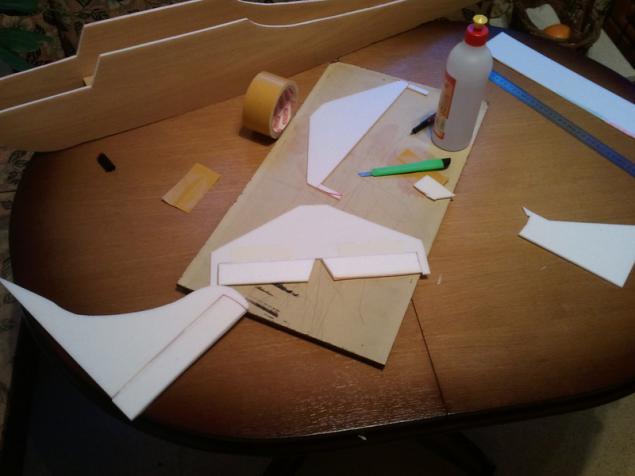
So there you go. All that we still need - a knife, ruler and ... and everything.
I have already said that I did not invent the wheel and tried to make the plane of the drawings, which are found on one of the sites (they are in the references at the end of the topic). But some parts of the drawing I was not clear, and after clipping wings, I decided to move away from them and do "by eye".
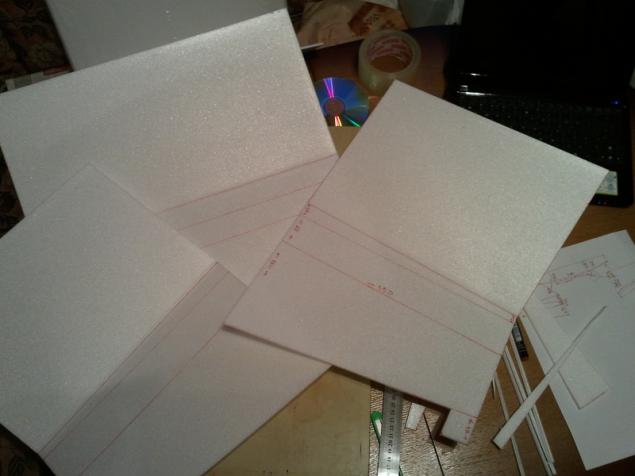
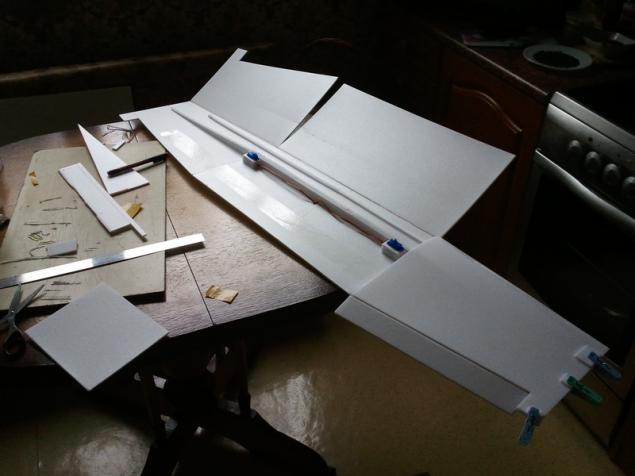
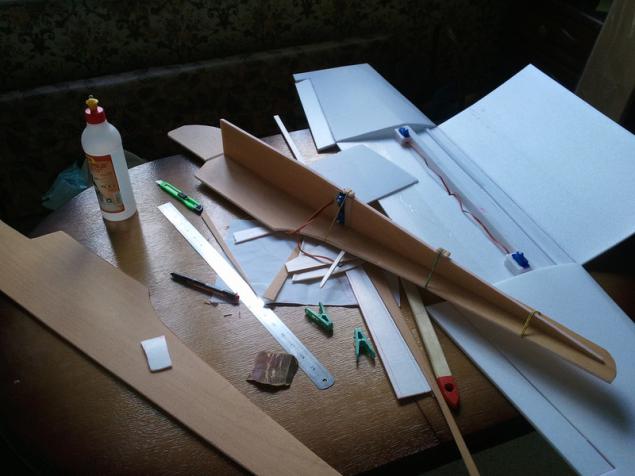
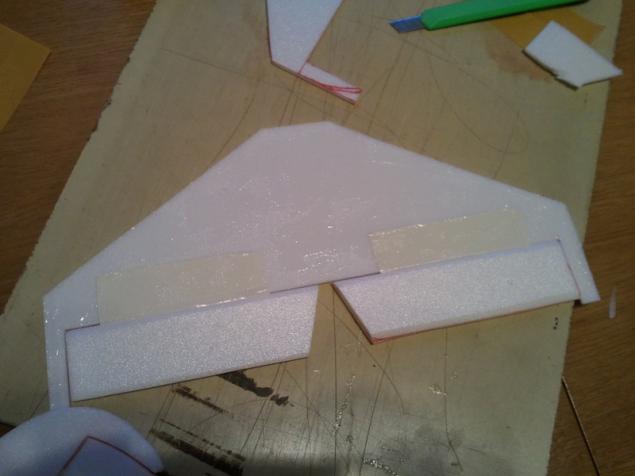
I decided to start with the wing. As I said, it will consist of three parts. Cut to size from the drawing. The wing is not flat, as in this aircraft, it has a convex shape (or something like this). Inside the wing spars are glued, which are (were to serve ...) ribs of the wing and do not give him "emerge."
Then, 3 parts glued together by the same member. Looking ahead, I will say that the wing spars will not keep themselves. But in the final of the entire aircraft is fitted by an adhesive tape, which gives 80% percent of the stiffness of the whole structure. But the Scotch alone also will not be able to keep the wing from the "folding." On this both methods are used. But spars should be more potent for these sizes. Often wing lay carbon tube diameter 3-5mm - and rightly so!
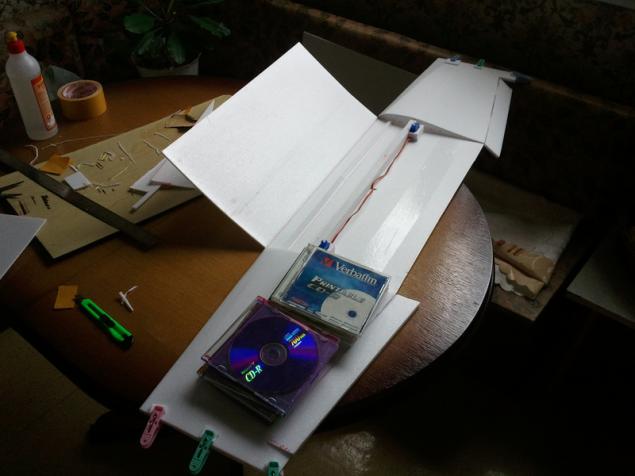
As you have already noticed, the wing will be closed by folding the top sheet of the ceiling tiles. For this purpose the outer side of the fold pasted strip of adhesive tape (along the whole length), and the inner side "prominaetsya" groove along a fold line. I used to do this as a CD, is usually advised to use blunt flathead screwdriver (I think it's much more difficult). Then you need to place the servo drives, which will control the ailerons. And you can seal the wing.
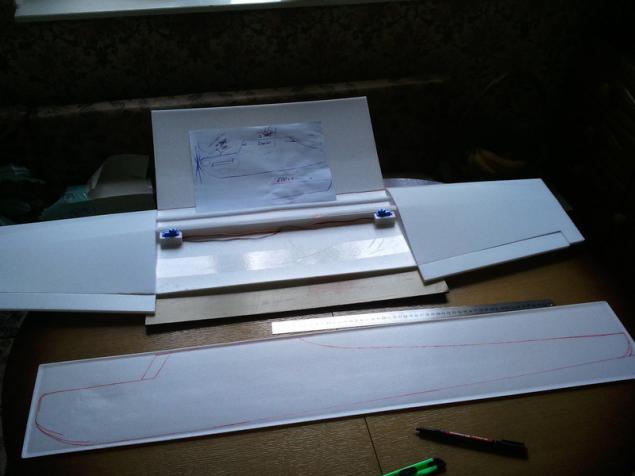
As you can see, I have already pasted the ailerons (link to glossary of key terms is the end of the topic), but the photos, unfortunately, did not. But about this process, I will tell you when we will make the tail unit. And now proceed to the body of the aircraft itself. Take the tile, the one that 200h1000mm, draw the outline. We pretend. Redrawn. Cut. This is not true! But I did just that. Because to follow the size at that time I was already very tired. The more precisely the exact size, I could not stand because of different circumstances. Although, maybe he would have flown even better if I did everything according to the drawings. So my story is not the perfect case! We continue. All parts of the plane will be glued of two layers of tiles. Therefore, we need 4 copies:
Potolochki surface used for the fuselage, had a texture "under the tree." I glue together their "white" parties. Generally, when gluing the two layers potolochki recommend sanding two surfaces (even if they are common). This will help to better absorb the glue. Cut the core portion of the fuselage, which have 2 Servo machine to control elevators and directions. Merge them.
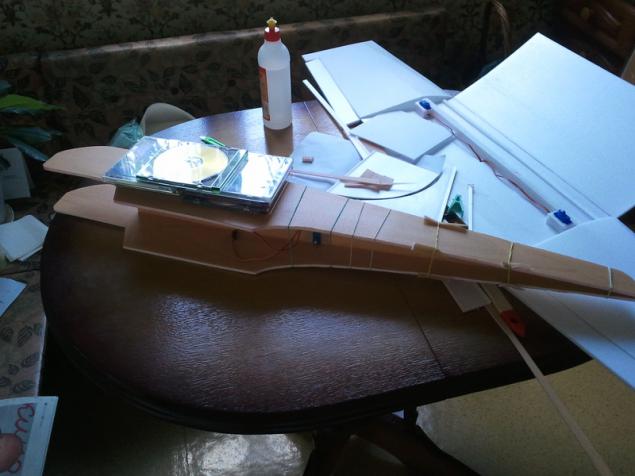
In the central part of the wing cut a hole for the servo machines and seal the wing completely.

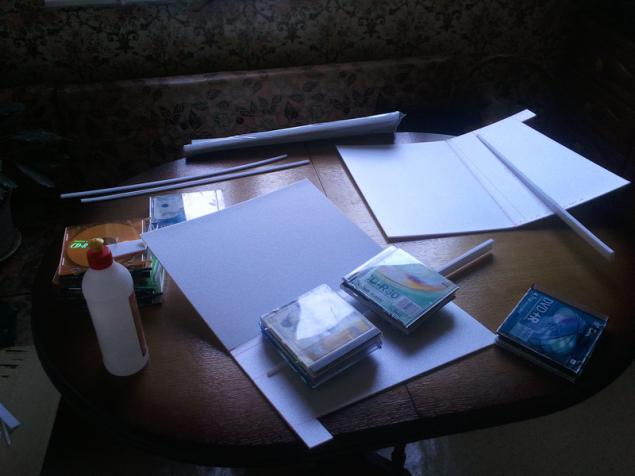
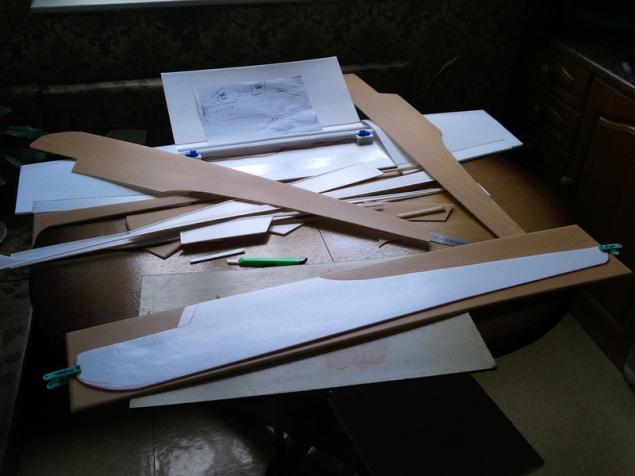
In order to glue grabbed finally, it should take about a day (so write experienced modelers). I kept the details Disk / elastic bands and all that just came across under a hand, about an hour or two. As has already been said - nothing falls off. Output:
The photo shows that the wing got crooked ... I do not know what to say. While I was doing the wing - I followed the drawings as accurately as possible. The central part was formed at a right angle, and the side - a tilt. Maybe that's the case ... In the future, it's all right. Let us turn to tail unit.
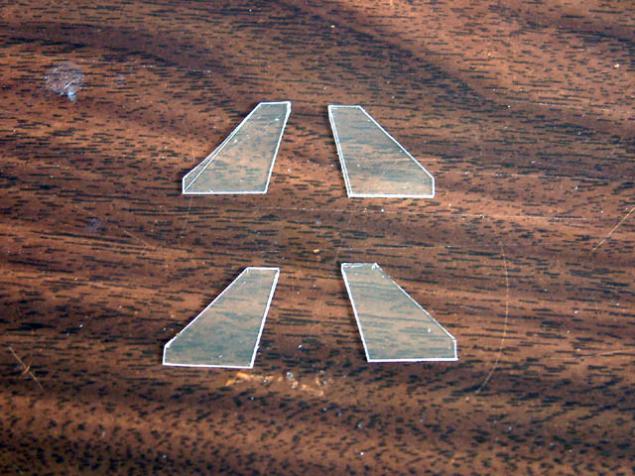
It can be seen as a pasted elevators (similar to the rudder and ailerons (See above.)). In a nutshell: features and cut out all the parts in 2 copies. Then, part of which will be glued together end to end (in fact, I would advise to make it 1-2 mm gap), you need to correct. Namely cut angles along the part at 45 degrees. If you look closely, it can be seen on the last picture, near the tape.
On the tape. It is two-way, and he pasted the tail (wing) and the steering wheel itself. They have double-layer, you remember it? So that's part of the adhesive tape pasted on the first layer of the helm, the rest area smear glue and apply a second layer of the steering wheel. Received the item applied to the first layer of the tail, pasted a piece of adhesive tape that sticks out from the wheel, and ... well, you understand. And if you do not understand see photo above again. I stopped the killing brain story at the same moment. Glued tail.
It may be noted that the airplane is already beginning to take a final view.
Next, electronics. Uh ... There's a lot of what you need to say, but I'm afraid if the article already have divided into parts. And given my status, it is unlikely to succeed. And the purpose of this topic is not to write detailed instructions for creating the plane (although it may do so in the future) - it will take 3-5 standard for Habra topic.
Briefly I will say this. Power comes from the entire aircraft batteries (thanks KOs) to it, in turn, is connected to the engine controller. Next, all the electronics of the aircraft is powered by the controller. The controller is used to smooth the increase / decrease engine speed. The engine is connected to the controller 3 by soldering wires. They that the engine, which controller, exactly alike. If after soldering engine turns the wrong way, then you need to rewire any two (swap). This is standard procedure, and the only true - do not be surprised. As the regulator is powered and the receiver (which will communicate with the remote control). All servo drives will be fed through the receiver chain. You just need to connect them (servo) to the receiver. This super condensed knowledge. Detailed information can be found on the links at end of article
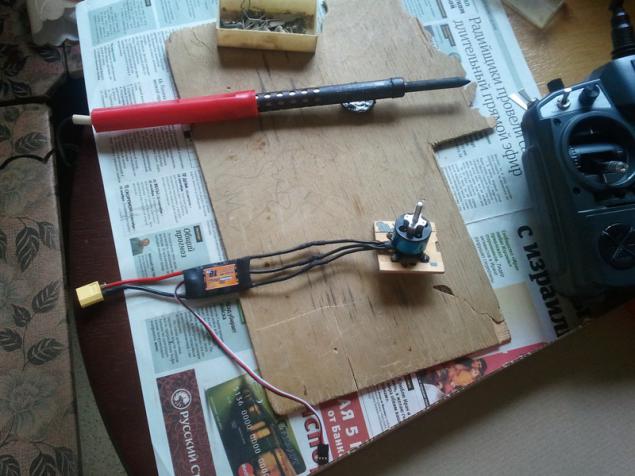
The photo and the motor controller. 2 thick wires with a large yellow connector goes to the battery 3 thin to the transmitter. Unfortunately I lost the photos (I did this plane summer of 2012), which I did pull from the servo machines to the pylon. They were glued to the elevators, ailerons and directions. Hog - a pieces of plastic or something similar (thin and strong enough), which are pasted into the handlebars. They look like this:
Notice how they are connected to the servo can be in the photos below, closer to the end.
Next you need to make engine mount. Already from the name you can understand the purpose, but I will explain. Usually, the term referred to in the construction of aircraft platform, which will be attached to the engine. But in the beginning, when I was going to start building the plane, I watched a lot of videos from the flight. There were steep flights and first flights, and carrots (the so-called crash aircraft when lost control over them and they are like a carrot nose fly to a meeting ground ...). So, 99% of the first flight ends carrot, 90% the second flight of the carrot ends, 80% ... well, you understand. So I knew that my poor nose of the aircraft will face at least a dozen strikes the ground at speeds of 5 to 35 km / h. On the video, I watched half of carrots ended with a broken nose. Do not worry, because you can paste a new one! But no, it's not for me!
Normally glued engine aircraft builders like this

Only instead of carbon - potolochka 2-3 layers. Well, after the carrots you know where is it all good. I'm not a little time thinking about how to take the concentration of power in the fall of the most fragile places - the nose. There were very brilliant ideas, but to do a frame made of plywood or lines did not have time, so I decided so:
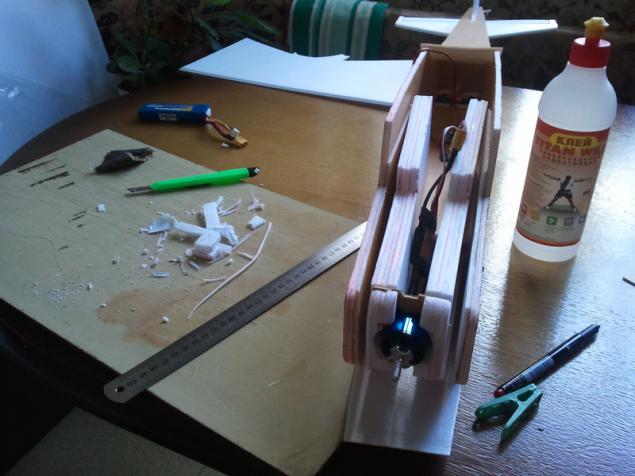
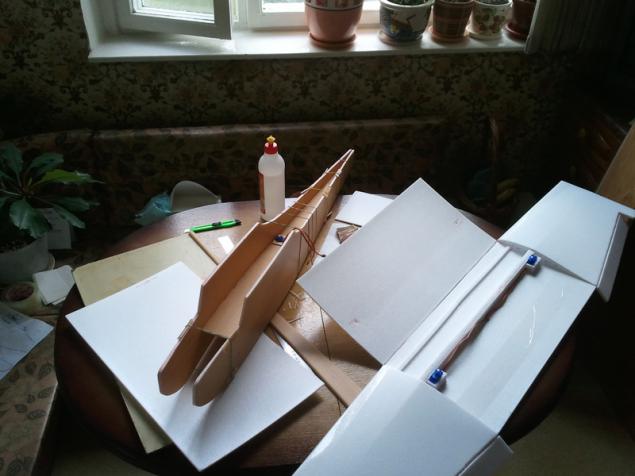
Then on top of this "safety frame" I cut out a place for batteries:
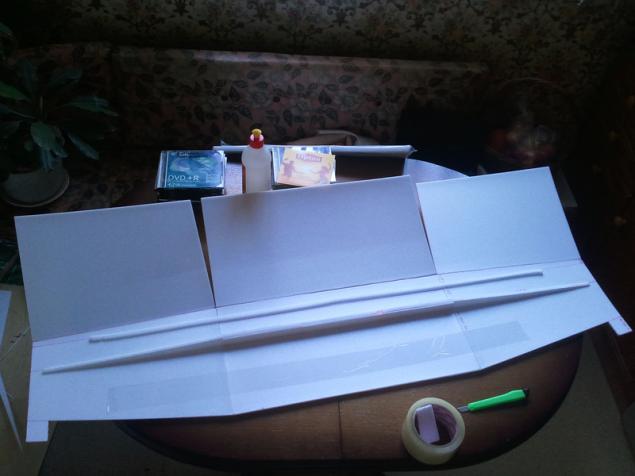
Due to the fact that the center of gravity should be on the leading edge line (2-5cm or more) needed to siting the battery as close to the nose of the aircraft. This framework served as a safety cushion for the heaviest parts of the aircraft - the motor and batteries. The framework rests on the frame of the plane and pass through it stick from a Chinese restaurant, which was used for fixing the wing:
Thus the energy from hitting the ground and the engine batteries took on itself the frame, and the frame attachment points without problems kept the impact energy from the rest of the body (which weighs less than the nose).
By the way, this picture is clearly seen drafts device (pieces of wire) from the servo machines to hog the ailerons. There's nothing tricky there.
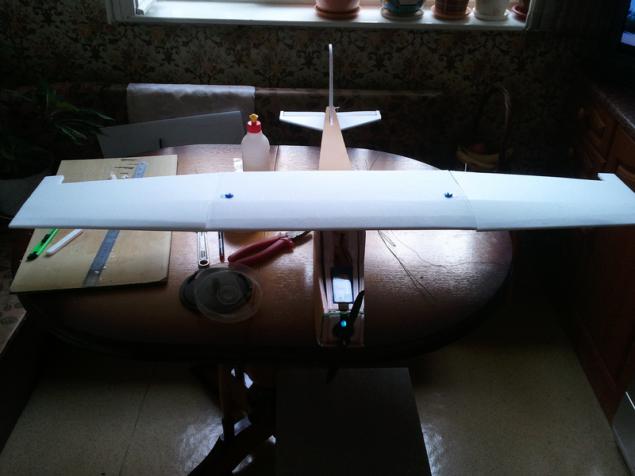
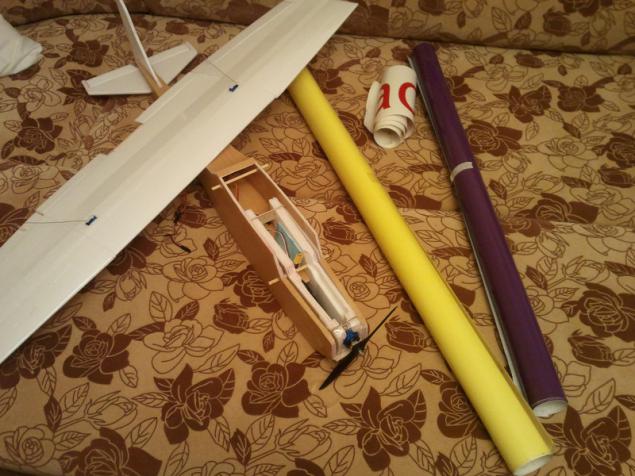
The photo is still present plenka⇗. Yes, I will paste his film, not tape, as I wrote earlier. Because of this, he again put on weight. But nothing can not do ... I'm fining process did not take off. There's nothing interesting happened crooked and bad.
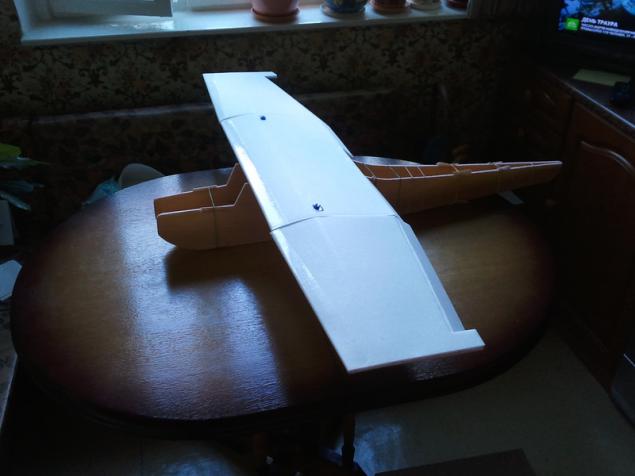
And now more interesting. Photos of the finished aircraft:
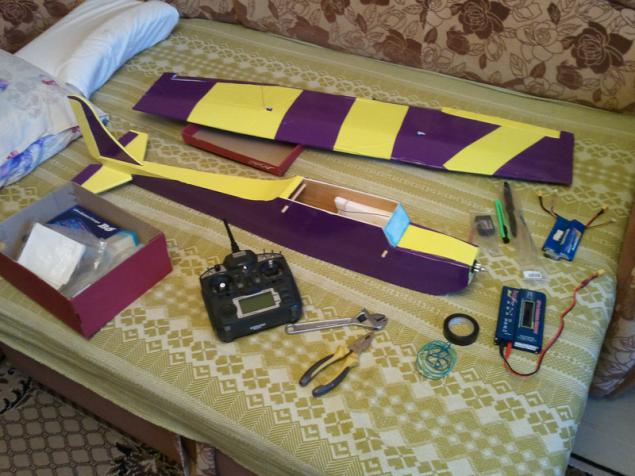
Yellow pieces glued on top of the wing the most horrible places pasting purple ... But now the conversation is not about that. On a photo still see the whole starter kit. The key, pliers, receiver, remote control, 2 batteries, a propeller, a knife and a lot of gum. One minute before the first run:
Flights
There is already a small tremor in my knees. I did it for two weeks (or slightly more), giving him an average of 2 hours a day. A friend helped me to run it. I spent a short briefing on the launch as where to throw and so on. To say that I was overwhelmed after starting raznosortnyh emotions - to say nothing. I have long felt no such.
Source:

Not so long ago, somewhere in half a year ago, I wanted to "make something" straight longed. Rather idleness so affected. All sorts of robots on the Arduino is not inspired. I wanted something even more complex, but more exciting ... mm, that is. And at this time I came to the forum community radio-controlled models, where people were making their own hands aircraft. At first I was surprised: "Wow, people make airplanes, but they then another and fly!". In this forum (by the way, references to all-all-all the ladies at the end of the topic), I spent 3-4 hours, looking at the theme of how the pieces of plywood or ceiling tiles with plastic bottles are converted into gunships years of World War II and then perform aerobatic flying in the air ... That's what inspired! But I still thought that all this is difficult, it is not for me, I have nothing like this will not work, and so on. But it continues to inspire. Then I remembered what way, I found myself at all in this forum, I was looking for and what he wanted. Half a second to think it took a clean sheet of paper and began to draw up a plan of construction of one of the simplest models. And then it started ...
I just want to decide on some few details:
I am a novice in this business
My approaches / solutions / suggestions do not claim to be the only true
I did not pioneer
I did not invent the wheel
I'm just sharing my experience in this matter
Plan. What you need to decide immediately
So there you go. The first and the last, which is important at an early stage in the construction of aircraft, it is to decide on its size and weight. It depends on it all: the choice of materials, electronics, technology, let's just all. At this point, I seriously missed. With the material choice was made at once - ceiling tile (yes, the one that many people glued to the ceiling in the hallways and in the kitchen). This is the easiest-to-use material after paper airplanes. Then I estimated the size of the plane, looked a weight, on average, produced aircraft of this size. And, on the basis of these data (mainly data on average weight), immediately ordered the electronics from China.
Planes come in different types: gliders, trenenry, acrobats, impeller, 3D. Fly can do everything, but each of them has its own purpose. It is intuitively clear from the names of these groups. I, of course, did the coach. This type of aircraft the most lenient in the management and fly at lower speeds. This theory. And in fact, it all depends on how you do it!
Then, while driving on the construction market, choosing a ceiling tile, completely determine the size. I did not want to do a little (in half a meter) plane immediately wanted something really tangible. Therefore, the size I had about 950mm in length and 1150mm wingspan. In the photo to the topic I (my height 1850mm), so that the plane was really appreciable size.
A mistake was the fact that for the average weight I took the weight of the aircraft (by the way, it was the famous Cessna 150⇗) with approximately the same dimensions (range 1-1.2 meters). But I did not realize that those planes did people already know a good judge. And usually they have weight obtained 1.5 - 2 times less than the newcomers. Enumerating accumulated weight is not only due to the surplus of the material used (say too thick layer of adhesive may be added up to 15% by weight), but also because of the choice of electronics. For example, I bought two batteries, larger capacity, and weight, respectively. I thought that would fly them longer - bummer, it's not. In general, for the estimated weight, I rolled out of interest on 30%. Is going to build a model weighing about 650 grams, it received nearly 900 aircraft for this critical. Highly. Although, I'll tell you that he raised up in the air, not only your weight but also the wrench on the board! This paper is not an instruction on manufacturing, but rather a tale about what steps need to be performed on the way of building aircraft, and of a series of photographs of the process.
Electronics
This is one of the most difficult moments. I think the plane was easier to do than pick electronics. Variants as there is not enough free time to reconsider all, re-read and compare. I've consulted with community activists and RC Design RC Aviation. Basically there to me and suggested my final set of electronics. And of course in which I like the most intelligent, changed batteries on a capacitive (almost twice). What is the minimum set of electronics is needed to raise the sky packaging ceiling tiles, 2 meters of wire, 2 square meters of film and 100 grams of glue? I had to buy:
Radio equipment upravleniya⇗
Brushless motor⇗
Regulator skorosti⇗
Battery (x2) ⇗
Battery ustroystvo⇗
Propeller (x6 different) ⇗
Servo privody⇗
(Pictures for informational purposes only, I bought a little more detail ...)
All but the equipment I ordered from China. The equipment that I wanted it for a long time to wait before the order, so found it in Moscow. Although 150% of the Chinese prices. It reaches all, as usual, in the past month. Box badly crumpled, but the insides are safe and sound.
First I would like to describe some of the intricacies of selection of electronics (having experienced it on their experiences), but thought that it is not necessary to clutter up the topic. I will give all the links where you can find all the details about it. There are even calculators (the easiest nih⇗).
Basically what you need to know to take this electronically, so it is:
Never, under any circumstances (!) Do not run is not attached properly electric motor with a propeller! Loose - means being on the table, in the hands (as far as much as you do not clamped - he will break !, tested on myself, but fortunately he flew off to the side and stopped hitting the wall)! Even after installing it on the plane if it can easily move his hands - he will break!
Never charge batteries unattended. Especially if the charger for their cheap
Do not recharge the batteries and discharge them below a certain threshold - otherwise you'll have to throw
In storage mode all electronics must be de-energized. De-energized - so disconnected from the battery, not just disabled
Selection of materials
For me, the choice of material was very simple. Ceiling tiles, period. Aircraft from it not only beginners build model airplanes, but have already learned a lot about this. Did I mention that this stuff is very easy to work with. It's easy. Aircraft from it is very easy to repair, which is very important for beginners (if you really really bad it was - you can cut a piece of the victim and the place to paste a new).
I went to the nearest hardware store and bought:
Simple packing (no texture) ceiling tiles 500h500mm
Packaging level, but not simple (understand more) tiles 200h1000mm
Clay TITAN
It has done it all about 300-350 rubles.
There are no tricks in buying a ceiling tile, in principle, not, choose flat (without relief) tile thickness of 4-5 mm, and carry on the cash register. But with the choice of adhesive experienced pilots only not advised. There's a whole lot of parameters that must be selected. Up to the fact that in different parts of the bonding sites of the aircraft used a different adhesive. I strongly hammer head does not become and decided to take it somewhere - TITAN. It is an inexpensive, well-washed from hands and none of the glued parts can not fall off. About the choice of adhesive can read zdes⇗.
About materials even note of what else doing good model. From plastic butylok.⇗ Tetris tehnologiya.⇗ Just cutting special aircraft plywood (or balsa) CNC.
Construction
So there you go. All that we still need - a knife, ruler and ... and everything.

I have already said that I did not invent the wheel and tried to make the plane of the drawings, which are found on one of the sites (they are in the references at the end of the topic). But some parts of the drawing I was not clear, and after clipping wings, I decided to move away from them and do "by eye".
I decided to start with the wing. As I said, it will consist of three parts. Cut to size from the drawing. The wing is not flat, as in this aircraft, it has a convex shape (or something like this). Inside the wing spars are glued, which are (were to serve ...) ribs of the wing and do not give him "emerge."


Then, 3 parts glued together by the same member. Looking ahead, I will say that the wing spars will not keep themselves. But in the final of the entire aircraft is fitted by an adhesive tape, which gives 80% percent of the stiffness of the whole structure. But the Scotch alone also will not be able to keep the wing from the "folding." On this both methods are used. But spars should be more potent for these sizes. Often wing lay carbon tube diameter 3-5mm - and rightly so!

As you have already noticed, the wing will be closed by folding the top sheet of the ceiling tiles. For this purpose the outer side of the fold pasted strip of adhesive tape (along the whole length), and the inner side "prominaetsya" groove along a fold line. I used to do this as a CD, is usually advised to use blunt flathead screwdriver (I think it's much more difficult). Then you need to place the servo drives, which will control the ailerons. And you can seal the wing.


As you can see, I have already pasted the ailerons (link to glossary of key terms is the end of the topic), but the photos, unfortunately, did not. But about this process, I will tell you when we will make the tail unit. And now proceed to the body of the aircraft itself. Take the tile, the one that 200h1000mm, draw the outline. We pretend. Redrawn. Cut. This is not true! But I did just that. Because to follow the size at that time I was already very tired. The more precisely the exact size, I could not stand because of different circumstances. Although, maybe he would have flown even better if I did everything according to the drawings. So my story is not the perfect case! We continue. All parts of the plane will be glued of two layers of tiles. Therefore, we need 4 copies:


Potolochki surface used for the fuselage, had a texture "under the tree." I glue together their "white" parties. Generally, when gluing the two layers potolochki recommend sanding two surfaces (even if they are common). This will help to better absorb the glue. Cut the core portion of the fuselage, which have 2 Servo machine to control elevators and directions. Merge them.


In the central part of the wing cut a hole for the servo machines and seal the wing completely.

In order to glue grabbed finally, it should take about a day (so write experienced modelers). I kept the details Disk / elastic bands and all that just came across under a hand, about an hour or two. As has already been said - nothing falls off. Output:

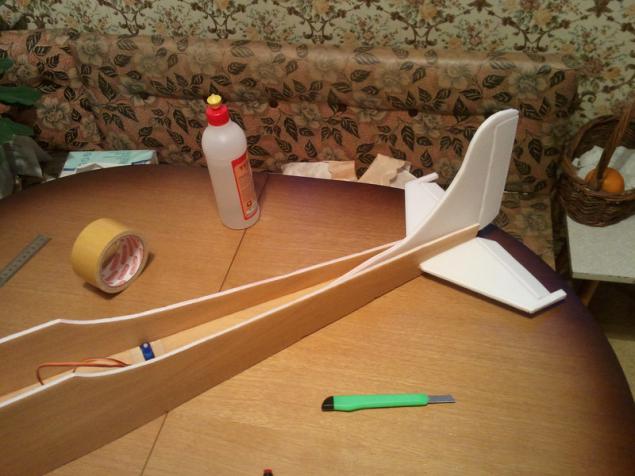
The photo shows that the wing got crooked ... I do not know what to say. While I was doing the wing - I followed the drawings as accurately as possible. The central part was formed at a right angle, and the side - a tilt. Maybe that's the case ... In the future, it's all right. Let us turn to tail unit.


It can be seen as a pasted elevators (similar to the rudder and ailerons (See above.)). In a nutshell: features and cut out all the parts in 2 copies. Then, part of which will be glued together end to end (in fact, I would advise to make it 1-2 mm gap), you need to correct. Namely cut angles along the part at 45 degrees. If you look closely, it can be seen on the last picture, near the tape.
On the tape. It is two-way, and he pasted the tail (wing) and the steering wheel itself. They have double-layer, you remember it? So that's part of the adhesive tape pasted on the first layer of the helm, the rest area smear glue and apply a second layer of the steering wheel. Received the item applied to the first layer of the tail, pasted a piece of adhesive tape that sticks out from the wheel, and ... well, you understand. And if you do not understand see photo above again. I stopped the killing brain story at the same moment. Glued tail.


It may be noted that the airplane is already beginning to take a final view.
Next, electronics. Uh ... There's a lot of what you need to say, but I'm afraid if the article already have divided into parts. And given my status, it is unlikely to succeed. And the purpose of this topic is not to write detailed instructions for creating the plane (although it may do so in the future) - it will take 3-5 standard for Habra topic.
Briefly I will say this. Power comes from the entire aircraft batteries (thanks KOs) to it, in turn, is connected to the engine controller. Next, all the electronics of the aircraft is powered by the controller. The controller is used to smooth the increase / decrease engine speed. The engine is connected to the controller 3 by soldering wires. They that the engine, which controller, exactly alike. If after soldering engine turns the wrong way, then you need to rewire any two (swap). This is standard procedure, and the only true - do not be surprised. As the regulator is powered and the receiver (which will communicate with the remote control). All servo drives will be fed through the receiver chain. You just need to connect them (servo) to the receiver. This super condensed knowledge. Detailed information can be found on the links at end of article

The photo and the motor controller. 2 thick wires with a large yellow connector goes to the battery 3 thin to the transmitter. Unfortunately I lost the photos (I did this plane summer of 2012), which I did pull from the servo machines to the pylon. They were glued to the elevators, ailerons and directions. Hog - a pieces of plastic or something similar (thin and strong enough), which are pasted into the handlebars. They look like this:

Notice how they are connected to the servo can be in the photos below, closer to the end.
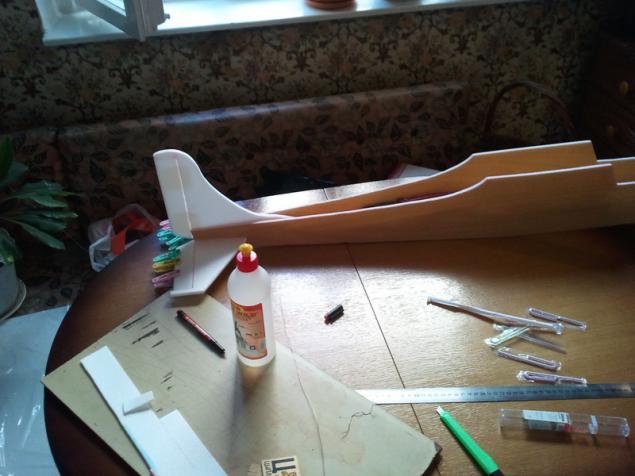
Next you need to make engine mount. Already from the name you can understand the purpose, but I will explain. Usually, the term referred to in the construction of aircraft platform, which will be attached to the engine. But in the beginning, when I was going to start building the plane, I watched a lot of videos from the flight. There were steep flights and first flights, and carrots (the so-called crash aircraft when lost control over them and they are like a carrot nose fly to a meeting ground ...). So, 99% of the first flight ends carrot, 90% the second flight of the carrot ends, 80% ... well, you understand. So I knew that my poor nose of the aircraft will face at least a dozen strikes the ground at speeds of 5 to 35 km / h. On the video, I watched half of carrots ended with a broken nose. Do not worry, because you can paste a new one! But no, it's not for me!
Normally glued engine aircraft builders like this

Only instead of carbon - potolochka 2-3 layers. Well, after the carrots you know where is it all good. I'm not a little time thinking about how to take the concentration of power in the fall of the most fragile places - the nose. There were very brilliant ideas, but to do a frame made of plywood or lines did not have time, so I decided so:

Then on top of this "safety frame" I cut out a place for batteries:

Due to the fact that the center of gravity should be on the leading edge line (2-5cm or more) needed to siting the battery as close to the nose of the aircraft. This framework served as a safety cushion for the heaviest parts of the aircraft - the motor and batteries. The framework rests on the frame of the plane and pass through it stick from a Chinese restaurant, which was used for fixing the wing:

Thus the energy from hitting the ground and the engine batteries took on itself the frame, and the frame attachment points without problems kept the impact energy from the rest of the body (which weighs less than the nose).
By the way, this picture is clearly seen drafts device (pieces of wire) from the servo machines to hog the ailerons. There's nothing tricky there.
The photo is still present plenka⇗. Yes, I will paste his film, not tape, as I wrote earlier. Because of this, he again put on weight. But nothing can not do ... I'm fining process did not take off. There's nothing interesting happened crooked and bad.
And now more interesting. Photos of the finished aircraft:

Yellow pieces glued on top of the wing the most horrible places pasting purple ... But now the conversation is not about that. On a photo still see the whole starter kit. The key, pliers, receiver, remote control, 2 batteries, a propeller, a knife and a lot of gum. One minute before the first run:

Flights
There is already a small tremor in my knees. I did it for two weeks (or slightly more), giving him an average of 2 hours a day. A friend helped me to run it. I spent a short briefing on the launch as where to throw and so on. To say that I was overwhelmed after starting raznosortnyh emotions - to say nothing. I have long felt no such.
Source: