1621
Keyboard with their hands
For me it all started with the topic of mechanical keyboards, the desire to learn how to type faster (to my shame, until recently, typing with two fingers, despite 25letny length programming), and a recent unpleasant sensations in your hands after work (and indeed the time spent for computer).
He spent a short study about what in general is of keyboards for computer programmers and those who print a lot, and wrote this one overview topic. I bought a Happy Hacking Lite (minimalist keyboard membrane switches), but typing on it was even less convenient than a notebook, mainly because of the even more compact arrangement of the keys.
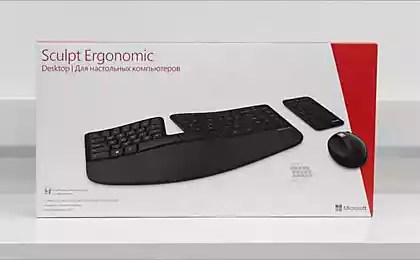
Soon, the topic, in which he talked about novopriobitёnnoy they Truly Ergonomic, perhaps almost perfect keyboard in my opinion, but in comments, the author also noted that after two months of use and could not really change on it, and hand position is not and convenient as advertised.
A little later there was a topic on the Kinesis Advantage, review of the author to which is also not so easy to get used to, but the price and just scary.
Researches
The link from the first topic I went to the fan sites lovers of keyboards, American and European, in which people are being finished, altered and made the keyboard from scratch. I zashtudiroval they learned everything (I'll tell you a lot in this topic), you need to build from scratch keyboard, ordered all the necessary parts and tools, and waited.
Checklist - below, but now for the seed will discuss two of the most interesting projects of ergonomic keyboards that I found and that and hammered into my head the thought "I can too».
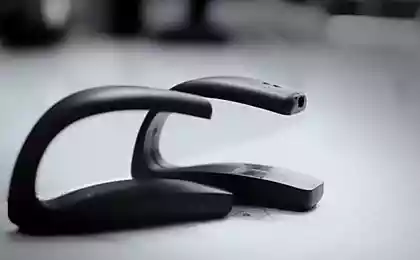
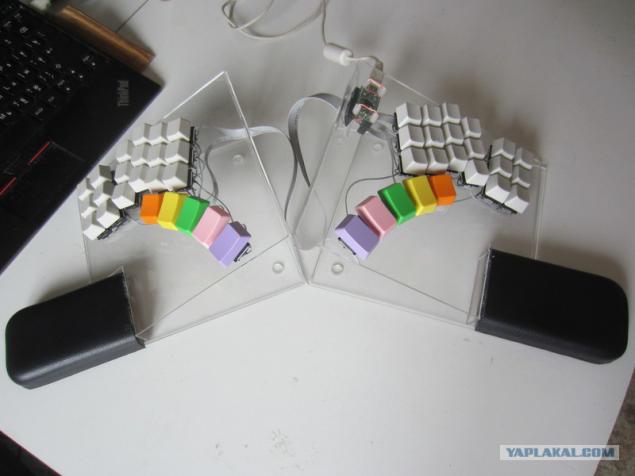
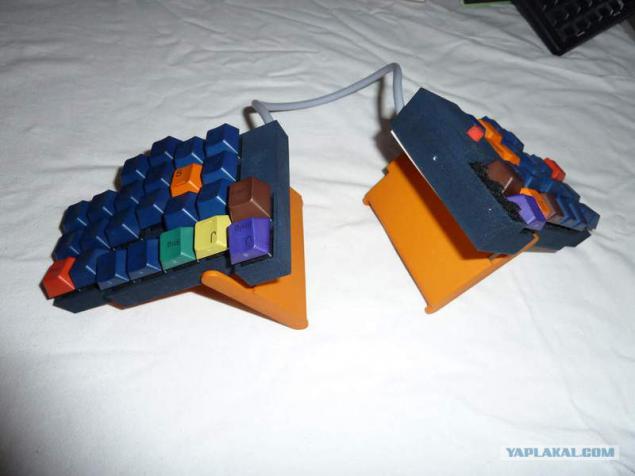
BlueCube
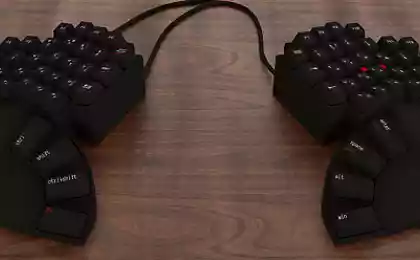
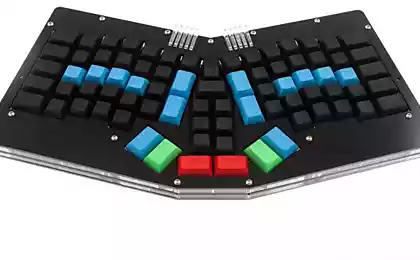
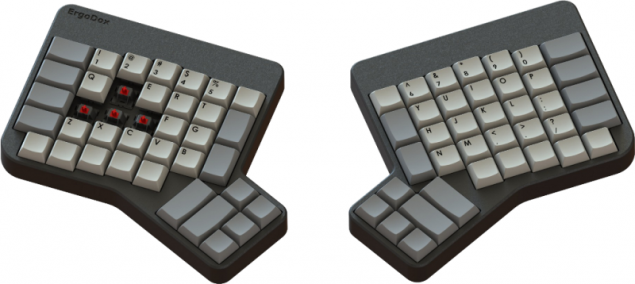
ErgoDox
The keyboard has passed the evolution from Key64, through DoxKB, and which reached the stage of mass production (although, with the self-assembly of the parts) at a price of $ 200.
Design
Both the keyboard from the preceding section differ from typical keypads that they significantly fewer keys. This is done at the expense of non-numeric keypad, a block arrow and block the function keys. It is worth considering whether so they are often used, and whether it is possible instead to press Fn-F1 1 or some other key combination.
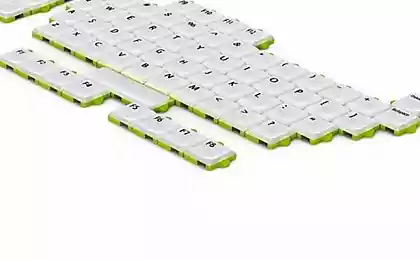
Keys on BlueCube, Ergodox arranged in neat columns, not in neat rows. The same arrangement of keys used in the Truly Ergonomic, TypeMatrix and several keyboards. This is done for two reasons: firstly - the difference in the length of the fingers, the average is typically longer than the others, and the little finger - in short, all of them, and not very comfortable to lie on the same row. Secondly, when using the fast desyatipaltsevym printing by putting directional keys serif, F and J, and the remaining keys on either side of them try to control the ring finger of the left hand to press X, without moving the other fingers or middle left Hands up key C. Key layout neat columns solves both these problems.
Another important point to be used in BlueCube, it is the combination of modifier keys with keys such as space bar, Tab, etc. as follows: if the key is pressed singly, the resulting symbol - space, and if the key is clamped, and in this point is pressed and then released, another key, such as 'q', then the first key is interpreted as a modifier, for example, Shift, and the resulting symbol turns Q.
It should also be noted that the thumb, which is almost never used to print on a conventional keyboard, here involved more similar to the keyboards on Maltron and Kinesis. However, the key block under the thumb does not seem so comfortable that ErgoDox (and similar to Maltron and Kinesis Advantage), and the BlueCube, where they have to bend right up to the base of the little finger.
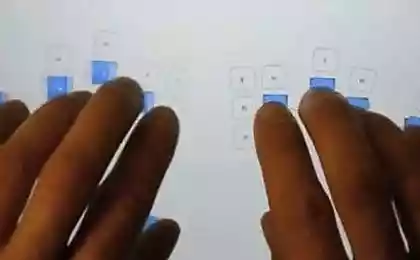
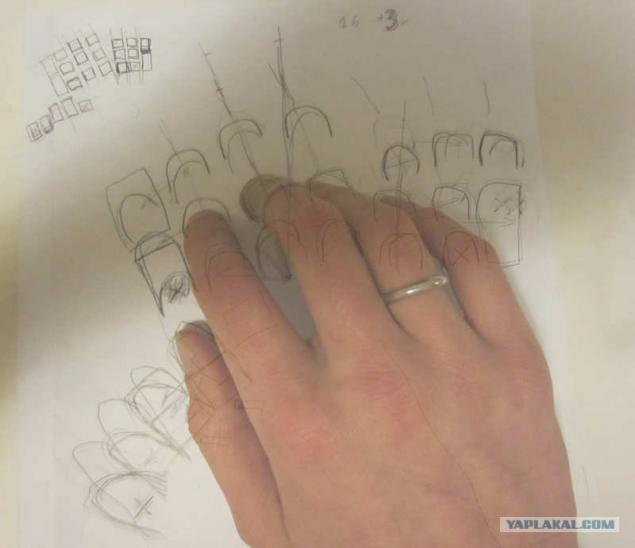
Since nothing deterred me that would look like a keyboard, I decided to just put your hands on the paper and figure out where I would be comfortable to get your fingers, not too much moving hands. As a result, I have turned here is a sketch:
I immediately suffered in vector editor, but with keys that are struck and the characters, placing them more or less traditional:
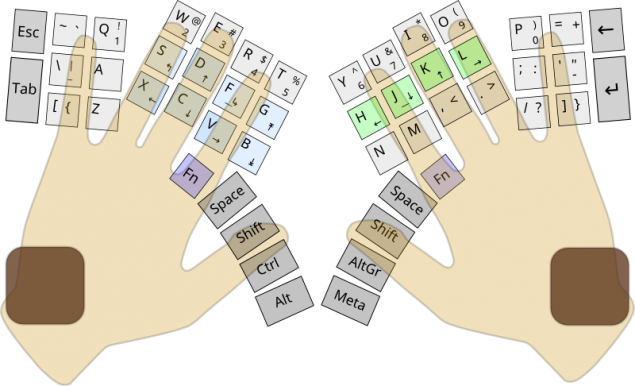
Total I got the fingers reach to the 50 keys, and like all the right keys in the field (although not necessarily on its own, when viewed from the perspective of traditional layouts). Is it enough to be 50ti keys, given that the traditional 104 key keyboards (in the extreme case, 87, in the version without the numeric keypad)? With the use of the modifier Fn this is possible, because the combination of letters and Fn are not commonly used, and it is possible for them to hang up everything that is not climbed, but for some reason you need to, for example, the arrow, Home, End, PgUp and PgDn.
Brown squares represent soft wrist pads.
Indicators? I do not use Caps Lock'om, there is no separate number pad, so that is not necessary and NumLock, and ScrollLock why we need many, probably do not even know. So dismiss indicators.
Slightly confused by the key block under the little finger, when suddenly someone else decides to use my keyboard, his little finger can be shorter than my semioktavnogo, so the unit under the pinky I decided to do turns on this, as shown, to parallel the other columns of the key.
Another aspect - is the natural position of the hands, which is closer to the vertical position of hands, rather than to the position, palms down, to which we are accustomed. This is one of the reasons why I did not buy the keyboard Truly Ergonomic and relaxed. It is inclined to make the keyboard is divided into two halves, as the Kinesis Freestyle and Ergodox with BlueCube'om and tilted.
So, the keyboard on the plan obtained forked, with a reduced number of keys with shifted block under the thumbs, with vertical smooth columns vertically shifted relative to each other, the left and right blocks tilted (adjustable because different sources advise slope from 15 to 90 degrees relative to the vertical surface, and slide adjustable power under little fingers, without indicators.
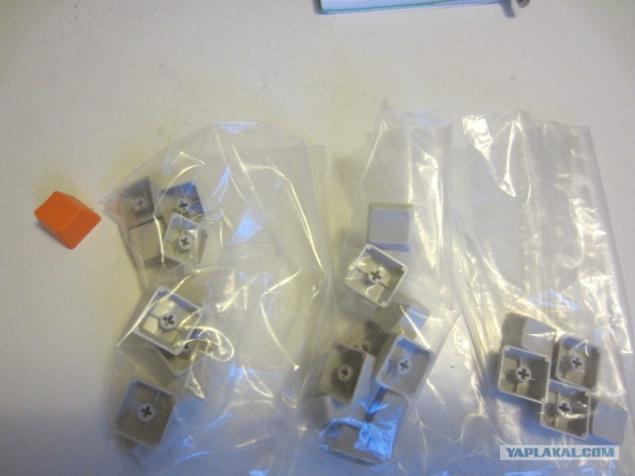
Details
A short list of what you need:
- Key switches;
- Caps on the switches;
- Diodes (what they need - a little later);
- Microcontroller, which allows the keyboard to be USB drives, and read the state of switches;
Fee
Since the chance for error-free PCB design from the first attempt to assess themselves as extremely low, with the loot and experience photoresist not know the price of production under the order in a single volume - high, then decided to make the hinged wiring. Material - PCB, used in conventional printed circuit boards. Have a friend, fortunately, a few stale fiberglass plates, which I had borrowed. Classy stuff, for ease of use is comparable only with blue tape.
Microcontroller
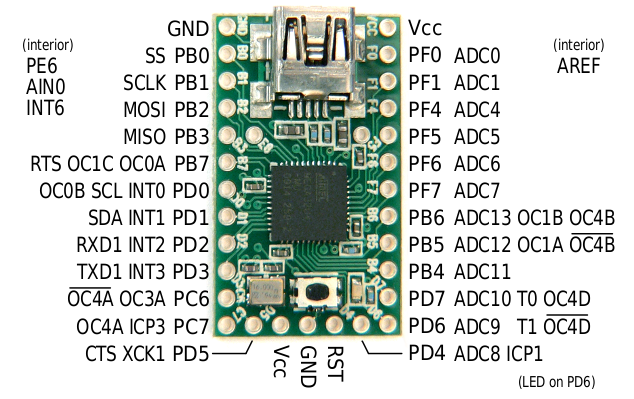
Despite his youthful enthusiasm about the bright future ARM-controllers, I nevertheless chose the device based on a more traditional AVR. Among the most suitable for this application has been identified Atmega32u4, with 32KB of ROM, a sufficient number of input-output ports, working in slave mode, USB devices, and knows how to communicate on the I2C. The fact that the keyboard will be without the traditional printed circuit board, led to the need to take the remote controller on the board, and I chose the most compact - Teensy. The options are many, even from the same manufacturer, and even have a domestic counterparts, although they are somehow more expensive.
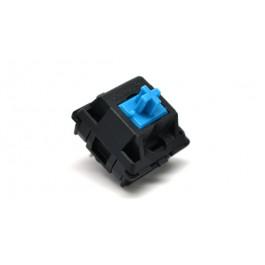
Switches
Selection of key switches between lies only mechanical by Cherry, the brand known to many on the keyboard, and now many Chinese clones are not issued switches Alps.
Cherry produces two main line switches, low-profile Cherry ML, and more frequently used MX, manufactured in the following main modifications:
- Black (Linear Velocity, the average elasticity without snapping);
- Red (Lienen, light without snapping), popular in the gaming keyboard;
- Gray (tactile, elastic, without snapping);
- Transparent (tactile, medium elasticity, without snapping);
- Green (tactile, medium elasticity, snapping);
- Blue (tactile, light, snapping);
- Brown (tactile, light, snapping);
- White (tactile, medium elasticity, moderately snapping).
On the basis of personal preference, I like transparent.
Different way to install more switches. There is an option for mounting on a printed circuit board and mounting the additional plate. At first there are two additional column for greater stability, and the second for the stability needed additional plate. This additional plate is snap the first option.
There are still many modifications MX, but it's one of those parts that are not so easy to buy, or not so cheap, especially in small amounts, but not too popular modifications - even more so. Sell them on Ebay for nearly $ 4 per share, from suppliers of electronic components choice quite small. Remarkably, the keyboard on the forums organized group purchases, in one of which I have written. Unfortunately, we had to either wait or take, that is, and I took golubenky (picking of red, brown and blue), in the version with the installation of PCB.
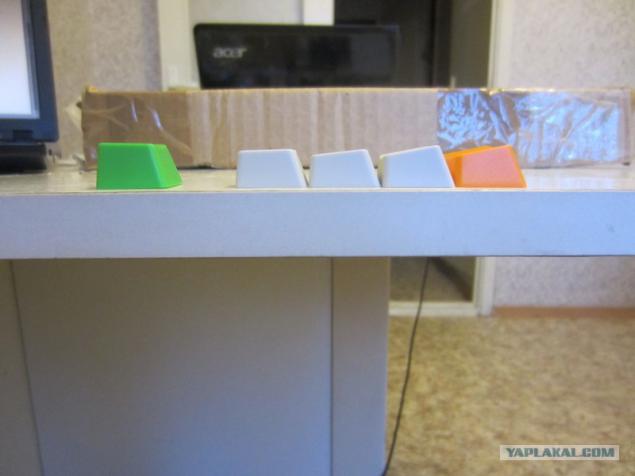
Caps
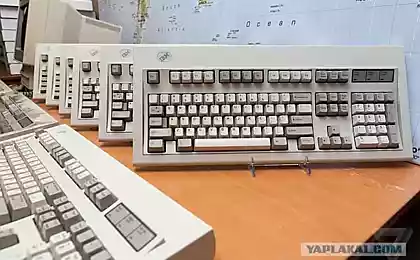
Initially, I wanted to buy some old mechanical keyboard vypayat from it and switches off caps, but nothing good, and did not find.
Since buying new - so choose. Good choices WASD Keyboards, I decided to take a different key, and took a set of 39 keys Alpha block, and two sets of color in the sample, which included are also keyboards dampers to reduce the snapping effect (snapping effect of caps on the board, and not Internal snapping effect of the switch). We also need oversized keys, and I took a few keys, usually used as a Tab (1.5x), Alt (1.25x) and Caps Lock (1.75x), different colors.
Now mainly used kolbachki cylindrical shape, in which each row of keys has its own profile. I was not in sets of any number of keys from the digital E:
...
"Lego for adults»
Parts and Tools.
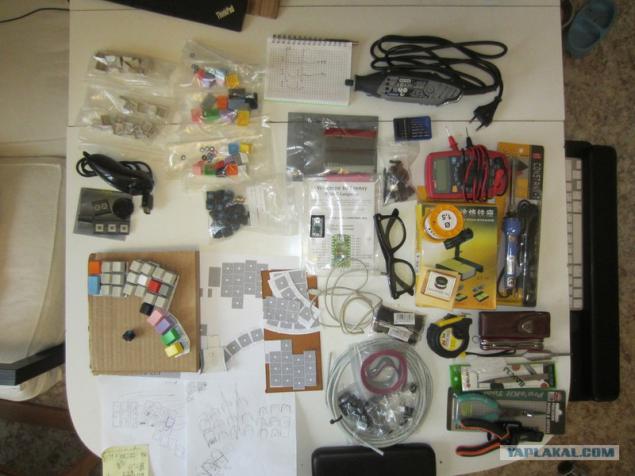
Layout
Iron
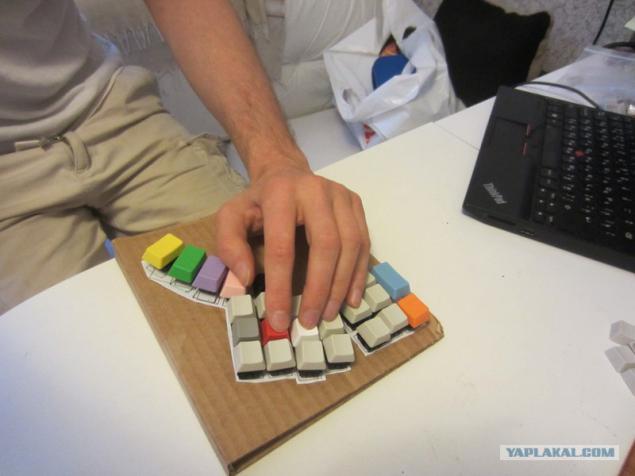
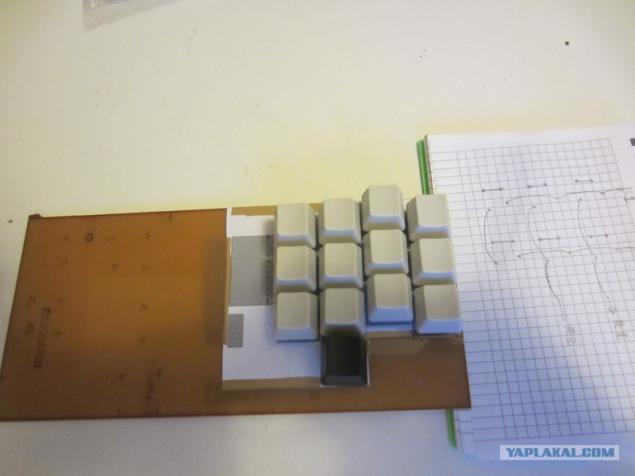
In order not to waste time, I decided to collect the layout and touch it, what does all of this can get, and not waste time if you suddenly do not like this intermediate result. Here's what I got:
Hand (left, I decided to act on the principle of trying on shoes) is comfortable, it gets to all the keys. Decided continue.
Microcontroller
Teensy comes with wired firmware called "flashing light". Surprisingly, when you connect it to your PC USB cable, small diodik really starts to blink. The site is one more example proshika called "fast Mihran light", I downloaded it, and filled to the device, and the light began to blink really fast. Filled original - again more slowly. Well, it is a good idea, it is already possible to make a stroboscope.
Small swarming with source code example of a site called «USB keyboard" and once every 8 seconds, the space character is printed, and the closure of GND with any of the inputs on the screen appear the two characters, denoting the port number and legs, for example B1. Current miserable - 135mkA. More luck.
Theory
How to connect 50 (as on a conventional keyboard with more than twice more) keys to the microcontroller 25 IO ports, leaving some on things like the mouse?
Everything is quite simple, you need to distribute the keys in rows and columns to form a matrix. Applying voltage to column A, and removing this voltage to the rows 2 and 3, you can understand that now the key at the intersection of rows and columns that are pressed. Power is fed to the column alternately. Thus, roughly speaking, it is not necessary number of input-output ports equal to the number keys, and enough of the square root of this number, in my case - 8x7, ie 8 outputs and 7 inputs (or vice versa).
However, this method has a serious drawback, which is manifested in blocking and loss of clicks:
This figure shows that when you press the keys W, E & D, and the voltage applied to column B, a false alarm occurs the key S. combat this phenomenon are called diodes:
In addition, the USB standard brings a serious limitation for connected devices typed input, 6 pressed simultaneously (non-modifier) keys. Some manufacturers circumvent this limitation by emulating the connection of multiple USB devices. Frankly, I faced with this limitation only on youth, when money did not have a MIDI keyboard, and wanted to play a fat chord. But, as interesting.
A brief pause for reflection
...
I have at various moments began to think that too many keys (yes, as though it may sound funny at all 50ti keys!). When I ordered a total of 50 switches without reserve, and when he tried to reach the little fingers to the extreme of four keys on the model, and when I started to think that the seventh column of keys will lead to the need to pull between the halves of the keyboard in addition to the additional wire loop. In addition to all these keys originally planned we had to stay Escape, Tab, Backspace and Enter, which is already on the keys under the thumbs. Duplicate is not much point. And if you have to get used to a new keyboard, so immediately, without any escape routes.
Driving
The scheme is so simple that even it is not much use to draw.
The columns and rows of the matrix correspond to the keys, block of thumb - the fourth row.
We serve the voltage from the column on the incoming leg of this column switches. On leaving the switch legs - to the anode of the diode. Outputs from the cathodes of all switches in the line connect, and connected to the input line.
For the right half of the keyboard is required 6 outputs and 4 inputs on the left - another 6 outputs and inputs can be used are the same. A matrix 12x4, a total of as many as 18 inputs and outputs, which is somewhat uneconomical. I will use the matrix 6 to 8, which is easy to imagine how one half of the keyboard, not located on the left and below the other, turns 14 total input-output ports.
It turns out that the left half of the keyboard will need to conduct 10 live. I bought pin connector only 10 lived, and exactly-exactly enough.
Feet of the controller can be in two modes: input or output. Input can be open, in which case, if it is not closed, he can make a noise, and better translate it into a built-enabled pull-up so that in case if it is not shorted to ground, it had always been in the state 1. The outputs set the default condition of 5V and while reading a particular column drops to 0 V, so that when it is closed, with the input of the last transition to 0, which means pressing the button. This option results in the connection no one in the form of a misunderstanding of what the current "flows" from the entrances to the exits.
There are other connectivity options, which is more or less logical, but they provide additional external elements, such as one for all outputs or more external resistors (to save ports by reading through ADC), but it seems to me that if there is a controller with sufficient number of ports, he himself has to deal with the way his leg where some have closed, so the - the easiest option, although at first sight is not the most intuitive.
Feet microcontroller Teensy withdrawn, not all, and those that are derived - are piecemeal. From the "whole" of ports there are only partly derived B. - F (no legs F2, F3), D (two legs on the bottom board, do not have their own legs, and two more are combined with I2C, C (only C6 and C7 legs ).
On the microcontroller using stem PF0, PF1, PC6, PC7, PF4-PF7 use at outlets, PB0-PB5 by inputs (with pull-up resistor). We reserve the legs PD0 and PD1 for I2C, which will come in handy later for connecting a mouse / trackpoint. PD6 legs do not touch because it is connected to the LED is placed on the board, which can feed current filed on this leg, and lower the voltage from 5V to about 1.7V.
Iron
Fee
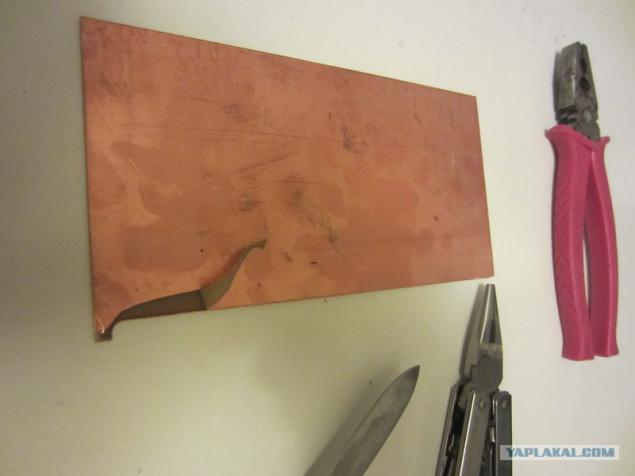
PCB is designed for etching conductive tracks on it. Because it is in my case it is not necessary, the foil will have to withdraw from it. It is not so easy, as it is much thicker and stronger than the one that we all used to shoot with chocolates. It is difficult from the very start - catch the corner of this foil, then, if you shoot her thick stripes, a large force is necessary to apply, and if thin - tries to tear, and you have to re-look area. I was able to identify a fairly simple way: hook from the corner and strip 1-1.5sm wage spiral toward the center of the board.
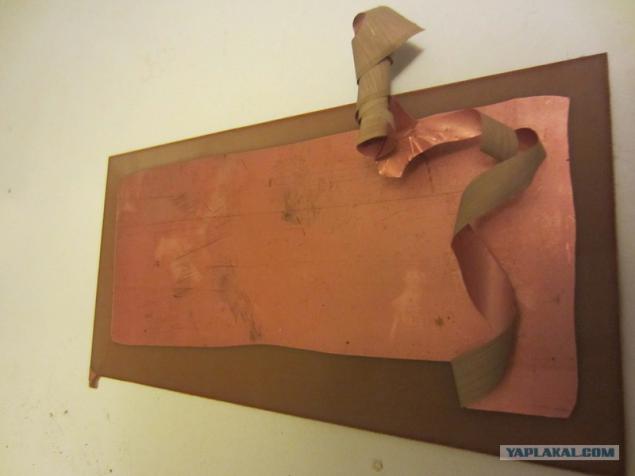
On the PCB are amusing patterns allows us to understand how the foil was removed.
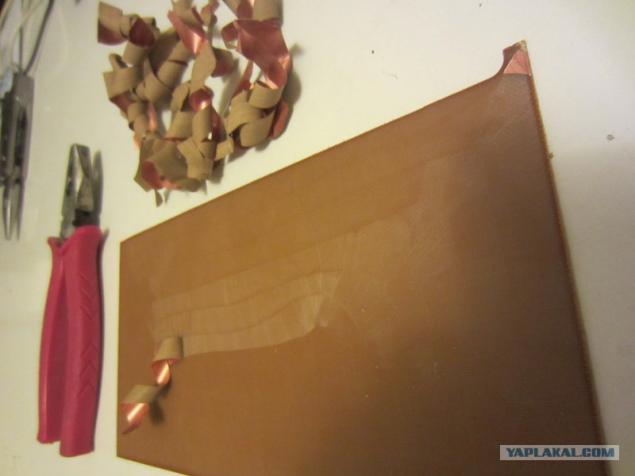
It is recommended to wear gloves and remove the foil pasatizhami otherwise inevitable scratches.
Drilling
...
...
...
...
...
...
...
...
...
...
...
...
...
...
...
...
PS
Source:
He spent a short study about what in general is of keyboards for computer programmers and those who print a lot, and wrote this one overview topic. I bought a Happy Hacking Lite (minimalist keyboard membrane switches), but typing on it was even less convenient than a notebook, mainly because of the even more compact arrangement of the keys.
Soon, the topic, in which he talked about novopriobitёnnoy they Truly Ergonomic, perhaps almost perfect keyboard in my opinion, but in comments, the author also noted that after two months of use and could not really change on it, and hand position is not and convenient as advertised.
A little later there was a topic on the Kinesis Advantage, review of the author to which is also not so easy to get used to, but the price and just scary.

Researches
The link from the first topic I went to the fan sites lovers of keyboards, American and European, in which people are being finished, altered and made the keyboard from scratch. I zashtudiroval they learned everything (I'll tell you a lot in this topic), you need to build from scratch keyboard, ordered all the necessary parts and tools, and waited.
Checklist - below, but now for the seed will discuss two of the most interesting projects of ergonomic keyboards that I found and that and hammered into my head the thought "I can too».
BlueCube

ErgoDox
The keyboard has passed the evolution from Key64, through DoxKB, and which reached the stage of mass production (although, with the self-assembly of the parts) at a price of $ 200.

Design
Both the keyboard from the preceding section differ from typical keypads that they significantly fewer keys. This is done at the expense of non-numeric keypad, a block arrow and block the function keys. It is worth considering whether so they are often used, and whether it is possible instead to press Fn-F1 1 or some other key combination.
Keys on BlueCube, Ergodox arranged in neat columns, not in neat rows. The same arrangement of keys used in the Truly Ergonomic, TypeMatrix and several keyboards. This is done for two reasons: firstly - the difference in the length of the fingers, the average is typically longer than the others, and the little finger - in short, all of them, and not very comfortable to lie on the same row. Secondly, when using the fast desyatipaltsevym printing by putting directional keys serif, F and J, and the remaining keys on either side of them try to control the ring finger of the left hand to press X, without moving the other fingers or middle left Hands up key C. Key layout neat columns solves both these problems.
Another important point to be used in BlueCube, it is the combination of modifier keys with keys such as space bar, Tab, etc. as follows: if the key is pressed singly, the resulting symbol - space, and if the key is clamped, and in this point is pressed and then released, another key, such as 'q', then the first key is interpreted as a modifier, for example, Shift, and the resulting symbol turns Q.
It should also be noted that the thumb, which is almost never used to print on a conventional keyboard, here involved more similar to the keyboards on Maltron and Kinesis. However, the key block under the thumb does not seem so comfortable that ErgoDox (and similar to Maltron and Kinesis Advantage), and the BlueCube, where they have to bend right up to the base of the little finger.
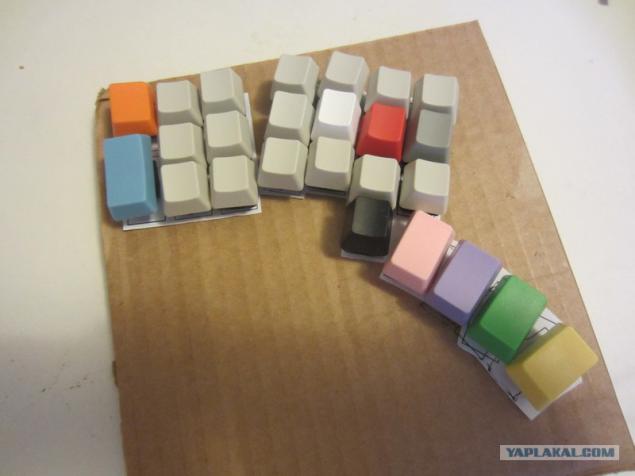
Since nothing deterred me that would look like a keyboard, I decided to just put your hands on the paper and figure out where I would be comfortable to get your fingers, not too much moving hands. As a result, I have turned here is a sketch:

I immediately suffered in vector editor, but with keys that are struck and the characters, placing them more or less traditional:

Total I got the fingers reach to the 50 keys, and like all the right keys in the field (although not necessarily on its own, when viewed from the perspective of traditional layouts). Is it enough to be 50ti keys, given that the traditional 104 key keyboards (in the extreme case, 87, in the version without the numeric keypad)? With the use of the modifier Fn this is possible, because the combination of letters and Fn are not commonly used, and it is possible for them to hang up everything that is not climbed, but for some reason you need to, for example, the arrow, Home, End, PgUp and PgDn.
Brown squares represent soft wrist pads.
Indicators? I do not use Caps Lock'om, there is no separate number pad, so that is not necessary and NumLock, and ScrollLock why we need many, probably do not even know. So dismiss indicators.
Slightly confused by the key block under the little finger, when suddenly someone else decides to use my keyboard, his little finger can be shorter than my semioktavnogo, so the unit under the pinky I decided to do turns on this, as shown, to parallel the other columns of the key.
Another aspect - is the natural position of the hands, which is closer to the vertical position of hands, rather than to the position, palms down, to which we are accustomed. This is one of the reasons why I did not buy the keyboard Truly Ergonomic and relaxed. It is inclined to make the keyboard is divided into two halves, as the Kinesis Freestyle and Ergodox with BlueCube'om and tilted.
So, the keyboard on the plan obtained forked, with a reduced number of keys with shifted block under the thumbs, with vertical smooth columns vertically shifted relative to each other, the left and right blocks tilted (adjustable because different sources advise slope from 15 to 90 degrees relative to the vertical surface, and slide adjustable power under little fingers, without indicators.
Details
A short list of what you need:
- Key switches;
- Caps on the switches;
- Diodes (what they need - a little later);
- Microcontroller, which allows the keyboard to be USB drives, and read the state of switches;
Fee
Since the chance for error-free PCB design from the first attempt to assess themselves as extremely low, with the loot and experience photoresist not know the price of production under the order in a single volume - high, then decided to make the hinged wiring. Material - PCB, used in conventional printed circuit boards. Have a friend, fortunately, a few stale fiberglass plates, which I had borrowed. Classy stuff, for ease of use is comparable only with blue tape.

Microcontroller
Despite his youthful enthusiasm about the bright future ARM-controllers, I nevertheless chose the device based on a more traditional AVR. Among the most suitable for this application has been identified Atmega32u4, with 32KB of ROM, a sufficient number of input-output ports, working in slave mode, USB devices, and knows how to communicate on the I2C. The fact that the keyboard will be without the traditional printed circuit board, led to the need to take the remote controller on the board, and I chose the most compact - Teensy. The options are many, even from the same manufacturer, and even have a domestic counterparts, although they are somehow more expensive.

Switches
Selection of key switches between lies only mechanical by Cherry, the brand known to many on the keyboard, and now many Chinese clones are not issued switches Alps.
Cherry produces two main line switches, low-profile Cherry ML, and more frequently used MX, manufactured in the following main modifications:
- Black (Linear Velocity, the average elasticity without snapping);
- Red (Lienen, light without snapping), popular in the gaming keyboard;
- Gray (tactile, elastic, without snapping);
- Transparent (tactile, medium elasticity, without snapping);
- Green (tactile, medium elasticity, snapping);
- Blue (tactile, light, snapping);
- Brown (tactile, light, snapping);
- White (tactile, medium elasticity, moderately snapping).
On the basis of personal preference, I like transparent.
Different way to install more switches. There is an option for mounting on a printed circuit board and mounting the additional plate. At first there are two additional column for greater stability, and the second for the stability needed additional plate. This additional plate is snap the first option.
There are still many modifications MX, but it's one of those parts that are not so easy to buy, or not so cheap, especially in small amounts, but not too popular modifications - even more so. Sell them on Ebay for nearly $ 4 per share, from suppliers of electronic components choice quite small. Remarkably, the keyboard on the forums organized group purchases, in one of which I have written. Unfortunately, we had to either wait or take, that is, and I took golubenky (picking of red, brown and blue), in the version with the installation of PCB.

Caps
Initially, I wanted to buy some old mechanical keyboard vypayat from it and switches off caps, but nothing good, and did not find.
Since buying new - so choose. Good choices WASD Keyboards, I decided to take a different key, and took a set of 39 keys Alpha block, and two sets of color in the sample, which included are also keyboards dampers to reduce the snapping effect (snapping effect of caps on the board, and not Internal snapping effect of the switch). We also need oversized keys, and I took a few keys, usually used as a Tab (1.5x), Alt (1.25x) and Caps Lock (1.75x), different colors.
Now mainly used kolbachki cylindrical shape, in which each row of keys has its own profile. I was not in sets of any number of keys from the digital E:

...

"Lego for adults»
Parts and Tools.

Layout
Iron
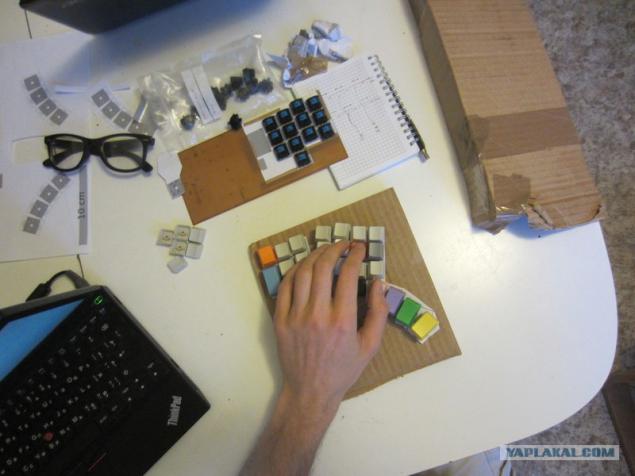
In order not to waste time, I decided to collect the layout and touch it, what does all of this can get, and not waste time if you suddenly do not like this intermediate result. Here's what I got:

Hand (left, I decided to act on the principle of trying on shoes) is comfortable, it gets to all the keys. Decided continue.
Microcontroller
Teensy comes with wired firmware called "flashing light". Surprisingly, when you connect it to your PC USB cable, small diodik really starts to blink. The site is one more example proshika called "fast Mihran light", I downloaded it, and filled to the device, and the light began to blink really fast. Filled original - again more slowly. Well, it is a good idea, it is already possible to make a stroboscope.
Small swarming with source code example of a site called «USB keyboard" and once every 8 seconds, the space character is printed, and the closure of GND with any of the inputs on the screen appear the two characters, denoting the port number and legs, for example B1. Current miserable - 135mkA. More luck.
Theory
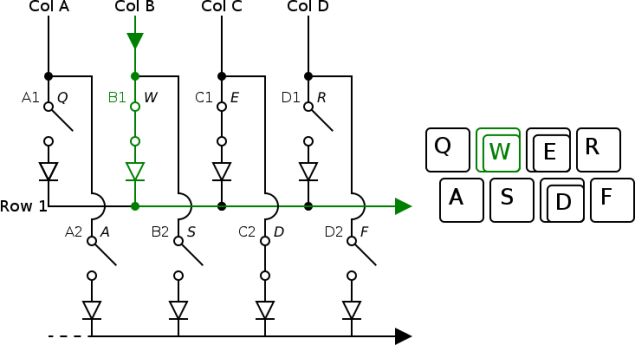
How to connect 50 (as on a conventional keyboard with more than twice more) keys to the microcontroller 25 IO ports, leaving some on things like the mouse?
Everything is quite simple, you need to distribute the keys in rows and columns to form a matrix. Applying voltage to column A, and removing this voltage to the rows 2 and 3, you can understand that now the key at the intersection of rows and columns that are pressed. Power is fed to the column alternately. Thus, roughly speaking, it is not necessary number of input-output ports equal to the number keys, and enough of the square root of this number, in my case - 8x7, ie 8 outputs and 7 inputs (or vice versa).
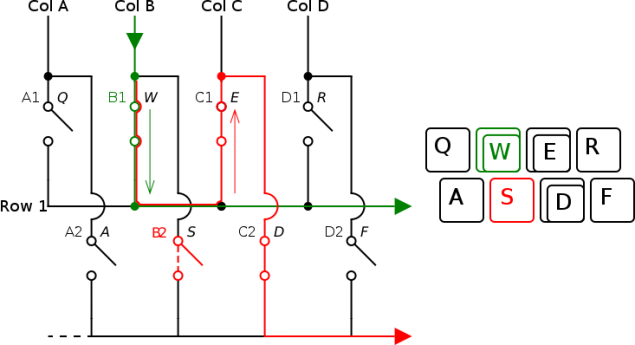
However, this method has a serious drawback, which is manifested in blocking and loss of clicks:

This figure shows that when you press the keys W, E & D, and the voltage applied to column B, a false alarm occurs the key S. combat this phenomenon are called diodes:

In addition, the USB standard brings a serious limitation for connected devices typed input, 6 pressed simultaneously (non-modifier) keys. Some manufacturers circumvent this limitation by emulating the connection of multiple USB devices. Frankly, I faced with this limitation only on youth, when money did not have a MIDI keyboard, and wanted to play a fat chord. But, as interesting.
A brief pause for reflection

...

I have at various moments began to think that too many keys (yes, as though it may sound funny at all 50ti keys!). When I ordered a total of 50 switches without reserve, and when he tried to reach the little fingers to the extreme of four keys on the model, and when I started to think that the seventh column of keys will lead to the need to pull between the halves of the keyboard in addition to the additional wire loop. In addition to all these keys originally planned we had to stay Escape, Tab, Backspace and Enter, which is already on the keys under the thumbs. Duplicate is not much point. And if you have to get used to a new keyboard, so immediately, without any escape routes.
Driving
The scheme is so simple that even it is not much use to draw.

The columns and rows of the matrix correspond to the keys, block of thumb - the fourth row.
We serve the voltage from the column on the incoming leg of this column switches. On leaving the switch legs - to the anode of the diode. Outputs from the cathodes of all switches in the line connect, and connected to the input line.
For the right half of the keyboard is required 6 outputs and 4 inputs on the left - another 6 outputs and inputs can be used are the same. A matrix 12x4, a total of as many as 18 inputs and outputs, which is somewhat uneconomical. I will use the matrix 6 to 8, which is easy to imagine how one half of the keyboard, not located on the left and below the other, turns 14 total input-output ports.
It turns out that the left half of the keyboard will need to conduct 10 live. I bought pin connector only 10 lived, and exactly-exactly enough.
Feet of the controller can be in two modes: input or output. Input can be open, in which case, if it is not closed, he can make a noise, and better translate it into a built-enabled pull-up so that in case if it is not shorted to ground, it had always been in the state 1. The outputs set the default condition of 5V and while reading a particular column drops to 0 V, so that when it is closed, with the input of the last transition to 0, which means pressing the button. This option results in the connection no one in the form of a misunderstanding of what the current "flows" from the entrances to the exits.
There are other connectivity options, which is more or less logical, but they provide additional external elements, such as one for all outputs or more external resistors (to save ports by reading through ADC), but it seems to me that if there is a controller with sufficient number of ports, he himself has to deal with the way his leg where some have closed, so the - the easiest option, although at first sight is not the most intuitive.
Feet microcontroller Teensy withdrawn, not all, and those that are derived - are piecemeal. From the "whole" of ports there are only partly derived B. - F (no legs F2, F3), D (two legs on the bottom board, do not have their own legs, and two more are combined with I2C, C (only C6 and C7 legs ).
On the microcontroller using stem PF0, PF1, PC6, PC7, PF4-PF7 use at outlets, PB0-PB5 by inputs (with pull-up resistor). We reserve the legs PD0 and PD1 for I2C, which will come in handy later for connecting a mouse / trackpoint. PD6 legs do not touch because it is connected to the LED is placed on the board, which can feed current filed on this leg, and lower the voltage from 5V to about 1.7V.
Iron
Fee
PCB is designed for etching conductive tracks on it. Because it is in my case it is not necessary, the foil will have to withdraw from it. It is not so easy, as it is much thicker and stronger than the one that we all used to shoot with chocolates. It is difficult from the very start - catch the corner of this foil, then, if you shoot her thick stripes, a large force is necessary to apply, and if thin - tries to tear, and you have to re-look area. I was able to identify a fairly simple way: hook from the corner and strip 1-1.5sm wage spiral toward the center of the board.

On the PCB are amusing patterns allows us to understand how the foil was removed.

It is recommended to wear gloves and remove the foil pasatizhami otherwise inevitable scratches.
Drilling
...
...
...
...
...
...
...
...
...
...
...
...
...
...
...
...
PS
Source: