497
Tank solar collector with their hands
What tank for the solar collector you choose will depend on the thermal inertia of the system, the volume of supply of hot water during the cold periods and the overall system performance. We are talking about the reservoir provided by the prototype manifold with PEX pipe. This variant of the reservoir of cheap and effective.
The pros of a homemade tank-box solar collector:
The option of installing a tank in the ground below floor level, is also used — if the ground is dry, there is a possibility of installing additional thermal insulation boards. Only control of tank inspection for corrosion or any other damage will be impossible. For rooms with high humidity, you can use moisture proof plywood or with a special impregnation.
The system is built on the principle of a drain (drainback), so the level of the tank must be below the level of the lower part of the manifold and just below the water pipe from the manifold to the tank. All the water in the reservoir and the water should drain under gravity when the pump is off. The shorter and straighter the water, the better. Pipes running from the manifold must slope towards the reservoir.
The installation place should be as close as possible to the current tank for home heating. Pipe to the cold water supply is redirected into the tank from the manifold, and then back to the heater. A long way from the manifold to the heater can lose too much heat.
How to make a tank for the solar collectorShould immediately determine if it's ready tank in the door of the room in which it will be placed, or it will need to collect already. Maybe the final Assembly easier to carry out in the room.
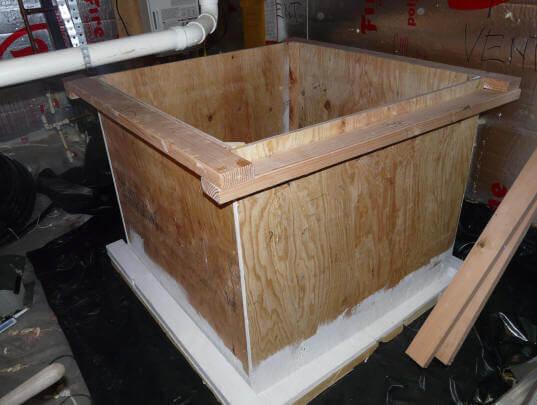
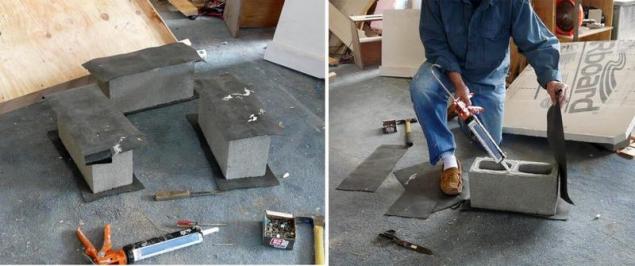
The box and frame of the tankWalls and bottom are cut out of plywood. The upper and lower frame supporting the edges of the tank around the perimeter, made of beams 2. 5x10 cm of water in the tank will be about 680 kg, so the strength of the tank should be paid special attention.
The reservoir size must be selected in accordance with available space and needs. Don't forget to add in the calculation the amount of insulation, which will occupy a lot of space. The tank should be able to slide the Bay to the coil.
The dimensions used in this prototype:
At the base is a sheet of plywood 120 by 120 cm After being placed inside the insulation (in this case 5 cm), the inner area of the tank will be about 95 square inches together with stacked rubber pool. The height of the walls of the tank 89 see, taking into account the insulation on the bottom 5 cm and 5 cm air space above the water — 79 cm for water and coil. Overall height with lid and insulation is 104 cm the Total volume of collecting tank ≈ 620 litres. Using dienstmerkmal coil PEX pipe, the tank must be not less than 90 cm in diameter.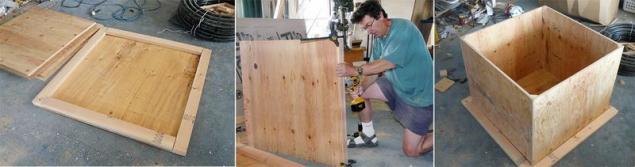
In the photo the bottom of the tank with fins on the left wall. Installing a corner reinforcing angles on one of the walls of the tank. The sides of the tank are fit to the lower frame.
The bottom should be of sufficient size for the additional fins. Vertical reinforcement is installed in every corner of the collector tank. The author of the prototype made of triangular reinforcing insert, but you can make them square in size isolation.
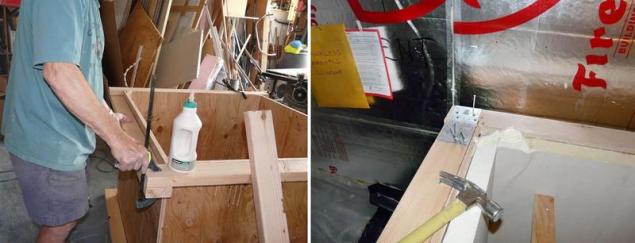
The photo shows the installation of the frame. The final establishment of the frame around the perimeter.
The fins at the top of the box provides a surface of contact with the cover. The timber for the fins should be of very good quality, smooth and dry.
Quality reinforcement is extremely important, as it should resist the water pressure, weighing 700 kg. Top frame provides the necessary area for the shift cover and a good grip.
Insulation of the collector tankWhen the tank is assembled, you can proceed to its thermal insulation. A good choice is a polyisocyanurate insulation with closed pores. Coefficient of thermal conductivity from R-5.6 to R-14, service life of about 15 years, over time, the gas from the pores can come out. In this case, a rigid shape, sheet thickness of 5 cm (R14). Polystyrene will not withstand those temperatures, which have to work in Baku. You can use additional insulation on the outside, if necessary. Insulation on the inside of the tank eliminates thermal bridges.
The tank is installed under a five-centimeter sheet of polystyrene. The lid is also insulated politlely plus a sheet of polystyrene on top.
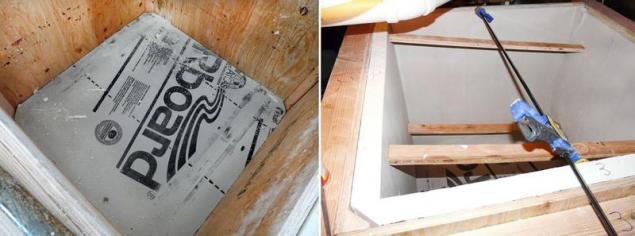
In the photo insulated the bottom of the tank in the process of fitting the sheet size of the insulator. Insulated tank walls. Making the cover of the tank.
To glue the insulation to the walls of the tank with polyurethane foam. Gaps and cracks also need to saponite.
It is desirable to paint the tank.
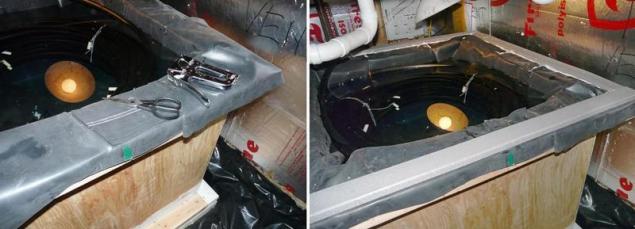
"Pool" gasket for manifold tank EPDMGasket rubber should be solid. Measurements made on the inner side of the tank. Approximate size 2 x wall height + bottom width + 25 see, For example, if the interior height is 84 cm, bottom width on the internal measurement of 94 cm, the size of the graft rubber 2 x 84 + 94 + 25 = 287 see If the tank is not square, then the flap will be of rectangular shape.
Rubber good cutting scissors. Before you fold the flap, mark the center of each side with a marker — this will help faster and more accurate to place it inside the tank. For rectangular tank, mark the longer side.
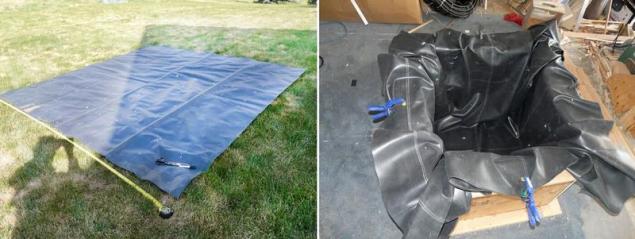
In the photo cutting the rubber blade. Fitting of the flap in the tank.
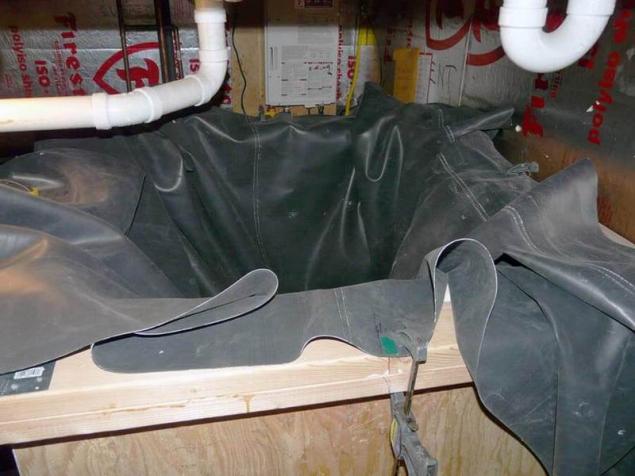
Mark the middle of each wall of the tank. Insert the gasket into the tank and map markers. Use clamps to seal "not walking" in Baku. Now I have to get inside. The flap should not be installed in the stretch. Extra fold the fabric into neat folds. Between the walls of the tank and the rubber should be free of voids.
Laying strip.
Folds with excess material in the corners of the tank, push something while working these folds to the frame.
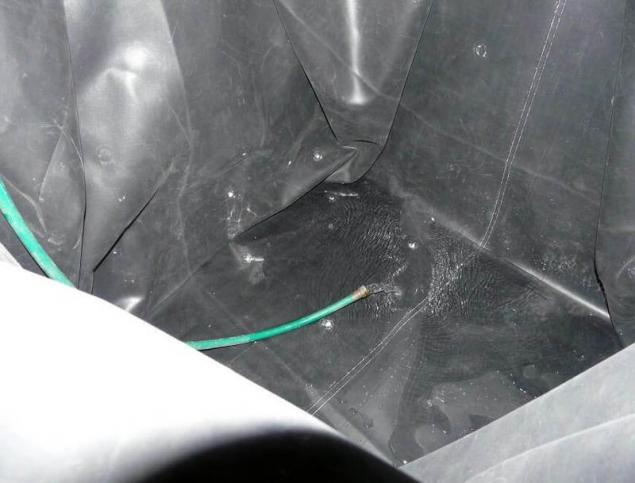
Fill the tank with water for 15-20 cm and make sure that the rubber leaves the air and the material does not float anywhere.
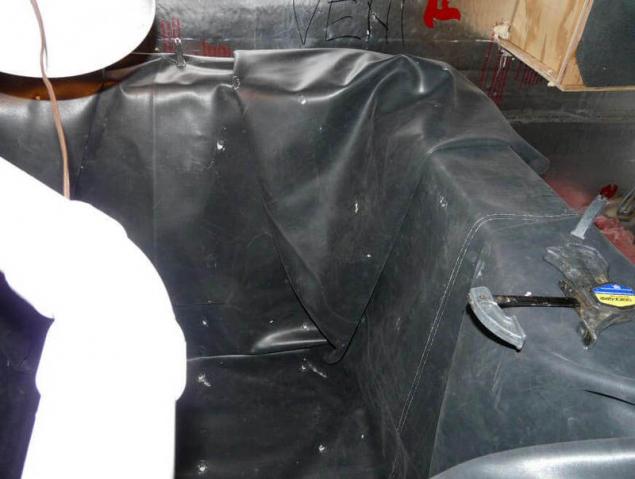
When laying the material was successful, seal the gap between the frame and seal with silicone and secure it with the stapler on the outer perimeter of the frame.
Next step is to install the seal between the tank and lid. It turns out that in some places we have 3 layers of rubber overlap. Use scraps of rubber to smooth the surface of the top frame before you install a secondary seal. The joints between the flaps and seal insulate with sealant. The master used plastic deck rails for the last layer of the fins of the tank. The joints are glued with silicone, Reiki, put on the screws made of stainless steel.
The entrance to the heat exchanger is cut out later.
The location of the reservoirTank ready to be installed on the prepared place.
The author of the tank is in the basement. Under the tank, he laid a thick polyethylene, it bricks, then another sheet of plywood, a layer of polyethylene and a sheet of extruded polystyrene. Next is the tank.
For all parts of the tank it is necessary to use screws, and glue.
Cap for tankCover is essential. It should provide a vapor barrier and insulation. What is the cover of the solar collector in the prototype: the layer of rubber, 5 cm insulation, plywood. Cover size must match frame.

Glue layers can be polyurethane foam, do not forget about the weights to prevent the expanding foam.
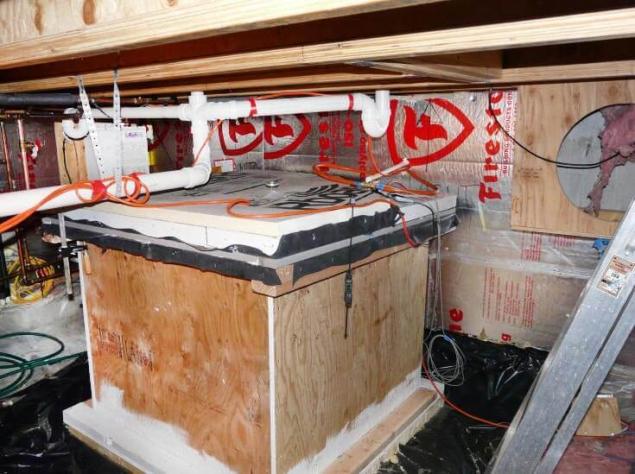
This tank San-those connections are going through the cover. From the other side of kriki, which is closer to the manifold, cut a triangle (photo). This part of the cover will be fixed. Now the tank can be opened, without breaking pipe connections and nodes.
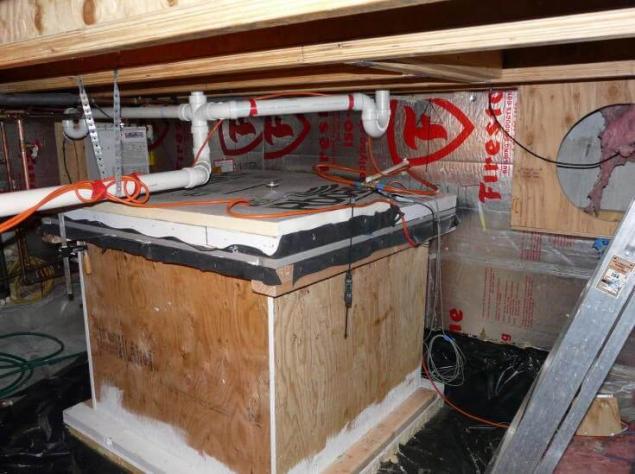
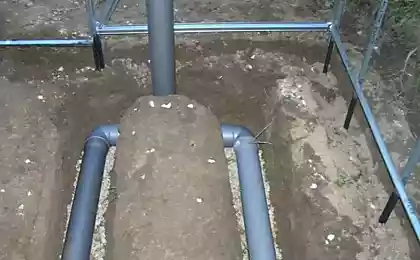
The orange tube connected to the lower part of the manifold (the one to the left, the other to the right side). They are connected by a tee and one line goes through the tank lid and connected to the pump. The electrical wire of the pump goes through the lid next to the chimney. The white pipe goes from the top of the manifold, goes through the lid and ends above the water level in the tank. When the drain process starts, the air goes into the pipe and is drained.
Cut a piece of rubber that will wrap removable part of the cover — to cover the edge of the insulation with a slight overlap on the top cover. Glue the rubber with silicone and fasten with a stapler. Do the same with the fixed part of the cover.
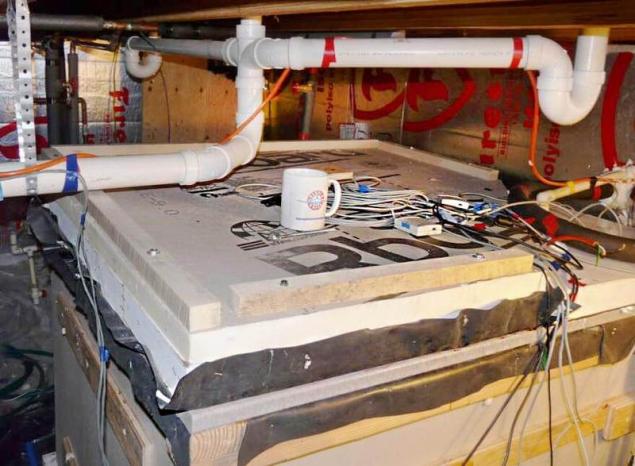
Use the clips to secure the triangle and make 2 holes for the pipes. Also we will need a hole for the wires. Cover lock long deck screws. After the installation of the pipe holes must be processed with silicone sealant, then repeat with the junction of the fixed portion of the cover and manifold.
Layers tank cover:
Rubber strip 5 cm of insulation Plywood, Another layer of insulation. The steam outlet shall be warned by the fixing cover clips. published
P. S. And remember, only by changing their consumption — together we change the world! ©
Source: //ehome.ironws.com/energiya/solnechnye-kollektory/bak-dlya-solnechnogo-kollektora-svoimi-rukami/

The pros of a homemade tank-box solar collector:
- You can create a capacity of any size that you need. Roomier than the insulated tank, the better the system performance.
- Tanks with ethylene-propylene rubber (EPDM) durable (over 15 years).
- Rubber can withstand temperatures of 80 degrees, but ideal for the long-term performance of the coating tank is a temperature of about 60-65 degrees.
- The shape of the tank manifold may be as close as possible to the confined space — even a-line.
- The design allows you to use as much insulation as you see fit.
- The tank is roomy enough for large rolls of pipe.
- The possibility of leakage is excluded.
- Tank for solar water heater should stand on a dry flat pedestal.
- He's not as pretty as a brand new tank out of stainless steel.
- Its creation requires time.
The option of installing a tank in the ground below floor level, is also used — if the ground is dry, there is a possibility of installing additional thermal insulation boards. Only control of tank inspection for corrosion or any other damage will be impossible. For rooms with high humidity, you can use moisture proof plywood or with a special impregnation.
The system is built on the principle of a drain (drainback), so the level of the tank must be below the level of the lower part of the manifold and just below the water pipe from the manifold to the tank. All the water in the reservoir and the water should drain under gravity when the pump is off. The shorter and straighter the water, the better. Pipes running from the manifold must slope towards the reservoir.
The installation place should be as close as possible to the current tank for home heating. Pipe to the cold water supply is redirected into the tank from the manifold, and then back to the heater. A long way from the manifold to the heater can lose too much heat.
How to make a tank for the solar collectorShould immediately determine if it's ready tank in the door of the room in which it will be placed, or it will need to collect already. Maybe the final Assembly easier to carry out in the room.
The box and frame of the tankWalls and bottom are cut out of plywood. The upper and lower frame supporting the edges of the tank around the perimeter, made of beams 2. 5x10 cm of water in the tank will be about 680 kg, so the strength of the tank should be paid special attention.
The reservoir size must be selected in accordance with available space and needs. Don't forget to add in the calculation the amount of insulation, which will occupy a lot of space. The tank should be able to slide the Bay to the coil.
The dimensions used in this prototype:
At the base is a sheet of plywood 120 by 120 cm After being placed inside the insulation (in this case 5 cm), the inner area of the tank will be about 95 square inches together with stacked rubber pool. The height of the walls of the tank 89 see, taking into account the insulation on the bottom 5 cm and 5 cm air space above the water — 79 cm for water and coil. Overall height with lid and insulation is 104 cm the Total volume of collecting tank ≈ 620 litres. Using dienstmerkmal coil PEX pipe, the tank must be not less than 90 cm in diameter.

In the photo the bottom of the tank with fins on the left wall. Installing a corner reinforcing angles on one of the walls of the tank. The sides of the tank are fit to the lower frame.
The bottom should be of sufficient size for the additional fins. Vertical reinforcement is installed in every corner of the collector tank. The author of the prototype made of triangular reinforcing insert, but you can make them square in size isolation.

The photo shows the installation of the frame. The final establishment of the frame around the perimeter.
The fins at the top of the box provides a surface of contact with the cover. The timber for the fins should be of very good quality, smooth and dry.
Quality reinforcement is extremely important, as it should resist the water pressure, weighing 700 kg. Top frame provides the necessary area for the shift cover and a good grip.
Insulation of the collector tankWhen the tank is assembled, you can proceed to its thermal insulation. A good choice is a polyisocyanurate insulation with closed pores. Coefficient of thermal conductivity from R-5.6 to R-14, service life of about 15 years, over time, the gas from the pores can come out. In this case, a rigid shape, sheet thickness of 5 cm (R14). Polystyrene will not withstand those temperatures, which have to work in Baku. You can use additional insulation on the outside, if necessary. Insulation on the inside of the tank eliminates thermal bridges.
The tank is installed under a five-centimeter sheet of polystyrene. The lid is also insulated politlely plus a sheet of polystyrene on top.

In the photo insulated the bottom of the tank in the process of fitting the sheet size of the insulator. Insulated tank walls. Making the cover of the tank.
To glue the insulation to the walls of the tank with polyurethane foam. Gaps and cracks also need to saponite.
It is desirable to paint the tank.
"Pool" gasket for manifold tank EPDMGasket rubber should be solid. Measurements made on the inner side of the tank. Approximate size 2 x wall height + bottom width + 25 see, For example, if the interior height is 84 cm, bottom width on the internal measurement of 94 cm, the size of the graft rubber 2 x 84 + 94 + 25 = 287 see If the tank is not square, then the flap will be of rectangular shape.
Rubber good cutting scissors. Before you fold the flap, mark the center of each side with a marker — this will help faster and more accurate to place it inside the tank. For rectangular tank, mark the longer side.

In the photo cutting the rubber blade. Fitting of the flap in the tank.
Mark the middle of each wall of the tank. Insert the gasket into the tank and map markers. Use clamps to seal "not walking" in Baku. Now I have to get inside. The flap should not be installed in the stretch. Extra fold the fabric into neat folds. Between the walls of the tank and the rubber should be free of voids.

Laying strip.

Folds with excess material in the corners of the tank, push something while working these folds to the frame.

Fill the tank with water for 15-20 cm and make sure that the rubber leaves the air and the material does not float anywhere.
When laying the material was successful, seal the gap between the frame and seal with silicone and secure it with the stapler on the outer perimeter of the frame.
Next step is to install the seal between the tank and lid. It turns out that in some places we have 3 layers of rubber overlap. Use scraps of rubber to smooth the surface of the top frame before you install a secondary seal. The joints between the flaps and seal insulate with sealant. The master used plastic deck rails for the last layer of the fins of the tank. The joints are glued with silicone, Reiki, put on the screws made of stainless steel.

The entrance to the heat exchanger is cut out later.
The location of the reservoirTank ready to be installed on the prepared place.
The author of the tank is in the basement. Under the tank, he laid a thick polyethylene, it bricks, then another sheet of plywood, a layer of polyethylene and a sheet of extruded polystyrene. Next is the tank.

For all parts of the tank it is necessary to use screws, and glue.
Cap for tankCover is essential. It should provide a vapor barrier and insulation. What is the cover of the solar collector in the prototype: the layer of rubber, 5 cm insulation, plywood. Cover size must match frame.

Glue layers can be polyurethane foam, do not forget about the weights to prevent the expanding foam.
This tank San-those connections are going through the cover. From the other side of kriki, which is closer to the manifold, cut a triangle (photo). This part of the cover will be fixed. Now the tank can be opened, without breaking pipe connections and nodes.

The orange tube connected to the lower part of the manifold (the one to the left, the other to the right side). They are connected by a tee and one line goes through the tank lid and connected to the pump. The electrical wire of the pump goes through the lid next to the chimney. The white pipe goes from the top of the manifold, goes through the lid and ends above the water level in the tank. When the drain process starts, the air goes into the pipe and is drained.
Cut a piece of rubber that will wrap removable part of the cover — to cover the edge of the insulation with a slight overlap on the top cover. Glue the rubber with silicone and fasten with a stapler. Do the same with the fixed part of the cover.

Use the clips to secure the triangle and make 2 holes for the pipes. Also we will need a hole for the wires. Cover lock long deck screws. After the installation of the pipe holes must be processed with silicone sealant, then repeat with the junction of the fixed portion of the cover and manifold.

Layers tank cover:
Rubber strip 5 cm of insulation Plywood, Another layer of insulation. The steam outlet shall be warned by the fixing cover clips. published
P. S. And remember, only by changing their consumption — together we change the world! ©
Source: //ehome.ironws.com/energiya/solnechnye-kollektory/bak-dlya-solnechnogo-kollektora-svoimi-rukami/


Equipment Anchor: sustainable change a negative experience into a positive
Basement waterproofing from the inside from the groundwater