946
Creating decoupage kitchen furniture
Medieval craftsmen to create the simulation way inlays, creating graceful paintings on the facades of furniture used applications of paper. Recently, this decorative technique is becoming increasingly popular. Many creative people gladly perform decoupage on furniture with his own hands. Below are fotoetoy furniture and describes a detailed master class.
What is decoupage
Decoupage - a method of decoration. It represents pasting clippings from a variety of available materials (paper, cloth, napkin, etc.) on the surface of various objects and applying nail effektnosti.
Result decoupage mebeliDekupazh old furniture literally alters it. Kitchen greatly transformed and becomes very fine and interesting. This technique of decorating by virtue of any person and allows virtually no cost to do an exclusive home furnishings.
To make decoupage on furniture with his own hands requires diligence and patience. However, the result will exceed all expectations.
Materials and tools
To perform a decoupage of kitchen furniture with his own hands, using the following materials:
Scissors.
Stationery knife.
Foam broom to remove wrinkles.
Regular or special glue for decoupage.
Cloth to remove the excess glue.
Protective spray or acrylic lacquer for smoothing the surface.
Newspaper or magazine clippings, colorful napkins, pictures, printed on a printer, and other materials.
All the necessary tools can be found at home or buy without incurring serious costs.
Forms and techniques
decoupage The classic version is the attachment of images on any surface with hot, wet or dry method. Then it is covered with varnish and fine tuning to get a completely smooth surface. In some cases, the surface is further subjected to coloring, give volume and aged artificially.
Reverse decoupage used in the design of objects made of glass. In this image pasted on the back side products.
Artistic decoupage is a union pasted images and the background in a painting one.
Dekopatch - a technique implying decoration surface to be treated is not a separate image, and the pieces of special paper that simulates the fur, fabric, and other natural materials, with surface completely filled. Some pieces are glued back to back, forming a uniform background.
Volumetric decoupage is a creation of the painting with an embossed texture. The volume produced by various methods.
To create the desired surface texture can be used auxiliary decorative e ffekty.
The main effects of decoupage are:
Gilding. In this case, the image is covered pasted gold, silver or other metallic paint. To give the appearance of precious inlays can be used analogues sheets of gold leaf.
Varieties decoupage effects mebeliSozdanie shadows using pastels and dry brush. This technique masks the border and softens the lines of the drawing.
Coloring picture colored paint to give it a special flavor.
Creating artificial aging of the object, which creates the illusion of the rich history of this subject.
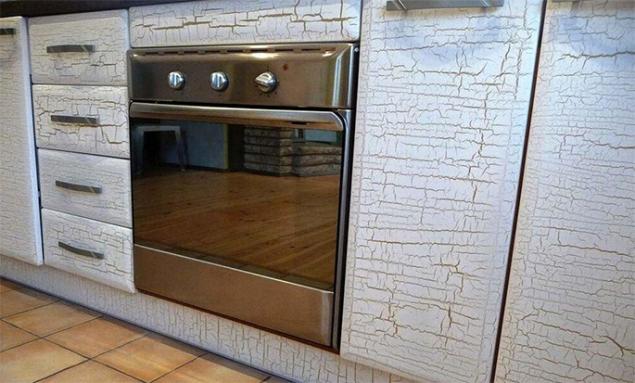
Craquelure - the process of creating artificial cracks on the surface of the object
. Patina - the application of artificial dark spots, simulating the effect of changing the subject of color in places that are prone to frequent contact with the hands. The dark spots are usually applied to the corners and edges.
Materials for decoupage have some peculiarities of their preparation:
Glass. To remove the fat from the surface, it is washed and dried using a lint-free cloth.
Tin. It is used for purification of the aqueous solution with vinegar in equal proportions. Purify the rust with a wire brush.
Tree. Use sandpaper to treat the surface to its full alignment.
Decoupage furniture with his own hands, a master class for beginners
Initially, all surfaces eliminate the roughness using sandpaper. After that, they must be wiped. If a surface is not a solid color, you need to paint it in neutral. If the furniture has multiple scratches or she was peeling paint, putty is necessary to align the grooves and depressions.
Recommendations for proper decoupage kitchen mebeliPotom cut paper, it is better at first in the form of squares of equal size average. On the surface of the applied glue for decoupage. Do the Work in stages, for example, first okleivaya countertop, then one leg, then another, and so on.
Paper squares tightly adhered to the surface of the butt or overlap. At the edge of an object simply wraps the edges of paper flaps around the corner. Then carefully smooth the surface with your fingers to remove the excess air out of the paper.
After the glue has dried thoroughly, the entire surface of the varnish is applied in several layers.
Decoupage a kitchen chair with his hands
Decoupage kitchen furniture is becoming very popular lately. Further phases of work presented with a kitchen stool, which in the end result will be an element of exquisite cuisine. It is made of plastic.
Step by step description decoupage kitchen stulevSnachala clean the surface of the chair. Take a sheet of tracing paper, and it can help fix the shape of the seat and backrest. The die cut blank, leaving a bit of space on the sides of the picture. , You must purchase a sharp pair of scissors to the edges were smooth.
Paper for decoupage should not be too thin, because it can be wrinkled from getting wet.
The entire surface of the stool is smeared with glue with a sponge. He should be more humid, when it will be necessary to put the paper.
Before you put the glue on the paper, it should be dipped in cold water, then carefully laid out on the surface and smooth from the center to the edges. This will help avoid air bubbles. Hands should also be wet, otherwise the paper may tear easily. Sponge clean water and glue residues. After the paper dries, it cut off the excess sharp blade. The sections are coated again to not bristled.
After the paper is pasted under it for one hour may be new bubbles of air. They need to be carefully smoothed.
The finished product has to dry thoroughly and then applied to the surface lacquer in several layers. Each layer has to dry for an hour and only then apply a new one. Below is a photo of the finished product.
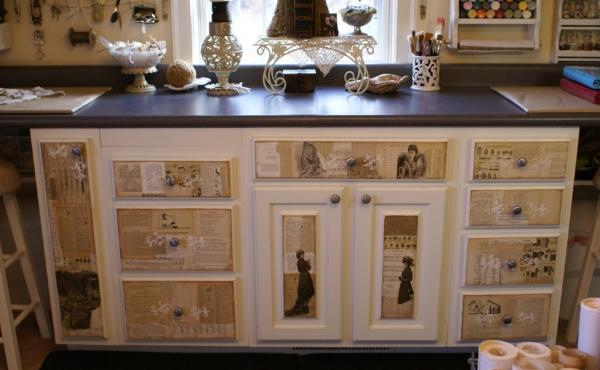
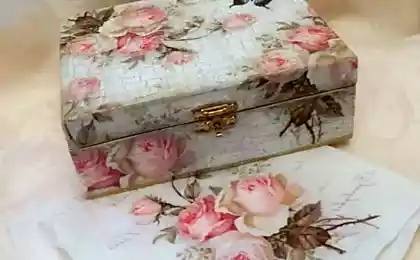
Decoupage kitchen cabinets with drawers with their hands
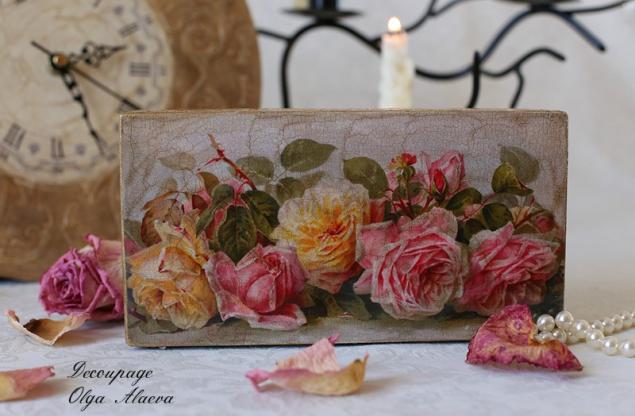
Trim the wallpaper here are the original notes, old letter and contrast rose. These images were found on the Internet.
The exterior of the cabinets and drawers side surface smeared with glue and applied to these image-basis. It also lowered the sheet in cold water and gently applied to the surface, carefully smoothing wet hands from the center to the edges.
Once the base is dry, process corners, making incisions and bending the paper in the right places. Then, the surface is covered with varnish.
In a paper-based and secured additional details decoupage. An old letter is cut to the desired size strips and glued to the surface of the boxes, then varnish covering.
Having waited until the boxes are dry, they are inserted and glued into place a rose. Her moistened with water, is glued on top of the boxes and varnish. After the varnish dries, cracks penetrate boxes on the perimeter, using a very sharp knife.
Once everything has dried completely, you must pull out the drawers and make sure that all folds are well taped. Handles can also handle paper, a suitable style. Below is a picture of the composition.
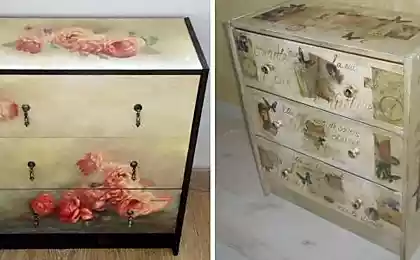
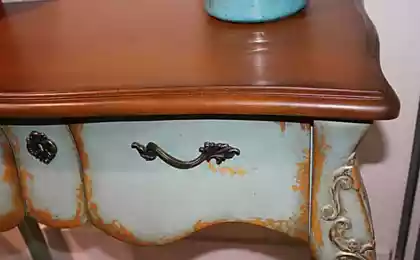
Decoupage kitchenette made of wood with their hands
The material used for kitchen corner wood-wipes. Recently, it is becoming very popular. The surface should be bright, or dark base beneath translucent wipes will look unattractive.
On a wooden surface is removed all the grease, dust, dirt, and cleaned with sandpaper for a perfect smoothness. Various cracks and chipped obscure furniture wax.
The product is treated with varnish. Then applied to the surface of the tissue cut patterns, and on top of them smeared adhesive layer. After the glue dries well, the surface is covered with varnish. Below is a photo of the finished product.
Kitchen furniture with his own hands decorated with a variety of applications literally transform the kitchen, making it elegant and unique. Decoupage Furniture workshop will allow even the novice feel like a pro.
Master class as for decorating the wall of the cabinet, and to paste labels of its own production. The sticker is made - on the photo paper print out the picture, where the top layer of acrylic varnish cover picture 2-3 layer dries, lozhite on mulforu picture down from Pulver soak, sliding finger top layer of paper shift the image on a dry cloth to dry, when the picture is dry carve your desired pattern, then pattern cover inside out and PVA kleite, and everything is very easy, but it has its own label, although its can paste fotgrafiyu.) Good luck)