873
How to lay tiles in the bathroom: the main stages and the technology works
Tile for the bathroom or kitchen - it is not only practical and popular, but also the most stylish material for finishing. Unusual colors and interesting patterns will help to create a special atmosphere in the room.
Do not worry: to lay the tiles with steps OBI and will not make labor. The duration of the work will depend on the room size and the materials used.
In this guide, we'll show you how to lay tile, the example of the room 10 square meters. m.
Preparation
To lay the tiles are particularly important check and training bases. All bearing surfaces should be clean, dust free, smooth, dry and have sufficient load-bearing capacity. If a tile is placed on a wooden floor or particleboard, they should be firmly screwed to the surface. To prevent vibration insulating plate should be used.
Putty and primed irregularities
Small cracks and irregularities need to putty using a trowel or a trowel, or repaired with the help of leveling compound. Before laying the tiles on the surface, apply a primer regardless of the type of foundation. Primers, deep penetration or adhesive emulsion is applied with a wide brush or paint roller. In areas with high humidity or in damp areas where water splashes on the primer is applied an additional insulating layer.
Cutting straight-edge software
For a straight edge to use the machine for cutting tiles at the extreme tiles (Tile). Risk is applied on the front side, and then on the edge of the tiles break in two.
Cutting circular holes
For cutting circular holes in the tile using special pliers, vykusyvaya hole millimeter by millimeter, or a drill with a special nozzle-mill.
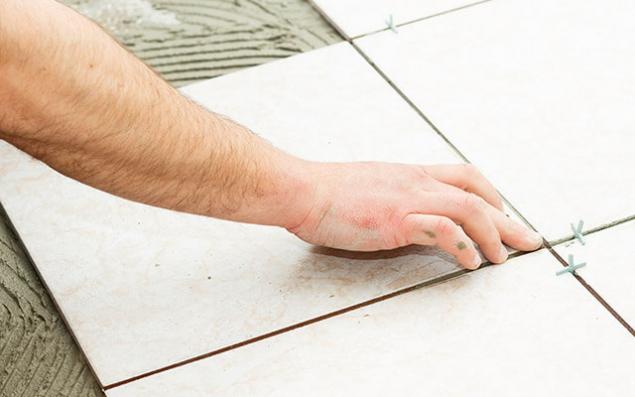
Laying tiles on the floor
After preparing the foundation necessary to accurately measure the area of the room and mark the middle of it. For the sample is recommended to put the tiles diagonally.
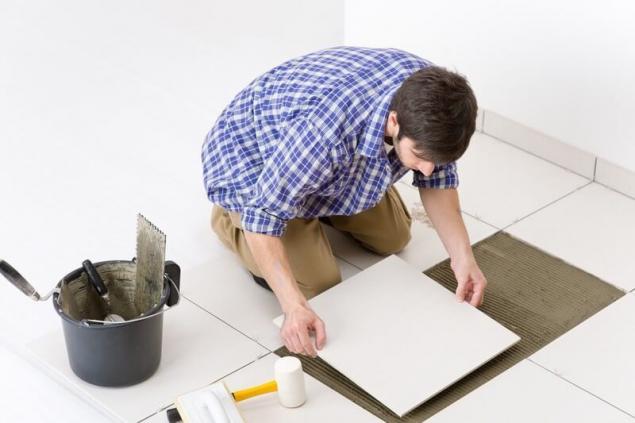
Clay tile
Glue should be diluted and stand in accordance with the instructions on the package, and then applied to the base with a trowel or a trowel. It is recommended to use ready-made adhesive mixture.
When laying tiles on chipboard or underfloor heating is to use elastic adhesive. Next embroidered adhesive mass comb spatula to form a flat surface.
1, 5 square meters - 1 In a single pass, depending on the adhesive setting time fit Grouting is dependent on the reverse side of the tile, its size and base.
Start with the center
The first row of tile should be placed on the center line of the room. For this purpose, the rectangular areas is recommended to pull the cord through the middle parallel to the walls. The first row of tiles is aligned with the seam or in the center of the tile. Then the tile is laid along the wall.
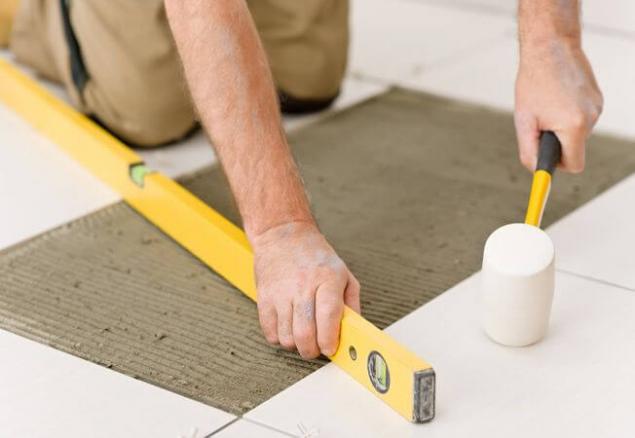
Proper tiling
Tile adhesive is pressed into a light rotating movement. To maintain the desired uniform spacing between the tiles should be used cross-shaped spacers. When laying need to gently tap the tile with a rubber mallet.
If you intend to stick to the walls of the ground tiles, the distance to the floor tiles should not be less than one tile seam. On the transitions into other areas and to other types of coatings expansion joint at the base of the coating is duplicated with the same width.
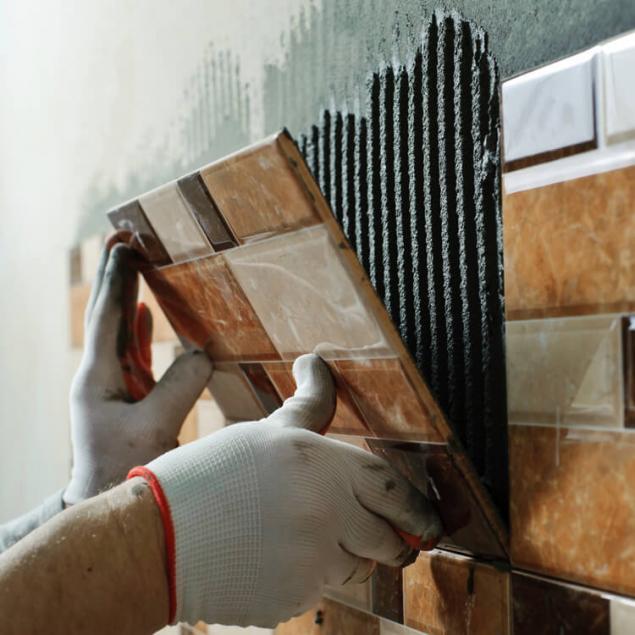
Laying the wall tiles
Wall tiles can be installed on a variety of bases, for example, to another tile on drywall sheets on gypsum plaster, etc. On the wall is necessary to carry out a vertical and a horizontal line. As it begins laying the first row. First top horizontal and then - in the vertical (in the form of letter T).
Start in the middle
Tile is laid symmetrically. In the center should be a seam or the middle of the tile. Knead the finished adhesive, after some exposure to put it on the wall evenly with a trowel or a trowel. If you stacked the tiles on old tiles, chipboard plate or tension, it is recommended to use a special flex-adhesive for high loads.
Gluing
Smooth a layer of glue comb spatula to form a flat surface. Spatula selected depending on the reverse side of the tile structure (for large profile should have a large spatula teeth), and the tile size.
Puts the tiles correctly
The first row is placed from the center to the edges. Tile adhesive is pressed into a light touch. To comply with the same width of joints using special cross-shaped struts.
If the tile is applied not to the entire height of the room, then start laying stands with the top row. To press cross-shaped spacers can just cover up with a solution when grouting. To check the contact area with tile adhesive Lay tiles into the adhesive, and then slightly lift it. Minimal contact area should be 80%.
External corners and curbs
On the outside corners should start with a whole tile trim and carry on towards the inner corner. The corners can be set angle or restrictive profiles. Curbs on the top row or decorative tiles help give the room an individual look.
Sealing joints and remove excess grout
Before sealing of joints is necessary to clear the wooden wedge. When using an elastic adhesive Termination solution must also be flexible. Grout should be diluted to a thick porridge. To perform this work, we recommend you wear rubber gloves.
Pour the solution on the tile grout and rub him with a rubber squeegee diagonally. Excess material should be removed carefully squeegee. After setting, remove the coating solution from the tile with a damp sponge.
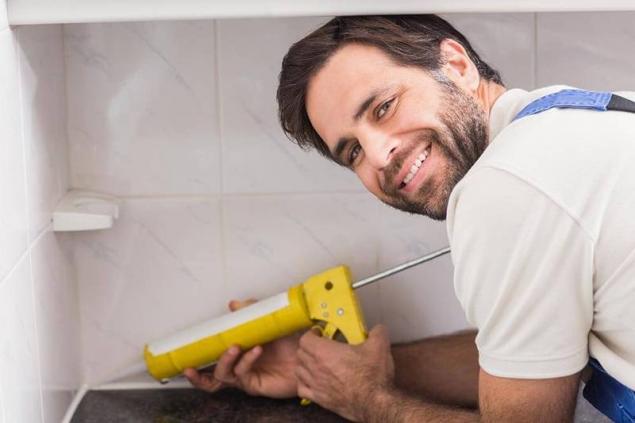
Sealing joints
All expansion, corner and edge joints must be sealed elastic sealing material such as silicone. Cover the edges of the tile masking tape on both sides and apply silicone. Then smooth the silicone thumb dipped in detergent, and tear off the masking tape, tilt it back and away from the seam.
Do not worry: to lay the tiles with steps OBI and will not make labor. The duration of the work will depend on the room size and the materials used.
In this guide, we'll show you how to lay tile, the example of the room 10 square meters. m.

Preparation
To lay the tiles are particularly important check and training bases. All bearing surfaces should be clean, dust free, smooth, dry and have sufficient load-bearing capacity. If a tile is placed on a wooden floor or particleboard, they should be firmly screwed to the surface. To prevent vibration insulating plate should be used.
Putty and primed irregularities
Small cracks and irregularities need to putty using a trowel or a trowel, or repaired with the help of leveling compound. Before laying the tiles on the surface, apply a primer regardless of the type of foundation. Primers, deep penetration or adhesive emulsion is applied with a wide brush or paint roller. In areas with high humidity or in damp areas where water splashes on the primer is applied an additional insulating layer.
Cutting straight-edge software
For a straight edge to use the machine for cutting tiles at the extreme tiles (Tile). Risk is applied on the front side, and then on the edge of the tiles break in two.
Cutting circular holes
For cutting circular holes in the tile using special pliers, vykusyvaya hole millimeter by millimeter, or a drill with a special nozzle-mill.

Laying tiles on the floor
After preparing the foundation necessary to accurately measure the area of the room and mark the middle of it. For the sample is recommended to put the tiles diagonally.
Clay tile
Glue should be diluted and stand in accordance with the instructions on the package, and then applied to the base with a trowel or a trowel. It is recommended to use ready-made adhesive mixture.
When laying tiles on chipboard or underfloor heating is to use elastic adhesive. Next embroidered adhesive mass comb spatula to form a flat surface.
1, 5 square meters - 1 In a single pass, depending on the adhesive setting time fit Grouting is dependent on the reverse side of the tile, its size and base.
Start with the center
The first row of tile should be placed on the center line of the room. For this purpose, the rectangular areas is recommended to pull the cord through the middle parallel to the walls. The first row of tiles is aligned with the seam or in the center of the tile. Then the tile is laid along the wall.

Proper tiling
Tile adhesive is pressed into a light rotating movement. To maintain the desired uniform spacing between the tiles should be used cross-shaped spacers. When laying need to gently tap the tile with a rubber mallet.
If you intend to stick to the walls of the ground tiles, the distance to the floor tiles should not be less than one tile seam. On the transitions into other areas and to other types of coatings expansion joint at the base of the coating is duplicated with the same width.
Laying the wall tiles
Wall tiles can be installed on a variety of bases, for example, to another tile on drywall sheets on gypsum plaster, etc. On the wall is necessary to carry out a vertical and a horizontal line. As it begins laying the first row. First top horizontal and then - in the vertical (in the form of letter T).
Start in the middle
Tile is laid symmetrically. In the center should be a seam or the middle of the tile. Knead the finished adhesive, after some exposure to put it on the wall evenly with a trowel or a trowel. If you stacked the tiles on old tiles, chipboard plate or tension, it is recommended to use a special flex-adhesive for high loads.

Gluing
Smooth a layer of glue comb spatula to form a flat surface. Spatula selected depending on the reverse side of the tile structure (for large profile should have a large spatula teeth), and the tile size.
Puts the tiles correctly
The first row is placed from the center to the edges. Tile adhesive is pressed into a light touch. To comply with the same width of joints using special cross-shaped struts.
If the tile is applied not to the entire height of the room, then start laying stands with the top row. To press cross-shaped spacers can just cover up with a solution when grouting. To check the contact area with tile adhesive Lay tiles into the adhesive, and then slightly lift it. Minimal contact area should be 80%.

External corners and curbs
On the outside corners should start with a whole tile trim and carry on towards the inner corner. The corners can be set angle or restrictive profiles. Curbs on the top row or decorative tiles help give the room an individual look.
Sealing joints and remove excess grout
Before sealing of joints is necessary to clear the wooden wedge. When using an elastic adhesive Termination solution must also be flexible. Grout should be diluted to a thick porridge. To perform this work, we recommend you wear rubber gloves.
Pour the solution on the tile grout and rub him with a rubber squeegee diagonally. Excess material should be removed carefully squeegee. After setting, remove the coating solution from the tile with a damp sponge.
Sealing joints
All expansion, corner and edge joints must be sealed elastic sealing material such as silicone. Cover the edges of the tile masking tape on both sides and apply silicone. Then smooth the silicone thumb dipped in detergent, and tear off the masking tape, tilt it back and away from the seam.


How to choose the right heat storage Wood stove house
Interactive public transport stop will appear in Gomel