844
Copter in a backpack - assembly based on the frame Predator 650
Today's post kopterovod prepare young designer named Dennis. He assembles compact copter with online broadcast (FPV). Pass the word to him:
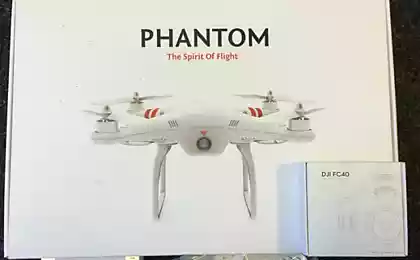
Frankly, I was a childhood dream to take photos "bird's eye". And when PR first started DJI Phantom, I realized that the time had come. Start planning bezzerkalku, and therefore sought an appropriate copter. While ready-made solutions with the required load capacity cost from $ 3,000. Moreover, they did not develop. A compact was for me the main parameter as naive copter like wearing a backpack. So I decided to put together their own drone.
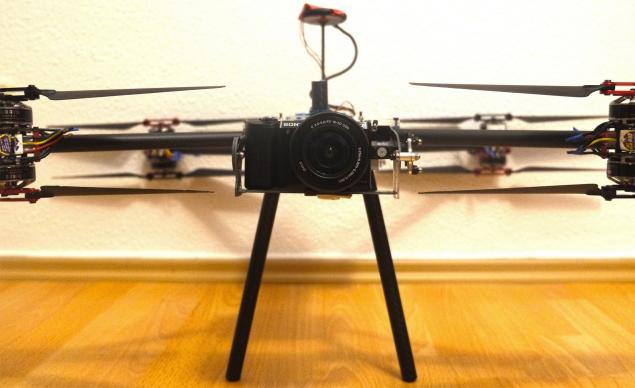
Having read forums and thinking that I know enough about quadrocopters, ordered a bunch of parts, including just such a frame (HobbykingPredator 650):
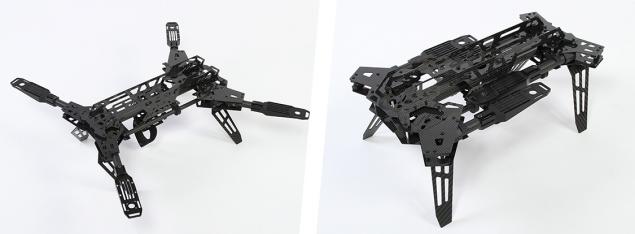
The selected frame seemed a good solution as long as I did not take it up. During assembly, was found a few drawbacks and is not entirely clear design solutions.
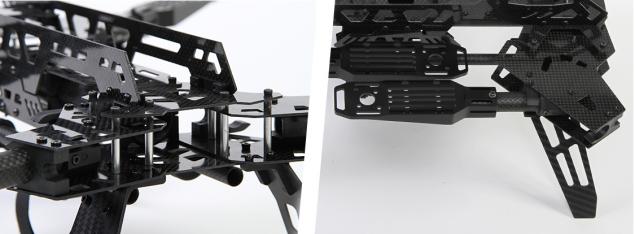
Firstly, the different diameters of the support tube and "clutches" (tubes in engines) lead to excessive piling carbon plates and the vertical plates are located close together and prevent post electronics.
Secondly, the frame is not particularly amenable to improvement. The feet do not extend, or cease to take shape; mounting motors are not suitable for twin engines (had to re-buy the other); home leg (chassis) is too short and flimsy, under a load of leaving.
The first flight of the drone went with minimal changes: twin motor mount, sponges for washing dishes on his feet. The camera was bolted directly to the frame. Despite the fact that this was my first experience, copter controlled easily, though, and responded with a delay. It seemed a little bit more, and the assembly is completed. But it was not there. Until now, new ideas and modernization continues.

By chassis is very well come floats for water aerobics (somewhere here I have already said goodbye to the idea of compactness). The camera was attached to the first self-made suspension "Two colander." Few violence and frame agreed to take shape with a 15-inch propellers. The chassis is replaced by "the crabs." Fondly planned to shoot plastic arc during transport, however, the tube could not withstand a large number of "clicks into place."

And now finally took a historic moment to connect the camera shutter to the console. On the first fine day at the hands of the unit took over near the clearing. GPS satellites can not see? Well, okay, fly! FPV I was not photographing the blind, but the main thing photographed! Then copter virtually stopped listening to adjust the gas. More precisely, refuses to hang either sharply up or down. As a result, it swoops down from ten meters ... The chassis in the trash box from under marmeladok miracle saved the camera. The reason for this behavior drone I is not found.
At the time, the budget spent was the only reason to continue. It is time to think about errors:
Firstly, it was not worth hanging on crude chamber assembly.
Secondly, it should start with small and simple model. Those bumps could fill with less.
Also, it is understood that for the compact chassis must be removable. The Chinese have not found anything like this. Reviewing the most famous online stores, and thinking that now I know enough about quadrocopters, I decided to put his frame.
Requirements for it have been formulated:
In the process of developing the frame I noted that this design is suitable for various sizes copter (frame members can be very easy to move on the supporting tube). It obtained from about 450 to 1000 mm, which corresponds to the propellers 8 to 18 inches. Therefore, the idea to develop a comprehensive set of components for drones, similar to Lego. This would allow the designer to easily modify and repair the copter frame, which in this case was able to be folded compactly.
Ready to paint an idea more in the following article. Now is the time frame and the upgrade can take pictures of all the series.
p.s. Thank Denis Krylov of this material and experience.
That's all, you had a simple service to select complex technology Dronk.Ru
Do not forget to subscribe to our blog , will be much more interesting.
Source: geektimes.ru/company/dronk/blog/265920/
Frankly, I was a childhood dream to take photos "bird's eye". And when PR first started DJI Phantom, I realized that the time had come. Start planning bezzerkalku, and therefore sought an appropriate copter. While ready-made solutions with the required load capacity cost from $ 3,000. Moreover, they did not develop. A compact was for me the main parameter as naive copter like wearing a backpack. So I decided to put together their own drone.

Having read forums and thinking that I know enough about quadrocopters, ordered a bunch of parts, including just such a frame (HobbykingPredator 650):

The selected frame seemed a good solution as long as I did not take it up. During assembly, was found a few drawbacks and is not entirely clear design solutions.

Firstly, the different diameters of the support tube and "clutches" (tubes in engines) lead to excessive piling carbon plates and the vertical plates are located close together and prevent post electronics.
Secondly, the frame is not particularly amenable to improvement. The feet do not extend, or cease to take shape; mounting motors are not suitable for twin engines (had to re-buy the other); home leg (chassis) is too short and flimsy, under a load of leaving.
The first flight of the drone went with minimal changes: twin motor mount, sponges for washing dishes on his feet. The camera was bolted directly to the frame. Despite the fact that this was my first experience, copter controlled easily, though, and responded with a delay. It seemed a little bit more, and the assembly is completed. But it was not there. Until now, new ideas and modernization continues.

By chassis is very well come floats for water aerobics (somewhere here I have already said goodbye to the idea of compactness). The camera was attached to the first self-made suspension "Two colander." Few violence and frame agreed to take shape with a 15-inch propellers. The chassis is replaced by "the crabs." Fondly planned to shoot plastic arc during transport, however, the tube could not withstand a large number of "clicks into place."

And now finally took a historic moment to connect the camera shutter to the console. On the first fine day at the hands of the unit took over near the clearing. GPS satellites can not see? Well, okay, fly! FPV I was not photographing the blind, but the main thing photographed! Then copter virtually stopped listening to adjust the gas. More precisely, refuses to hang either sharply up or down. As a result, it swoops down from ten meters ... The chassis in the trash box from under marmeladok miracle saved the camera. The reason for this behavior drone I is not found.
At the time, the budget spent was the only reason to continue. It is time to think about errors:
Firstly, it was not worth hanging on crude chamber assembly.
Secondly, it should start with small and simple model. Those bumps could fill with less.
Also, it is understood that for the compact chassis must be removable. The Chinese have not found anything like this. Reviewing the most famous online stores, and thinking that now I know enough about quadrocopters, I decided to put his frame.
Requirements for it have been formulated:
- The feet should be combined as compact
- The chassis should be removable
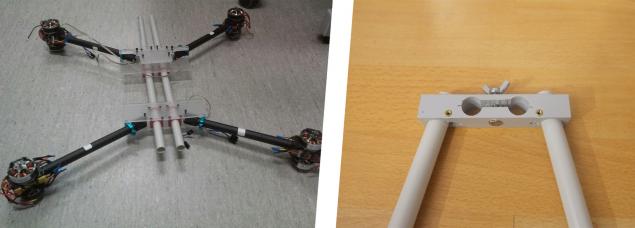
For the feet and took a bar of PVC pipe drilled at 16 mm. In the middle of the bolt can be fastened to the suspension of the camera. In this frame, we all came together well: 340x200x200 400x300x300 vs. Predator at 650 with "crabs." It looks is messy, but going for 3 minutes.
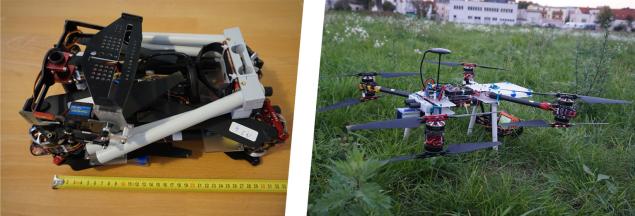
For 2 years on the details it took about $ 1,500. The current assembly ~ $ 1055.81, this should add a nice suspension ($ 200) Charger ($ 100) and things like spare propellers.
Below is a list of the main components and their cost:
- HobbyKing® Predator 650 (101.10 $). li >
- 8 x ARRIS 3508 380KV (2 spare) - motors are good, although I have nothing to compare ($ 376.20).
- 9 x Afro ESC 12Amp OPTO - no complaints have I currents 6-8 A (101.52 $).
- HKPilot32 Autonomous Vehicle - clone Pixhawk, no complaints (120.89 $).
- Ublox Neo-M8N GPS with Compass a > (45.39 $).
- HobbyKing B6 50W Charger - absolutely do not recommend killing the battery. Normal below.
- - reasonable minimum (109.95 $). a href="https://dronk.ru/shorten/39"> Turnigy 5X 5Ch Mini Transmitter
In the process of developing the frame I noted that this design is suitable for various sizes copter (frame members can be very easy to move on the supporting tube). It obtained from about 450 to 1000 mm, which corresponds to the propellers 8 to 18 inches. Therefore, the idea to develop a comprehensive set of components for drones, similar to Lego. This would allow the designer to easily modify and repair the copter frame, which in this case was able to be folded compactly.
Ready to paint an idea more in the following article. Now is the time frame and the upgrade can take pictures of all the series.
p.s. Thank Denis Krylov of this material and experience.
That's all, you had a simple service to select complex technology Dronk.Ru
Do not forget to subscribe to our blog , will be much more interesting.
Source: geektimes.ru/company/dronk/blog/265920/


