1044
How to make a dryer for fruits and vegetables in 11 steps
If you grow organic food, dryer for fruits and vegetables — an essential item in your household. We offer you a diagram for the Assembly of electric oven from Ilya Tratnikov
The most important task is to understand the principle of operation of drying. Without this understanding not budge. I do not propose to repeat after me and do not believe that my method is perfect, but understand the processes of drying will have an understanding of what tasks need to be addressed.
1. The products dry due to the evaporation of water from their fibres. For this you need two factors:
is the heat that will take the moisture from the center of the product and be directed to the periphery
— blowing, which will release the wall of the product of the accumulated moisture and to make it beyond the space of the drying Cabinet.
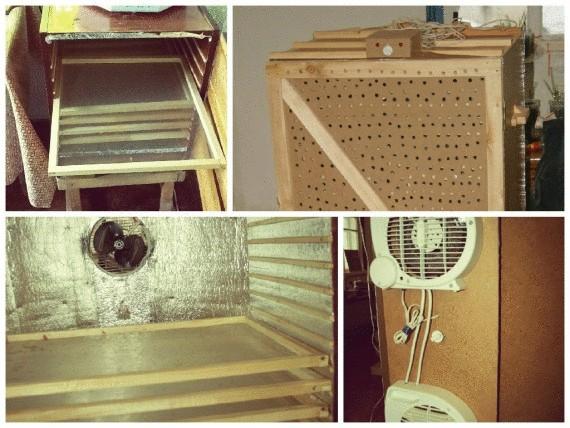
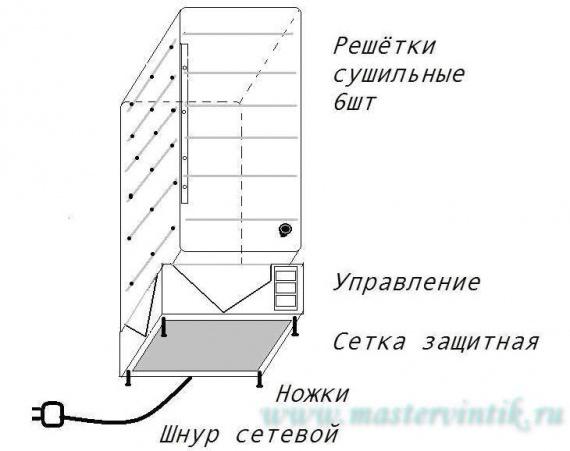
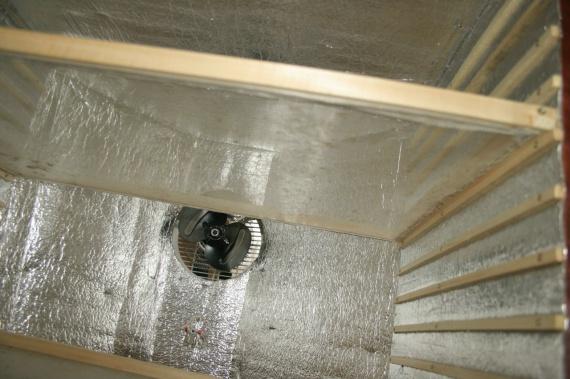
For the solution of this problem requires an electric fan, and electric heater, also called Stan. No need to invent the wheel, but you need to take the bike and go to the nearest hardware store and buy a simple device that people call a "sulker", that is, teploelektrotsentrali, of course, plastic and China. It already has the heater and fan, and more important, in fact a free item — the case for drying.
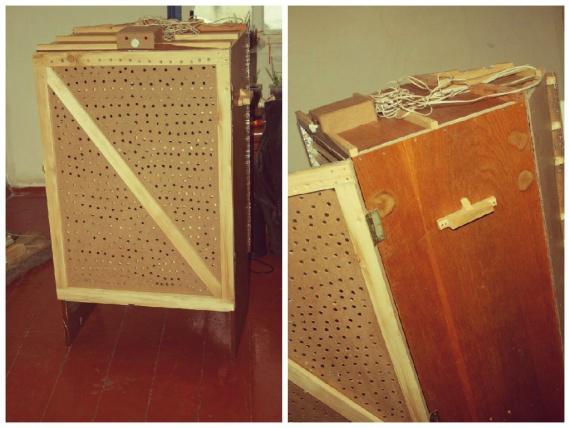
2. Humidity increases not only on the walls of the product, but in the closet. This means that the Cabinet shall be vented, that is to have holes to the accumulated moist air to escape outside the drying space of the Cabinet. You just need to make holes in the housing. Holes can be placed on the roof of the drying (as in Ezidri) or on the opposite side of the fan (as in "Excalibur"). I used the last option and the holes made by the drill at the door.
3. The temperature in the middle of the rack must be controlledso that the product is not boiled and remained alive.
The optimum temperature for drying — 40 C.
To solve this problem you need a device called a thermostat. The options are plenty. For example, you can buy a home thermostat for incubator, it not only adjusts the heat, and has an electronic display showing the temperature. And it's much easier and nothing, again, to invent: the "sulker", a miracle of Chinese engineering has already been fitted and the thermostat, and the special fuse, from overheating, in case the screw does not twist. So that the device is completely safe.
Looking ahead and answer frequently asked questions:
1) do not be afraid — nothing will burn;
2) and if plastic is not environmental? — Environmental and does not exist, the only difference in quality.
4. The product needs to dry on the baking sheet, which is breathable, that is to be mesh. Options revised set, but the cheapest and most reliable — a wooden frame (like a photo frame) and mosquito net.
In terms of sustainability muskito mesh: I had no complaints, and if there is any doubt — there are companies that sell the same food the mesh specifically for this purpose.
The pan is connected with screws and two rods "in the tail". The mesh was nailed on a baking tray conventional hand furniture stapler.
Please note: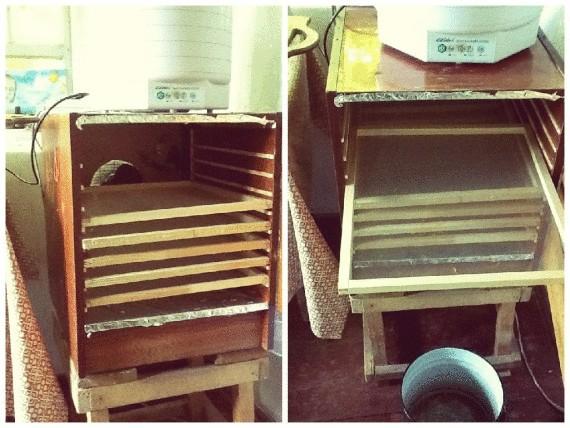
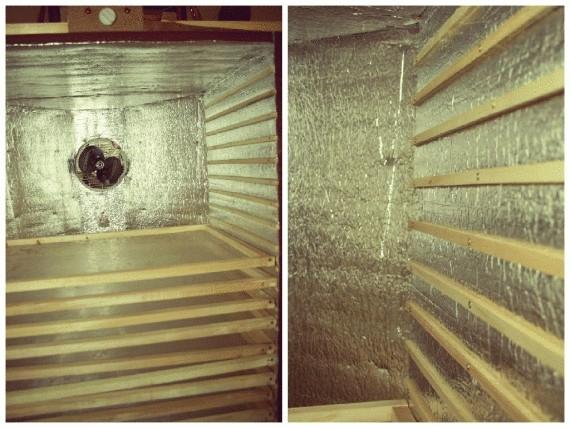
5. The pan should be comfortable to enter and securely hanging in the dryer. To do this, use the wooden slats-lengths in width of the side wall of the dryer and thick rails — square of about 1 cm. I used a 5x8 mm. thickness To the casing wall to fasten a short, thin screws. In the end you can put a vertical limiter with the same rails, if the design is exceptionally square to a baking sheet and entered the screw heater.
6. Space to disperse air is the distance from the heater to the edge of the pan. This distance is necessary in order to uniformly blow the cooking, both in height and width. This distance must be at least 20 cm.
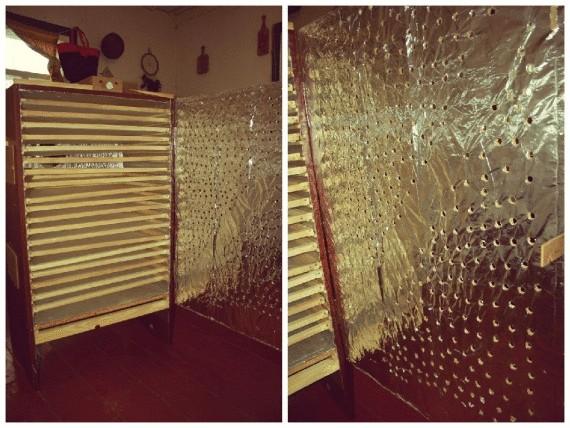
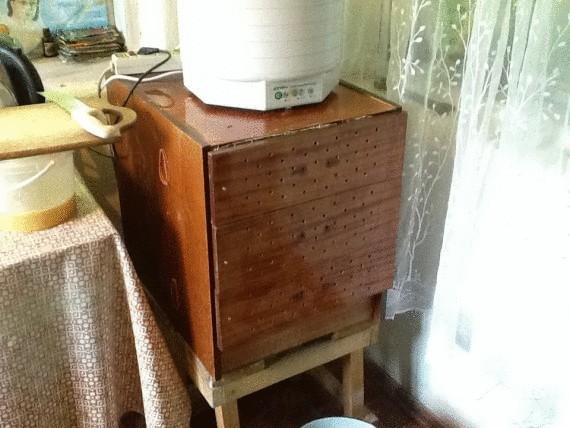
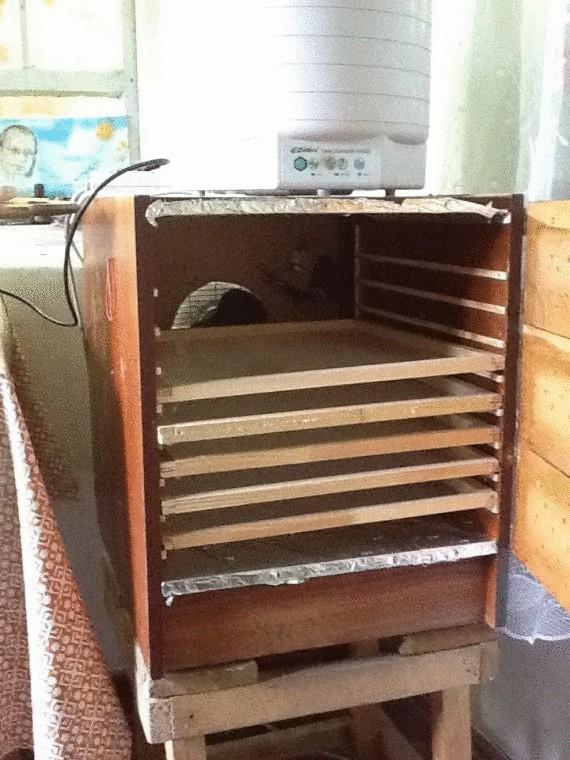
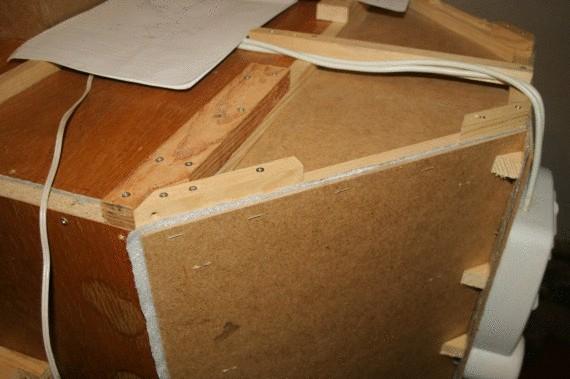
7. Housing for drying wood is the most available, cheap and malleable material. I used the old Soviet Cabinet, which was sad on the balcony. Particle Board of the Cabinet, contain glue and formaldehyde, that's why I additionally studded internal walls natural foil without lamination.
Food kitchen foil for these purposes is also used, but it is not comfortable and short-lived. Still has foil-self-adhesive glued on the paper is the most convenient option, but I am not here found. The following models will be produced exclusively from natural wood, because the first attempt was experimental. Wood suggest to use perfectly dried, and before installation, it is necessary to primality linseed oil or linseed oil and be very dry. These steps to ensure that the drying was durable and less absorbed moisture.
8. A little bit of creativity. This principle will help you from beginning to end works. First imagine everything in my head, and then start improvising to do. It may turn out not as planned, do not worry, because this result can be better expectations.
In fact, these are the basic principles of operation and design of drying.
This is our first homemade drying of 12 kg of fruit. Above is the EZIDRI 5 kg of fruit.
I did everything intuitively, without precise calculations and planning. First, the lessons of geometry and mathematics is something distant and unattainable, and secondly, I didn't know what happens. So pay attention to the charts in this article will not, to the same description would take to much space. I will write only a few basic principles, which is enough:
1. Do not use nails — this is not material for this design, only screws of different diameters and lengths. Before screw screw make a hole, smaller in diameter from screw, then this will guarantee the integrity of the parts and prevent cracking.
2. Here are shown two constructions of drying: one 13 kg — has a square shape, the second 40 kg, has a square case under the pan and a pyramidal attachment for heaters and dispersal of air. Latest design has certain advantages, because the pyramidal shape of the consoles better disperse air and it is not "lost" in the corners, and also serves as a kind of the direction of air flow.
3. One fan is sufficient for drying with a depth of 57 cm, a width of the internal working surface (V. R. p.) — 41 cm, height-V. R. p. — 39,5 cm the size of Deco: 41х45 when the thickness of the wood 1,7h1,7 see
So, from 57 cm total depth subtract 45 cm length baking tray, we get 12 cm to disperse air. In my case, the square drying it on 13 kg is enough.
Two fans provide the dryer with a pyramidal console this size: depth — 42 cm, width of V. R. p. — 61 cm, height: V. R. p. — 83 cm Distance to disperse the air from the wall of attachment to the main body (and therefore in the tray) — 23 cm tray Size: 41,5х60,5 cm
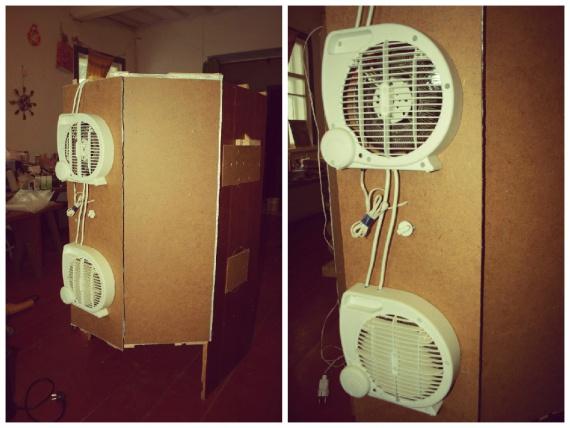
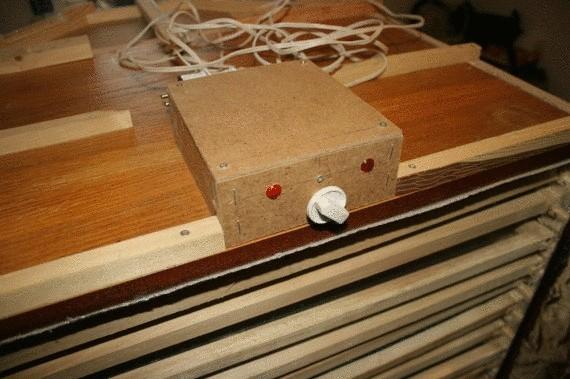
4. Electricity and thermostat. Paint scheme I don't know how to explain I will try. Buying the "sulker", you provide yourself with a bunch of useful parts, for example, switch for fan, light bulb, thermostat and wiring.
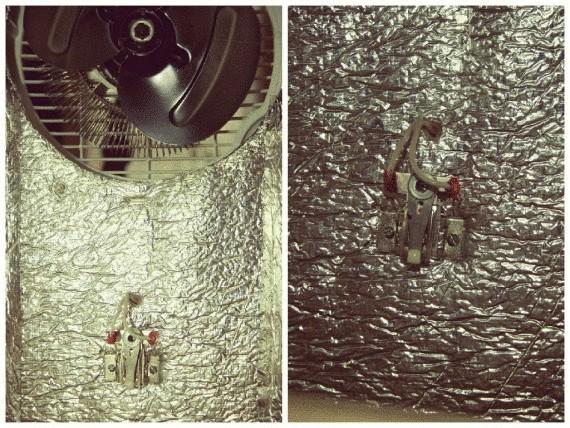
By itself, the thermostat is already built into the fan, and manually adjustable. The knob located on the front panel of the heater near the switch OFF / 1st / 2nd speed. The knob on the thermostat is the thermostat that is in the middle of the body. This is a simple metal device will need to be placed inside the working chamber of the dryer. Manually using a thermometer to set up and calibrate your thermostat — it sounds technical and confusing, but it's very simple.
Now the important point! By default (i.e. in the original Assembly) thermostat when reaching the desired temperature, open the whole fan, that is switches off and the fan motor and heater. This result is not needed. For this we need to rearrange the contacts so that the thermostat was separated only by ten, i.e., off of the spiral when the temperature reaches the maximum, the fan will continue to spin, and when the temperature goes down, the thermostat will again include spiral and they will heat up. This method is much more economical, even in comparison with Ezidri. Of course, professionals use camerastore the keys to "click" the opening and closing of the network, because it carries certain negative consequences for the life of the Tan, but we are only Amateurs, so this option will satisfy us.
5. Leave only one spiral, one that is better is blown, the second should be disconnected from the network.
6. Switch the dryer to better distribute as follows: off / on fan only / fan included and spiral heat.
7. The bulbs use two: one shows that the drying time is generally included (or on the first or the second position, except "off"), and the second turns on when the heater is running, and off when the thermostat cut off the heater and the fan.
8. If you do option two "sulker", you have to leave each "sulker" only one spiral. I would put a "sulker" series, but there is a suspicion that in this case, the voltage on the second less — dry is uneven, therefore, suggest to connect in parallel. The thermostat should break the heating elements on both the "Quad" at the same time. To check the temperature uniformity and airflow using two thermometers — one downstairs the other upstairs. Of course, the thermometers measure the temperature outside with the doors closed, as the vents we have are in the doors.
9. The legs for the dryer — be sure to lift her to the floor.
10. Use the filter to your network with built-in fuse. Assume that the maximum power included two "duek" with the spirals of up to 2 kW.
11. Use the "picture" with a smooth body, without waves and concavity, otherwise you will not be able to tie half-shell of the blower motor to the housing of the dryer.
Such drying can be used for all types Foochow, berries, herbs, vegetables and seeds. You will also be engaged in preparing pastes
Source: Natural-FarmТолько registered and authorized users can leave comments.
Source: www.natural-farm.com.ua/naturalfarm/content/%D1%8F%D0%BA-%D0%B7%D1%80%D0%BE%D0%B1%D0%B8%D1%82%D0%B8-%D0%B5%D0%BB%D0%B5%D0%BA%D1%82%D1%80%D0%BE%D1%81%D1%83%D1%88%D0%B0%D1%80%D0%BA%D1%83-%D0%B4%D0%BB%D1%8F-%D0%BE%D0%B2%D0%BE%D1%87%D1%96%D0%B2-%D1%82%

The most important task is to understand the principle of operation of drying. Without this understanding not budge. I do not propose to repeat after me and do not believe that my method is perfect, but understand the processes of drying will have an understanding of what tasks need to be addressed.

1. The products dry due to the evaporation of water from their fibres. For this you need two factors:
is the heat that will take the moisture from the center of the product and be directed to the periphery
— blowing, which will release the wall of the product of the accumulated moisture and to make it beyond the space of the drying Cabinet.

For the solution of this problem requires an electric fan, and electric heater, also called Stan. No need to invent the wheel, but you need to take the bike and go to the nearest hardware store and buy a simple device that people call a "sulker", that is, teploelektrotsentrali, of course, plastic and China. It already has the heater and fan, and more important, in fact a free item — the case for drying.

2. Humidity increases not only on the walls of the product, but in the closet. This means that the Cabinet shall be vented, that is to have holes to the accumulated moist air to escape outside the drying space of the Cabinet. You just need to make holes in the housing. Holes can be placed on the roof of the drying (as in Ezidri) or on the opposite side of the fan (as in "Excalibur"). I used the last option and the holes made by the drill at the door.

3. The temperature in the middle of the rack must be controlledso that the product is not boiled and remained alive.
The optimum temperature for drying — 40 C.
To solve this problem you need a device called a thermostat. The options are plenty. For example, you can buy a home thermostat for incubator, it not only adjusts the heat, and has an electronic display showing the temperature. And it's much easier and nothing, again, to invent: the "sulker", a miracle of Chinese engineering has already been fitted and the thermostat, and the special fuse, from overheating, in case the screw does not twist. So that the device is completely safe.
Looking ahead and answer frequently asked questions:
1) do not be afraid — nothing will burn;
2) and if plastic is not environmental? — Environmental and does not exist, the only difference in quality.

4. The product needs to dry on the baking sheet, which is breathable, that is to be mesh. Options revised set, but the cheapest and most reliable — a wooden frame (like a photo frame) and mosquito net.
In terms of sustainability muskito mesh: I had no complaints, and if there is any doubt — there are companies that sell the same food the mesh specifically for this purpose.
The pan is connected with screws and two rods "in the tail". The mesh was nailed on a baking tray conventional hand furniture stapler.
Please note:
- the grid in place of punching the bracket needs to be folded several times to rotationals;
- First nail stapler one direction, and then strongly pulling on the opposite. So you need to do first width of the pan, and then in length.
- In any case, do not use nails — this is unreliable, only screws.

5. The pan should be comfortable to enter and securely hanging in the dryer. To do this, use the wooden slats-lengths in width of the side wall of the dryer and thick rails — square of about 1 cm. I used a 5x8 mm. thickness To the casing wall to fasten a short, thin screws. In the end you can put a vertical limiter with the same rails, if the design is exceptionally square to a baking sheet and entered the screw heater.
6. Space to disperse air is the distance from the heater to the edge of the pan. This distance is necessary in order to uniformly blow the cooking, both in height and width. This distance must be at least 20 cm.
7. Housing for drying wood is the most available, cheap and malleable material. I used the old Soviet Cabinet, which was sad on the balcony. Particle Board of the Cabinet, contain glue and formaldehyde, that's why I additionally studded internal walls natural foil without lamination.

Food kitchen foil for these purposes is also used, but it is not comfortable and short-lived. Still has foil-self-adhesive glued on the paper is the most convenient option, but I am not here found. The following models will be produced exclusively from natural wood, because the first attempt was experimental. Wood suggest to use perfectly dried, and before installation, it is necessary to primality linseed oil or linseed oil and be very dry. These steps to ensure that the drying was durable and less absorbed moisture.
8. A little bit of creativity. This principle will help you from beginning to end works. First imagine everything in my head, and then start improvising to do. It may turn out not as planned, do not worry, because this result can be better expectations.
In fact, these are the basic principles of operation and design of drying.
This is our first homemade drying of 12 kg of fruit. Above is the EZIDRI 5 kg of fruit.

I did everything intuitively, without precise calculations and planning. First, the lessons of geometry and mathematics is something distant and unattainable, and secondly, I didn't know what happens. So pay attention to the charts in this article will not, to the same description would take to much space. I will write only a few basic principles, which is enough:
1. Do not use nails — this is not material for this design, only screws of different diameters and lengths. Before screw screw make a hole, smaller in diameter from screw, then this will guarantee the integrity of the parts and prevent cracking.


2. Here are shown two constructions of drying: one 13 kg — has a square shape, the second 40 kg, has a square case under the pan and a pyramidal attachment for heaters and dispersal of air. Latest design has certain advantages, because the pyramidal shape of the consoles better disperse air and it is not "lost" in the corners, and also serves as a kind of the direction of air flow.
3. One fan is sufficient for drying with a depth of 57 cm, a width of the internal working surface (V. R. p.) — 41 cm, height-V. R. p. — 39,5 cm the size of Deco: 41х45 when the thickness of the wood 1,7h1,7 see
So, from 57 cm total depth subtract 45 cm length baking tray, we get 12 cm to disperse air. In my case, the square drying it on 13 kg is enough.
Two fans provide the dryer with a pyramidal console this size: depth — 42 cm, width of V. R. p. — 61 cm, height: V. R. p. — 83 cm Distance to disperse the air from the wall of attachment to the main body (and therefore in the tray) — 23 cm tray Size: 41,5х60,5 cm
4. Electricity and thermostat. Paint scheme I don't know how to explain I will try. Buying the "sulker", you provide yourself with a bunch of useful parts, for example, switch for fan, light bulb, thermostat and wiring.

By itself, the thermostat is already built into the fan, and manually adjustable. The knob located on the front panel of the heater near the switch OFF / 1st / 2nd speed. The knob on the thermostat is the thermostat that is in the middle of the body. This is a simple metal device will need to be placed inside the working chamber of the dryer. Manually using a thermometer to set up and calibrate your thermostat — it sounds technical and confusing, but it's very simple.
Now the important point! By default (i.e. in the original Assembly) thermostat when reaching the desired temperature, open the whole fan, that is switches off and the fan motor and heater. This result is not needed. For this we need to rearrange the contacts so that the thermostat was separated only by ten, i.e., off of the spiral when the temperature reaches the maximum, the fan will continue to spin, and when the temperature goes down, the thermostat will again include spiral and they will heat up. This method is much more economical, even in comparison with Ezidri. Of course, professionals use camerastore the keys to "click" the opening and closing of the network, because it carries certain negative consequences for the life of the Tan, but we are only Amateurs, so this option will satisfy us.
5. Leave only one spiral, one that is better is blown, the second should be disconnected from the network.

6. Switch the dryer to better distribute as follows: off / on fan only / fan included and spiral heat.
7. The bulbs use two: one shows that the drying time is generally included (or on the first or the second position, except "off"), and the second turns on when the heater is running, and off when the thermostat cut off the heater and the fan.
8. If you do option two "sulker", you have to leave each "sulker" only one spiral. I would put a "sulker" series, but there is a suspicion that in this case, the voltage on the second less — dry is uneven, therefore, suggest to connect in parallel. The thermostat should break the heating elements on both the "Quad" at the same time. To check the temperature uniformity and airflow using two thermometers — one downstairs the other upstairs. Of course, the thermometers measure the temperature outside with the doors closed, as the vents we have are in the doors.
9. The legs for the dryer — be sure to lift her to the floor.
10. Use the filter to your network with built-in fuse. Assume that the maximum power included two "duek" with the spirals of up to 2 kW.
11. Use the "picture" with a smooth body, without waves and concavity, otherwise you will not be able to tie half-shell of the blower motor to the housing of the dryer.
Such drying can be used for all types Foochow, berries, herbs, vegetables and seeds. You will also be engaged in preparing pastes
Source: Natural-FarmТолько registered and authorized users can leave comments.
Source: www.natural-farm.com.ua/naturalfarm/content/%D1%8F%D0%BA-%D0%B7%D1%80%D0%BE%D0%B1%D0%B8%D1%82%D0%B8-%D0%B5%D0%BB%D0%B5%D0%BA%D1%82%D1%80%D0%BE%D1%81%D1%83%D1%88%D0%B0%D1%80%D0%BA%D1%83-%D0%B4%D0%BB%D1%8F-%D0%BE%D0%B2%D0%BE%D1%87%D1%96%D0%B2-%D1%82%