1207
How to handle?
Hello, regularly visit this site, so I decided something of his fakes to post)) did some time ago.
drove
Preface ...
There is a huge variety of handles, which without special problems can be purchased at any office supply store. Sometimes, you want to have the thing that no one has, and never will be, or is, but from a limited circle of persons. Also things and handles ... yeah !!! with ordinary writing pens that students write their useless notes, chemists write different formulas reactions accountants fill all sorts of different forms, references, etc. This tutorial "How to handle ..." (DAC), I will try popular show how you can make an original wooden handle.
Development of the project (office rabotenka).
Before, something to do, do you need a plan. Now the plan is called the selection of materials, the development of 3D models of pens, then create the necessary drawings, development of manufacturing technology of a particular node.
Selection of materials.
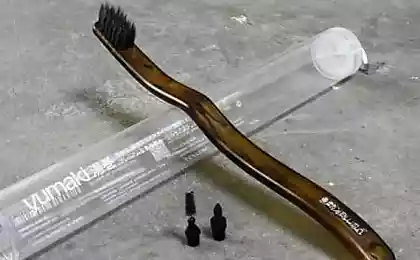
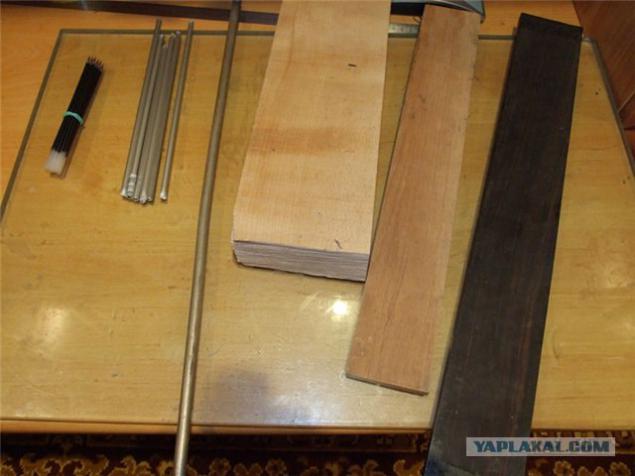
The move, which should be approached with great responsibility, because it is the choice of material will depend on the durability of the handles, their appearance. Wood, from which will be manufactured pens should be as hard, dense, as a consequence would be nice polished. I chose the ebony (Ebony), beech, maple, with regard to the tree; not of wood materials - aluminum tube, brass rod, and directly the ball rod with toothpaste. Actually, that's the whole list of materials.
From left to right: bars with paste, aluminum tubes, brass rod (type such as these in the varnish), maple, beech, ebony.
Development appearance.
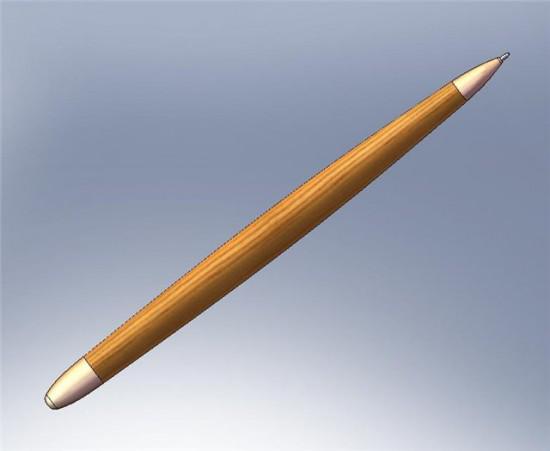
Having the necessary material can begin to design. First, the appearance of the handles. Immediately say, that the cap will not have handles, as well as clips (to the bag hanging on the handle). Actually, that's four variants of the handle (painted in Photoshop CS). By the way, none of them realized in life differently made.

Actually, it is clear that the very tip of the handle is made of ebony, beech and then finally maple. Caps (twist on, not those that pin closed) are made of brass and then polished.
Simulation.
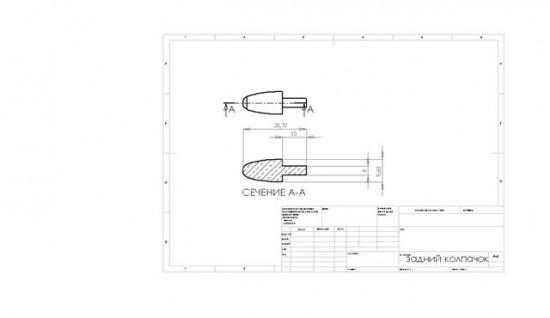
After the appearance of a fully defined, let's move to 3D handles. Why is this done? The fact is that when you look at what is to succeed, it is easier to make and present, in addition, using a model defined by all dimensions of the handle (Diameter, length, depth), as with the model can obtain necessary drawings which also good to help in the production (of course, handle - well, very simple object model could not draw him, just decided to show the approach).
About how the model can draw a lot of paint, but that's another topic in general, and therefore will not be affected. Let me just say that modeled in the program Solid Works 2008, it also created the drawings.
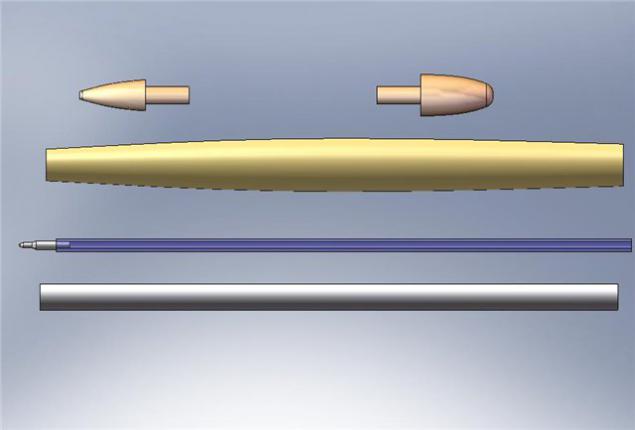
This is a 3D model (top - right, top - down) front cap, rear cap, wooden array, ball rod, aluminum tube.
Following the same model, but in the collection and overlaid with wood texture.
Drawing model, we obtain here are approximate figures which are very useful in the production of (Dimensions for reference can be different). Actually, on the design of (foreign stamp, not by guests) I drawings are not particularly fussed, because it is not required.


Modeling this is completed, now for the materialization of our project. On a piece of paper it looks good, and in his hand lying will be even better. And so, making ...
Manufacturing.
So, we proceed to the most interesting - the production that drew. As I wrote earlier, in the manufacturing process may change both the appearance and size of pens ...
Fabrication of the central rod.
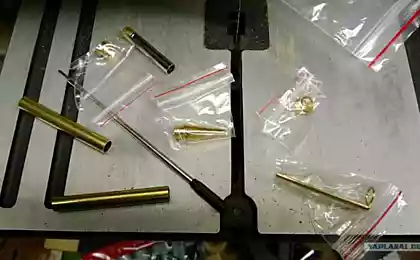
One of the most important parts, as it closes on itself front and rear caps, as is the rigid part in the handle. Preform rod is an aluminum tube with an outside diameter of 6 mm and 4 mm internal.
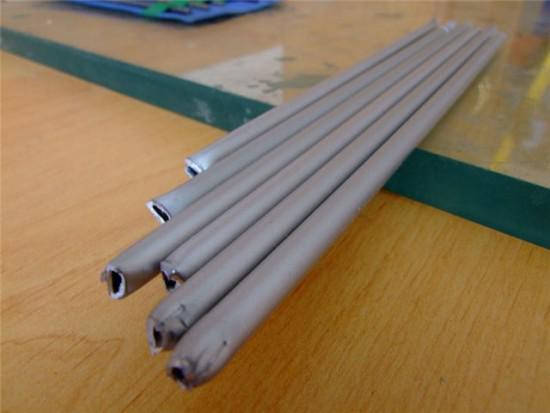
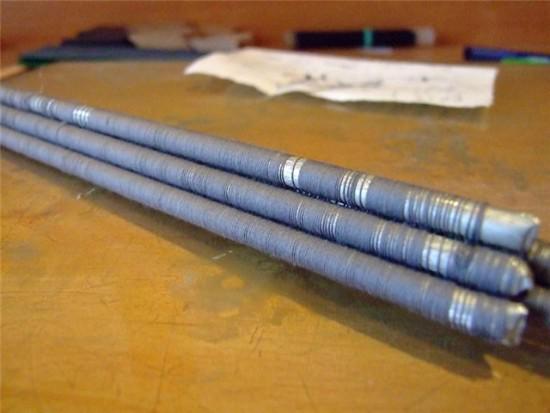
The stem will later be "plastered" tree. For better adhesion ligament "pipe - glue - wood" should rough up the surface of the tubes, that is, make it rough (sandpaper, needle files, a file, does not matter). Next, wrap the yarn, preferably cotton (cotton thread absorbs better adhesives).
The tubes wrapped thread. At this stage the tube is ready.
Posted in [mergetime] 1233259191 [/ mergetime]
so excuse slowly spread (
Making a wooden shell.
As planned earlier, decorative shell will consist of three colors of wood - black (ebony), reddish-brown - beech, cream - Maple (if the color is not as described, then do not worry, maybe I color blind). Unlike painted in Photoshop CS will consist in the fact that most of the wood will be black, and then beech, maple and less likely.
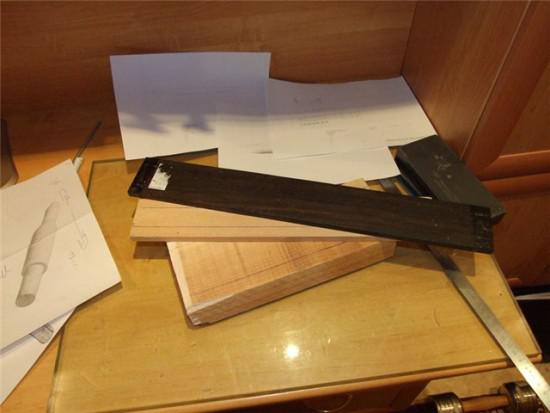
Beech and ebony have in the form of plates, therefore, have to glue two rails to increase the thickness. But maple in the form of an array and switching does not need.
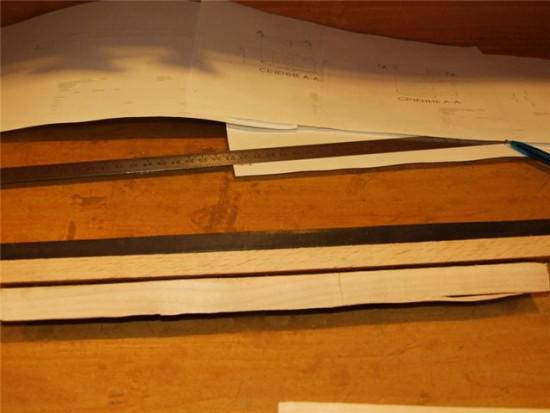
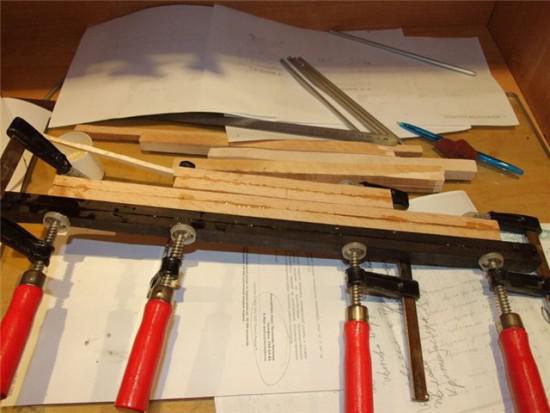
Prepared for gluing slats ebony, beech, maple (top - bottom). Dilute epoxy resin (ED-20). It is possible to use a polyester resin, but it loses strength, moreover, in the polymerization of styrene is released, and it is harmful (from the epoxy resin - chloro). When the resin is highly desirable to use rubber gloves.
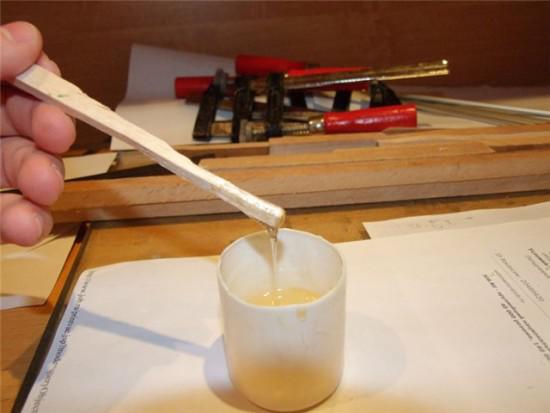
Resin smear and squeeze clamps.
After the resin rose, (it does not dry out, and cures, so experienced and say, stood resin) can begin to dismember. To do this, use the miter box (roughly speaking, the pattern).
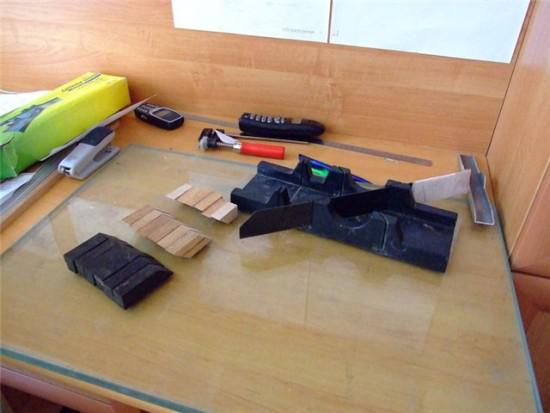
After simple movements there - here we get blanks for "calf" handle. Black and the largest on the table - this is a miter box, there grooves for hacksaw.
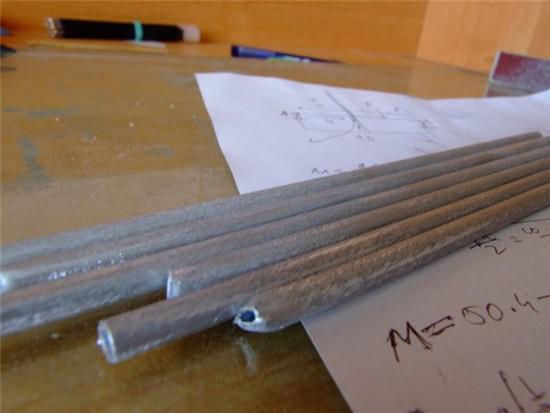
Now it remains the most difficult - Drill a hole for the tube. The difficulty lies in the fact that the hole must be aligned in each harvested included pen. If the holes are not pines, then we will match the plane is not a plane, and the line and get the clearance, which is, of course, filled with resin, but will not look neat. Therefore, I will first drill a hole in the most dense and long workpieces - in Eben.
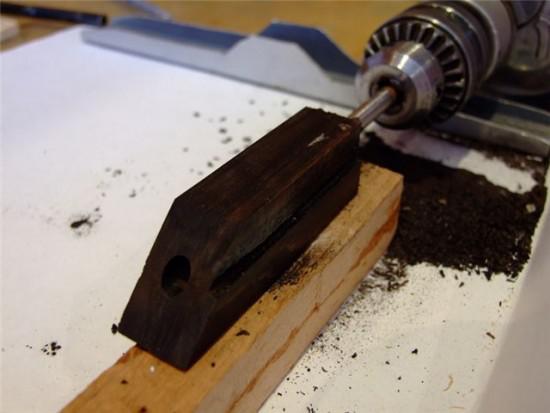
Drill immovably fixed, so just move our billet in the axial direction of the drill, eyes looking down on the alignment (if you do not trust your eyes, make a guide that will be parallel to the drill).
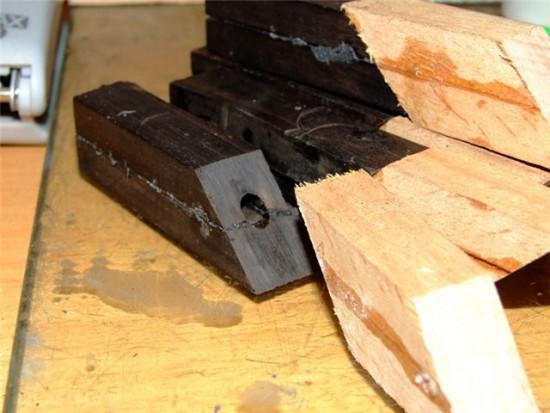
After the drill holes in the ebony it is necessary to stick to the superglue (Ethyl cyanoacrylate, super glue in common) to the beech, by the way, you need to glue dot, taking a bit to tear could. Thus, the hole in Ebene is the guide, and will not be any displacement.
Once the hole is drilled in beech (which, incidentally, will be blind, that is, not through, due to the fact that the drill bit short) need to break these halves and drill a hole through.
The final touch at this stage - sanded adhesive residue on the plane.
Workpiece assembly handles.
The assembly will be carried out on the epoxy binder (epoxy resin). First, spreading the resin impregnating the thread on the rod should not remain dry places. Then strung cut our procurement tube, like meat on a skewer, do not forget to lubricate the mating plane of the resin.
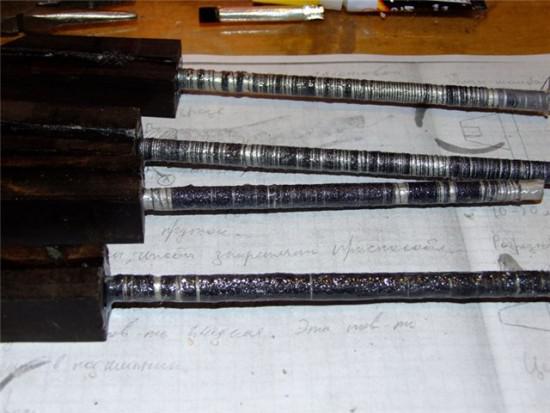
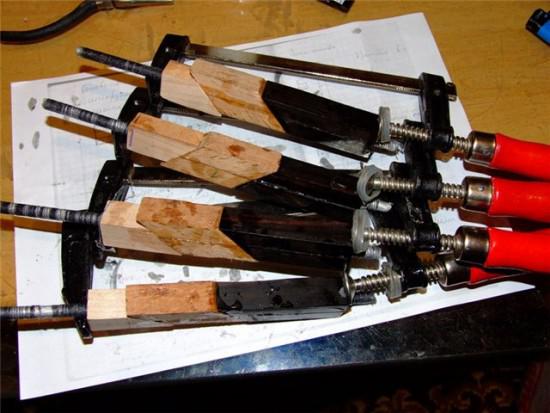
The result is something like a multicolored sticks. Resin fully stands up for 24 hours, but the polymerization process continues and maximum strength of hardened resin reaches about a week, it provided that it is properly prepared (correct ratio of resin / hardener, for the ED-20 is 10 parts resin 1 part hardener) . It remains to squeeze clamps and wait.
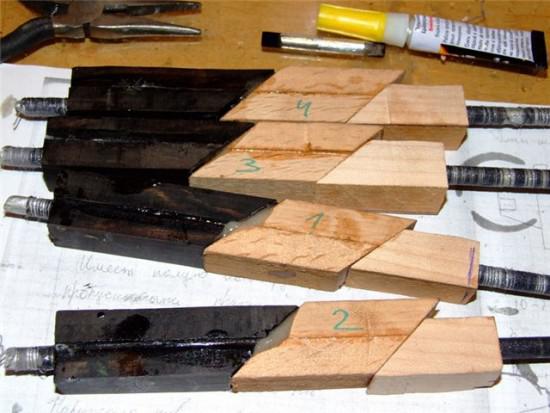
During compression clamps the gap between the workpieces is even less.
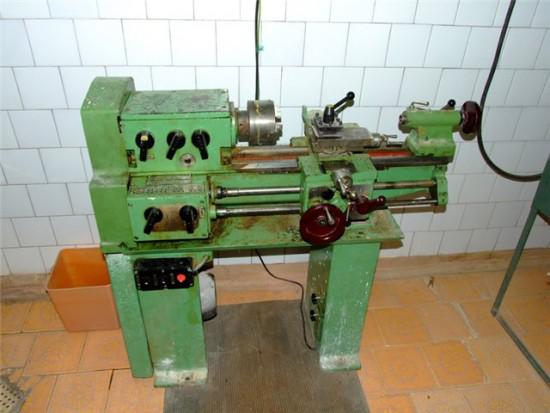
After curing epoxy can begin to chiselled handles. Sharpening will be on universal educational lathe TV-6.
Turning (roll) of the handle.
As written earlier, profiling will be made on a lathe TV-6 is on lathes we can get almost any body of revolution (cylinder, sphere, cone, and other).
We have a lathe chuck, which is clamped one end of the handle and the tailstock, which is inserted into the center. When we stifle detail in the cartridge, then we still have free unfastened end parts that must hold the center.
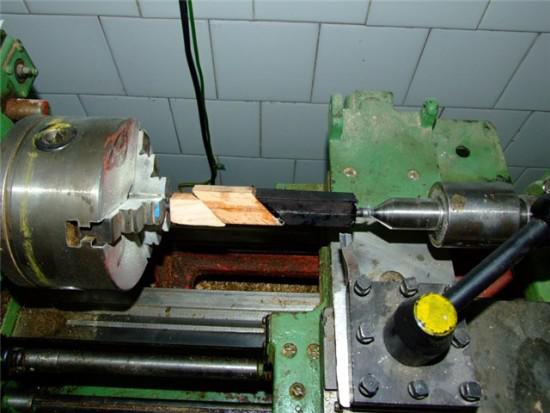
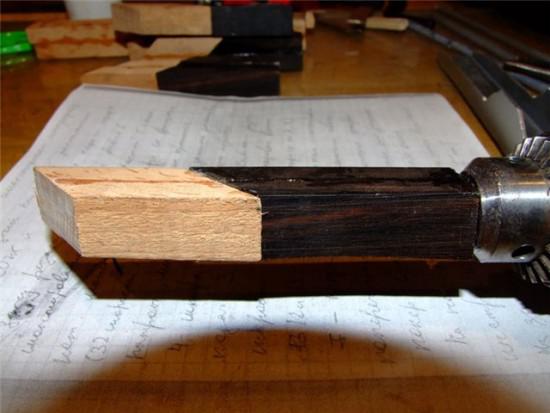
After the workpiece is clamped in the machine can begin processing. First, the workpiece to be processed so as to obtain a cylinder with a diameter corresponding to the maximum diameter of the handle plus 0 to 5 millimeters margin.
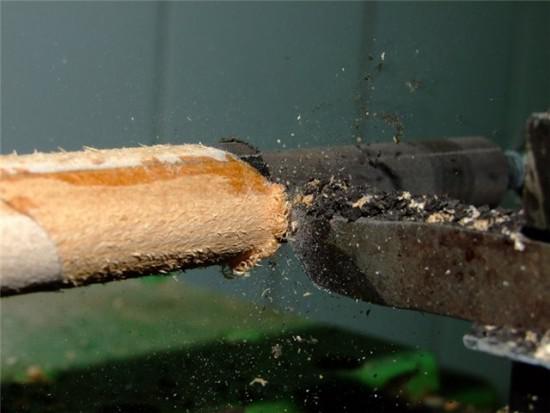
Resulting cylinder must Sause to the ends thus giving it the shape of a handle. Make it easier to first cutter and then brought to the desired state of sandpaper glued to the bar.
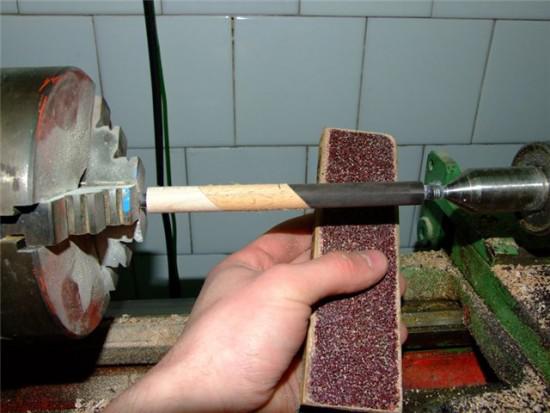
After processing, we obtain a semi-finished product to be treated fine sandpaper for smoothing the surface.
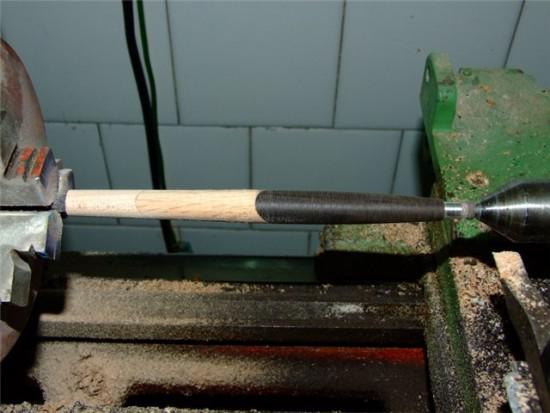
Cut away the excess protruding aluminum tube.
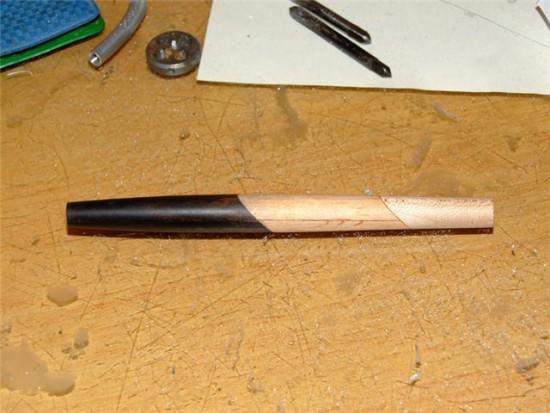
This profiling is ended.
Tapping.
The thread is required for mounting the front and rear twist-off caps. Because the handle is thin enough, then to the choice of the size of the thread should be taken very carefully. First of all, you need to determine the diameter and thread pitch. The diameter is 5 mm. Pitch - is the distance between two adjacent turns of the thread. The higher the pitch, the larger the thread, and vice versa.
To handle a greater degree, it is important and aesthetic beauty, but not clamped, however small thread pitch maximum - 0, 5 millimeters. Moreover, the smaller the pitch, the lower the thread height and a smaller diameter tube can be threaded without "breaking" it. The device is called a thread tap. Taps are distinguished by numbers 1, 2 and 3. The difference is that one is a tap that has a gentle approach and a fine thread, 2 - a steeper approach and almost full-size carving, 3 - used for final finishing of the thread where high accuracy is required. I will use only the first thread to be more dense, with no backlash.
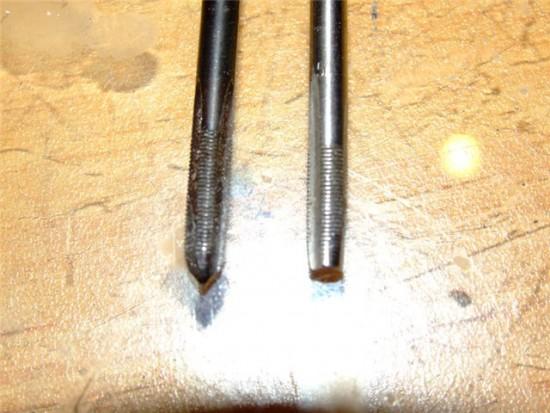
Left - tap-deuce, right - the tap unit.
Before cutting the thread must be drilled to a diameter aluminum tube 4, 6 millimeters (remember that the inner diameter is 4 millimeters). Otherwise, tap to expand the hole if he unfolding.
For threading, but rather is used to hold the tap knob. When threading handle better hold in the hand, because a vise, pliers and other tools pomnut holding a pen and make her look ugly. More, threading, better wrap the handle in the foam, as if we hold a pen in his hands, the tree absorbed fat, sweat and dirt, which is available on the hands and is especially evident in the light wood.
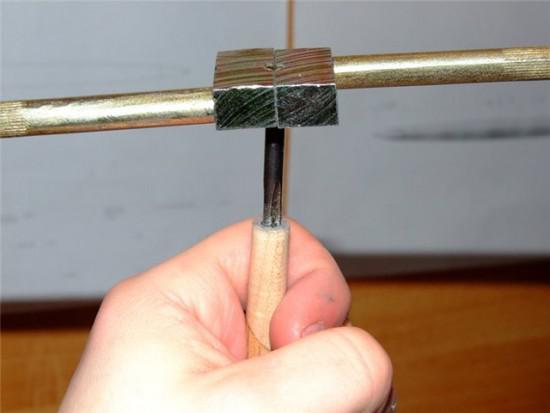
The thread must be cut to a depth of 10 millimeters, at least. This is due to the fact that the length of the thread in the cap of 10 millimeters.
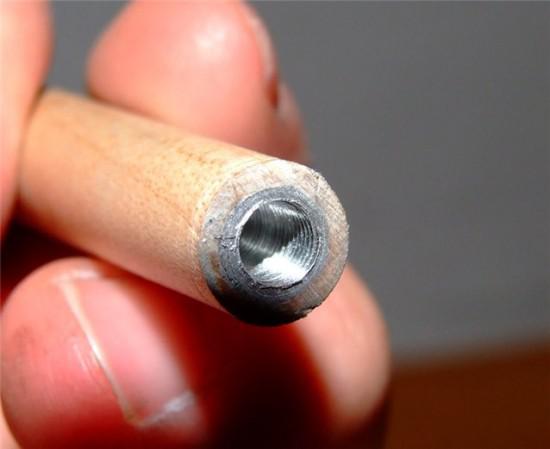
The finished thread in the handle.
anesenie inscriptions. By the way, he came up with an inscription put
To handle was even more unique and gained membership to the owner, that is, became the name, you must put the name. The name will be applied to the lightest part of the handle (in maple). The principle of the following inscription:
1. In Photoshop CS Draw the name, type the name of the font that we see Hoti on the handle.
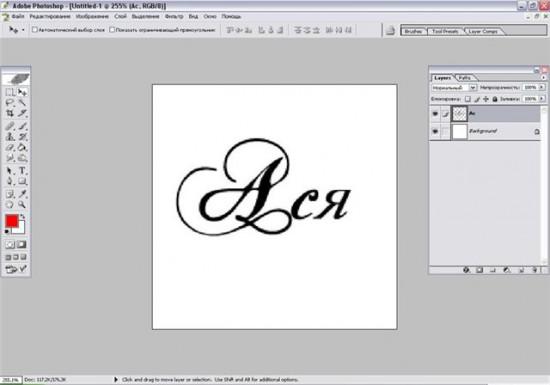
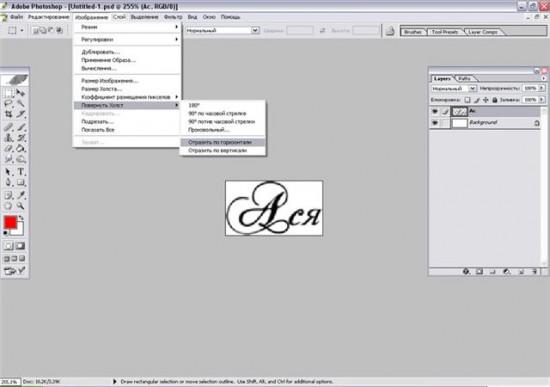
2.Invertireum image vertically or horizontally. No matter what, the bottom line is to get a mirror image of our drawing.
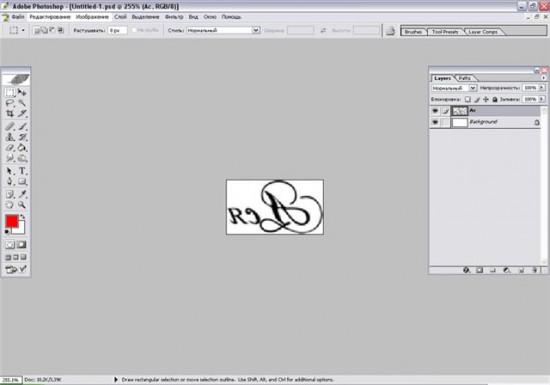
3.To change the image size so that it is great to fit the light of the handle and do not come out. In this case, the length (largest dimension) is 20 millimeters, and the height is determined proportionally.
After these operations are printed on a sheet of multiple image data using a laser printer (laser is not an inkjet or matrix, otherwise it will not work).
But before you apply the image to try to put a handle on the first test piece of wood.
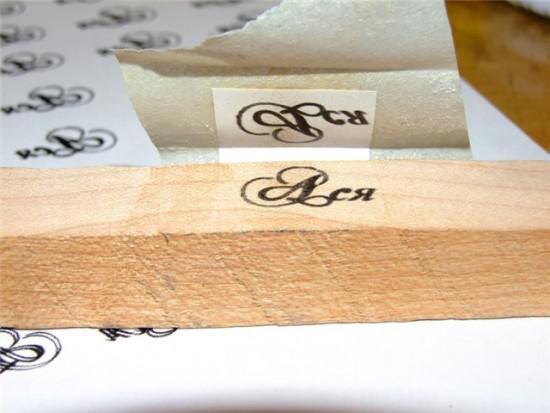
How do we cut off a small piece of our image, we fix it with paper tape on the workpiece. Next, we take a hot iron and heated our image. Heat to be careful, because if overheated paper can prikleetsya a piece of wood and pieces remains on it (image transfer is carried out on almost the same principle as in a laser printer, dye in a laser printer is the toner (powder) which, when heated "sintered "and adheres to the surface on which the heating up, so if any toner on your clothes can not wash it in hot water).
Practice on a scrap, will start drawing the image directly on the handle itself.
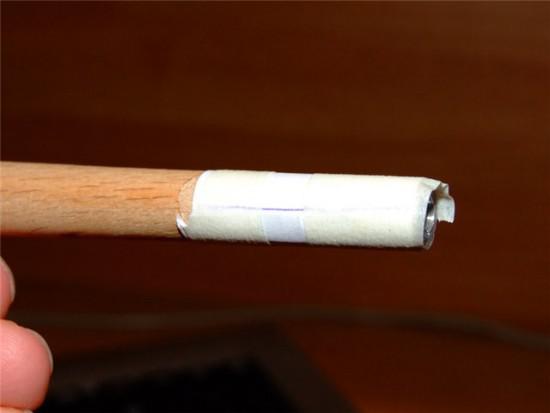
We maintain, and get after heating.
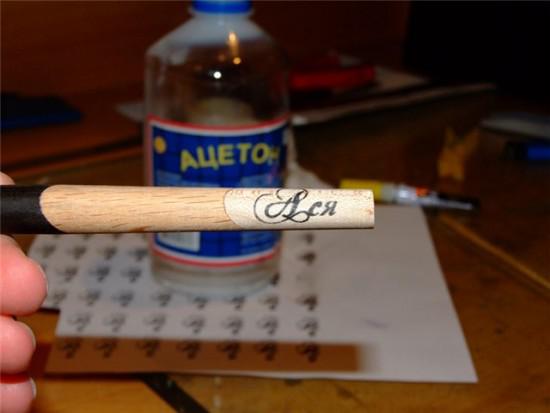
As you can see in the picture, the name does not look very contrasting, that is not a radical black color, therefore, take in hand helium black handle and gently stroke a path. The result is clearly visible in the next picture (letter "A" is not completely circled).
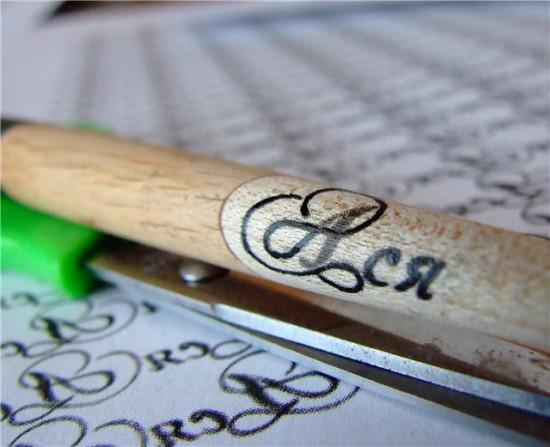
After the inscription is completely encircled, reserve handle alone to dry pasta. This application can be considered complete inscription.
Source:
drove
Preface ...
There is a huge variety of handles, which without special problems can be purchased at any office supply store. Sometimes, you want to have the thing that no one has, and never will be, or is, but from a limited circle of persons. Also things and handles ... yeah !!! with ordinary writing pens that students write their useless notes, chemists write different formulas reactions accountants fill all sorts of different forms, references, etc. This tutorial "How to handle ..." (DAC), I will try popular show how you can make an original wooden handle.
Development of the project (office rabotenka).
Before, something to do, do you need a plan. Now the plan is called the selection of materials, the development of 3D models of pens, then create the necessary drawings, development of manufacturing technology of a particular node.
Selection of materials.
The move, which should be approached with great responsibility, because it is the choice of material will depend on the durability of the handles, their appearance. Wood, from which will be manufactured pens should be as hard, dense, as a consequence would be nice polished. I chose the ebony (Ebony), beech, maple, with regard to the tree; not of wood materials - aluminum tube, brass rod, and directly the ball rod with toothpaste. Actually, that's the whole list of materials.
From left to right: bars with paste, aluminum tubes, brass rod (type such as these in the varnish), maple, beech, ebony.

Development appearance.
Having the necessary material can begin to design. First, the appearance of the handles. Immediately say, that the cap will not have handles, as well as clips (to the bag hanging on the handle). Actually, that's four variants of the handle (painted in Photoshop CS). By the way, none of them realized in life differently made.

Actually, it is clear that the very tip of the handle is made of ebony, beech and then finally maple. Caps (twist on, not those that pin closed) are made of brass and then polished.
Simulation.
After the appearance of a fully defined, let's move to 3D handles. Why is this done? The fact is that when you look at what is to succeed, it is easier to make and present, in addition, using a model defined by all dimensions of the handle (Diameter, length, depth), as with the model can obtain necessary drawings which also good to help in the production (of course, handle - well, very simple object model could not draw him, just decided to show the approach).
About how the model can draw a lot of paint, but that's another topic in general, and therefore will not be affected. Let me just say that modeled in the program Solid Works 2008, it also created the drawings.

This is a 3D model (top - right, top - down) front cap, rear cap, wooden array, ball rod, aluminum tube.
Following the same model, but in the collection and overlaid with wood texture.

Drawing model, we obtain here are approximate figures which are very useful in the production of (Dimensions for reference can be different). Actually, on the design of (foreign stamp, not by guests) I drawings are not particularly fussed, because it is not required.


Modeling this is completed, now for the materialization of our project. On a piece of paper it looks good, and in his hand lying will be even better. And so, making ...
Manufacturing.
So, we proceed to the most interesting - the production that drew. As I wrote earlier, in the manufacturing process may change both the appearance and size of pens ...
Fabrication of the central rod.
One of the most important parts, as it closes on itself front and rear caps, as is the rigid part in the handle. Preform rod is an aluminum tube with an outside diameter of 6 mm and 4 mm internal.

The stem will later be "plastered" tree. For better adhesion ligament "pipe - glue - wood" should rough up the surface of the tubes, that is, make it rough (sandpaper, needle files, a file, does not matter). Next, wrap the yarn, preferably cotton (cotton thread absorbs better adhesives).

The tubes wrapped thread. At this stage the tube is ready.

Posted in [mergetime] 1233259191 [/ mergetime]
so excuse slowly spread (
Making a wooden shell.
As planned earlier, decorative shell will consist of three colors of wood - black (ebony), reddish-brown - beech, cream - Maple (if the color is not as described, then do not worry, maybe I color blind). Unlike painted in Photoshop CS will consist in the fact that most of the wood will be black, and then beech, maple and less likely.

Beech and ebony have in the form of plates, therefore, have to glue two rails to increase the thickness. But maple in the form of an array and switching does not need.

Prepared for gluing slats ebony, beech, maple (top - bottom). Dilute epoxy resin (ED-20). It is possible to use a polyester resin, but it loses strength, moreover, in the polymerization of styrene is released, and it is harmful (from the epoxy resin - chloro). When the resin is highly desirable to use rubber gloves.

Resin smear and squeeze clamps.

After the resin rose, (it does not dry out, and cures, so experienced and say, stood resin) can begin to dismember. To do this, use the miter box (roughly speaking, the pattern).

After simple movements there - here we get blanks for "calf" handle. Black and the largest on the table - this is a miter box, there grooves for hacksaw.
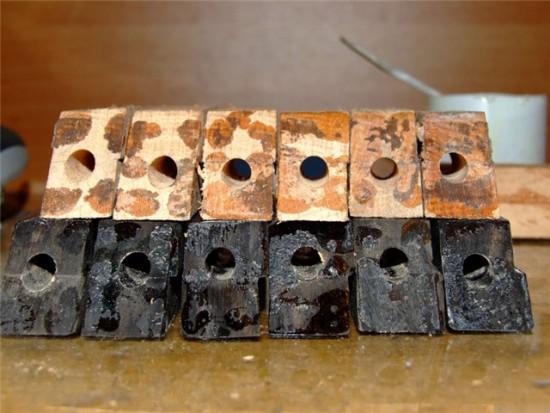
Now it remains the most difficult - Drill a hole for the tube. The difficulty lies in the fact that the hole must be aligned in each harvested included pen. If the holes are not pines, then we will match the plane is not a plane, and the line and get the clearance, which is, of course, filled with resin, but will not look neat. Therefore, I will first drill a hole in the most dense and long workpieces - in Eben.

Drill immovably fixed, so just move our billet in the axial direction of the drill, eyes looking down on the alignment (if you do not trust your eyes, make a guide that will be parallel to the drill).

After the drill holes in the ebony it is necessary to stick to the superglue (Ethyl cyanoacrylate, super glue in common) to the beech, by the way, you need to glue dot, taking a bit to tear could. Thus, the hole in Ebene is the guide, and will not be any displacement.

Once the hole is drilled in beech (which, incidentally, will be blind, that is, not through, due to the fact that the drill bit short) need to break these halves and drill a hole through.

The final touch at this stage - sanded adhesive residue on the plane.
Workpiece assembly handles.
The assembly will be carried out on the epoxy binder (epoxy resin). First, spreading the resin impregnating the thread on the rod should not remain dry places. Then strung cut our procurement tube, like meat on a skewer, do not forget to lubricate the mating plane of the resin.

The result is something like a multicolored sticks. Resin fully stands up for 24 hours, but the polymerization process continues and maximum strength of hardened resin reaches about a week, it provided that it is properly prepared (correct ratio of resin / hardener, for the ED-20 is 10 parts resin 1 part hardener) . It remains to squeeze clamps and wait.

During compression clamps the gap between the workpieces is even less.

After curing epoxy can begin to chiselled handles. Sharpening will be on universal educational lathe TV-6.
Turning (roll) of the handle.
As written earlier, profiling will be made on a lathe TV-6 is on lathes we can get almost any body of revolution (cylinder, sphere, cone, and other).

We have a lathe chuck, which is clamped one end of the handle and the tailstock, which is inserted into the center. When we stifle detail in the cartridge, then we still have free unfastened end parts that must hold the center.

After the workpiece is clamped in the machine can begin processing. First, the workpiece to be processed so as to obtain a cylinder with a diameter corresponding to the maximum diameter of the handle plus 0 to 5 millimeters margin.

Resulting cylinder must Sause to the ends thus giving it the shape of a handle. Make it easier to first cutter and then brought to the desired state of sandpaper glued to the bar.


After processing, we obtain a semi-finished product to be treated fine sandpaper for smoothing the surface.
Cut away the excess protruding aluminum tube.

This profiling is ended.
Tapping.
The thread is required for mounting the front and rear twist-off caps. Because the handle is thin enough, then to the choice of the size of the thread should be taken very carefully. First of all, you need to determine the diameter and thread pitch. The diameter is 5 mm. Pitch - is the distance between two adjacent turns of the thread. The higher the pitch, the larger the thread, and vice versa.
To handle a greater degree, it is important and aesthetic beauty, but not clamped, however small thread pitch maximum - 0, 5 millimeters. Moreover, the smaller the pitch, the lower the thread height and a smaller diameter tube can be threaded without "breaking" it. The device is called a thread tap. Taps are distinguished by numbers 1, 2 and 3. The difference is that one is a tap that has a gentle approach and a fine thread, 2 - a steeper approach and almost full-size carving, 3 - used for final finishing of the thread where high accuracy is required. I will use only the first thread to be more dense, with no backlash.

Left - tap-deuce, right - the tap unit.
Before cutting the thread must be drilled to a diameter aluminum tube 4, 6 millimeters (remember that the inner diameter is 4 millimeters). Otherwise, tap to expand the hole if he unfolding.
For threading, but rather is used to hold the tap knob. When threading handle better hold in the hand, because a vise, pliers and other tools pomnut holding a pen and make her look ugly. More, threading, better wrap the handle in the foam, as if we hold a pen in his hands, the tree absorbed fat, sweat and dirt, which is available on the hands and is especially evident in the light wood.

The thread must be cut to a depth of 10 millimeters, at least. This is due to the fact that the length of the thread in the cap of 10 millimeters.

The finished thread in the handle.
anesenie inscriptions. By the way, he came up with an inscription put
To handle was even more unique and gained membership to the owner, that is, became the name, you must put the name. The name will be applied to the lightest part of the handle (in maple). The principle of the following inscription:
1. In Photoshop CS Draw the name, type the name of the font that we see Hoti on the handle.

2.Invertireum image vertically or horizontally. No matter what, the bottom line is to get a mirror image of our drawing.


3.To change the image size so that it is great to fit the light of the handle and do not come out. In this case, the length (largest dimension) is 20 millimeters, and the height is determined proportionally.
After these operations are printed on a sheet of multiple image data using a laser printer (laser is not an inkjet or matrix, otherwise it will not work).
But before you apply the image to try to put a handle on the first test piece of wood.

How do we cut off a small piece of our image, we fix it with paper tape on the workpiece. Next, we take a hot iron and heated our image. Heat to be careful, because if overheated paper can prikleetsya a piece of wood and pieces remains on it (image transfer is carried out on almost the same principle as in a laser printer, dye in a laser printer is the toner (powder) which, when heated "sintered "and adheres to the surface on which the heating up, so if any toner on your clothes can not wash it in hot water).
Practice on a scrap, will start drawing the image directly on the handle itself.

We maintain, and get after heating.

As you can see in the picture, the name does not look very contrasting, that is not a radical black color, therefore, take in hand helium black handle and gently stroke a path. The result is clearly visible in the next picture (letter "A" is not completely circled).

After the inscription is completely encircled, reserve handle alone to dry pasta. This application can be considered complete inscription.
Source: