138
Bath cladding in ten minutes and how to implement it
The bathroom has been on my list since May. This activity seemed to me quite difficult and too time consuming. So I kept putting it off for later.
In fact, it turned out that only 15 minutes are enough to clean the bath from the outside! The main thing is to find the right materials and inspiration for this creative work.
Those who want to carry out a complete renovation of the bathroom, restoring it also inside, will have to spend a little more time. And how to do this with ordinary acrylic, you can learn from the video we left for you at the end of the article.
Editorial "Site" I have repeatedly shared tips on the bathroom. But this method, even for us, was new.
Without further ado, we share our discovery with you!
The main problem of designing a small bathroom is that the usual replacement of the screen for the bath is not enough.
To save space and bring the bath to the divine appearance, you need to at least paint it. And this case is really too troublesome.
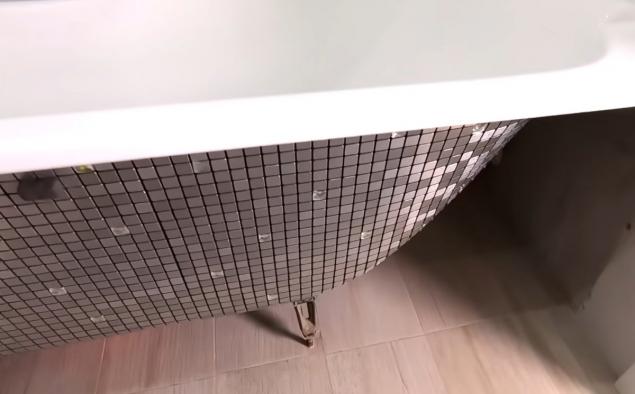
So the ideal solution to the problem will be a facing mosaic of stainless steel based on self-adhesive.
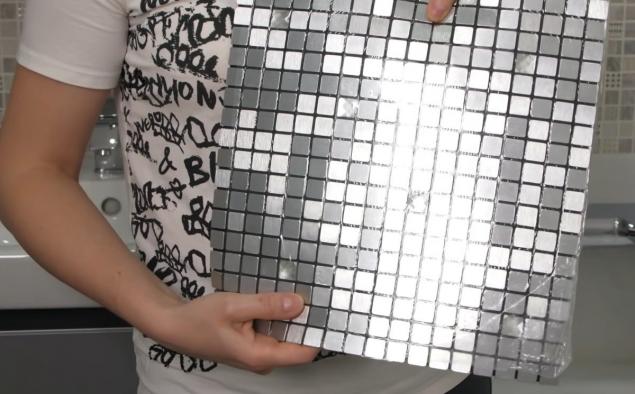
To finish one bath, only 5 layers of 20 cm square are enough. Therefore, you will not have to spend a lot. And to find such design material can be found in any online store.

Due to the fact that the mosaic is quite small, it lies well in place of the lateral curves of the bath. Therefore, the finish looks very neat and presentable.
All you need to do is get rid of the protective film and simply glue the mosaic layers to the bath. The only thing you will need to work on is the connection of the seams between the layers of the mosaic.
In order for the pattern to be uniform and beautiful, the width of the seams between the two layers should correspond to the width of the seams between the mosaic cubes themselves.
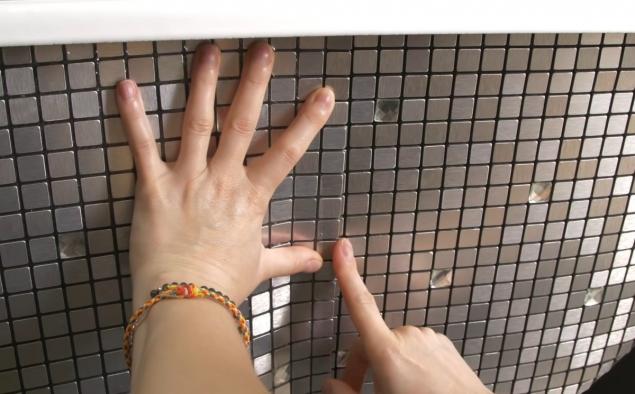
As for the legs of the bath, you can give them a good look with the help of ordinary air plasticine. It is extremely malleable and quickly takes shape. Therefore, working with this material is very simple.
In addition, you can not be afraid that the legs will deform or crack when in contact with water.

And those who are not confident in their abilities as a sculptor, make the legs as smooth and neat as possible will help an ordinary plastic bottle.
You just need to cut it under the height of the legs and cut along one wall. And then the resulting form to cover the applied to the base of the leg crumpled plasticine.

Here's the promised video, in which the charming Irina says, How to restore a bath with acrylic in 20 minutes.
https://www.youtube.com/watch? v=fGgPZCsFKOU
We hope it will give you as much inspiration to renovate your bathroom as we do.
Have a good day and see you again!
In fact, it turned out that only 15 minutes are enough to clean the bath from the outside! The main thing is to find the right materials and inspiration for this creative work.

Those who want to carry out a complete renovation of the bathroom, restoring it also inside, will have to spend a little more time. And how to do this with ordinary acrylic, you can learn from the video we left for you at the end of the article.
Editorial "Site" I have repeatedly shared tips on the bathroom. But this method, even for us, was new.
Without further ado, we share our discovery with you!
The main problem of designing a small bathroom is that the usual replacement of the screen for the bath is not enough.
To save space and bring the bath to the divine appearance, you need to at least paint it. And this case is really too troublesome.
So the ideal solution to the problem will be a facing mosaic of stainless steel based on self-adhesive.

To finish one bath, only 5 layers of 20 cm square are enough. Therefore, you will not have to spend a lot. And to find such design material can be found in any online store.

Due to the fact that the mosaic is quite small, it lies well in place of the lateral curves of the bath. Therefore, the finish looks very neat and presentable.
All you need to do is get rid of the protective film and simply glue the mosaic layers to the bath. The only thing you will need to work on is the connection of the seams between the layers of the mosaic.
In order for the pattern to be uniform and beautiful, the width of the seams between the two layers should correspond to the width of the seams between the mosaic cubes themselves.

As for the legs of the bath, you can give them a good look with the help of ordinary air plasticine. It is extremely malleable and quickly takes shape. Therefore, working with this material is very simple.
In addition, you can not be afraid that the legs will deform or crack when in contact with water.

And those who are not confident in their abilities as a sculptor, make the legs as smooth and neat as possible will help an ordinary plastic bottle.
You just need to cut it under the height of the legs and cut along one wall. And then the resulting form to cover the applied to the base of the leg crumpled plasticine.

Here's the promised video, in which the charming Irina says, How to restore a bath with acrylic in 20 minutes.
https://www.youtube.com/watch? v=fGgPZCsFKOU
We hope it will give you as much inspiration to renovate your bathroom as we do.
Have a good day and see you again!
