525
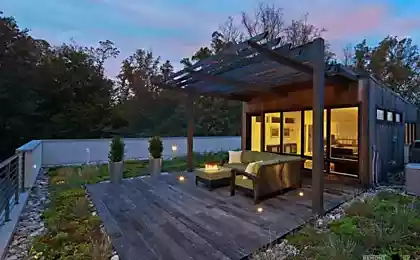
Patio — not a house, but not street
The British, like the Dutch and Germans can do without pools, no playgrounds, and even — scary thought! — without Alpine. But comfortable patio (Seating area), though tiny, has a place in almost near each house!
This item so got used to the way modern European garden, patio (incidentally, the word has a Spanish origin) is already not perceived as an element of the typical architecture of the Mediterranean countries. Today, designers are saying about patio, the paved area mean that is used as a transit area between the house and the garden as a recreation area.
It seems that our summer visitor will become clear, what is a patio and why we need it, if you remember what role we ascribe to our traditional terraces or verandas. "Not the house, but not a street" because that's what you perceive light extension to the summer house? Needless to say,. the veranda is not only a favorite place where to stay with the guests until late, but the place where you can work on homework or seedlings, to arrange a corner for children to play and a home Studio... well, needless to say, without terrace the cottage is not a cottage.

If your house already has such an extension, a patio you may not need to. However, if your home is still in the process of construction, should seriously reflect on how best to organize this very area — stick to Russian traditions or to claim a European option, taking into account the fact that a patio is cheaper.
Indeed, all that is required from you is to properly and carefully pave the area of arbitrary size in front of the house. Arches, fountains, benches and containers with plants — all these, of course, pretty things will adorn a cozy patio, but most importantly for patio is still paving.
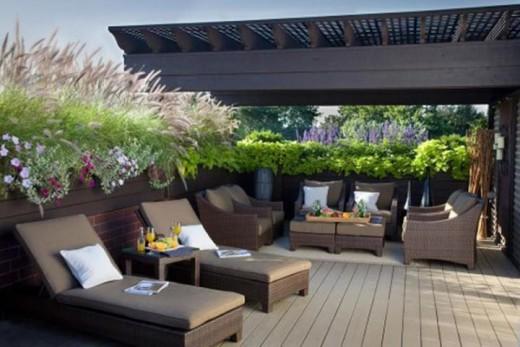
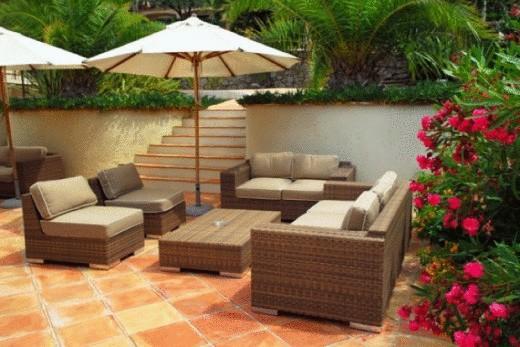
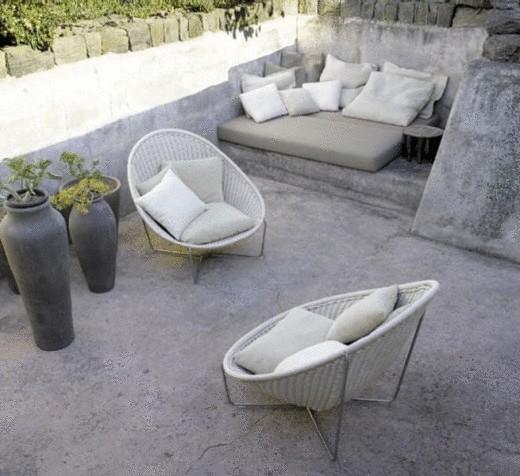
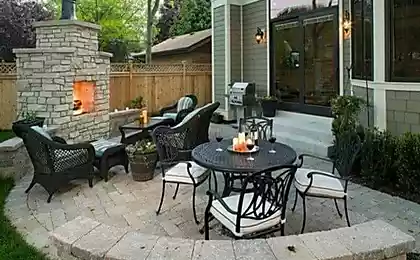
Patio is the only area of the garden that has a semantic relationship with the interiors of the house. It is obvious that outdoor furniture and décor items a patio style should be aligned with the interior of the home.
The patio design should be approached with great care — after all, it is a favorite vacation spot of all family members. Floral design will make even the smallest patio elegant and presentable.
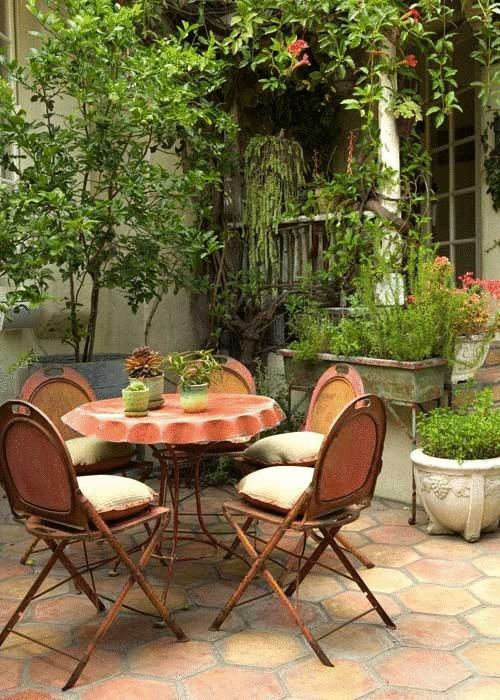
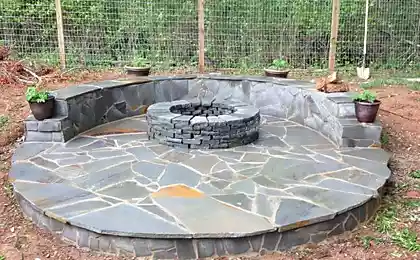
Round patio in a secluded place
A patio may not be located in the immediate vicinity of the house, a small deviation from the generally accepted rules is not only tolerated, but also give the design a special charm.
Consider a round platform, which is formalized as a patio, and located at a considerable distance from home, in a secluded corner of the garden.
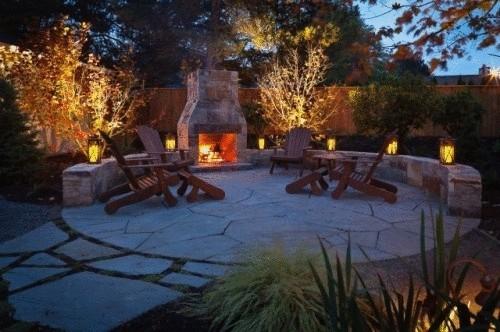
But its isolated location made it possible to plant around her high bushes. Surrounded by a dense green wall, a patio, and really was like a secluded patio.
The materials and tools.
Fig.1
1. On the edge of the patio, install a strip of plywood, align the height with the level. Hammer the pegs on the outer side flanging and in the construction of the wedges adjust the frame exactly to the radius of the patio.
The flange fastened to the stakes with screws (if you use nails, be careful, it can lead to displacement of the edges of the flanging!). At the bottom of the trough will lay the geotextile black color, then through the paving would not sprout weeds.Set in the middle of the pad axle for the equalizer. Cut one of the ends of the equalizer so that the equalizer can freely slide along the strip (see Fig. 1). The cutout length is 10 cm, to neutralize the allowable curvature of the flanging. Cutout height must equal the height of a brick.Align the surface of the sand bags with the help of the equalizer, this operation is easier to do together. Then liberally pour sand cushion with water from a hose to the sand settle. Then add the sand and level the area again.
Fig.2
2. Laying bricks starting at the circumference, on the outside patio. Move inwards, consistently ending each row. Having laid a few rows, they can be used as a working platform. The surface of each stacked section check level and adjust if necessary, upsetting some bricks with a mallet or adding them under the extra-wide portion of the sand. Every 2 — 3 section check the accuracy of horizontal stacking, pulling a string tied to a peg in the center of the patio (Fig. 2).If you need to work half or quarter bricks, sawed them better than a circular saw or grinder with disc for cutting stone.After laying the bricks, notice the cracks, the sand shed and patio with water. Repeat this 2 to 3 times. Remove the strip and carefully tamp the ground along the edge of the patio.
Patio with tile flooring on concrete osnovannaya and durable paving slabs — an ideal surface for patio. Huge selection of colors, shapes and textures allows you to find the material blend harmoniously with any landscape and architectural surroundings. The tile thickness is more than 5 cm can be laid directly on the sand, in the same way as the brick patio, but any tile looks better when she lies on a concrete base. So the device is patio paving or ceramic tiles begins with pouring the concrete pad.
Preparation Determine the dimensions of the future patio area (length, width and height). Based on these dimensions, calculate the number of solution and gravel.
Materials and tools
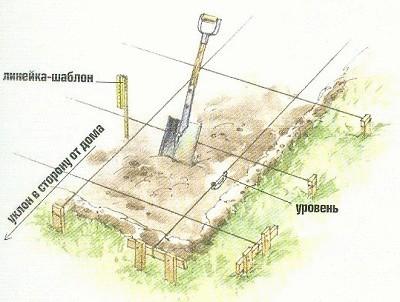
Hammer the edges of the site pegs and pull the twine crosswise. With a ruler-template determine the exact depth. Pulling on the string, don't forget to set the angle of 1 — 1.5 cm per 1 m of grounds, necessary to divert water from the house.
2. Around the Playground is set to the shuttering of 20-San meters of boards that are supported with the pegs (a cross section of 5x10 cm), they act as buttresses.
Install them every 30 cm Pegs fixed to the boards with screws to prevent vertical displacement.If the length of the patio exceeds 3 m, the inside of the pad sets the separation Board, which will serve as a guide when leveling the concrete.
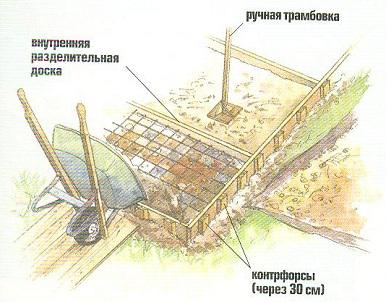
3. Pour on the bottom of the trough 7 — 8 cm of gravel and flatten it carefully tamped. Trim the metal mesh the size of the site. If you want to connect multiple sections of the grid, use the tie-wire.Put under a grid of stones or bricks so that the valve was set above the gravel pad on 3 — 4 see
4. If possible, fit the mixer with the solution close to the site, so the solution was poured from the mixer directly into the form. If not, you need to install a special ramp out of thick plywood or wide boards for trucks solution.
5. Once the section filled with concrete, it is leveled using a long Board 5x15 cm This work is done together.
Move the Board along the guide rails, making a sawtooth motion in the perpendicular direction. At the end of the section the excess concrete will fall outside the shape. After the concrete hardens, the dividing Board can be removed.
6. Use special tool — trowel to achieve a smooth surface of the concrete pad.

Not necessary to achieve perfectly smooth surfaces, but bumps and hollows in the screed should not be. Before the last stage — laying the tiles — give a concrete screed to stand for five days.
7. Mark on the surface of the concrete ties two perfectly flat, mutually perpendicular straight — this will be the reference line for tile laying.
Prepare the glue according to the instructions and spread it over the surface of the screed with a trowel, being careful not to erase lines. Laying the tiles, leave a gap between them. Tamp the tile in "place", gently tapping it with a rubber mallet. Periodically check the level of the tile. For cutting tiles, use a special cutter. Noting a cut line, don't forget to consider the size of the gap between the tiles.
8. After laying the tiles must pass the night before can be applied in the grooves of the mixture for grouting.
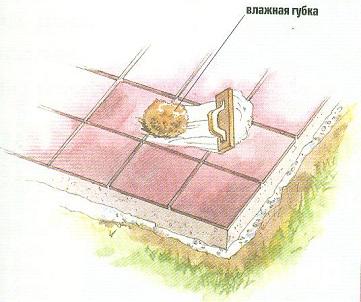
The excess of grouting mortar is immediately removed from the surface of the tiles with a damp cloth. After the surface has dried, it is again cleaned with a damp sponge.
I agree with the English on the patio - the most necessary place in the garden, a place of rest and receive pleasure from a light breeze, the fragrances of the garden and a Smoking barbecue.
This should be in every garden!
Source: modern-garden.ru/patio-eshhe-ne-dom-no-uzhe-i-ne-ulitsa/

This item so got used to the way modern European garden, patio (incidentally, the word has a Spanish origin) is already not perceived as an element of the typical architecture of the Mediterranean countries. Today, designers are saying about patio, the paved area mean that is used as a transit area between the house and the garden as a recreation area.

It seems that our summer visitor will become clear, what is a patio and why we need it, if you remember what role we ascribe to our traditional terraces or verandas. "Not the house, but not a street" because that's what you perceive light extension to the summer house? Needless to say,. the veranda is not only a favorite place where to stay with the guests until late, but the place where you can work on homework or seedlings, to arrange a corner for children to play and a home Studio... well, needless to say, without terrace the cottage is not a cottage.

If your house already has such an extension, a patio you may not need to. However, if your home is still in the process of construction, should seriously reflect on how best to organize this very area — stick to Russian traditions or to claim a European option, taking into account the fact that a patio is cheaper.
Indeed, all that is required from you is to properly and carefully pave the area of arbitrary size in front of the house. Arches, fountains, benches and containers with plants — all these, of course, pretty things will adorn a cozy patio, but most importantly for patio is still paving.
Patio is the only area of the garden that has a semantic relationship with the interiors of the house. It is obvious that outdoor furniture and décor items a patio style should be aligned with the interior of the home.
The patio design should be approached with great care — after all, it is a favorite vacation spot of all family members. Floral design will make even the smallest patio elegant and presentable.
Round patio in a secluded place
A patio may not be located in the immediate vicinity of the house, a small deviation from the generally accepted rules is not only tolerated, but also give the design a special charm.
Consider a round platform, which is formalized as a patio, and located at a considerable distance from home, in a secluded corner of the garden.

But its isolated location made it possible to plant around her high bushes. Surrounded by a dense green wall, a patio, and really was like a secluded patio.

The materials and tools.
- 1 cubic meter of sand per 10 sq. m patio;
- geotextile (patio size);
- plywood for flanging thickness of 0.5 cm, a width of 12 cm;
- pegs cross-section of 5x5 cm;
- Board for leveling the surface of the sand cushion 5x15 cm;
- Board 5x10 cm for the device the base of the equalizer;
- thin wedges;
- clinker brick;

Fig.1
1. On the edge of the patio, install a strip of plywood, align the height with the level. Hammer the pegs on the outer side flanging and in the construction of the wedges adjust the frame exactly to the radius of the patio.
The flange fastened to the stakes with screws (if you use nails, be careful, it can lead to displacement of the edges of the flanging!). At the bottom of the trough will lay the geotextile black color, then through the paving would not sprout weeds.Set in the middle of the pad axle for the equalizer. Cut one of the ends of the equalizer so that the equalizer can freely slide along the strip (see Fig. 1). The cutout length is 10 cm, to neutralize the allowable curvature of the flanging. Cutout height must equal the height of a brick.Align the surface of the sand bags with the help of the equalizer, this operation is easier to do together. Then liberally pour sand cushion with water from a hose to the sand settle. Then add the sand and level the area again.

Fig.2
2. Laying bricks starting at the circumference, on the outside patio. Move inwards, consistently ending each row. Having laid a few rows, they can be used as a working platform. The surface of each stacked section check level and adjust if necessary, upsetting some bricks with a mallet or adding them under the extra-wide portion of the sand. Every 2 — 3 section check the accuracy of horizontal stacking, pulling a string tied to a peg in the center of the patio (Fig. 2).If you need to work half or quarter bricks, sawed them better than a circular saw or grinder with disc for cutting stone.After laying the bricks, notice the cracks, the sand shed and patio with water. Repeat this 2 to 3 times. Remove the strip and carefully tamp the ground along the edge of the patio.
Patio with tile flooring on concrete osnovannaya and durable paving slabs — an ideal surface for patio. Huge selection of colors, shapes and textures allows you to find the material blend harmoniously with any landscape and architectural surroundings. The tile thickness is more than 5 cm can be laid directly on the sand, in the same way as the brick patio, but any tile looks better when she lies on a concrete base. So the device is patio paving or ceramic tiles begins with pouring the concrete pad.

Preparation Determine the dimensions of the future patio area (length, width and height). Based on these dimensions, calculate the number of solution and gravel.
Materials and tools
- gravel (1 cu. m 12 sq. m gravel beds);
- concrete (1 cubic meter per 10 sq. m area by the thickness of the fill to 10 cm);
- rebar or mesh construction;
- roofing;
- Board 5x10 cm and 5x20 cm for the device of the formwork; screws with a length of 8 cm or nails;
- flagstones or ceramic;
- dry mixture or tile adhesive (with the purchase of the tiles immediately find out what type of glue required for its installation);
- an angle grinder with disc for cutting metal;
- the binding wire;
- manual ramming or tamping machine,
- the level of construction,
- trowel,
- trowel,
- cutter on tile.

Hammer the edges of the site pegs and pull the twine crosswise. With a ruler-template determine the exact depth. Pulling on the string, don't forget to set the angle of 1 — 1.5 cm per 1 m of grounds, necessary to divert water from the house.
2. Around the Playground is set to the shuttering of 20-San meters of boards that are supported with the pegs (a cross section of 5x10 cm), they act as buttresses.

Install them every 30 cm Pegs fixed to the boards with screws to prevent vertical displacement.If the length of the patio exceeds 3 m, the inside of the pad sets the separation Board, which will serve as a guide when leveling the concrete.
3. Pour on the bottom of the trough 7 — 8 cm of gravel and flatten it carefully tamped. Trim the metal mesh the size of the site. If you want to connect multiple sections of the grid, use the tie-wire.Put under a grid of stones or bricks so that the valve was set above the gravel pad on 3 — 4 see
4. If possible, fit the mixer with the solution close to the site, so the solution was poured from the mixer directly into the form. If not, you need to install a special ramp out of thick plywood or wide boards for trucks solution.
5. Once the section filled with concrete, it is leveled using a long Board 5x15 cm This work is done together.
Move the Board along the guide rails, making a sawtooth motion in the perpendicular direction. At the end of the section the excess concrete will fall outside the shape. After the concrete hardens, the dividing Board can be removed.
6. Use special tool — trowel to achieve a smooth surface of the concrete pad.

Not necessary to achieve perfectly smooth surfaces, but bumps and hollows in the screed should not be. Before the last stage — laying the tiles — give a concrete screed to stand for five days.
7. Mark on the surface of the concrete ties two perfectly flat, mutually perpendicular straight — this will be the reference line for tile laying.
Prepare the glue according to the instructions and spread it over the surface of the screed with a trowel, being careful not to erase lines. Laying the tiles, leave a gap between them. Tamp the tile in "place", gently tapping it with a rubber mallet. Periodically check the level of the tile. For cutting tiles, use a special cutter. Noting a cut line, don't forget to consider the size of the gap between the tiles.
8. After laying the tiles must pass the night before can be applied in the grooves of the mixture for grouting.

The excess of grouting mortar is immediately removed from the surface of the tiles with a damp cloth. After the surface has dried, it is again cleaned with a damp sponge.
I agree with the English on the patio - the most necessary place in the garden, a place of rest and receive pleasure from a light breeze, the fragrances of the garden and a Smoking barbecue.
This should be in every garden!
Source: modern-garden.ru/patio-eshhe-ne-dom-no-uzhe-i-ne-ulitsa/


A sure way to kill your metabolism quickly and safely
As the techniques of slicing and cutting 5 products