5217
Shooting the counter on the phone with the subsequent recognition
Introduction h4> It so happens that I live in a cottage with no central heating, and hence each warms my apartment on your own. Most often used for this purpose gas boilers, the method is cheap enough, nothing to complain about, but there is one subtlety. For correct operation of the gas boiler (suddenly), you must have gas in the tube.
Perhaps because not all behave boilers, but our turn off even if the short-term interruption to the gas supply and not turn back if the supply is restored. If someone has a home, it is not a problem, press the button and the boiler heats further, but if it happened so suddenly that we decided as a family to go on vacation, and the yard for winter, so good, so -20 ° C, then the consequences could be dire.
The solution is simple - leave the keys to relatives / friends / neighbors, so they can come and turn on the boiler will be any trouble. Well, if there is a neighbor who would come every day and check if everything is in order. And if not? Or is he too decides to go somewhere for the weekend?
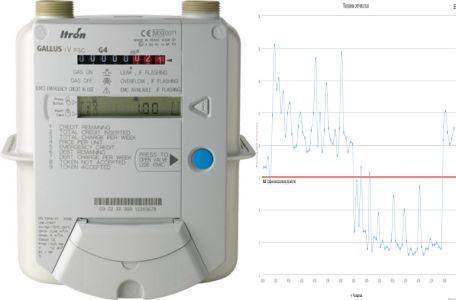
So, I decided to establish the lay meter reading somewhere on the Internet, so that I could find anywhere in a long trip to periodically check whether the gas is wasted, and if you suddenly stop spending, then rushed to call relatives / friends / neighbors (or anyone there I left the keys) to come and click.
Of course, after putting some simple indications internet I decided not to stop there and muddied more recognition of indications and graphical representation on this in part 2 of this topic.
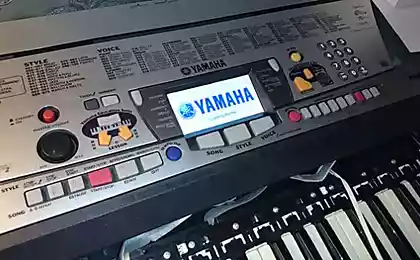
Part 1: The readings from the meter and putting them on the Internet h4> It is necessary to mention that there are counters in a completely different nature, some of them have special tires and interfaces for automated removal of evidence. If you have this, then the next, probably can not read. But I have a very ordinary without such interfaces (at least I did not find, can, bad looking) model GALLUS iV PSC. Therefore, it remains one option - visual indications removal rates. In networks offer ready-made solutions, but they cost a lot of money, and most importantly, it's not sports, so we will do everything themselves.
What do we need? H5> For readings from the meter and then send these readings to the Internet, we need any unnecessary android smartphone. For example, I have used for these purposes, Samsung Galaxy S III (SCH-I535). Yes, probably, not every reader has wallowing around with third-Galaxy, but we must understand that the requirements for a smartphone is not so great:
- it must be loaded
- should work the camera
- should work WiFi
Having a hobby to buy on ebay different broken phones and collecting of them work, I easily found in his zagashnike motherboard from sgs3 inoperative microphone (~ $ 10), and b / y shnuyu camera (~ $ 10) and a Chinese battery (~ 300r). Also for the convenience of attaching the battery to the board using a frame with broken display.
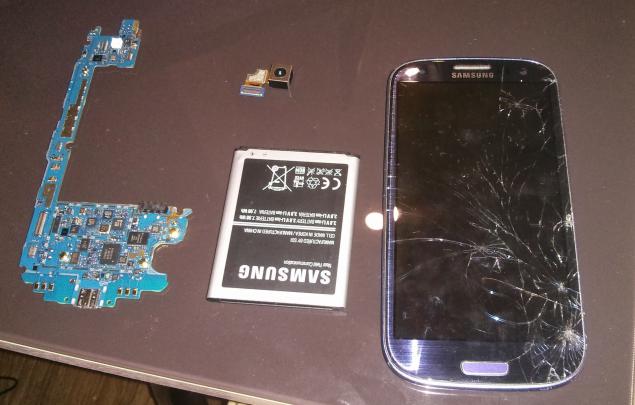
Initially thought to manage only the motherboard and the camera, but it turned out that even when connected to charging fees not included without batteries, so I had to add another frame and battery. But in this case the budget was about $ 30 if you use the machines easier sgs3, you can get away and to a lesser amount.
However, this solution has its drawbacks, the smartphone without a touchscreen display, and is not as convenient to adjust, so talk a little about how it was necessary to solve this problem.
Machine Setup h5> We start from the worst-case scenario. Assume that there is no display, no touchscreen, smartphone no root, adb debugging is disabled, the firmware is unknown.
Resuscitation h6> Warning! B> Further instructions appropriate for the Samsung Galaxy S III (SCH-I535), if you have another smartphone, the steps may be different.
It is assumed that you are familiar with concepts such as adb, firmware, etc..
To bring the smartphone in a more or less known to us the condition to start the drain beg firmware VRBMB1 here using Odin . I will not describe in detail how this is done, the Internet is full of instructions on how to use Odin-ohm. Odin in this case is good that he is easy to work without using the screen of the smartphone, you need only turn your smartphone into download mode (Vol Down + Home + Power - hold a few seconds, then the Vol Up, connected by usb to windsurfing and all further business Odin-a).
After Odin sew drain, phone boot the system, disconnect it from the usb and remove the battery, so it is turned off. This operation should be done every time after completing the firmware Odin-ohm to start the next operation with the power off state.
Next sew CWM recovery and root on инструкции. In short, because:
- After Odin to flash a custom butcheyn VRALEC.bootchain.tar.md5

Turn the body holding the Vol Up + Home + Power - Keep a few seconds, and then another 5 seconds of loading, get into the mode of CWM-recovery.
Check this by typing in the console in ubuntu
adb devices code> pre> (the body itself must be connected by usb and should be installed adb - sudo apt-get install android-tools-adb code> pre>):
& lt; code class = & quot; bash & quot; & gt; malefic @ lepeshka: ~ $ adb devices List of devices attached 64cb5c59 recovery & lt; / code & gt; pre> If you see the last line, then everything is OK, click on a device Vol Down, Vol Down, Power - switches to adb sideload (at least in the version of CWM instructions it is the second line from the top), we can only type in the console ubuntu:
& lt; code class = & quot; bash & quot; & gt; malefic @ lepeshka: ~ $ adb sideload SuperSU_Bootloader_FIXED.zip sending: 'sideload' 100% & lt; / code & gt; pre> and root flies on the device, after which no Remember to switch off the device, remove the batteries. After Odin to flash a stock butcheyn corresponding to the set up of the drain insertion VRBMB1_Bootchain.tar.md5 < / a>
Next we need to enable usb-debugging on your phone, this smartphone launch mode CWM-recovery, check:
& lt; code class = & quot; bash & quot; & gt; malefic @ lepeshka: ~ $ adb devices List of devices attached 64cb5c59 recovery & lt; / code & gt; pre> Mount system:
& lt; code class = & quot; bash & quot; & gt; malefic @ lepeshka: ~ $ adb shell mount -o rw -t ext4 /dev/block/platform/msm_sdcc.1/by-name/system / system & lt; / code & gt; pre> to add the lines in /system/build.prop:
& lt; code class = & quot; bash & quot; & gt; malefic @ lepeshka: ~ $ adb shell & quot; echo \ & quot; persist.service.adb.enable = 1 \ & quot; & Gt; & gt; /system/build.prop" & Lt; / code & gt; pre> Reboot:
& lt; code class = & quot; bash & quot; & gt; malefic @ lepeshka: ~ $ adb reboot & lt; / code & gt; pre> We are waiting for loading, check the status of the terminal adb:
 & lt; code class = & quot; bash & quot; & gt; malefic @ lepeshka: ~ $ adb devices List of devices attached 64cb5c59 device & lt; / code & gt;  pre> Bingo! Debugging is on, let's see what we've got going on on your phone for this run  using Java Web Start and see:


This screen activation simkarty Verizon, I do not have a sim card, so I'll just skip activation, acting on the instructions:
 & lt; code class = & quot; bash & quot; & gt; malefic @ lepeshka: ~ $ adb shell input tap October 1150 malefic @ lepeshka: ~ $ adb shell input tap 710 1150 malefic @ lepeshka: ~ $ adb shell input tap October 1150 malefic @ lepeshka: ~ $ adb shell input tap 710 1150 & lt; / code & gt;  pre> Then press the button on the smartphone Vol Up, now see:


Put a check mark and click OK:
 & lt; code class = & quot; bash & quot; & gt; malefic @ lepeshka: ~ $ adb shell input tap 50,600 malefic @ lepeshka: ~ $ adb shell input tap 650 600 & lt; / code & gt;  pre>


Svaypaem to unlock the screen:
 & lt; code class = & quot; bash & quot; & gt; malefic @ lepeshka: ~ $ adb shell input swipe 100 100 500 100 & lt; / code & gt;  pre>


Now you need to put some vnc-server for Android, for example, . Install it on your smartphone:
& lt; code class = & quot; bash & quot; & gt; malefic @ lepeshka: ~ $ adb install droid + VNC + server + v1.1RC0.apk 4055 KB / s (2084419 bytes in 0.501s) pkg: / data / local /tmp/droid+VNC+server+v1.1RC0.apk Success & lt; / code & gt; pre> We awake smartphone, as it is likely to fall asleep until we installed vnc-server and svaypaem, that unlock the screen:
& lt; code class = & quot; bash & quot; & gt; malefic @ lepeshka: ~ $ adb shell input keyevent 26 malefic @ lepeshka: ~ $ adb shell input swipe 100 100 500 100 & lt; / code & gt; pre> Run vnc -server:
 & lt; code class = & quot; bash & quot; & gt; malefic @ lepeshka: ~ $ adb shell am start -a android.intent.action.Main -n org.onaips.vnc / .MainActivity & lt; / code & gt;  pre>


Click OK:
 & lt; code class = & quot; bash & quot; & gt; malefic @ lepeshka: ~ $ adb shell input tap 50900 & lt; / code & gt;  pre>


Click Start:
 & lt; code class = & quot; bash & quot; & gt; malefic @ lepeshka: ~ $ adb shell input tap 350 300 & lt; / code & gt;  pre>


Click to grant access:
 & lt; code class = & quot; bash & quot; & gt; malefic @ lepeshka: ~ $ adb shell input tap 600 1000 & lt; / code & gt;  pre>


Ok, now are forwarding ports through adb:
 & lt; code class = & quot; bash & quot; & gt; malefic @ lepeshka: ~ $ adb forward tcp: 5801 tcp: 5801 malefic @ lepeshka: ~ $ adb forward tcp: 5901 tcp: 5901 & lt; / code & gt;  pre > and go through the browser on your smartphone, or your favorite vnc client.


Further work as a conventional Android phone, only through a computer, it is convenient to set up WiFi connection, then we can go on vnc via WiFi, but not all the time to keep the phone connected to the computer (after gas meter is not always located in the vicinity of the computer.)


Now, when the interaction with the device is fully established, you can proceed to configure the photography and publishing data on the Internet.
Periodic photographing h6> install applications , create it with the time profile of 00:00 to 23:59 every 30 minutes to perform an action - to do the photo. Shooting Options select the most suitable location for the phone and the counter. I have this macro with the obligatory flash.
That's the way, actually, I placed my phone (top view):
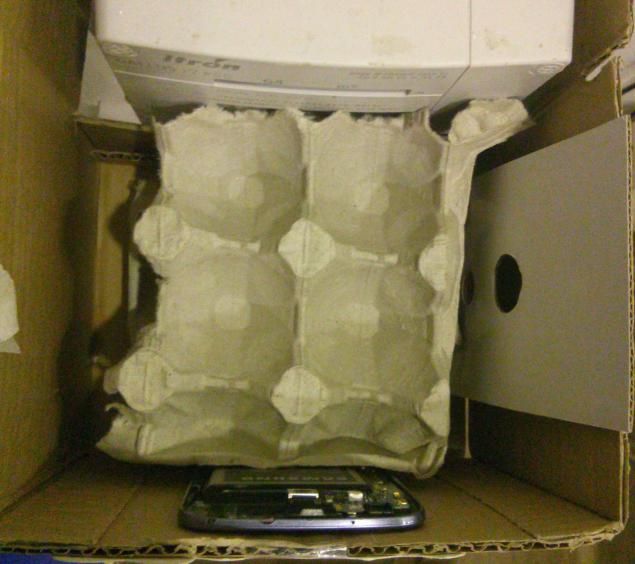
Cardboard box tied with string to the counter, it is home to a smartphone, packing of eggs there to fix your smartphone in a vertical position. I then more refined design with adhesive tape and cardboard to the flash does not beat directly into the face, it gives a serious glare, preventing recognition. On top of all the closed lid to inside was dark, or in bright ambient light is not always correct autofocus works.
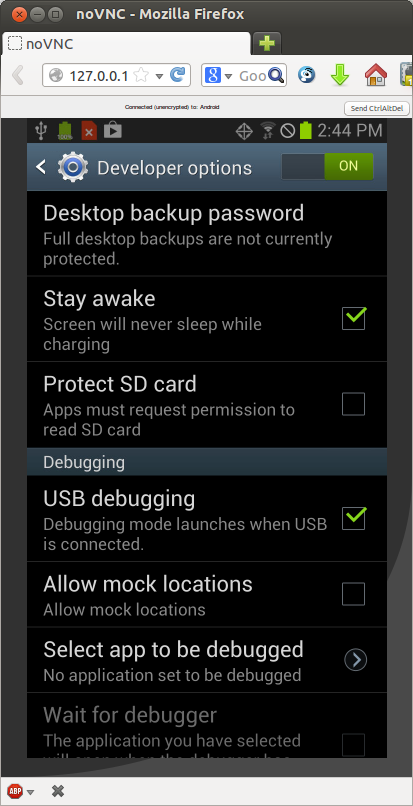
In the setting of the smartphone in the media developer should definitely put a check mark to the smartphone did not fall asleep at the connected charging, and then at some point he stops to photograph and only if it continues to disturb.
 to spread in the Internet  h6> to move the captured images of the counter in the Internet, I used the first available application - . It is able to synchronize a folder with a folder on your smartphone such as Google Drive.


Thus, I can now from anywhere in the world where there is Internet access, go to your Google drive and verify that the gas boiler is operating normally.
Part 2: Detection of indications h4> So, after sending the meter reading on the Internet, I became interested in the possibility of automatic recognition of evidence. This will allow:
& lt; code class = & quot; python & quot; & gt; import sys import os from models import getImage, sess from gdrive import getImagesFromGDrive, createImageFromGDriveObject if __name__ == '__main__': # get a list of new photos from Google disk images, http = getImagesFromGDrive () # alternately process them in a loop for img_info in images: # download images img = createImageFromGDriveObject (img_info, http) file_name = img_info ['title'] # look for an entry in the database try: dbimage = getImage (os.path.basename ( file_name)) dbimage.img = img dbimage.download_url = img_info [& quot; downloadUrl & quot;] dbimage.img_link = img_info ['webContentLink']. replace ('& amp; export = download', '') except ValueError as e: print e continue # recognizes the indication dbimage.identifyDigits () # save the data into the database sess.commit () & lt; / code & gt; pre> It uses the function code which I'll post below:
getImagesFromGDrive code> pre> - a function that returns a list of not yet recognize the images from Google DrivecreateImageFromGDriveObject code> pre> - function, download the image itself and converts it into a format OpenCVgetImage code> pre> - function searches for a record of the images in the database, if not, then create itidentifyDigits code> pre> - method recognizing the testimony in this imagehttp code> pre> - authorized client to access Google Drive, details about access to the API disk read < a href = "https://developers.google.com/drive/web/quickstart/quickstart-python"> here


sess < / code> pre> - the connection object to the database using the library SQL Alchemy Working with Google Drive h5> The first thing we do is get with Google Drive image list:
Working with Google Drive h5> The first thing we do is get with Google Drive image list:
& lt; code class = & quot; python & quot; & gt; import os from datetime import tzinfo, timedelta, date from dateutil.relativedelta import relativedelta from apiclient.discovery import build from models import getLastRecognizedImage def getImagesFromGDrive (): # define id folder Google disc in which images are FOLDER_ID = '0B5mI3ROgk0mJcHJKTm95Ri1mbVU' # create the object authorized client http = getAuthorizedHttp () # service object Disc drive_service = build ('drive', 'v2', http = http) # to start deleted from the disk image over all month, we are no longer interested month_ago = date.today () + relativedelta (months = -1) q = & quot; '% s' in parents and mimeType =' image / jpeg 'and trashed = false and modifiedDate & lt;'% s '& quot; % (FOLDER_ID, month_ago.isoformat ()) files = drive_service.files (). List (q = q, maxResults = 1000) .execute () for image in files.get ('items'): drive_service.files (). trash (fileId = image ['id']). execute () # Now do the query to the database, returns the last recognized image last_image = getLastRecognizedImage () # get a list from disk images, the modification date is greater than the date of recording of the last recognized image page_size = 1000 result = [] pt = None # since Drive API does not allow for time to get more than 1000 images, # then download the list page by page to 1,000 and adds a single array while True: q = & quot; '% s' in parents and trashed = false and mimeType = 'image / jpeg' and modifiedDate & gt; '% s' & quot; % (FOLDER_ID, last_image.check_time.replace (tzinfo = TZ ()). Isoformat ('T')) files = drive_service.files (). List (q = q, maxResults = page_size, pageToken = pt) .execute () result.extend (files.get ('items')) pt = files.get ('nextPageToken') if not pt: break # overturn list to treatment was in the order of time shooting result.reverse () return result, http & lt; / code & gt; pre> Authorized client disks are created as follows:
 & lt; code class = & quot; python & quot; & gt; import httplib2 import ConfigParser from oauth2client.client import OAuth2WebServerFlow from oauth2client.file import Storage def getAuthorizedHttp (): # we obtain from the config.ini file recorded there CLIENT_ID and CLIENT_SECRET config = ConfigParser .ConfigParser () config.read ([os.path.dirname (__ file __) + '/ config.ini']) CLIENT_ID = config.get ('gdrive', 'CLIENT_ID') CLIENT_SECRET = config.get ('gdrive', 'CLIENT_SECRET') # OAuth 2.0 scope that will be authorized. # Check https://developers.google.com/drive/scopes for all available scopes. OAUTH_SCOPE = 'https://www.googleapis.com/auth/drive' # Redirect URI for installed apps REDIRECT_URI = 'urn: ietf: wg: oauth: 2.0: oob' # client_secrets.json file will store the token storage = Storage (os.path.dirname (__ file__) + '/client_secrets.json') credentials = storage.get () # if nothing in the file, then run the procedure for authorization if not credentials: # Perform OAuth2.0 authorization flow. flow = OAuth2WebServerFlow (CLIENT_ID, CLIENT_SECRET, OAUTH_SCOPE, REDIRECT_URI) authorize_url = flow.step1_get_authorize_url () # output in the console link where it is necessary to go to authorize print 'Go to the following link in your browser:' + authorize_url # solicits a response code = raw_input ('Enter verification code:') .strip () credentials = flow.step2_exchange (code) # save the token storage.put (credentials) # create the http client and authorizing its http = httplib2.Http () credentials.authorize (http) return http & lt; / code & gt;  pre> For CLIENT_ID and CLIENT_SECRET in  Google Developers Console  need to create a project, and for this project under  APIs & auth  -  Credentials  -  OAuth  click  CREATE NEW CLIENT ID , there select  Installed application  -  Other


When you first run the script to write to the console on the url you want to go to get a token, insert it into your browser, allow applications to access Google Drive, copy issued by Google verification code from the browser and give the script. Then the script will keep everything you need in the file
client_secrets.json code> pre> and subsequent runs will not ask anything.
The function of downloading images is extremely simple:
& lt; code class = & quot; python & quot; & gt; import cv2 import numpy as np def downloadImageFromGDrive (downloadUrl, http = None): if http == None: http = getAuthorizedHttp () # download images resp, content = http. request (downloadUrl) # Create the image object OpenCV img_array = np.asarray (bytearray (content), dtype = np.uint8) return cv2.imdecode (img_array, cv2.IMREAD_COLOR) def createImageFromGDriveObject (img_info, http = None): return downloadImageFromGDrive ( img_info ['downloadUrl'], http) & lt; / code & gt; pre>
Search testimony in the photo h5> The first thing to do after we got the photo, it is found on it figures that we recognize. This method does
Search testimony in the photo h5> The first thing to do after we got the photo, it is found on it figures that we recognize. This method does extractDigitsFromImage code> pre>:
 & lt; code class = & quot; python & quot; & gt; def extractDigitsFromImage (self): img = self.img & lt; / code & gt;  pre>

Originally photo looks like this:


So first we turn to it acquired the desired orientation.
& lt; code class = & quot; python & quot; & gt; # Is rotated by 90 degrees h, w, k = img.shape M = cv2.getRotationMatrix2D ((w / 2, h / 2), 270, 1) img = cv2.warpAffine (img, M, (w, h)) & lt; / code & gt; pre>
& lt; code class = & quot; python & quot; & gt; # Crop the black field that emerged after the rotation img = img [0: h, (wh) / 2: h + (wh) / 2] h, w, k = img.shape & lt; / code & gt; pre>


Solar battery - 60 years
NASA approved the children's designer allows you to build a working model of the rover