933
Budget repairing generator
Will 100 photos! .. Well, it was a joke, I'm not Avtobotanik
I intend to provide 16 reproductions.
That's decided gash another kulibinskuyu another topic like this post as "pro repair the monitor and swollen capacitors" to repair the device with your hands.
I have a light and a hope that some of the young and curious people in general by reading the topic, can gain for himself something interesting, informative, and may be useful. So, forgive me my little lengthy explanation of the picture ... But, I'll try to be as brief as possible !!! Honestly.
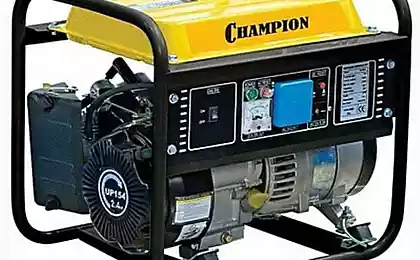
Actually, a subject theme that lying around in my car a few generators, which at the time, did not rise to throw a hand. The Soviet education.
So, to understand gene. Nothing complicated and hard about it.

On the one hand, I am sad of what modern life dictates its own new reality that nothing and no one wants to repair, such as less expensive to buy new.
On the other hand, as it turned out, even the non-poor in some European countries, there are certain firms specializing in the repair of various open sites of automobile generators, starters, pumps, pump and other units. Further, they also sell to someone like restored, sometimes taking, by the way, as part of the payment, your old non-working unit. (He then they also: podmarafetyat, otpiskostruyat, paint, napidarasyat, change the consumables and the price it will have, yet the fact that much cheaper with a new plant.
Well, if we consider that in the area where I live, for example, a new generator can cost 700-800 US Taller, the appropriate car owners, especially in the art of understanding people - they are very willing to buy at a lower price recovered.
So I have repeatedly witnessed (and consultant), like people dying generator, and I was faced with the question "do you have? We will buy. "
(I have the same, though, and lay in a shed among the parts which -That different generators, but it was defective parts, which I managed to grab dismissing from service centers. Then, taking them myself, I was hoping they "ever mend and maybe sell ».)
In general, therefore, several times I was denied the opportunity to make some money.
At the time, I put together a device to test the generator. (I even wrote about it here)
And then, finally, I decided to check it out in action, and at the same time to repair a faulty one of the generators, which, incidentally, comes to my pipilatsu. (All the same, you need to have on a stock, as it is quite old.)
Anyway, the main task was to work out a ready concept of fast and, most importantly, low-budget repairs, if possible, any generator. In the sense that we should not waste any time or money - in search of spare parts, which in principle can be made most.
(Here it should be emphasized that such an unusual task is relevant only for me here, for Russia to engage in such crap was neither the time nor the desire nor the special economic sense.)
The rear part of the rotor bearing (which, in turn, not much, but is firmly seated in the rear cover) is not very difficult to get .. (more likely, some difficulty sometimes deliver brushes that cling to the little groove developed on the contact ring or can be hooked for the rear rotor bearing.)
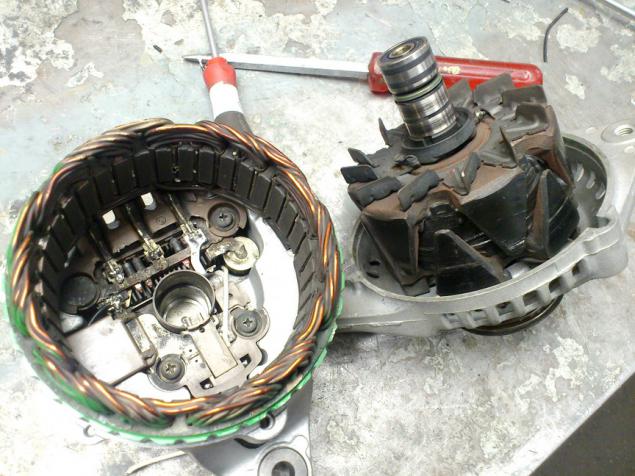
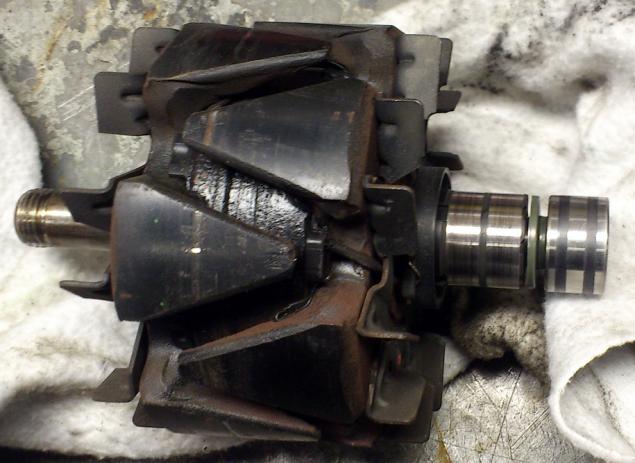
Separating the front cover with the rotor can loosen the pulley nut and separate the rotor itself. Thus, it is possible to verify (or change) the front bearing of the generator.
On the rotor often worn contact rings, which slide brush. Given the large runs of cars in Russia, we have such a deterioration happens quite often. But while the bronze ring does not rub up the holes, it may still serve.
Of course, the wear is highly dependent on the quality of the material. There are, for example, is not very old machines with moderate runs, where the rings are rubbing their entirely to plastics (at all, for example, VALEO, BOSCH) (become unusable), and just across generators (such as increasingly pleased DENSO, especially on right-handed cars) even when rabid shoots wear was barely noticeable. All the same, the quality is very Materially affects the durability. Here is a lot to twist the generator, but as new ring
Here stator winding
with the regulator and the rectifier. (Visible in the rectifier 6 power diodes)
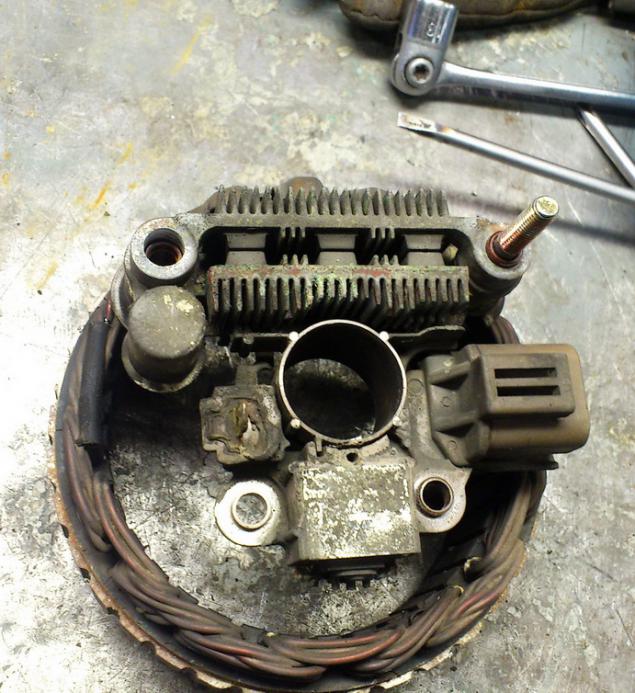
Here's a side view. see the bolt connecting the positive cable and the power connector to connect to the wiring.
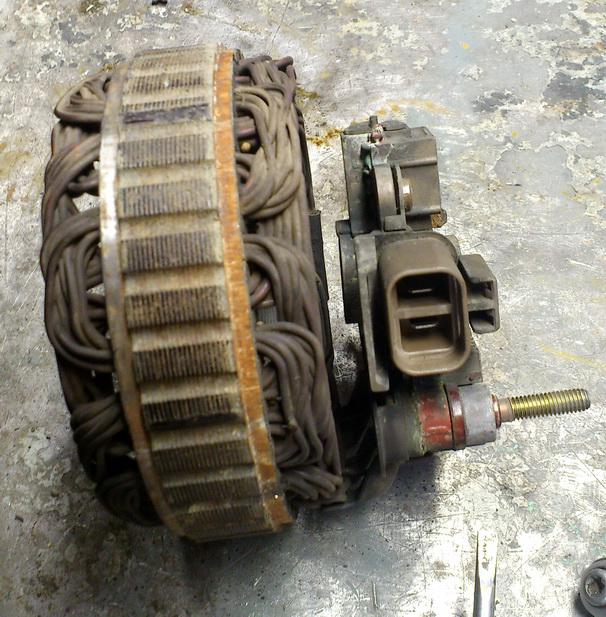
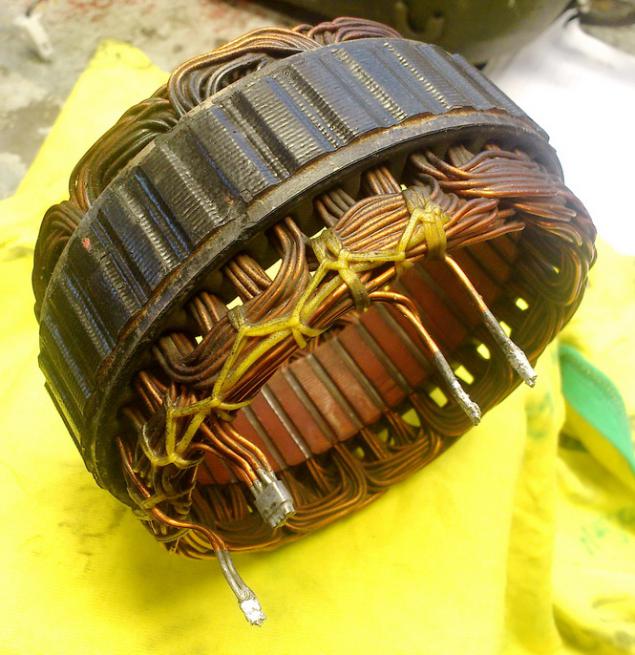
Here stator winding in a pure form.
Just very rarely fails.
While earlier there were cases basins Winding short circuit and charring. In ancient times of shortage of spare parts for the youth and poverty I once had to take a coil of wire and a winding reel own generator for vaz2101. He even worked as an acquaintance has not sold a car. )))))
(If you need to pull out only the regulator, the stator and the rectifier can not pull out of the back cover of the generator) (I parse all - for cleaning and painting. All the same, for me it was kind of like a hobby.)
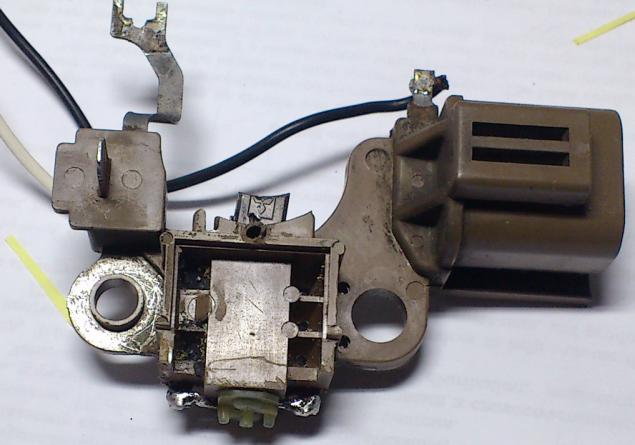
Then gently unsolder control from the rectifier. Only two conductors fastened it to a rectifier diode. As can be seen, it is formed with the brush holder.
(This is a slightly different controller, untouched photo of my not preserved), but the only difference is in the arrangement of sockets.
By the way, the right conductor nowhere at all connected ... Initially it was used to supply AC power directly from the coil to control, for example, the revolutions in the diesel engine.
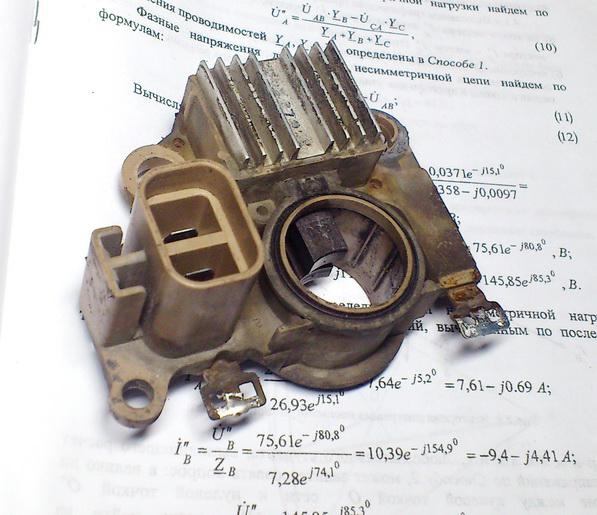
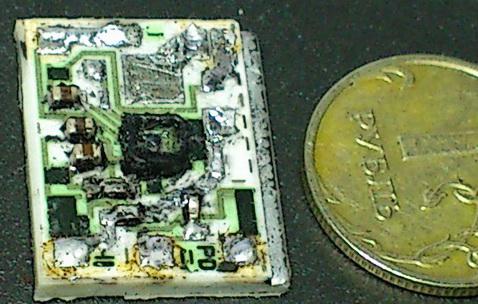
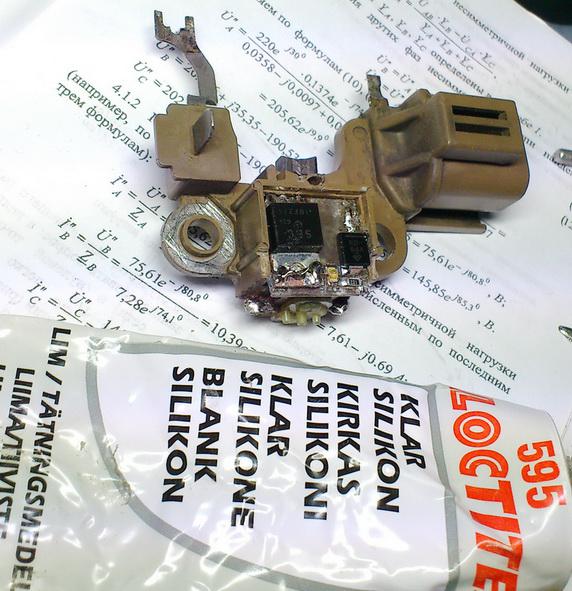
Under the aluminum radiator - ceramic hybrid regulator assembly. By simple testing, it was found that the regulator is dead.
More precisely, there are dead: diode and switching transistor. In the picture you can see a site where there was open-frame chip transistors (and diode) in the top of the ceramic plate.
When you remove the silicone coating the transistor just fell off of a hybrid assembly. e rest of the living. (I checked) As an option, it can be soldered on your remote postings. And indeed, at the very least, he can be a voltage regulator to withdraw outside of genes and to fix the outside. This has been done many times in the old days.
ps.
It was very unpleasant to remove silicone compound from the board ... it is soft and sticky ... no dissolves when washing hands ...
Of course, regulators for different types of generators are available as spare parts. But I remind you that my task was to explore the possibility of a regulator sgorodit by the collective farm.
Looking on the Internet many schemes other craftsmen came to the conclusion that not much of the original solutions. I was looking for a very simple and fast by the schematic, so promptly inserted pencil on paper their own scheme (however, say, that nothing fundamentally new, I did not invent, the network has a bunch of similar) I just used different schematics from other systems.
The principle at the controls, it should be noted, one common to all: System voltage track and manage car field winding on the rotor (via the contact rings) I will not ship here by special terms.
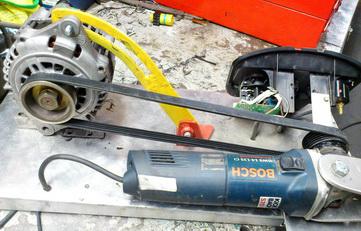
First, hastily assembled a trial version on the clumsy "breadboard»
and connected to the nozzle to the gene.
On the breadboard first set trimmer to expose issued Gena tension. (Lower battery on the floor to the gene did not work "in the air»)
Under the rules of the voltage at the motor should be around 13, 7 volts.
Changing the way, the voltage applied to Batteries can be changed, and the charging current, which is caused by the difference of potential genes and Batteries, Batteries and internal resistance.
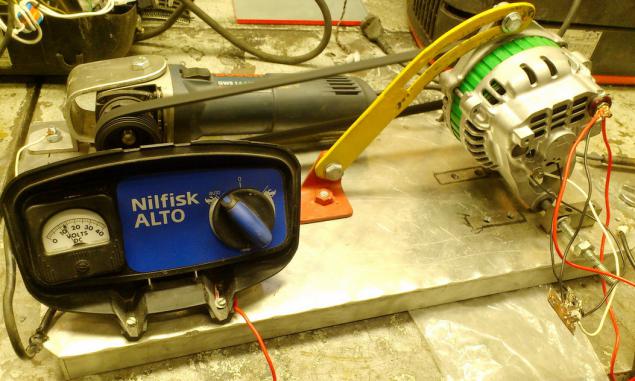
(Later, on the test bench is going to make a dummy load with an ammeter. (But now it was not necessary, because there was a problem in the controller)

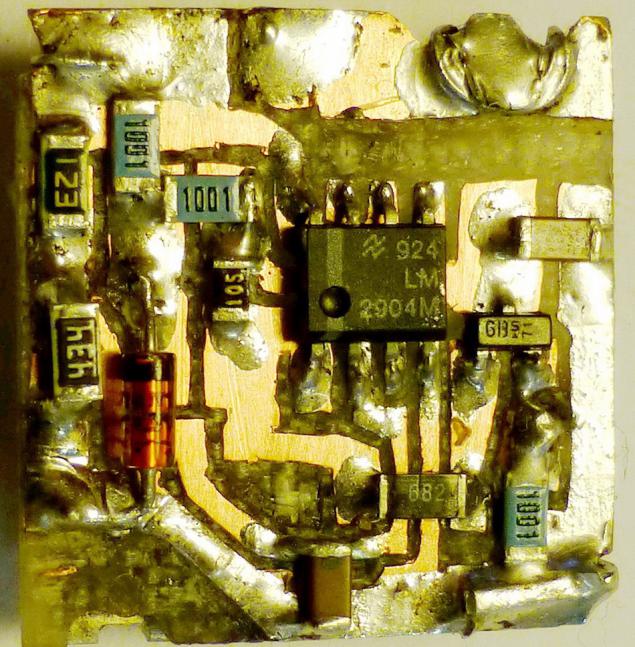
In general, the scheme I somehow decided. Now I had to make and stuff their board instead of the old faulty regulator. In this case, the size was not very volgotno- at my disposal was a place for a square board 2smH2sm
Details had to be put together so that the desired conductors were in their channels on its platform to connect to the brush, rectifier, as well as the conclusions of the management and control lamp Gena charge. (Only 5 pins)
Details had to be positioned on both sides. Key mosfet and diode on the one hand ... (more added svetodiodik, but who sees it in the engine compartment through the slots of the generator cover ??)
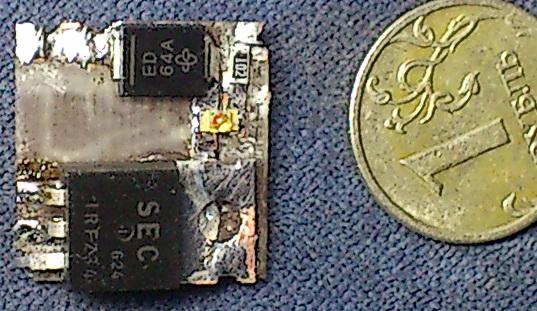
Other details - located on the other side. Instead rheostat - I put two ordinary resistor, choosing ratings. So safer and takes less space.
I beg you brothers radiolyubiteley- not reproach me loot ... I is, in general, I can well understand that the so nice and neat ... but! if I need to quickly make simple platu- I cut out a lot faster track a special cutter.
Here, perhaps, it is unethical, but fast, cheap, practical ©.
Solder the wires to it to be mounted on the brush holder.
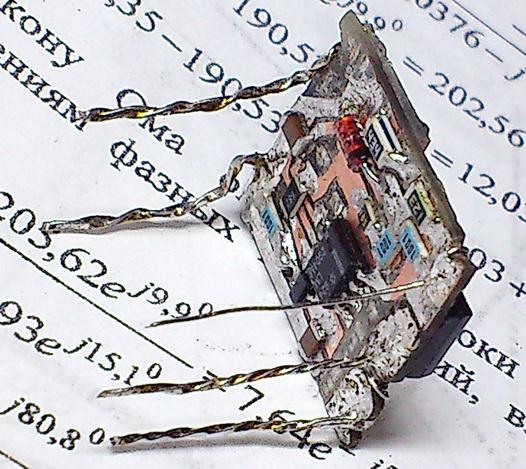
Before installing smeared silicone components, output slipped through the holes on the back side and soldered. Outside, then just smeared with silicone. Transparent so that you can look at the LED.
When the generator quickly flickers. Probably, it is possible to judge how the health system as a whole.
In short, all collect and check again on the bench. As BE operates.
The transistor is not heated at all. I am leaving him without a radiator. (Still open mosfet has a low contact resistance, so the heat is released arhimalo)
In conclusion:
From radio components do not have to buy anything, all they found on the old boards, which have all kept a lot of Elijah.
Either inache- I personally think such repairs occupation much more reasonable and profitable than, for example, Reballing proca on the motherboard cost of $ 100. For the generator on a foreign car is expensive as it is.
On this topic finish.
Thank you for attention.
Source:
I intend to provide 16 reproductions.
That's decided gash another kulibinskuyu another topic like this post as "pro repair the monitor and swollen capacitors" to repair the device with your hands.
I have a light and a hope that some of the young and curious people in general by reading the topic, can gain for himself something interesting, informative, and may be useful. So, forgive me my little lengthy explanation of the picture ... But, I'll try to be as brief as possible !!! Honestly.
Actually, a subject theme that lying around in my car a few generators, which at the time, did not rise to throw a hand. The Soviet education.
So, to understand gene. Nothing complicated and hard about it.

On the one hand, I am sad of what modern life dictates its own new reality that nothing and no one wants to repair, such as less expensive to buy new.
On the other hand, as it turned out, even the non-poor in some European countries, there are certain firms specializing in the repair of various open sites of automobile generators, starters, pumps, pump and other units. Further, they also sell to someone like restored, sometimes taking, by the way, as part of the payment, your old non-working unit. (He then they also: podmarafetyat, otpiskostruyat, paint, napidarasyat, change the consumables and the price it will have, yet the fact that much cheaper with a new plant.
Well, if we consider that in the area where I live, for example, a new generator can cost 700-800 US Taller, the appropriate car owners, especially in the art of understanding people - they are very willing to buy at a lower price recovered.
So I have repeatedly witnessed (and consultant), like people dying generator, and I was faced with the question "do you have? We will buy. "
(I have the same, though, and lay in a shed among the parts which -That different generators, but it was defective parts, which I managed to grab dismissing from service centers. Then, taking them myself, I was hoping they "ever mend and maybe sell ».)
In general, therefore, several times I was denied the opportunity to make some money.
At the time, I put together a device to test the generator. (I even wrote about it here)
And then, finally, I decided to check it out in action, and at the same time to repair a faulty one of the generators, which, incidentally, comes to my pipilatsu. (All the same, you need to have on a stock, as it is quite old.)
Anyway, the main task was to work out a ready concept of fast and, most importantly, low-budget repairs, if possible, any generator. In the sense that we should not waste any time or money - in search of spare parts, which in principle can be made most.
(Here it should be emphasized that such an unusual task is relevant only for me here, for Russia to engage in such crap was neither the time nor the desire nor the special economic sense.)
The rear part of the rotor bearing (which, in turn, not much, but is firmly seated in the rear cover) is not very difficult to get .. (more likely, some difficulty sometimes deliver brushes that cling to the little groove developed on the contact ring or can be hooked for the rear rotor bearing.)

Separating the front cover with the rotor can loosen the pulley nut and separate the rotor itself. Thus, it is possible to verify (or change) the front bearing of the generator.
On the rotor often worn contact rings, which slide brush. Given the large runs of cars in Russia, we have such a deterioration happens quite often. But while the bronze ring does not rub up the holes, it may still serve.
Of course, the wear is highly dependent on the quality of the material. There are, for example, is not very old machines with moderate runs, where the rings are rubbing their entirely to plastics (at all, for example, VALEO, BOSCH) (become unusable), and just across generators (such as increasingly pleased DENSO, especially on right-handed cars) even when rabid shoots wear was barely noticeable. All the same, the quality is very Materially affects the durability. Here is a lot to twist the generator, but as new ring

Here stator winding
with the regulator and the rectifier. (Visible in the rectifier 6 power diodes)

Here's a side view. see the bolt connecting the positive cable and the power connector to connect to the wiring.

Here stator winding in a pure form.
Just very rarely fails.
While earlier there were cases basins Winding short circuit and charring. In ancient times of shortage of spare parts for the youth and poverty I once had to take a coil of wire and a winding reel own generator for vaz2101. He even worked as an acquaintance has not sold a car. )))))

(If you need to pull out only the regulator, the stator and the rectifier can not pull out of the back cover of the generator) (I parse all - for cleaning and painting. All the same, for me it was kind of like a hobby.)
Then gently unsolder control from the rectifier. Only two conductors fastened it to a rectifier diode. As can be seen, it is formed with the brush holder.
(This is a slightly different controller, untouched photo of my not preserved), but the only difference is in the arrangement of sockets.
By the way, the right conductor nowhere at all connected ... Initially it was used to supply AC power directly from the coil to control, for example, the revolutions in the diesel engine.

Under the aluminum radiator - ceramic hybrid regulator assembly. By simple testing, it was found that the regulator is dead.
More precisely, there are dead: diode and switching transistor. In the picture you can see a site where there was open-frame chip transistors (and diode) in the top of the ceramic plate.
When you remove the silicone coating the transistor just fell off of a hybrid assembly. e rest of the living. (I checked) As an option, it can be soldered on your remote postings. And indeed, at the very least, he can be a voltage regulator to withdraw outside of genes and to fix the outside. This has been done many times in the old days.
ps.
It was very unpleasant to remove silicone compound from the board ... it is soft and sticky ... no dissolves when washing hands ...

Of course, regulators for different types of generators are available as spare parts. But I remind you that my task was to explore the possibility of a regulator sgorodit by the collective farm.
Looking on the Internet many schemes other craftsmen came to the conclusion that not much of the original solutions. I was looking for a very simple and fast by the schematic, so promptly inserted pencil on paper their own scheme (however, say, that nothing fundamentally new, I did not invent, the network has a bunch of similar) I just used different schematics from other systems.
The principle at the controls, it should be noted, one common to all: System voltage track and manage car field winding on the rotor (via the contact rings) I will not ship here by special terms.
First, hastily assembled a trial version on the clumsy "breadboard»
and connected to the nozzle to the gene.

On the breadboard first set trimmer to expose issued Gena tension. (Lower battery on the floor to the gene did not work "in the air»)
Under the rules of the voltage at the motor should be around 13, 7 volts.
Changing the way, the voltage applied to Batteries can be changed, and the charging current, which is caused by the difference of potential genes and Batteries, Batteries and internal resistance.
(Later, on the test bench is going to make a dummy load with an ammeter. (But now it was not necessary, because there was a problem in the controller)

In general, the scheme I somehow decided. Now I had to make and stuff their board instead of the old faulty regulator. In this case, the size was not very volgotno- at my disposal was a place for a square board 2smH2sm

Details had to be put together so that the desired conductors were in their channels on its platform to connect to the brush, rectifier, as well as the conclusions of the management and control lamp Gena charge. (Only 5 pins)
Details had to be positioned on both sides. Key mosfet and diode on the one hand ... (more added svetodiodik, but who sees it in the engine compartment through the slots of the generator cover ??)

Other details - located on the other side. Instead rheostat - I put two ordinary resistor, choosing ratings. So safer and takes less space.
I beg you brothers radiolyubiteley- not reproach me loot ... I is, in general, I can well understand that the so nice and neat ... but! if I need to quickly make simple platu- I cut out a lot faster track a special cutter.
Here, perhaps, it is unethical, but fast, cheap, practical ©.

Solder the wires to it to be mounted on the brush holder.

Before installing smeared silicone components, output slipped through the holes on the back side and soldered. Outside, then just smeared with silicone. Transparent so that you can look at the LED.
When the generator quickly flickers. Probably, it is possible to judge how the health system as a whole.
In short, all collect and check again on the bench. As BE operates.
The transistor is not heated at all. I am leaving him without a radiator. (Still open mosfet has a low contact resistance, so the heat is released arhimalo)

In conclusion:
From radio components do not have to buy anything, all they found on the old boards, which have all kept a lot of Elijah.
Either inache- I personally think such repairs occupation much more reasonable and profitable than, for example, Reballing proca on the motherboard cost of $ 100. For the generator on a foreign car is expensive as it is.
On this topic finish.
Thank you for attention.

Source: