910
Leather notebook Skyrim
Near the holidays, which is accepted to give a gift. Why not please his mate (or maybe just a friend, family or colleague) interesting and not ordinary gifts made with their own hands.
Especially enjoyable it will be for fans of the game Skyrim :)
We need:
- Skin (bite size ~ 30x40 cm) \\ If the skin is not present, you can take leatherette or cloth dense homogeneous
- Paper - 52 (plus 2-3 pieces in reserve) A4 sheet (Maiden, blueprints)
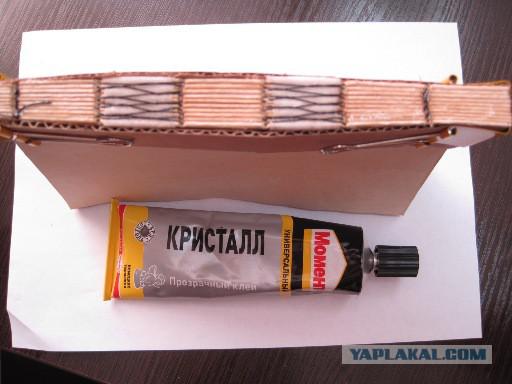
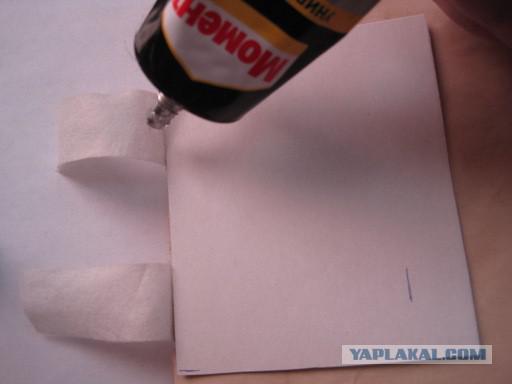
- Glue - Moment of "Crystal" - an album out almost all small tube (50ml)
- Thick cardboard for the cover, two-piece, size ~ 15h22sm (if found in stores are not successful, you can pull off a friend's Accounting folder-folder larger or plain cardboard box razderebanit)
- Thin cardboard fortsazev and spine
- Two thin strips of cloth (can be replaced with a thin cardboard)
- Acrylic paint on fabric
- Thin brush
- Pen, ruler, scissors, knife stationery, paper clips
- Threads, needles
- File \ needle file
- Coffee and water
- Newspaper.
There will be about 60 photos
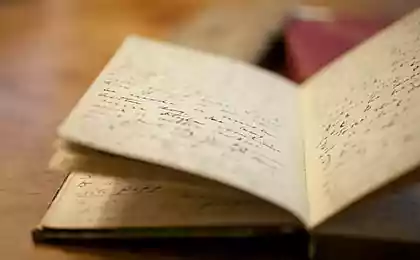
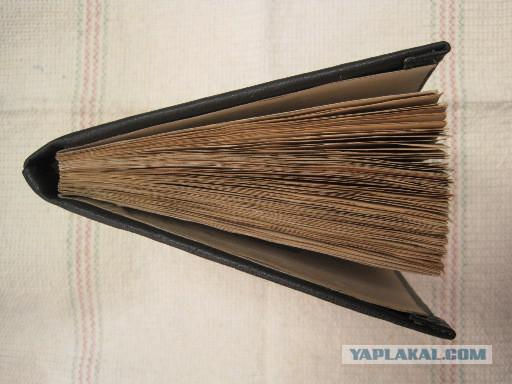
Notepad will do with the aged sheets.
\\\\
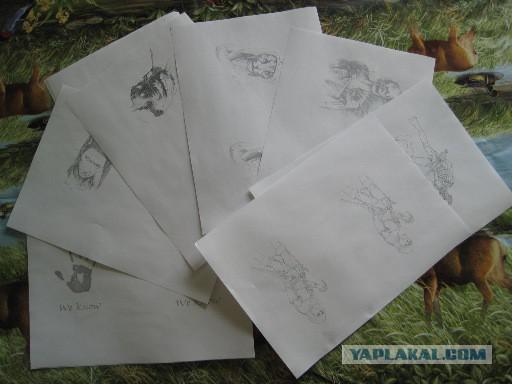
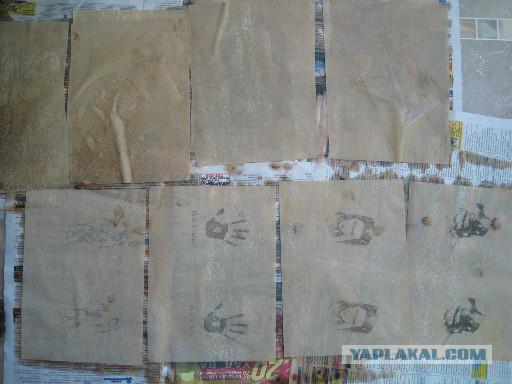
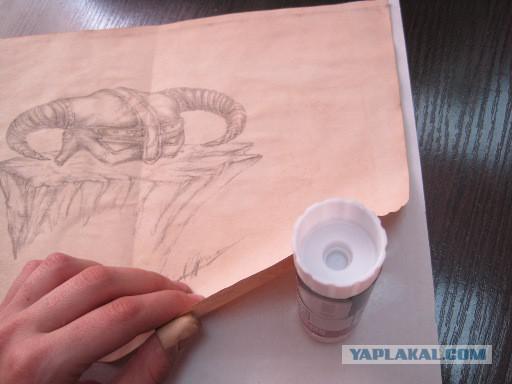
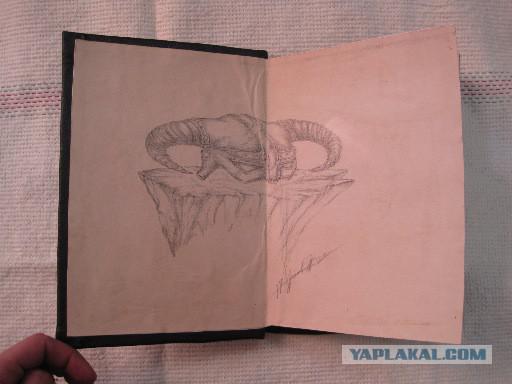
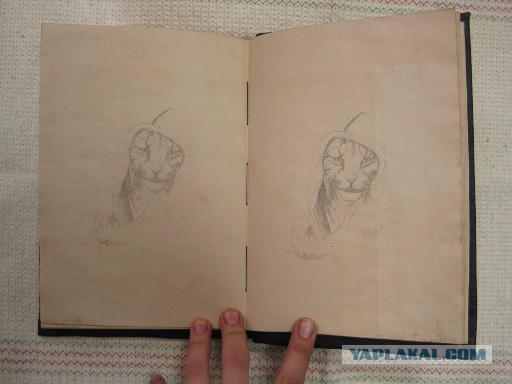
Previously, on the sheets, you can print pictures on the theme you want (in my version - a race from the game, spells, characters, etc.). Ideally, they add transparency to be able to write on top. Well suited pencil drawings or processed in the program to convert your pictures into sketches.
Since the beginning of brewed coffee (I take the custard can be soluble). The more coffee, the darker the pages turn out in the end. I take 7-8 tablespoons of table on 1.5L of water. Bring to a boil while stirring, remove from heat, I give settle "welding».
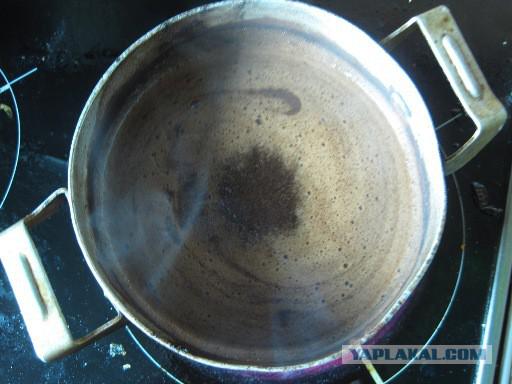
Pour the "solution" in the pan with high sides and begin to soak page. I soaked each separately with the two sides. Next put on top. Let stand for 5-10 minutes.
Then gently pull out, too, one by one, otherwise there is a risk of break (Maiden thinner blueprint thicker, more time is necessary to soaking), allow to drain and put the coffee on sheets of paper spread out in advance.
Repeat the operation until the end of the white paper. I usually do in stages 3-4 (vlazit in proitven 15-20 sheets, which can cover the water for toning)
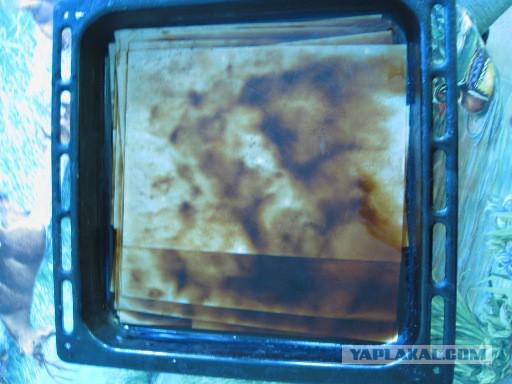
The first 20 sheets of paper are passed on to dry, spread on an old second batch, and so on. So Aged paper dries quickly.
To dry out most of the time. So, it is better to conduct this operation in the evening to dry for the night (if house humidity is big, can dry the whole day).
When the paper has dried, assemble it into a pack, wipe with a dry cloth coffee (if something is left on the surface).
\\\\
Optionally, you can burn the pages lighter \ candle (but then edges are a little dirty) (!) Do not forget to comply with fire safety :) On one sheet of paper is burning well, and if the right pack - bad kindled.
\\\\
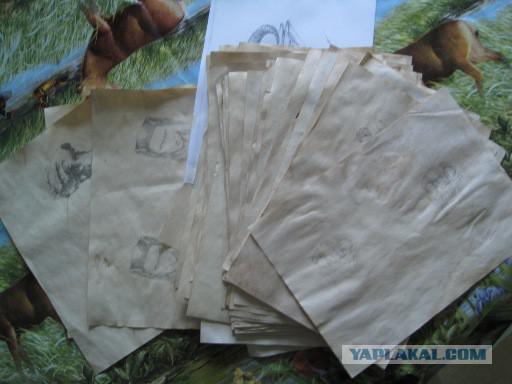
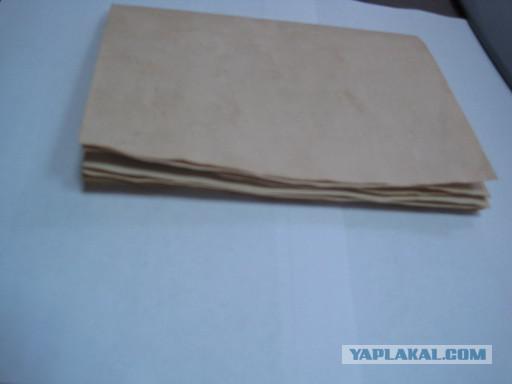
Then proceed to block the formation of a notebook. Putting on 5 sheets together to align well and folded in half in the note-book. Repeat step 9 more times with the remaining sheets. You should now have 10 notebooks to 5 sheets.
If the pages are printed images, making sure not messed orientation.
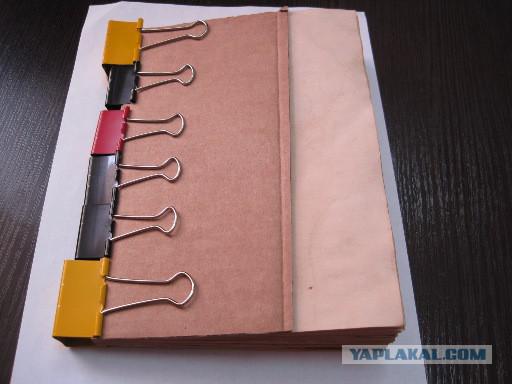
We are putting in place the entire unit again aligned sheets and clamped at the spine using paper clips. Previously under which both sides put a thick cardboard to paper no trace remained.
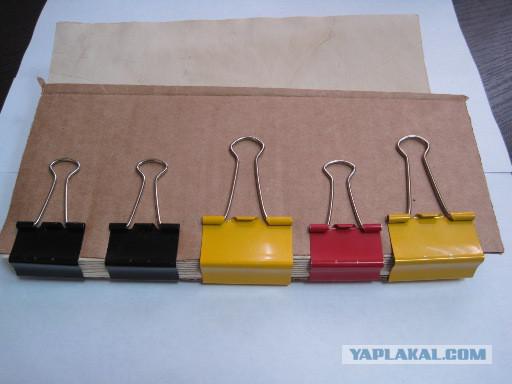
It is then that the unit has become more dense and sheets did not seek fled in all directions.
Clips can be replaced with something heavy (the weight of a suitable size, stack of books, boxes of paper, a)
After the sheets are compacted, proceed to the firmware block.
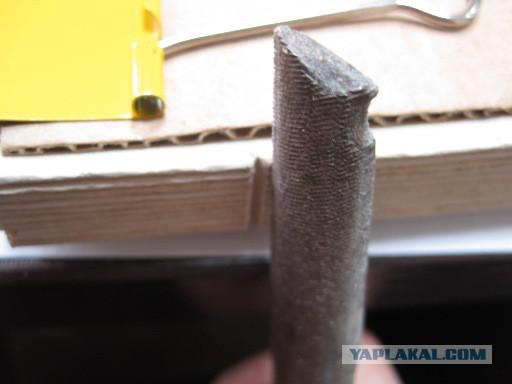
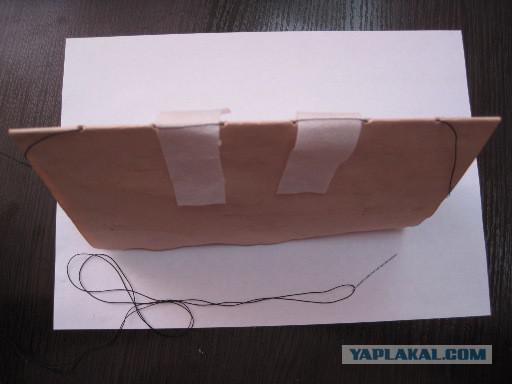
On cardboard mark up "line" of 7 cells by 3 cm each. On them we will make cuts.
Hold the clamps and a file \ needle files do cuts. Sufficient depth to the hole was at the very least a sheet (millimeter 3-4). It will mark our future \ hole for insertion.
Again, remove the clips and start to flash, unlock.
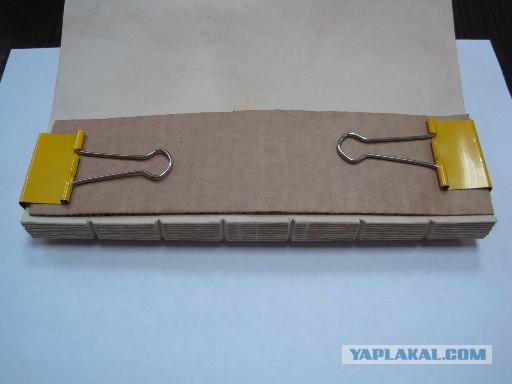
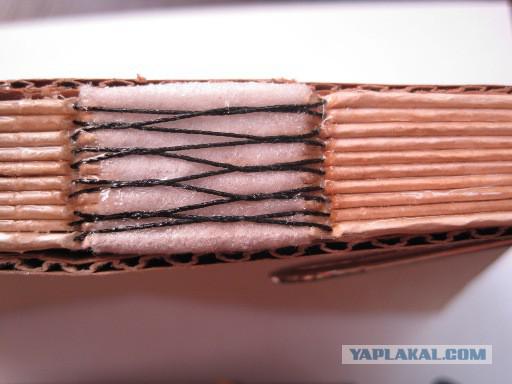
Pre-need to cut two strips of fabric, approximately 3 cm wide and 10-15 cm in length.
Apply them to the first notebook in the center, through one period.
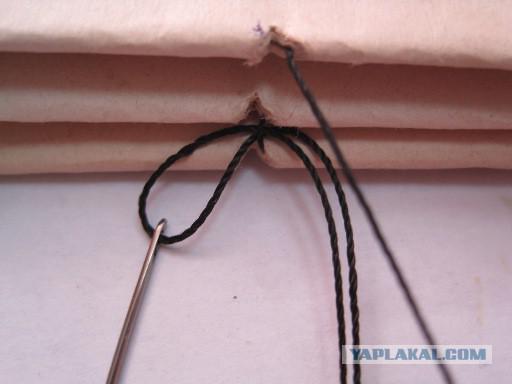
Sewn from right to left on the previously chosen holes. Threads stretch out completely, leaving untouched the tip of 10-15 centimeters in length.
Sew down (into the folded sheets), straighten notebook derive the string out, stretch out completely, but that has not got the tip, down again at what remains in the fabric thread, and so on - until the end of the sheet. There's a good stretch the string, holding the end of the right side.
Impose a notebook on top of the next and continue to sew the same way.
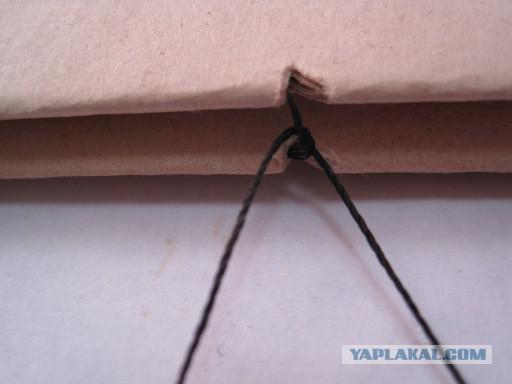
Only now, having reached the tissue is necessary to hold the thread crosswise

Doshivaem back to the top, tighten the thread to nowhere does not sag and do two or three bundles of abandoned before tip.
Impose a third book and continue the operation. Reaching the end of the left, tighten the thread and you need to fix the knot and then.
For this purpose, it is necessary to thread the needle in the loop on the bottom seam and tighten, may be repeated a couple of times.
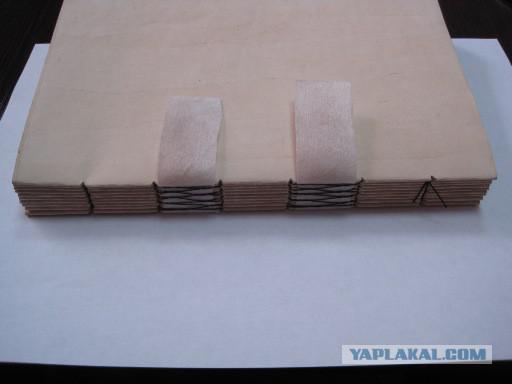
Thus we sew all notebooks, not forgetting to pass through the thread crosswise opposite the fabric and the fabric of output kept upward.
All base pad sewn.
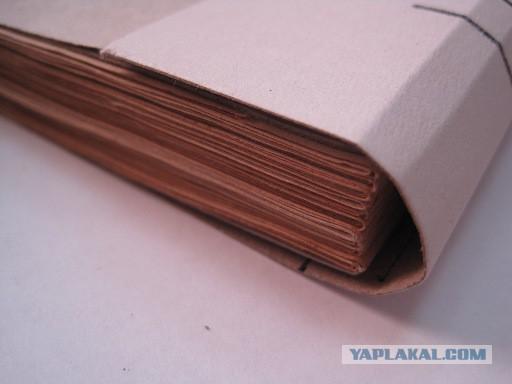
It remains to glue the spine.
Again squeeze clamps around the edges by placing cardboard. Thoroughly smear glue the spine, smeared across the line of the excess spine.
We look to the glue did not get between the pages, and do not drip (so best to take it transparent adhesive)
Again anchoring the entire structure clamps the sheets were pressed tightly together and give dry
While the glue dries, do bookends
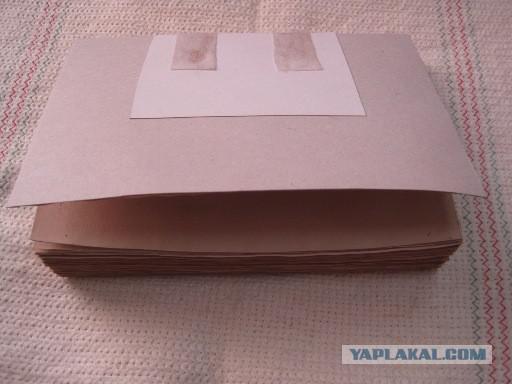
Take a thin cardboard (A4 size) in half and squeeze the glue to his list - it will be the very first and very last page, which then are glued to the cover.
Glued stained sheet is also better to be folded in half. Then it is better pasted.
By this time, the adhesive sheets on the block dried up, continue to collect "designer».
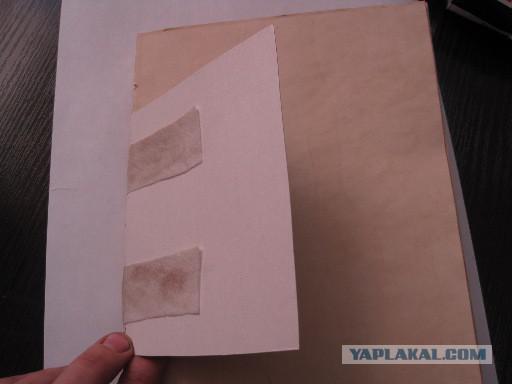
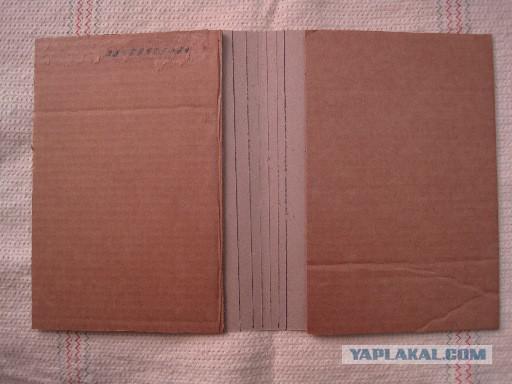
Take two small squares of cardboard, 10x7 wide (enough to cover the fabric strip) and glue on both sides of the notebook. To avoid soiling the adhesive sheet, puts a piece of paper.
Glue, smooth
Then paste it bookends. Here you can put a pencil on the glue, you can at the time. Since the beginning of the adhesive sheet of notebook and lubricate it gently putting a bookend and presses, making sure the edges are smooth.
Next to the end leaf is pasted vnatyag fabric with cardboard.
Repeat the operation for the other side of the block.
Glued unit again under pressure, to grab all good.
At this time, prepare the cover.
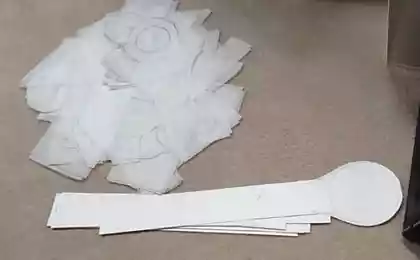
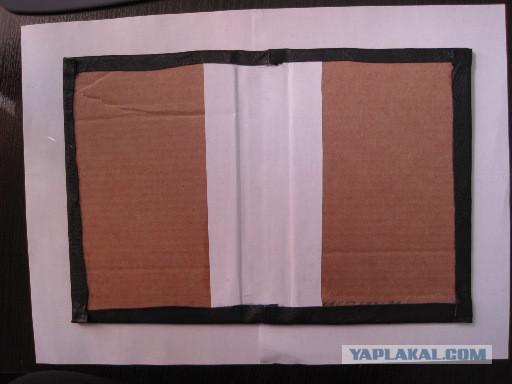
First, take a strip of cardboard 10 cm wide and 21 (the length of the future covers) length. And do handle awl or razlinovku (scoring). Along these lines (they must be deep enough, but not enough to break the cardboard) is bent to cover the spine.
Try on
Then cut two pieces of cardboard. Each half cover should protrude by 5 mm at each end of the sheet pad and 7 mm to move away from the spine. On average, it turns out 15x21 cm.
Merge all three parts together.
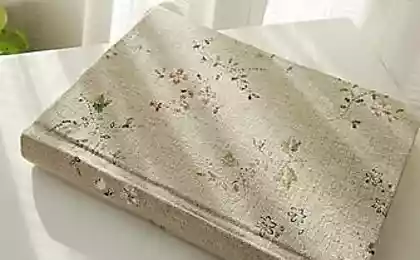
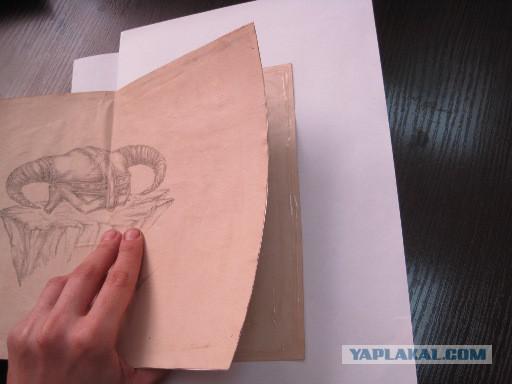
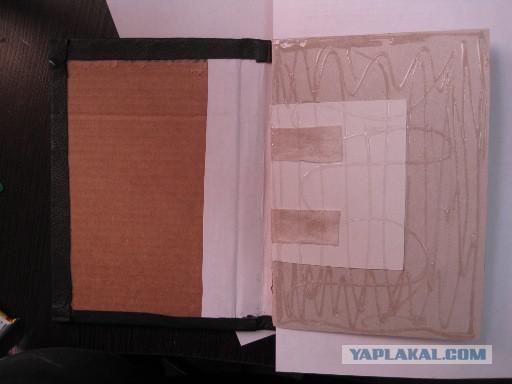
Then, from a piece of leather cut out the cover of the future. The edges should retreat to 3-5 cm from the edge of cardboard on each side. The skin is better not take a thick (0.7-1 mm)
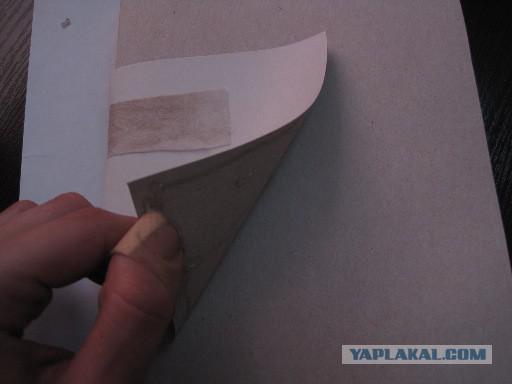
Thoroughly grease the cardboard cover is adhered to the skin. It follows that there are no folds, bumps and more.

We coat the edges and fold at a time (the top two, then the two side). For greater strength, you can squeeze clamps, do not forget to put a cardboard to trace is left.
When the cover has dried up, try on it to the notebook. If everything is OK - proceed to the final stage.
Lubricates both flyleaf glue, put a block in the center of the cover. Do not forget that the cover should protrude by 5 mm at each end, and glue parts together. One can start with one side and then the other. You can just press the two halves to the block of paper.
Again, under the press, give dry.
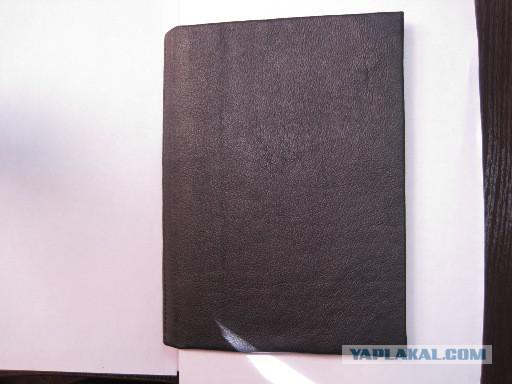
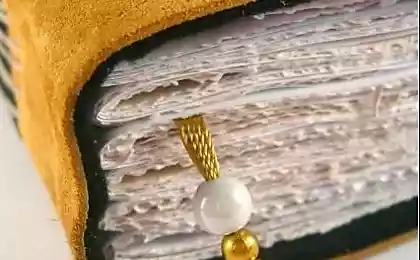
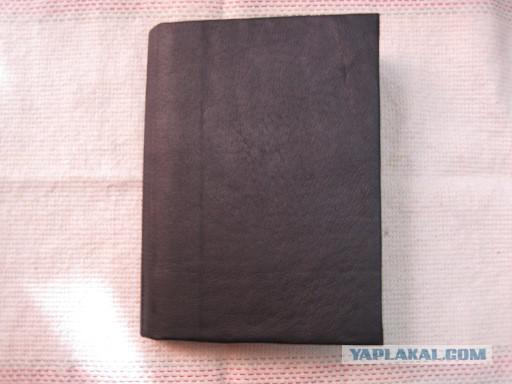
Voila - ready notebook.
Endpapers
Sheets
Now it should be decorated.
Getting started drawing on the cover.
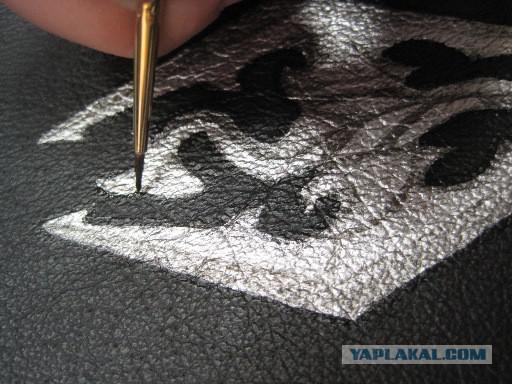
Rubbings from a template or just draw out the cut, or come up out of your head. Who in that much :)
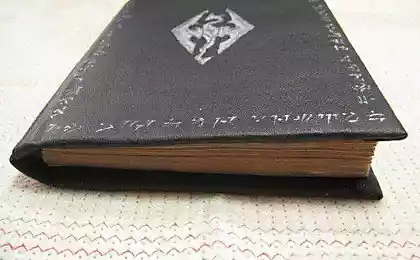
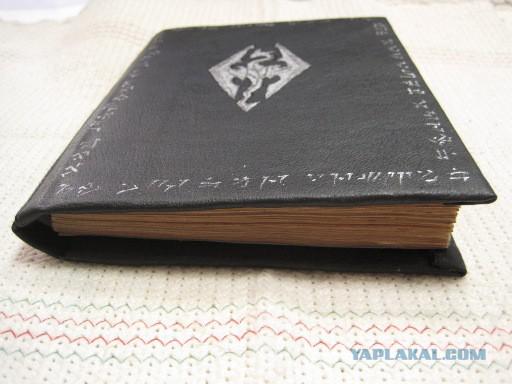
I draw a dragon from the game Skyrim.
First, to outline
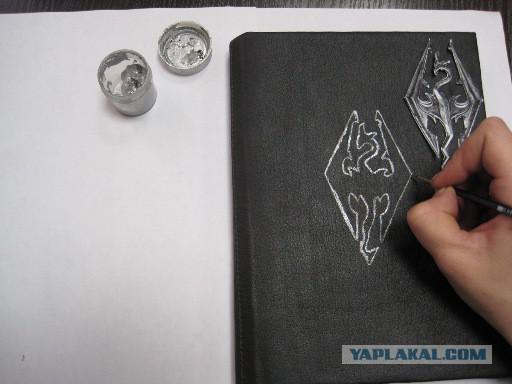
Then, completely painted over with silver paint the dragon's body.
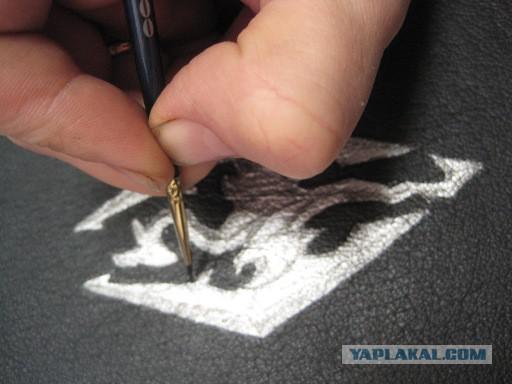
Later darker shade turned the convexity, the wings, the body.
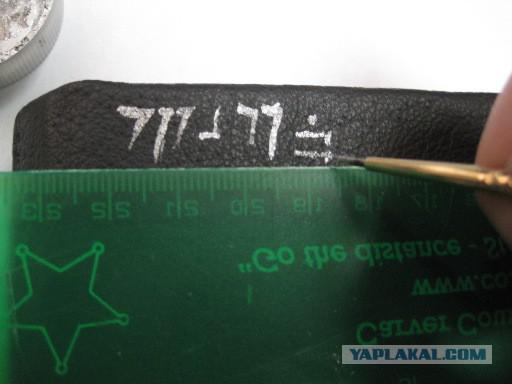
To complete the picture edge inscriptions decorate the cover of the dragon language. The dictionary can be in the internet, who needs.
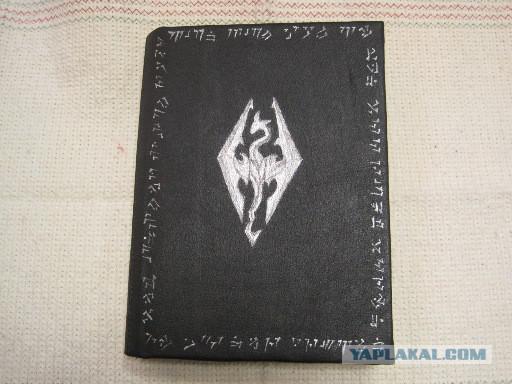
We get here is such a wonderful notebook :)
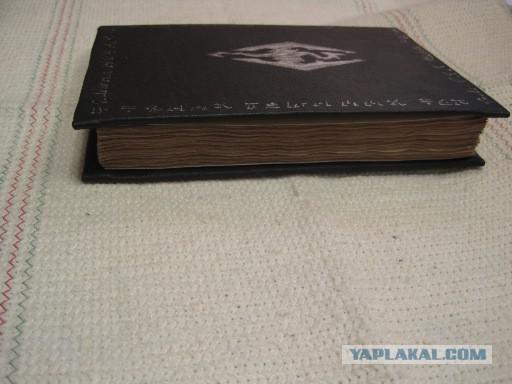
Admiring, and at the same time we look, where there are no unnecessary stocks

side view
top view
Do not forget to give the selected object and get a lot of enthusiasm;)
That's all I wanted to say. Thank you all for your attention. Hopefully, someone will come in handy this small workshop :)
Source:
Especially enjoyable it will be for fans of the game Skyrim :)
We need:
- Skin (bite size ~ 30x40 cm) \\ If the skin is not present, you can take leatherette or cloth dense homogeneous
- Paper - 52 (plus 2-3 pieces in reserve) A4 sheet (Maiden, blueprints)
- Glue - Moment of "Crystal" - an album out almost all small tube (50ml)
- Thick cardboard for the cover, two-piece, size ~ 15h22sm (if found in stores are not successful, you can pull off a friend's Accounting folder-folder larger or plain cardboard box razderebanit)
- Thin cardboard fortsazev and spine
- Two thin strips of cloth (can be replaced with a thin cardboard)
- Acrylic paint on fabric
- Thin brush
- Pen, ruler, scissors, knife stationery, paper clips
- Threads, needles
- File \ needle file
- Coffee and water
- Newspaper.
There will be about 60 photos

Notepad will do with the aged sheets.
\\\\
Previously, on the sheets, you can print pictures on the theme you want (in my version - a race from the game, spells, characters, etc.). Ideally, they add transparency to be able to write on top. Well suited pencil drawings or processed in the program to convert your pictures into sketches.

Since the beginning of brewed coffee (I take the custard can be soluble). The more coffee, the darker the pages turn out in the end. I take 7-8 tablespoons of table on 1.5L of water. Bring to a boil while stirring, remove from heat, I give settle "welding».

Pour the "solution" in the pan with high sides and begin to soak page. I soaked each separately with the two sides. Next put on top. Let stand for 5-10 minutes.

Then gently pull out, too, one by one, otherwise there is a risk of break (Maiden thinner blueprint thicker, more time is necessary to soaking), allow to drain and put the coffee on sheets of paper spread out in advance.

Repeat the operation until the end of the white paper. I usually do in stages 3-4 (vlazit in proitven 15-20 sheets, which can cover the water for toning)
The first 20 sheets of paper are passed on to dry, spread on an old second batch, and so on. So Aged paper dries quickly.
To dry out most of the time. So, it is better to conduct this operation in the evening to dry for the night (if house humidity is big, can dry the whole day).
When the paper has dried, assemble it into a pack, wipe with a dry cloth coffee (if something is left on the surface).
\\\\
Optionally, you can burn the pages lighter \ candle (but then edges are a little dirty) (!) Do not forget to comply with fire safety :) On one sheet of paper is burning well, and if the right pack - bad kindled.
\\\\

Then proceed to block the formation of a notebook. Putting on 5 sheets together to align well and folded in half in the note-book. Repeat step 9 more times with the remaining sheets. You should now have 10 notebooks to 5 sheets.
If the pages are printed images, making sure not messed orientation.

We are putting in place the entire unit again aligned sheets and clamped at the spine using paper clips. Previously under which both sides put a thick cardboard to paper no trace remained.

It is then that the unit has become more dense and sheets did not seek fled in all directions.
Clips can be replaced with something heavy (the weight of a suitable size, stack of books, boxes of paper, a)
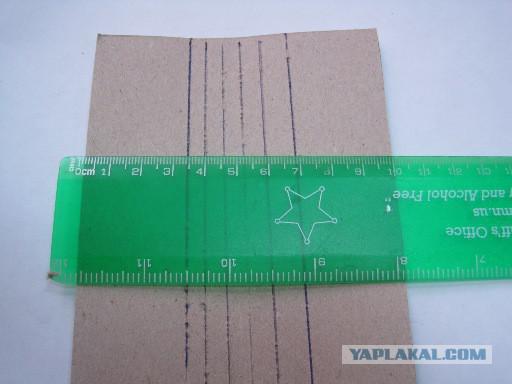
After the sheets are compacted, proceed to the firmware block.
On cardboard mark up "line" of 7 cells by 3 cm each. On them we will make cuts.
Hold the clamps and a file \ needle files do cuts. Sufficient depth to the hole was at the very least a sheet (millimeter 3-4). It will mark our future \ hole for insertion.

Again, remove the clips and start to flash, unlock.

Pre-need to cut two strips of fabric, approximately 3 cm wide and 10-15 cm in length.
Apply them to the first notebook in the center, through one period.

Sewn from right to left on the previously chosen holes. Threads stretch out completely, leaving untouched the tip of 10-15 centimeters in length.
Sew down (into the folded sheets), straighten notebook derive the string out, stretch out completely, but that has not got the tip, down again at what remains in the fabric thread, and so on - until the end of the sheet. There's a good stretch the string, holding the end of the right side.
Impose a notebook on top of the next and continue to sew the same way.
Only now, having reached the tissue is necessary to hold the thread crosswise

Doshivaem back to the top, tighten the thread to nowhere does not sag and do two or three bundles of abandoned before tip.
Impose a third book and continue the operation. Reaching the end of the left, tighten the thread and you need to fix the knot and then.

For this purpose, it is necessary to thread the needle in the loop on the bottom seam and tighten, may be repeated a couple of times.

Thus we sew all notebooks, not forgetting to pass through the thread crosswise opposite the fabric and the fabric of output kept upward.
All base pad sewn.

It remains to glue the spine.
Again squeeze clamps around the edges by placing cardboard. Thoroughly smear glue the spine, smeared across the line of the excess spine.

We look to the glue did not get between the pages, and do not drip (so best to take it transparent adhesive)

Again anchoring the entire structure clamps the sheets were pressed tightly together and give dry

While the glue dries, do bookends
Take a thin cardboard (A4 size) in half and squeeze the glue to his list - it will be the very first and very last page, which then are glued to the cover.
Glued stained sheet is also better to be folded in half. Then it is better pasted.

By this time, the adhesive sheets on the block dried up, continue to collect "designer».
Take two small squares of cardboard, 10x7 wide (enough to cover the fabric strip) and glue on both sides of the notebook. To avoid soiling the adhesive sheet, puts a piece of paper.

Glue, smooth

Then paste it bookends. Here you can put a pencil on the glue, you can at the time. Since the beginning of the adhesive sheet of notebook and lubricate it gently putting a bookend and presses, making sure the edges are smooth.

Next to the end leaf is pasted vnatyag fabric with cardboard.

Repeat the operation for the other side of the block.

Glued unit again under pressure, to grab all good.
At this time, prepare the cover.
First, take a strip of cardboard 10 cm wide and 21 (the length of the future covers) length. And do handle awl or razlinovku (scoring). Along these lines (they must be deep enough, but not enough to break the cardboard) is bent to cover the spine.

Try on

Then cut two pieces of cardboard. Each half cover should protrude by 5 mm at each end of the sheet pad and 7 mm to move away from the spine. On average, it turns out 15x21 cm.
Merge all three parts together.

Then, from a piece of leather cut out the cover of the future. The edges should retreat to 3-5 cm from the edge of cardboard on each side. The skin is better not take a thick (0.7-1 mm)
Thoroughly grease the cardboard cover is adhered to the skin. It follows that there are no folds, bumps and more.

We coat the edges and fold at a time (the top two, then the two side). For greater strength, you can squeeze clamps, do not forget to put a cardboard to trace is left.

When the cover has dried up, try on it to the notebook. If everything is OK - proceed to the final stage.
Lubricates both flyleaf glue, put a block in the center of the cover. Do not forget that the cover should protrude by 5 mm at each end, and glue parts together. One can start with one side and then the other. You can just press the two halves to the block of paper.

Again, under the press, give dry.

Voila - ready notebook.

Endpapers

Sheets

Now it should be decorated.
Getting started drawing on the cover.
Rubbings from a template or just draw out the cut, or come up out of your head. Who in that much :)
I draw a dragon from the game Skyrim.
First, to outline

Then, completely painted over with silver paint the dragon's body.

Later darker shade turned the convexity, the wings, the body.

To complete the picture edge inscriptions decorate the cover of the dragon language. The dictionary can be in the internet, who needs.

We get here is such a wonderful notebook :)

Admiring, and at the same time we look, where there are no unnecessary stocks

side view

top view

Do not forget to give the selected object and get a lot of enthusiasm;)
That's all I wanted to say. Thank you all for your attention. Hopefully, someone will come in handy this small workshop :)

Source: