169
What techniques need to know beginners needlewomen
If you have ever dealt with needlework, then you probably know that a beautifully knit product is only half the case. In order for the time spent on knitting not to be wasted, you need to learn how to stitch together the details and carefully handle the seams. It is very important that the seams are smooth, moderately tight and do not deform the resulting product.
How to sew knitted parts There are several ways to make seams perfect. Someone turns to the help of the machine, someone performs seams manually. In this article you will see two better ways. knittingYou can choose from them yourself. The instructions are light and accurate, the seams are imperceptible on the front side and neat on the inside out. Checked!
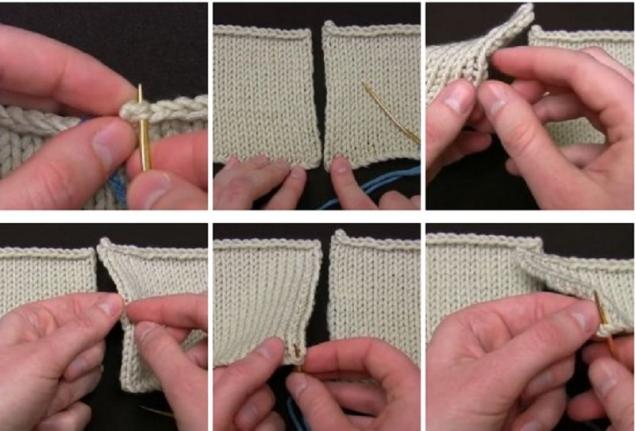
Way one: hooked.
At first glance, the task may seem impossible. Don't be afraid! As soon as you figure out the little things, this will be your favorite.
The seam is quite fast in execution, and the edge is smooth and neat. However, the seam has one drawback - it is not suitable for products with a complex edge.
It is best to sew them simple details without diminution. Or, as an option, decrease and add to do, but at the same time retreat one loop from the edge. In that case, everything will be perfect! To simplify the task, you can place edge loops on separate pins. This will make them easier to disband.
Explanation
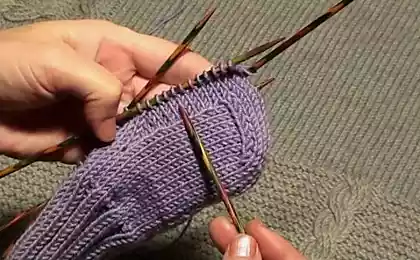
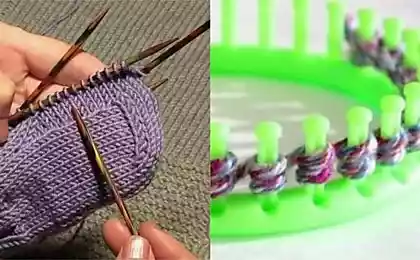
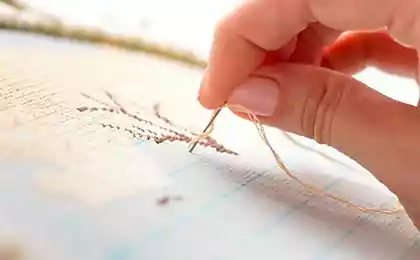
Tiny loops create a kind of pigtail around the edges of the detail. On one of the details, this pigtail must be dissolved with a needle. You will see the sleeves on the edge of the loop – this is the thread that you need to make the seam of the product.
Put the parts together on the back side. Insert the hook between the two loops of the part that remained unbroken, and pick up the loosened edge loop. Stretching this loop through the upper part, with the next loop of the walk the same way and stretching it through the first.
Continue the above sequence of actions until the end of the seam. So you get a drawing of the edge hinges of the lower part on the top. This seam has the added advantage that parts stitched in this way are very easy to disconnect. You just need to push the parts that are bonded together a little and pick up the seam. He'll break up on his own.
Video to help.
about:blank
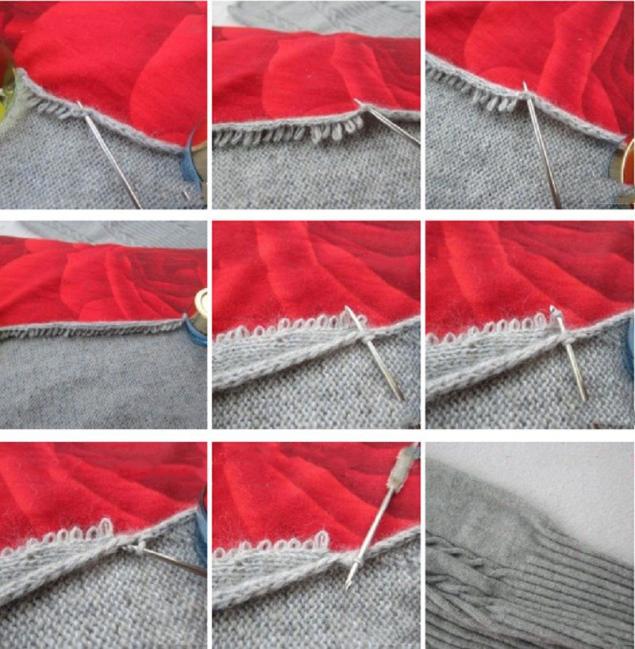
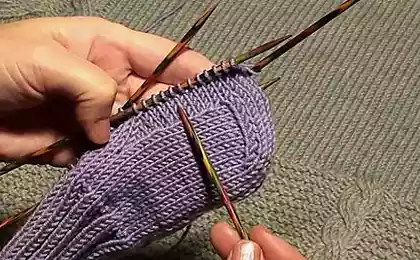
Method two: stitch the needle
The next seam is also very comfortable. It's called a mattress. Now you learn, How to sew knitted parts with a needle.
Important advice: to perform this seam take blunt-end needle. Like an embroidery needle. It is even better to use a needle with a curved end, similar to those with which balls are sewn.
Advice second, no less important: if the product is connected from coarse, thick yarn, then it is better to take a thinner thread for the seam. This will make the seam neat. The thread must necessarily coincide in color with the product.
19442004
Explanation
The needle should be inserted into the jumper between the edge and the next loop. Pick up a jumper first on one part, then on the second. Continue this sequence until the end of the product. At the end, pull the string.
Video to help.
about:blank
Please your loved ones with stylish knitted things and certainly share the secret of convenient assembly of products with friends.
How to sew knitted parts There are several ways to make seams perfect. Someone turns to the help of the machine, someone performs seams manually. In this article you will see two better ways. knittingYou can choose from them yourself. The instructions are light and accurate, the seams are imperceptible on the front side and neat on the inside out. Checked!
Way one: hooked.
At first glance, the task may seem impossible. Don't be afraid! As soon as you figure out the little things, this will be your favorite.
The seam is quite fast in execution, and the edge is smooth and neat. However, the seam has one drawback - it is not suitable for products with a complex edge.
It is best to sew them simple details without diminution. Or, as an option, decrease and add to do, but at the same time retreat one loop from the edge. In that case, everything will be perfect! To simplify the task, you can place edge loops on separate pins. This will make them easier to disband.

Explanation
Tiny loops create a kind of pigtail around the edges of the detail. On one of the details, this pigtail must be dissolved with a needle. You will see the sleeves on the edge of the loop – this is the thread that you need to make the seam of the product.
Put the parts together on the back side. Insert the hook between the two loops of the part that remained unbroken, and pick up the loosened edge loop. Stretching this loop through the upper part, with the next loop of the walk the same way and stretching it through the first.
Continue the above sequence of actions until the end of the seam. So you get a drawing of the edge hinges of the lower part on the top. This seam has the added advantage that parts stitched in this way are very easy to disconnect. You just need to push the parts that are bonded together a little and pick up the seam. He'll break up on his own.
Video to help.
about:blank
Method two: stitch the needle
The next seam is also very comfortable. It's called a mattress. Now you learn, How to sew knitted parts with a needle.
Important advice: to perform this seam take blunt-end needle. Like an embroidery needle. It is even better to use a needle with a curved end, similar to those with which balls are sewn.
Advice second, no less important: if the product is connected from coarse, thick yarn, then it is better to take a thinner thread for the seam. This will make the seam neat. The thread must necessarily coincide in color with the product.

19442004
Explanation
The needle should be inserted into the jumper between the edge and the next loop. Pick up a jumper first on one part, then on the second. Continue this sequence until the end of the product. At the end, pull the string.
Video to help.
about:blank
Please your loved ones with stylish knitted things and certainly share the secret of convenient assembly of products with friends.


You've never made a chicken dish like that! Spring, light, diet...
The flower withered not by day, but by hour. Everything changed with this super tool!