679
How to build a windmill with your hands
The conversion of wind energy into electricity (especially in rural areas, which are famous for their zaduvnaya winds) will save you money. And invention, which helps to do a regular windmill.
In order to bring to life, you should understand the structure of the windmill and reveal the list of materials that you will need to build.
Thus, the main part of the windmill.
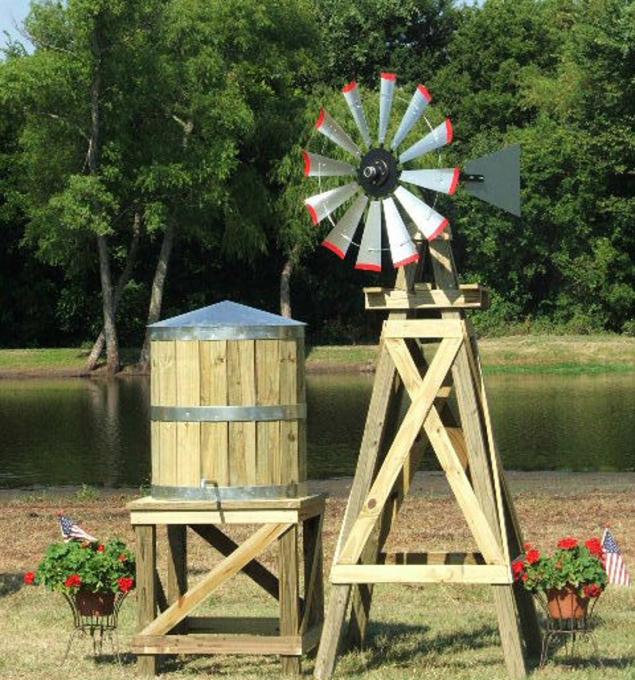
Base — is the base of the windmill. This is her very strong and heavy item. It is usually made of concrete. If the mill is supposed to be six feet high, the base assumes a size of 45 sq. cm and weighing 36 kg.
The mill tower.
The tower is made from durable piece 5-8-inch plastic pipe (PVC). Other materials are also used, but they are not as effective. The height of the tower, as we have agreed, shall be five feet.
Of the blade.
The blades of the mill are similar to those that are in the propeller plane. Knives-collectors of wind energy are made from a light plastic or wood. Sizes of the blades correspond to the size of the base and tower. For mill one and a half meter of the blade length is approximately 0.9 m.
Gondola.
The basis of the wind the nacelle is the gearbox. With the help of the knife - blades connect to the tower and then unable to function normally.
After we learned all the parameters of the base, tower, nacelle, it's time to build the windmill.
Solar panels.
Solar panels installed on the roof in a place where it gets maximum amount of sunlight, and where it is most open.
Now set the tower.
Before it should reach the maximum amount of wind. Therefore, its location should also be chosen so that the wind on the way to the tower did not meet any obstacles.
The tower is attached to the gondola. Inspect the size of the blade in order to respond to the wind and catch it.
The connection of the generator is the final step of construction. Combine together the solar panels and wires of the generator.
"Have you tried to harness the wind to make it work for yourself! Because wind energy is one of the cheapest and easily accessible! I do not propose to build the windmills, as it did in the old days, or complex modern wind turbine. But to build a wind turbine to generate electricity, albeit small, low-power, I think, will be able every family living in the rural area of each school.
Energy produced by a wind turbine, enough to turn on the pump for watering the garden or garden, to light the house or class. And if at least in every fifth house will work its own free mini — wind power, imagine how much savings kilowatt-hours will form an "energy spike" in our country!"
With dad Serge is going this summer to build a house near a wind farm. In the letter he sent sketches of its future installation. We showed them to the engineer Vyacheslav Nikolaevich Shumeeva, he carefully studied the sketches, developed, and now offers them to readers.
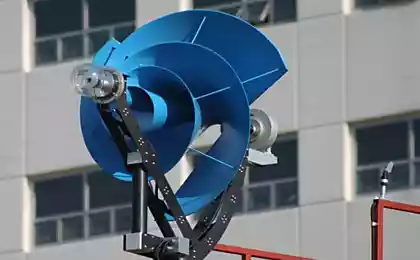
Serge Courneuve used known even in ancient times, the scheme of wind turbines with self-rotating drum.
The device consists of two halves of a hollow cylinder, which after cutting was parted to the side of the common axis (see figure).
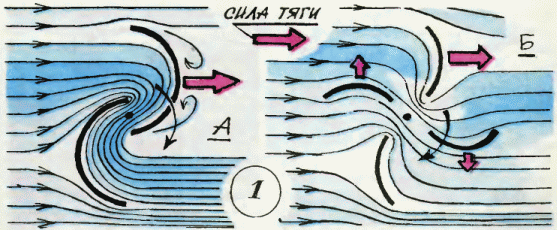
The resulting body had a pronounced aerodynamic asymmetry. Rolling across the axis of flow of the air as if slipping on the convex side of one half-cylinder. But the other, facing the wind a kind of pocket, had a significant resistance. The drum was turned, the half-cylinders were exchanged faster and faster, and the turntable so quickly ...
It is the principle, perhaps not knowing about it, and had based his future of wind power Serge Courneuve.
This scheme compares favorably with wind turbines with propeller spinner. First, it requires in the manufacture of high precision and provides a wide range of materials. Second, it is compact.
Judge for yourself. Power generator driven drum with a diameter of about one meter, will be the same as when using three-bladed propeller with a diameter of 2.5 m! And if propeller meter must be installed on a tall pole or on the roof (this requires a safety), the chopper drum can be placed directly on the ground, under a canopy. Have drum and even a number of advantages: high torque at low revs (so you can get in with no gear, or you can use a simple single-stage), lack of brush Tarasenko mechanism.
Serge offers a two-drum, we suggest to increase the number of blades to four (Fig. 1B). Traction characteristics of such installation will be significantly improved.
Let's start with the drum (Fig. 2). The blades can be made of plywood, roofing iron, aluminum sheet or plastic sheet of suitable size. In any case, try to avoid excessively thick blanks, the rotor should be easy. This will reduce the friction in the bearings, which means that the drum will be easier to spin by the wind.
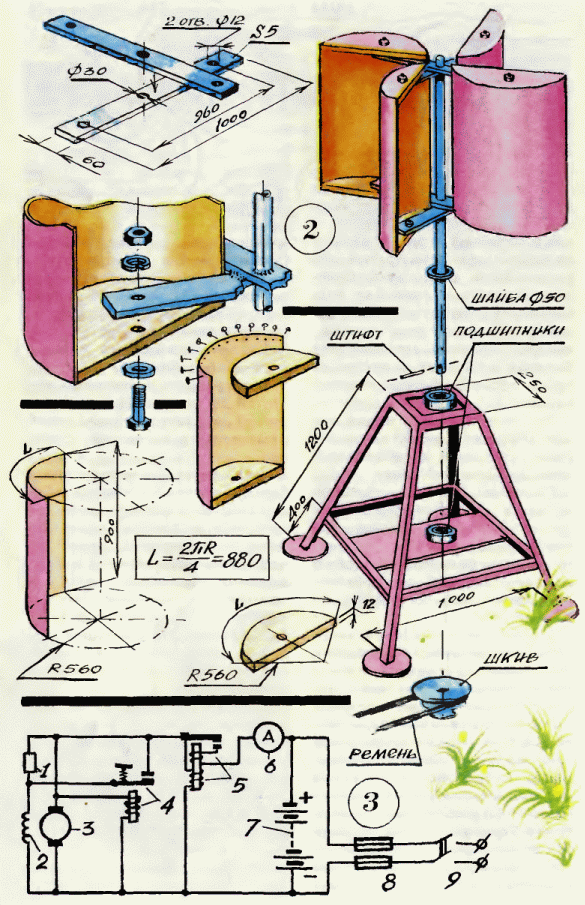
In the figure below:
1 — resistor;
2 — stator winding of the generator;
3 — the rotor of the generator;
4 — voltage regulator;
5 — relay reverse current;
6 — ammeter;
7 — battery;
8 — fuse;
9 — switch.
If you use roofing iron, vertical edges of the blades strengthen, tucked under the angled metal rod with a diameter of 5-6 mm. If you have decided to make the details of the turntable out of plywood (its thickness should be 5-6 mm), do not forget to impregnate the workpiece with hot linseed oil. The cheeks of the drum can be made of wood, plastic or light metal. Collecting drum, don't forget to coat the joints of thick oil paint.
The crossing, connecting the individual blades to the rotor, it is better welded or riveted out of steel strips with a cross-section of 5×60 mm. Can be used wood: workpiece thickness at least 25 mm, width 80 mm.
Axis for a turntable is the easiest way to make a two-meter cut steel pipe with an outside diameter of about 30 mm. Before you pick up the rod axis, locate the two ball bearing, preferably a new one. Agreeing upon the pipe dimensions and bearings, you will save yourself a lot of work fitting the pipe to the internal bearing cage. Steel cross braces are welded to the rotor axis, hardwood fastened with epoxy glue and steel pins with a diameter of 5 - 6 mm, passing simultaneously through each crossbar and the pipe. The blades mount on the M12 bolt. Carefully check the distance from the blades to the axis: they should be the same — 140-150 mm. Gathering drum again cover the joints of parts thick oil paint.
The main element of the installation is ready, it remains to make the bed, cook or sklepow it from the metal bracket (good and wood). On a ready frame install ball bearings. Make sure to avoid bias, otherwise rotor can not rotate easily. All installation details double coat oil paint, on the lower end of the shaft attach a set of pulleys of different diameters. Over the pulley of the fan belt will connect with a generator of electric current, such as a car. The sample was built wind turbines at wind speeds 9-10 m/s will be able to provide the power transferred to the generator equal to 800 watts.
Well, if the weather is calm or the wind is too weak to put the necessary electricity? Interruptions in electricity generation will not be if take advantage of energy storage — battery. The wind is — let electricity directly to the consumer, no wind — turn charged from the wind turbines the batteries. In figure 3 we have shown a schematic arrangement of an electric circuit of wind turbines.
If the turbine is to be used for watering the garden or garden, it must be mounted above the water source.
And now the job. Think guys how to adapt the wind turbine, which we are told to geologists, mountaineers, mobile repair and construction crews, to the shepherds on remote pastures.
UTE 1983 No. 5, V. SHUMEEV, engineer, Drawings of Alexander MATROSOV
Wind turbine for wind turbines
the proposed design allows to increase waterefficient of a wind turbine almost 3.2 times in comparison with the classical and bring it to a value of 0.65-0.75.
New uses for wind energy
The use of a new method of controlling the operation of the wind power installation and its design allows to increase the efficiency of the turbine wheel due to more complete returns air flows of their energy, to increase the area of grip of the front air flows from 2 to 10 times, reduce the size of the turbine wheel and increase the frequency of its rotation, to reduce dynamic loading of the structure by reducing the weight and dimensions of the rotating parts several times, to reduce the capital cost of the production and installation of the power units in industry and the private sector. published
P. S. And remember, just changing your mind — together we change the world! ©
Source: svoya-izba.ru/2013/07/04/kak-sdelat-vetryanuyu-melnicu/
In order to bring to life, you should understand the structure of the windmill and reveal the list of materials that you will need to build.
Thus, the main part of the windmill.
Base — is the base of the windmill. This is her very strong and heavy item. It is usually made of concrete. If the mill is supposed to be six feet high, the base assumes a size of 45 sq. cm and weighing 36 kg.

The mill tower.
The tower is made from durable piece 5-8-inch plastic pipe (PVC). Other materials are also used, but they are not as effective. The height of the tower, as we have agreed, shall be five feet.
Of the blade.
The blades of the mill are similar to those that are in the propeller plane. Knives-collectors of wind energy are made from a light plastic or wood. Sizes of the blades correspond to the size of the base and tower. For mill one and a half meter of the blade length is approximately 0.9 m.
Gondola.
The basis of the wind the nacelle is the gearbox. With the help of the knife - blades connect to the tower and then unable to function normally.
After we learned all the parameters of the base, tower, nacelle, it's time to build the windmill.
Solar panels.
Solar panels installed on the roof in a place where it gets maximum amount of sunlight, and where it is most open.
Now set the tower.
Before it should reach the maximum amount of wind. Therefore, its location should also be chosen so that the wind on the way to the tower did not meet any obstacles.
The tower is attached to the gondola. Inspect the size of the blade in order to respond to the wind and catch it.
The connection of the generator is the final step of construction. Combine together the solar panels and wires of the generator.
"Have you tried to harness the wind to make it work for yourself! Because wind energy is one of the cheapest and easily accessible! I do not propose to build the windmills, as it did in the old days, or complex modern wind turbine. But to build a wind turbine to generate electricity, albeit small, low-power, I think, will be able every family living in the rural area of each school.
Energy produced by a wind turbine, enough to turn on the pump for watering the garden or garden, to light the house or class. And if at least in every fifth house will work its own free mini — wind power, imagine how much savings kilowatt-hours will form an "energy spike" in our country!"
With dad Serge is going this summer to build a house near a wind farm. In the letter he sent sketches of its future installation. We showed them to the engineer Vyacheslav Nikolaevich Shumeeva, he carefully studied the sketches, developed, and now offers them to readers.
Serge Courneuve used known even in ancient times, the scheme of wind turbines with self-rotating drum.
The device consists of two halves of a hollow cylinder, which after cutting was parted to the side of the common axis (see figure).

The resulting body had a pronounced aerodynamic asymmetry. Rolling across the axis of flow of the air as if slipping on the convex side of one half-cylinder. But the other, facing the wind a kind of pocket, had a significant resistance. The drum was turned, the half-cylinders were exchanged faster and faster, and the turntable so quickly ...
It is the principle, perhaps not knowing about it, and had based his future of wind power Serge Courneuve.
This scheme compares favorably with wind turbines with propeller spinner. First, it requires in the manufacture of high precision and provides a wide range of materials. Second, it is compact.
Judge for yourself. Power generator driven drum with a diameter of about one meter, will be the same as when using three-bladed propeller with a diameter of 2.5 m! And if propeller meter must be installed on a tall pole or on the roof (this requires a safety), the chopper drum can be placed directly on the ground, under a canopy. Have drum and even a number of advantages: high torque at low revs (so you can get in with no gear, or you can use a simple single-stage), lack of brush Tarasenko mechanism.
Serge offers a two-drum, we suggest to increase the number of blades to four (Fig. 1B). Traction characteristics of such installation will be significantly improved.
Let's start with the drum (Fig. 2). The blades can be made of plywood, roofing iron, aluminum sheet or plastic sheet of suitable size. In any case, try to avoid excessively thick blanks, the rotor should be easy. This will reduce the friction in the bearings, which means that the drum will be easier to spin by the wind.

In the figure below:
1 — resistor;
2 — stator winding of the generator;
3 — the rotor of the generator;
4 — voltage regulator;
5 — relay reverse current;
6 — ammeter;
7 — battery;
8 — fuse;
9 — switch.
If you use roofing iron, vertical edges of the blades strengthen, tucked under the angled metal rod with a diameter of 5-6 mm. If you have decided to make the details of the turntable out of plywood (its thickness should be 5-6 mm), do not forget to impregnate the workpiece with hot linseed oil. The cheeks of the drum can be made of wood, plastic or light metal. Collecting drum, don't forget to coat the joints of thick oil paint.
The crossing, connecting the individual blades to the rotor, it is better welded or riveted out of steel strips with a cross-section of 5×60 mm. Can be used wood: workpiece thickness at least 25 mm, width 80 mm.
Axis for a turntable is the easiest way to make a two-meter cut steel pipe with an outside diameter of about 30 mm. Before you pick up the rod axis, locate the two ball bearing, preferably a new one. Agreeing upon the pipe dimensions and bearings, you will save yourself a lot of work fitting the pipe to the internal bearing cage. Steel cross braces are welded to the rotor axis, hardwood fastened with epoxy glue and steel pins with a diameter of 5 - 6 mm, passing simultaneously through each crossbar and the pipe. The blades mount on the M12 bolt. Carefully check the distance from the blades to the axis: they should be the same — 140-150 mm. Gathering drum again cover the joints of parts thick oil paint.
The main element of the installation is ready, it remains to make the bed, cook or sklepow it from the metal bracket (good and wood). On a ready frame install ball bearings. Make sure to avoid bias, otherwise rotor can not rotate easily. All installation details double coat oil paint, on the lower end of the shaft attach a set of pulleys of different diameters. Over the pulley of the fan belt will connect with a generator of electric current, such as a car. The sample was built wind turbines at wind speeds 9-10 m/s will be able to provide the power transferred to the generator equal to 800 watts.
Well, if the weather is calm or the wind is too weak to put the necessary electricity? Interruptions in electricity generation will not be if take advantage of energy storage — battery. The wind is — let electricity directly to the consumer, no wind — turn charged from the wind turbines the batteries. In figure 3 we have shown a schematic arrangement of an electric circuit of wind turbines.
If the turbine is to be used for watering the garden or garden, it must be mounted above the water source.
And now the job. Think guys how to adapt the wind turbine, which we are told to geologists, mountaineers, mobile repair and construction crews, to the shepherds on remote pastures.
UTE 1983 No. 5, V. SHUMEEV, engineer, Drawings of Alexander MATROSOV
Wind turbine for wind turbines
the proposed design allows to increase waterefficient of a wind turbine almost 3.2 times in comparison with the classical and bring it to a value of 0.65-0.75.
New uses for wind energy
The use of a new method of controlling the operation of the wind power installation and its design allows to increase the efficiency of the turbine wheel due to more complete returns air flows of their energy, to increase the area of grip of the front air flows from 2 to 10 times, reduce the size of the turbine wheel and increase the frequency of its rotation, to reduce dynamic loading of the structure by reducing the weight and dimensions of the rotating parts several times, to reduce the capital cost of the production and installation of the power units in industry and the private sector. published
P. S. And remember, just changing your mind — together we change the world! ©
Source: svoya-izba.ru/2013/07/04/kak-sdelat-vetryanuyu-melnicu/
How to make tea and Jerusalem artichoke syrup, a natural source of inulin
6 best drinks for a healthy body

