177
How to grow a thaw from a cutting
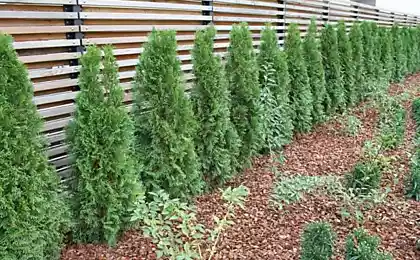
It seems to me that there are no better plants for giving than evergreens. They are unpretentious, always pleased with their neat appearance. They are green and beautiful all year round. One trouble, the planting material of such plants is not cheap. But it is too early to despair, because you can always grow a luxurious evergreen bush from a small cutting.

Today's edition. "Site" It tells you how to grow. household. Beauty that doesn't cost a penny.
It seems that now there will be a complex instruction, including a thousand and one points, but this is not the case. As it turned out, growing tua on the site is easier than simple, even a beginner will cope. All you need to do is get a branch of your favorite tree. Of course, not all plants take root, but in the case of green and blue thuja, everything worked.

Now let's figure out what to do next with the extracted cutting. Let's take a simpler approach first.
Growing turquoise
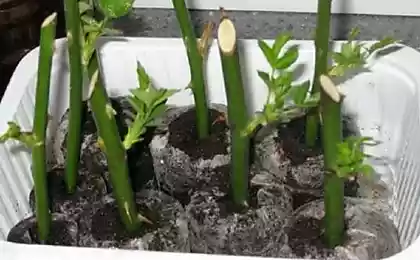
This is a simple method that works well. If you want to make sure that the cutting has taken root and will definitely take root, you can go a more difficult way. Choose a cutting, from below free it from twigs, so that nutrients go to the formation of roots, not branches. Keep the cutting in the shade for about two days.
Then soak the cutting in a growth promoter. Now plant the cutting in any small container, in light soil that does not create stagnation of water. After planting abundant fields, and then create the same greenhouse. You can even plant cuttings in plastic glasses, covering them with the same top.
Leave the cutting for a week, do nothing but maintain a stable temperature. To create a greenhouse effect, you can place cups in jars with a little water. You will get a humid and favorable environment.

After a week, start spraying the cutting every other day. Do not water, but only slightly wet the ground and the twig itself. It'll last a month, two at most. If you see that the roots have formed, and the branches have begun to grow, then the cutting has taken root. After that, you can bravely plant permanent place.

As you can see, nothing is complicated. No unnecessary fuss, and most importantly, no spending. Tui grow very well, so you can safely try to grow them!
Earlier we told how to grow and reproduce geranium at home.
They also shared a simple way to grow a rose from a cutting in a pot.
And we made a selection of stunning life hacks for the cottage, which will help to use old plastic bottles on the site with maximum benefit.
Do you like the way you grow tuya? Share it with your friends.

Today's edition. "Site" It tells you how to grow. household. Beauty that doesn't cost a penny.
It seems that now there will be a complex instruction, including a thousand and one points, but this is not the case. As it turned out, growing tua on the site is easier than simple, even a beginner will cope. All you need to do is get a branch of your favorite tree. Of course, not all plants take root, but in the case of green and blue thuja, everything worked.

Now let's figure out what to do next with the extracted cutting. Let's take a simpler approach first.
Growing turquoise
- Choice of cutting
In order for the cutting to have more chances to take root, you need to choose it correctly. It's simple: the more cuttings, the better it will take root. It is best to take a branch from an adult thuya about 30 centimeters long. Cut it with something sharp, cut the lower leaves. The cut is ready, we have to prepare a place for it.
- Soil preparation
For tuya, a wet place in a shaded corner of the site is best suited. Dig a shallow hole there (20-25 cm), well loosened the soil at the bottom. It would be good to put fertilizer at the bottom of the hole. It is best to choose water-soluble, so they will be absorbed better and the roots will not be burned. Well fertilize the hole and leave for a while so that the soil is soaked with the necessary substances.
- Landing.
Now place the cutting in the hole on the very leaves. Align the branch to stand straight. If the cutting is not solid, sprinkle it a little with earth and compact the soil around it. - Creating a greenhouse
The cutting is quite tender, so first he should be in a special greenhouse. Strong transparent materials are best suited to create suitable conditions. The easiest option is trimmed plastic bottles of light color. Cover the cutting with a greenhouse, filling all the leaves inside. It is necessary to make sure that cold air does not enter the greenhouse. So squeeze the bottle into the ground for a few centimeters and sprinkle on the edges of the earth. A little field the entire structure and leave it alone.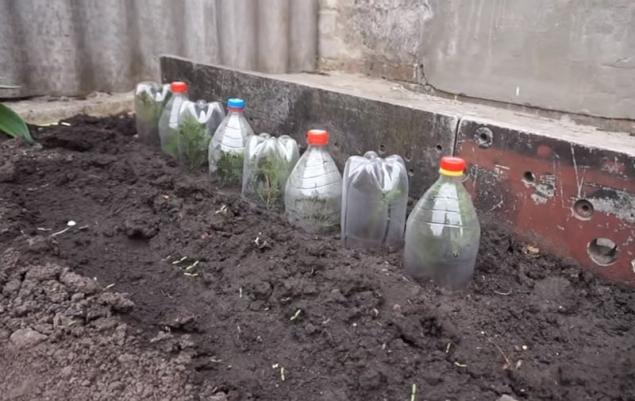
- Further departure
Care for the cutting is easy: periodically water and air, but not earlier than two weeks after planting. When you notice that the cutting is rooted, you can remove the greenhouse completely. The next year you can transplant the taya, but it is better to give it a year or two in one place.


This is a simple method that works well. If you want to make sure that the cutting has taken root and will definitely take root, you can go a more difficult way. Choose a cutting, from below free it from twigs, so that nutrients go to the formation of roots, not branches. Keep the cutting in the shade for about two days.
Then soak the cutting in a growth promoter. Now plant the cutting in any small container, in light soil that does not create stagnation of water. After planting abundant fields, and then create the same greenhouse. You can even plant cuttings in plastic glasses, covering them with the same top.
Leave the cutting for a week, do nothing but maintain a stable temperature. To create a greenhouse effect, you can place cups in jars with a little water. You will get a humid and favorable environment.

After a week, start spraying the cutting every other day. Do not water, but only slightly wet the ground and the twig itself. It'll last a month, two at most. If you see that the roots have formed, and the branches have begun to grow, then the cutting has taken root. After that, you can bravely plant permanent place.

As you can see, nothing is complicated. No unnecessary fuss, and most importantly, no spending. Tui grow very well, so you can safely try to grow them!
Earlier we told how to grow and reproduce geranium at home.
They also shared a simple way to grow a rose from a cutting in a pot.
And we made a selection of stunning life hacks for the cottage, which will help to use old plastic bottles on the site with maximum benefit.
Do you like the way you grow tuya? Share it with your friends.