1636
Software adjustable chandelier on the Arduino
It has long walked the idea of light, continuously adjustable, even remotely. H4> While LEDs were unpopular, expensive, and incandescent do not want to, because the voltage and consumption.
And then came the day ...
Recently completed an alpha version of intellectual chandeliers, which can only happen if the system administrator picks up a soldering iron and C ++.
Before you share a bit of technology to tell what she knows and what I was not able to achieve. H5> - When enabled, the chandelier is included in the maximum (not surprisingly), ie it can be used as an ordinary chandelier with physical switching;
- Chandelier well as remotely controlled from the control panel (four-for Arduino);
- The brightness can be adjusted continuously (relatively) back and forth by means of two buttons. In this cyclical adjustment, ie, if you make a brighter maximum - the light goes off (reset to 0), and if you make less than minimum - maximum turn on (so the touch of a button on the remote, the chandelier can be turned on and off)
- Half an hour later after the chandelier bit resets the brightness. Bright light is not always necessary, and this crutch little to cool the system. After resetting the brightness, it can be re to maximum, and again for half an hour.
- There is an inevitable chandeliers sleep timer. By default, it is one hour. Using the remote control (pressing one of the buttons) may be installed on the half hour, two hours or back one hour. But it's not stupid timer because:
- We have a motion sensor lamps, respectively, the timer counts time after the last detected motion;
- At night, when motion is detected, the chandelier is turned on very little brightness for one minute. In the daytime it does not work, because the chandelier should light sensor. Movements need a few (about 5 seconds), the chandelier was not included when I roll over in bed;
- Fitch include chandeliers at night turned off by pressing the button on the remote, since the notion of "night-time" for the light sensor to humans is slightly different;
- When you reach the timeout off - light gradually begins to be extinguished, and if at that time the movement happens - the light will return to its old value;
- Chandelier able to indicate its status using svetodiodika, and even the most chandeliers.
Have a desire to read more? Then go ahead.
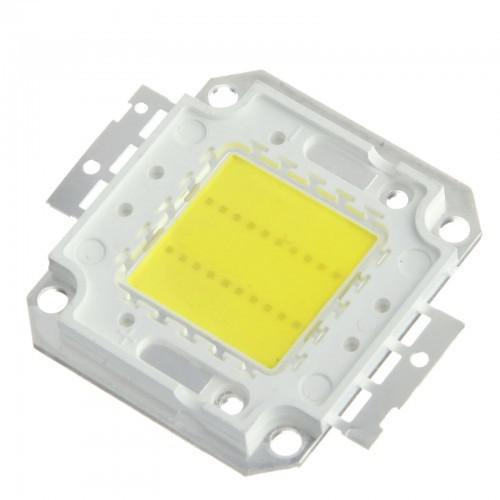
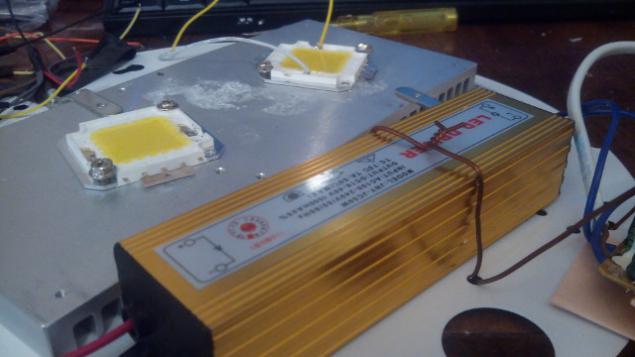
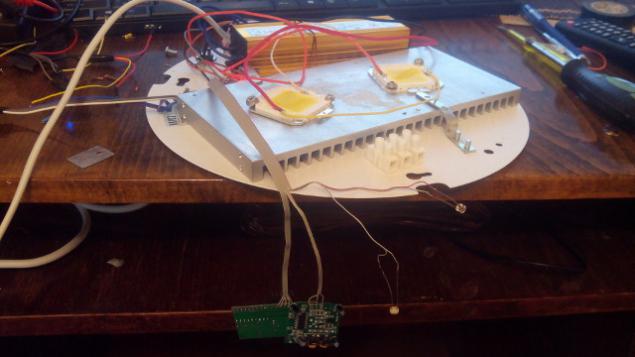
To illuminate the ordinary Chinese were selected LEDs, 20 watts, warm white light
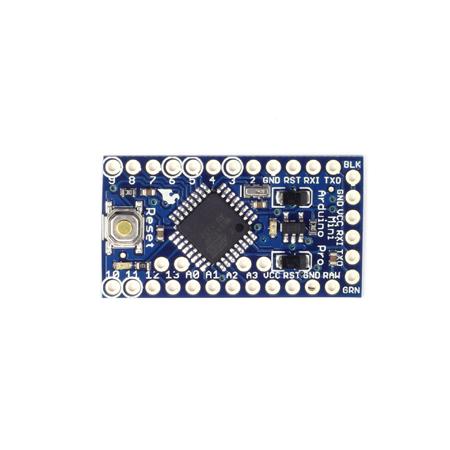
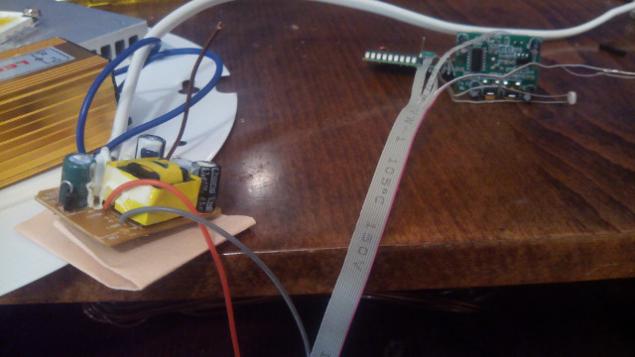
To manage the logical part was chosen Arduino Mini
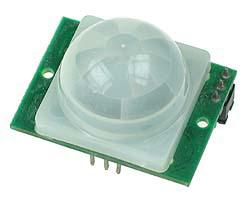
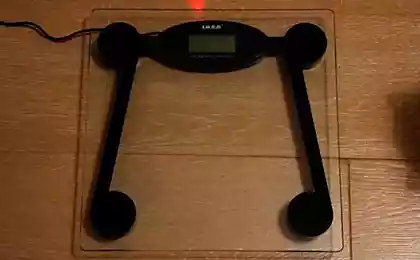
Motion sensor provides IT
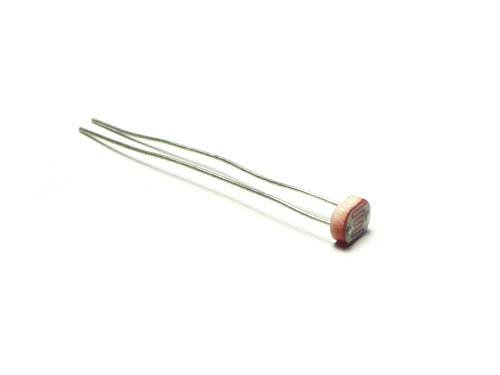
A light sensor here it
Remote control used here such

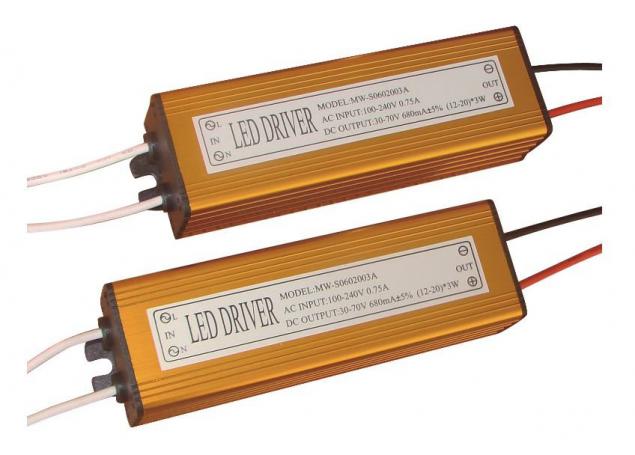
Driver ordinary Chinese.
I will not clutter readers useless theoretical unnecessary circuits connected in each block utterly primitive.
Sensor for the remote control has four outputs that return the unit by pressing the buttons on the remote. Them we connect to the digital inputs. The motion sensor too. Light sensor is connected to the analog input A0.
The painted ceiling was taken too cheap and Chinese.
Special attention should be dimmer, adjustable by software. On the Internet a bunch of schemes, a lot of ready-made devices. I went in a simple way, and set a single MOSFET, IRF840. By the way, works.


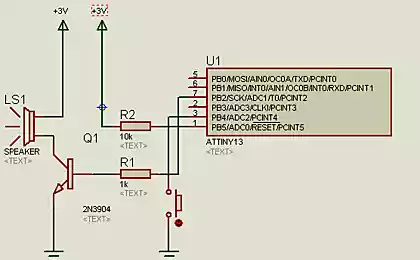
I apologize for the hand-drawn diagram, schematic alas I'm not special. The principle here is a connection: h5> 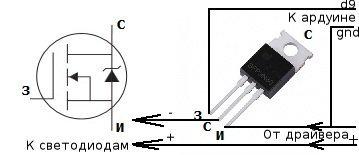

I apologize for the code, alas programming I do not spec: h5>
& lt; code class = & quot; cpp & quot; & gt; // Special Lieb, which reduces the latency when using digitalRead \ digitalWrite. #include & lt; digitalWriteFast.h & gt; int led = 7; // Ping, which is connected indicator LED int mov = 5; // Ping, where the motion sensor is connected int tra = 9; // Ping, which is connected gate of the FET int up = 12; // Pin, where Pin A int down = 11; // Pin where Pin B int swi = 10; // Pin, where Pin C int swi1 = 6; // Pin, where Pin D String btn; int tmp; int mv; int timer, inttimer; // Timer variable int br = 255; // Brightness LED default int cur = 255; // Service variable brightness int stepp = 5; // How much to change the brightness int moved; // Symptom work after going int out = 3600; // Timeout after which the light is switched off int svet = 60; // How many turn on the lights when driving at night void setup () {pinMode (led, OUTPUT); pinMode (tra, OUTPUT); pinMode (13, OUTPUT); pinMode (mov, INPUT); pinMode (up, INPUT); pinMode (down, INPUT); pinMode (swi, INPUT); timer = 0; Serial.begin (9600); analogWrite (tra, 255); } Void loop () {// We increase timers timer ++; inttimer ++; int sensorValue = analogRead (A0); // Read the brightness of light mv = mv + digitalReadFast (mov); if (mv == 7) {mv = 0;} // Count how many movements, and reset if they like 7 btn = buttonpressed (); // Read which button was pressed on the remote // If the button is pressed, the forming of action if (btn! = & Quot; & quot;) {if (br & gt; 10) {stepp = 10;} // If the current value is greater than 10 then increment set to 10. This makes for a more noticeable change in brightness if (btn == & quot; a & quot;) {br = br + stepp;} if (btn == & quot; b & quot;) {br = br-stepp;} if (btn == & quot; c & quot;) {// If pressing the Option key timeout, then if (out == 7200) {out = 3600; blink (8, 50); delay (1000);} else // If the current time-out for two hours, then reset for an hour, and blimkaem 8 times if (out == 1800) {out = 7200; blink (0, 2000); delay (1000);} else // If the current timeout for half an hour, then put on two and one blimkaem long time if (out == 3600) {out = 1800; blink (50, 15); delay (1000);} // If the current timeout hour, then put on the half hour and Flashing light} if (br & lt ; 0) {br = 255;} // If the brightness threshold too low, then set to maximum (turn on the light) if (br & gt; 255) {br = 0;} // If the brightness threshold is exceeded, then reset to 0 (disable light ) cur = br; analogWrite (tra, br); // Set the voltage at the output of the PWM Arduino, and accordingly the gate tranzictora // Reset variables after pressing each button timer = 0; inttimer = 0; moved = 0; delay (250); } // If there was a motion is detected, the counting starts again if (digitalReadFast (mov) == 1) {timer = 0; digitalWriteFast (13, HIGH); } Else {digitalWriteFast (13, LOW); } If ((br & gt; 240) and (inttimer == 1800)) {br = 180; cur = 180; analogWrite (tra, cur);} // If it's been half an hour, and the brightness of the lamps is high, then reset it a bit // To achieve a certain timer gradually extinguish the light, but to recover, if at this moment to detect motion if (timer == out) {for (int i = br; i & gt; = 0; i--) {analogWrite (tra, i); br = 0; if (digitalReadFast (mov) == 1) {timer = 0; br = cur; analogWrite (tra, cur); break; } Delay (100); }} // If the timer load nightlight on and off the light if ((timer == svet) and (moved == 1)) {br = 0; moved = 0; mv = 0; cur = 0; analogWrite (tra, br); } // If there were motion and brightness of the lamp - a zero, then turn on the light in the Pyaterochka and reset the timer if ((mv & gt; 5) and (br == 0) and (sensorValue & gt; 1020)) {br = 5; cur = 5; timer = 0; moved = 1; mv = 0; analogWrite (tra, br); }} Void blink (int count, int del) {for (int i = 0; i & lt; = count; i ++) {// sets the value (range from 0 to 255): delay (del); digitalWriteFast (led, HIGH); delay (del); digitalWriteFast (led, LOW); }} String buttonpressed () // function to determine the crutch-pressing the keypad + pause {btn = & quot; & quot ;; for (int i = 0; i & lt; = 1000; i ++) {if (digitalReadFast (down) == 1) {btn = & quot; b & quot ;;} if (digitalReadFast (up) == 1) {btn = & quot; a & quot ;;} if (digitalReadFast (swi) == 1) {btn = & quot; c & quot ;;} if (digitalReadFast (swi1) == 1) {btn = & quot; d & quot ;;} if (btn! = & quot; & quot ;) {blink (0, 20); break;} delay (1); } Return btn; } & Lt; / code & gt; pre>
A bit workflow: h5>


A little video demonstration: h5>
bit of a disappointment: h5> - The design, which was filmed on video - is unusable. Two 20-watt LED warm light raskochegarilsya radiator to such an extent that the molten tin, which to them were soldered wires. Replaced two 20-watt warm, four 10-watt neutral and introduced a crutch down the brightness.
- Neutral white LEDs - nasty, unpleasant to the eye.
- I can not think of emulation clamping keys on a computer keyboard. Because of this, the light changes in spurts, because delay - fixed.
- Remote control periodically proglyuchivaet, namely not caught by the receiver, therefore, when he hath lighted indicator on the remote - not a guarantee of signal delivery. For this purpose it was necessary to introduce an indicator on the chandelier
- Massive radiator for two 20-watt LEDs - was not enough, or they are working in extreme mode. Tomorrow I measure the currents and try to put a resistor.
- Courtesy light - complete crap, because it shows all the snot on the wires. I plan to order the matte acrylic, and make diffused white light.
- Did not find the market KREN5A (unbelievable but true), because of this, for Arduin had to put extra. power supply, but I wanted to feed her from the driver.
- Snot - it is not good, Arduino too. Etched fee for atmegi, come programmer - get rid of excess mucus.
Thanks for reading until the end. H4> Are you interested in the fact that I posted another article with an improved chandelier?
| yes |
| not Voted 242 people. 40 people abstained. Only registered users can vote in polls. Sign , please. Source: habrahabr.ru/post/247151/ |


Best pictures from the telescope "Hubble" (Part Two)
IBM is working with Nvidia to create a new generation of supercomputers