2392
My Weather Station
Not long ago I started programming microcontrollers based boards arduino. Thing very interesting and practical. Based on the arduino, you can create a lot of useful devices for themselves and not only. For example, you can make the machine automatically turn on lights in the apartment various robots or quadrocopter.
I can not list all the devices that are created on the basis of these boards, and today I will talk mostly about the weather station that I created. And if you're curious to learn more about arduino, - ask Google or Yandex.
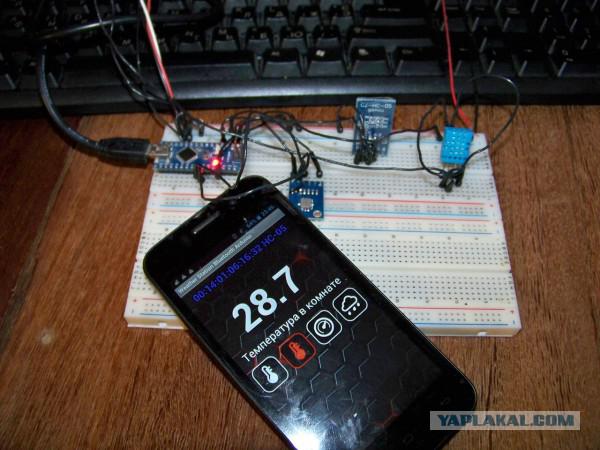
Weather station consists of arduino board and connected pressure sensors, humidity and two temperature sensors. The second device is a mobile phone or tablet android.
The principle is simple - charge reads the sensors, and when you start the application on your phone command is sent via bluetooth to the board and the board sends the readings on the phone. After that, we can already see the temperature, pressure or humidity.
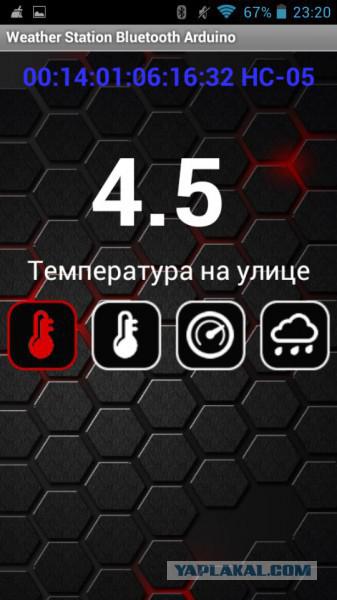
Temperature outside
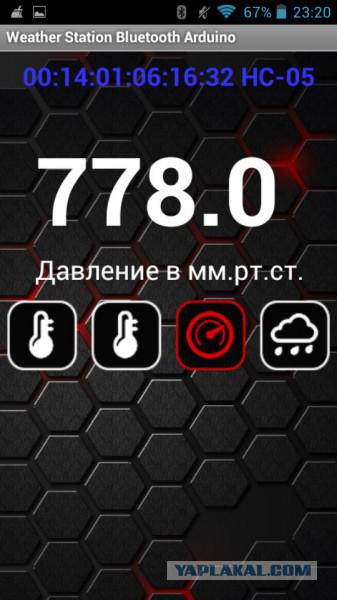
Pressure in mmHg
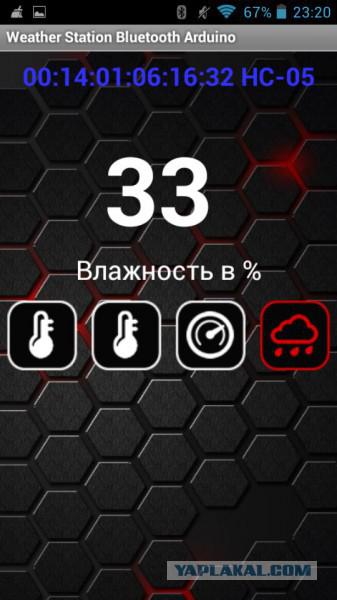
and humidity percentage
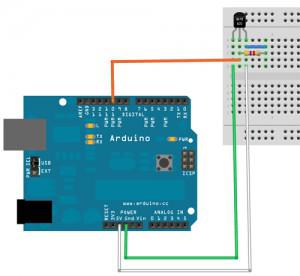
To begin, connect 2 DS18B20 temperature sensor to the arduino as shown in the picture. The sensor is connected to a digital pin of 4 to Arduino.
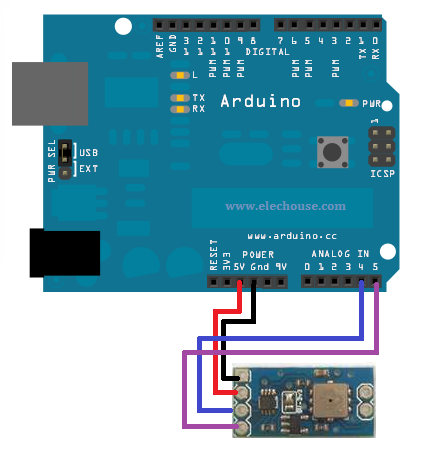
Then connect the atmospheric pressure sensor as in the picture VMR085
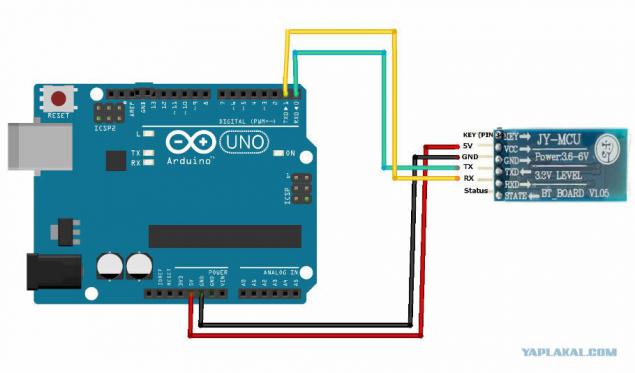
Next bluetooth module HC-05 and HC can be 07 ... Also like the picture
After everyone assembled, write the software part for boards with sensors
#include & lt; OneWire.h & gt;
#include & lt; DallasTemperature.h & gt;
#include & lt; Wire.h & gt;
#include & lt; BMP085.h & gt;
#include & lt; DHT.h & gt;
#define ONE_WIRE_BUS 4
OneWire oneWire (ONE_WIRE_BUS);
DallasTemperature sensors (& oneWire);
DeviceAddress Thermometer1 = {
0x28, 0x00, 0x54, 0xB6, 0x04, 0x00, 0x00, 0x92};
DeviceAddress Thermometer3 = {
0x28, 0x94, 0xAC, 0xDF, 0x02, 0x00, 0x00, 0xB5};
BMP085 dps = BMP085 ();
long Temperature = 0, Pressure = 0, Altitude = 0;
DHT dht (8, DHT11);
char incomingByte;
int x = 0;
void setup () {
sensors.begin ();
sensors.setResolution (Thermometer1, 10);
sensors.setResolution (Thermometer3, 10);
Wire.begin ();
dps.init (MODE_ULTRA_HIGHRES, 21000, true);
dht.begin ();
Serial.begin (9600);
}
void printTemperature (DeviceAddress deviceAddress) {
float tempC = sensors.getTempC (deviceAddress);
Serial.println (tempC, 1);
}
void loop () {
sensors.requestTemperatures ();
dps.getPressure (& Pressure);
int h = dht.readHumidity ();
float t = dht.readTemperature ();
if (Serial.available () & gt; 0) {
incomingByte = Serial.read ();
if (incomingByte == '1') {
x = 2;
}
if (incomingByte == '2') {
x = 1;
}
if (incomingByte == '3') {
x = 3;
}
if (incomingByte == '4') {
x = 4;
}
}
delay (100);
switch (x) {
case 1:
printTemperature (Thermometer1);
break;
case 2:
printTemperature (Thermometer3);
break;
case 3:
Serial.println (Pressure / 133.3, 1);
break;
case 4:
Serial.println (h);
break;
}
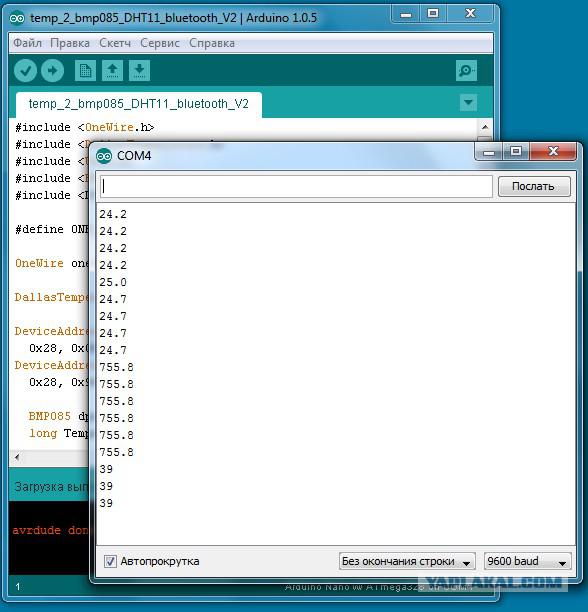
} Open the serial port on the computer when connecting the card and check the performance ... And if you send more precisely 1, then 2, 3 and 4. As a result, we need to get the values of temperature on the street - sending 1, the temperature in the room - when sending 2 pressure - when sending 3 and humidity - when sending 4.
Posted in [mergetime] 1405694477 [/ mergetime]
If everything works, you can swing the app for your phone, and set to Use ...
arduino-project.net/download/arduino-android/WSAB.apk
Posted in [mergetime] 1405694560 [/ mergetime]
In the video you can see a video of the weather station in
youtu.be/z3ldbmcO8Ck
I can not list all the devices that are created on the basis of these boards, and today I will talk mostly about the weather station that I created. And if you're curious to learn more about arduino, - ask Google or Yandex.

Weather station consists of arduino board and connected pressure sensors, humidity and two temperature sensors. The second device is a mobile phone or tablet android.
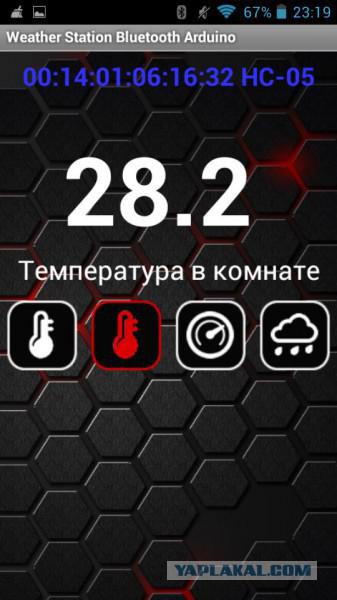
The principle is simple - charge reads the sensors, and when you start the application on your phone command is sent via bluetooth to the board and the board sends the readings on the phone. After that, we can already see the temperature, pressure or humidity.

Temperature outside

Pressure in mmHg

and humidity percentage

To begin, connect 2 DS18B20 temperature sensor to the arduino as shown in the picture. The sensor is connected to a digital pin of 4 to Arduino.

Then connect the atmospheric pressure sensor as in the picture VMR085

Next bluetooth module HC-05 and HC can be 07 ... Also like the picture

After everyone assembled, write the software part for boards with sensors
#include & lt; OneWire.h & gt;
#include & lt; DallasTemperature.h & gt;
#include & lt; Wire.h & gt;
#include & lt; BMP085.h & gt;
#include & lt; DHT.h & gt;
#define ONE_WIRE_BUS 4
OneWire oneWire (ONE_WIRE_BUS);
DallasTemperature sensors (& oneWire);
DeviceAddress Thermometer1 = {
0x28, 0x00, 0x54, 0xB6, 0x04, 0x00, 0x00, 0x92};
DeviceAddress Thermometer3 = {
0x28, 0x94, 0xAC, 0xDF, 0x02, 0x00, 0x00, 0xB5};
BMP085 dps = BMP085 ();
long Temperature = 0, Pressure = 0, Altitude = 0;
DHT dht (8, DHT11);
char incomingByte;
int x = 0;
void setup () {
sensors.begin ();
sensors.setResolution (Thermometer1, 10);
sensors.setResolution (Thermometer3, 10);
Wire.begin ();
dps.init (MODE_ULTRA_HIGHRES, 21000, true);
dht.begin ();
Serial.begin (9600);
}
void printTemperature (DeviceAddress deviceAddress) {
float tempC = sensors.getTempC (deviceAddress);
Serial.println (tempC, 1);
}
void loop () {
sensors.requestTemperatures ();
dps.getPressure (& Pressure);
int h = dht.readHumidity ();
float t = dht.readTemperature ();
if (Serial.available () & gt; 0) {
incomingByte = Serial.read ();
if (incomingByte == '1') {
x = 2;
}
if (incomingByte == '2') {
x = 1;
}
if (incomingByte == '3') {
x = 3;
}
if (incomingByte == '4') {
x = 4;
}
}
delay (100);
switch (x) {
case 1:
printTemperature (Thermometer1);
break;
case 2:
printTemperature (Thermometer3);
break;
case 3:
Serial.println (Pressure / 133.3, 1);
break;
case 4:
Serial.println (h);
break;
}
} Open the serial port on the computer when connecting the card and check the performance ... And if you send more precisely 1, then 2, 3 and 4. As a result, we need to get the values of temperature on the street - sending 1, the temperature in the room - when sending 2 pressure - when sending 3 and humidity - when sending 4.
Posted in [mergetime] 1405694477 [/ mergetime]
If everything works, you can swing the app for your phone, and set to Use ...
arduino-project.net/download/arduino-android/WSAB.apk
Posted in [mergetime] 1405694560 [/ mergetime]
In the video you can see a video of the weather station in
youtu.be/z3ldbmcO8Ck