334
Making guns with YaPlakal.
Guns!
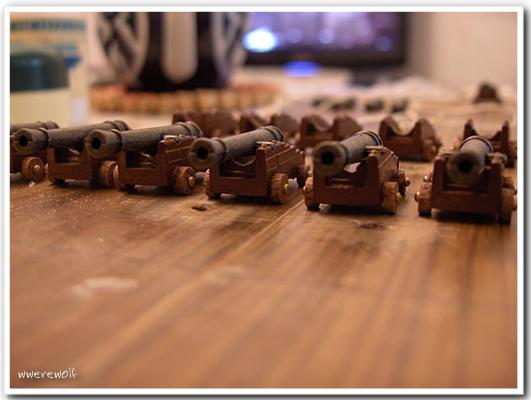
Well, finally, I got to the guns! Trial flitches, I did a long time ago and in the previous review can be viewed. By the same principle, and I handled all the other carriages. Then sawed from the circular section of the two rods (5 and 4 mm) "wheel". I grind one of the faces, nasverlil the center of the hole axis washers. The axes used segments of studs with heads, stuck them into the holes and future oshlifoval second side wheels. Then I glued to the wheel carriage and carriages painted with acrylic paint themselves under the dark wood. And all the carriages are ready:

Perspective.
Then, he engaged strapping guns. In this case the instructions safely overlooked, offering as it is glued to the deck gun. But, in my opinion, it would look like a "bare". But to make their own blocks for strapping guns I can not, and get them in my region is impossible. So I decided to install only the trousers for the guns. Trouser I picked up a thick retinue synthetic thread beige (bought nearest shoemaker). For fastening trousers boards must be installed eyebolts. In the absence of a brass or bronze wire, I craned their copper (load they carry will not be).

Between the twisted fibers slipped a little "pimpochki" guns (do not know how they are called) in the breech. Tightly re-platted fibers together and poured a little cyanoacrylate to fix the whole thing.

Perspective.

even.

I set the first two guns on both sides. Eyebolts glued into pre-drilled holes on the inner side of the bead near the gun ports. Lends credence to bend "heavy" trousers, and fixed it on the deck drops of glue.

Perspective.

Stands for falcon - segments of the square cubes. The corners of the upper end of beveled at 45 degrees. At the center of the drilled hole on one side for the subsequent installation of falcon, and the other - under the stud hole to solidify on a rack on the gunwale falcon poop.
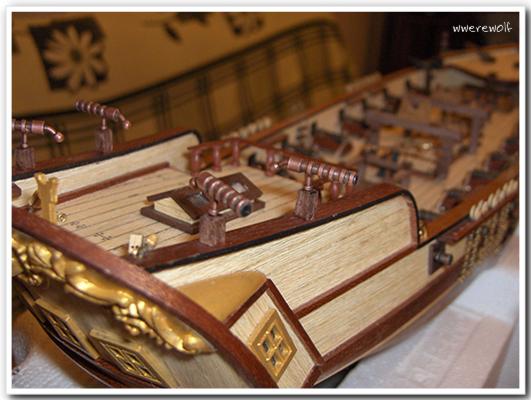
And then, finally, all the guns and the deck elements are in place. It only remains to produce and strengthen the boat. But this thing, I decided to put off until later. I want to see what kind of material will be left to make their own boat. And then the one that goes in the kit - this is not a boat, and misery - the casting of some strange metal curve shape.

11

12

13

14
Posted in [mergetime] 1219810153 [/ mergetime]
Who started and rigging. Again we have to move away from highly manual and rely book KH Marquardt 'mast, rigging and sails of ships of the 18th century ", as outlined in its information closer to the truth than that indicated in the instructions. Already on the bowsprit and jib-boom booolshoy failure to follow instructions.
© wwerewolf

Source:
Well, finally, I got to the guns! Trial flitches, I did a long time ago and in the previous review can be viewed. By the same principle, and I handled all the other carriages. Then sawed from the circular section of the two rods (5 and 4 mm) "wheel". I grind one of the faces, nasverlil the center of the hole axis washers. The axes used segments of studs with heads, stuck them into the holes and future oshlifoval second side wheels. Then I glued to the wheel carriage and carriages painted with acrylic paint themselves under the dark wood. And all the carriages are ready:

Perspective.

Then, he engaged strapping guns. In this case the instructions safely overlooked, offering as it is glued to the deck gun. But, in my opinion, it would look like a "bare". But to make their own blocks for strapping guns I can not, and get them in my region is impossible. So I decided to install only the trousers for the guns. Trouser I picked up a thick retinue synthetic thread beige (bought nearest shoemaker). For fastening trousers boards must be installed eyebolts. In the absence of a brass or bronze wire, I craned their copper (load they carry will not be).

Between the twisted fibers slipped a little "pimpochki" guns (do not know how they are called) in the breech. Tightly re-platted fibers together and poured a little cyanoacrylate to fix the whole thing.

Perspective.

even.

I set the first two guns on both sides. Eyebolts glued into pre-drilled holes on the inner side of the bead near the gun ports. Lends credence to bend "heavy" trousers, and fixed it on the deck drops of glue.

Perspective.

Stands for falcon - segments of the square cubes. The corners of the upper end of beveled at 45 degrees. At the center of the drilled hole on one side for the subsequent installation of falcon, and the other - under the stud hole to solidify on a rack on the gunwale falcon poop.

And then, finally, all the guns and the deck elements are in place. It only remains to produce and strengthen the boat. But this thing, I decided to put off until later. I want to see what kind of material will be left to make their own boat. And then the one that goes in the kit - this is not a boat, and misery - the casting of some strange metal curve shape.

11

12

13

14
Posted in [mergetime] 1219810153 [/ mergetime]
Who started and rigging. Again we have to move away from highly manual and rely book KH Marquardt 'mast, rigging and sails of ships of the 18th century ", as outlined in its information closer to the truth than that indicated in the instructions. Already on the bowsprit and jib-boom booolshoy failure to follow instructions.
© wwerewolf

Source:
