How to build outdoor kitchen with their hands
 Bashny.Net
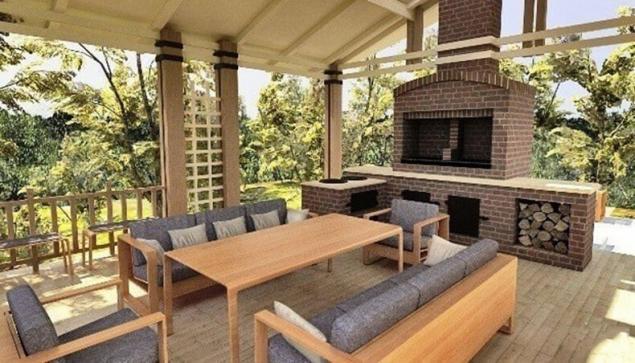
A summer kitchen is an irreplaceable assistant in the garden and is suitable for many kinds of work: cooking, feeding livestock and washing.
It can be used as a dining room on the open air terrace, if it is adjacent to the house, or shed-gazebo, if located in a recreation area.
The site must be selected on the basis of the following criteria:
Best sheathing frame longitudinal planks with oakum. To prevent drafts, the wall with door, make deaf. To Orient the appropriate door to the North. Usually a room consists of two zones: kitchen and dining room.
Necessary equipment for the kitchen must include a stove for cooking, Desk, sink, wall cabinets for dishes and products, refrigerator, water tank, if there is no running water.
In the presence of water is necessary to equip the spillway into the local sewage system. Also in the kitchen, on the one hand, the need for a window, and on the other — a wooden crate Christmas tree. This provides better ventilation.
For exterior it is best natural color of the wooden parts. They can be treated with linseed oil with the addition of pigments and to cover two or three layers of clear waterproof varnish.
Owners of garden plots are offered many designs of ovens that would satisfy them in all respects, if not too large for a modest garden houses sizes, especially when the owner wishes to combine with a stove and a stove for cooking.
Oven for outdoor kitchens
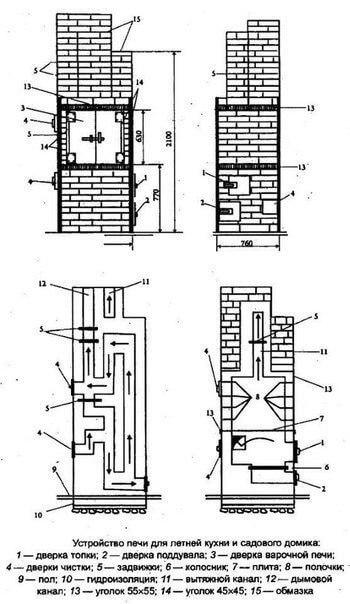
The following figure shows the structure of the furnace, where a stove and cooking chamber are combined in a small oven in terms of size 885×760 mm.

A large cast-iron plate allows you to quickly heat the room on cold days, cooking chamber with two doors is not only used For cooking but also serves as an oven, in which dry fruits and vegetables.
After the furnace normal furnace keeps the temperature in the house for 14-16h.
Materials and parts required for devices of such a furnace:
A trench filled with concrete or filled with rubble stone with pouring the cement mortar. The size of the Foundation should be 10-20 mm larger than the dimensions of the furnace, and from the inner walls of the room it needs to separate not less than 250 mm are an essential fire requirements.
In addition, the furnace Foundation should not come into contact with the house Foundation. The durability of the furnace depends on the quality of the brick.
For masonry should be applied to red, fine burnt brick — it has a pink color and when struck with a hammer emits a pure sound. Overburnt brick with a purple hue to the furnaces.
Nedozhzhenny brick has an orange-yellowish color and reduced strength, it breaks easily and is not suitable for laying pipes. It is desirable that the bricks were the same size, with smooth surface, without cracks and chips.
You have to remember that chipped or flattened surfaces of the bricks cannot be put in the side firebox or chimney. The masonry stove is drawing each row.
Marked out on the Foundation of the right rectangles of the size of the furnace, first lay a row of bricks without mortar to fit. Then a few bricks removed and immersed for 1-2 min in water.
The fact that the dry bricks are poorly connected with solution. At this time the vacant seat is placed an even layer of solution on it — soaked bricks. The excess solution was removed after a light push.
In the same way, stacked the remaining bricks of a number, all the joints should be filled with saline. Laid on the number stack three layers of roofing material (waterproofing), and then lay out the next row and continue the brickwork, checking for levelness after every two or three floors Radoi.
The inner surface of the furnace and chimneys should be immediately cleaned from the adhered mortar with a wet cloth/ or subsequently dried pieces will clog up the channel.
Fire doors, blower and cleaning or attached with special clips or annealed wire, laid in the joints between the bricks. The edges of the bricks of the sixth row stesyvajut to grate lay flush.
On top of the eleventh series of the solution is placed in the cast-iron stove. Sides and rear it overlaps the bricks, and the front does not reach 15-20 mm to the edge of the masonry.
Around the perimeter of the plate is laid an asbestos cord or cut strips of sheet asbestos, which are covered by the frame area 55×55. This will prevent the clutch from breaking during thermal expansion of cast iron.
Laying pipe, don't forget about fire cutting between the ceiling slab and brick lining of the pipe should be at least 20-30 mm gap filled with asbestos. The corners of the chimney masonry is protected from damage by the corners, which are bolted to the frame.
The cooking chamber is enclosed in the inside corners.
If desired, the stove can be plastered with mortar: 1 part clay, 2 parts sand, 1 part cement and 0.1 part of asbestos.
The surface of the oven before applying the mortar should be dry and warm, first applied liquid layer, and after drying more dense. Oven will reliably serve their masters, if to observe some simple rules of operation.
Once a season is necessary to clean flues, carefully concealing even the smallest cracks. In the garden, at the base, in the expedition can be folded oven for baking bread and cooking various dishes of Russian cuisine. It's either a brick oven or a more simple, does not require scarce materials, backfill.
Charging the furnace is better to build away from the house and outbuildings. This greatly simplifies the design and eliminates a number of fire prevention measures required when placing the furnace in the house.
Mound sand court size of 1.5×1.5 m, 10 cm thick, on top of the pad fits the rock is the Foundation of the furnace.
If there are no suitable stones, on top of the sand you can pour a layer of crushed stone or gravel with a thickness of 5-7 cm and leveling the ground with cement mortar. The Foundation established the furnace casing in a log or wooden boxes.
Its function is to hold the backfill and partly external insulation. Backfill (the backfill) duct stone, sand, gravel, crushed stone, gravel first to the floor(lower part, under furnace) furnace — about 40 cm from the Foundation.
Then laid the floor and shelf niches in front of him. This is best done red solid clay brick (silicate, perforated and slit are not suitable for masonry stoves).
On the floor is installed the metal insert or it is of brick, in a brick oven, is nailed to the casing tin plating niches, installed pipe, and the casing is filled to the top with stone or other filling. Metal furnace can be made of iron barrels (lower quarter), destroying it with a chisel or cutting torch.
Backfilling of the casing should be tight and play the role of insulation and heat accumulator. Stone and gravel must be dense rocks. Not suitable Sandstone, limestone, dolomite, diabase, shale, as when heated, they crack. This is particularly important in the area of the highest temperature in the pavement of the floor and filling the metal arch furnace.
The Foundation for the stationary brick kilns laid out in the same way as for charging, but it is advisable to pave it with cobblestones. Otherwise, you need to lay a layer of waterproofing (roofing felt, roofing material), since brick is absorbent.
A brick oven is placed not on the cement and clay mortar. To this end, two days before the beginning of the work clay pour water in a wooden or metal box. Periodically, two to three times a day, the clay should be mixed with a shovel. Then the clay is filtered through a grid cell of 3×3 mm.
Received a creamy mass is mixed with 1-2 parts of sand, sieved on a sieve with holes 1 mm. the Amount of sand the more, the fatter the clay.
See also:
Vacationers note: all of the STEPCHILDREN and not only
Frame pool on the site: how to cook pad under pool
A good solution does not contain lumps, has a rough surface does not stick to the shovel and is easily squeezed out from the seam when you press on a brick hand. The bricks prior to laying should be soaked in water until saturation (cease to stand out air bubbles). This increases the adhesion of the brick with the solution and, accordingly, the strength of masonry.published
P. S. And remember, only by changing their consumption — together we change the world! ©
Join us in Facebook , Vkontakte, Odnoklassniki
Source: vk.com/mydacha2?w=wall-86102607_18796
It can be used as a dining room on the open air terrace, if it is adjacent to the house, or shed-gazebo, if located in a recreation area.
The site must be selected on the basis of the following criteria:
- the shortest path of communication with the house;
- minimum costs for equipment, lighting, Sewerage, water supply.

Best sheathing frame longitudinal planks with oakum. To prevent drafts, the wall with door, make deaf. To Orient the appropriate door to the North. Usually a room consists of two zones: kitchen and dining room.
Necessary equipment for the kitchen must include a stove for cooking, Desk, sink, wall cabinets for dishes and products, refrigerator, water tank, if there is no running water.
In the presence of water is necessary to equip the spillway into the local sewage system. Also in the kitchen, on the one hand, the need for a window, and on the other — a wooden crate Christmas tree. This provides better ventilation.
For exterior it is best natural color of the wooden parts. They can be treated with linseed oil with the addition of pigments and to cover two or three layers of clear waterproof varnish.
Owners of garden plots are offered many designs of ovens that would satisfy them in all respects, if not too large for a modest garden houses sizes, especially when the owner wishes to combine with a stove and a stove for cooking.
Oven for outdoor kitchens
The following figure shows the structure of the furnace, where a stove and cooking chamber are combined in a small oven in terms of size 885×760 mm.

A large cast-iron plate allows you to quickly heat the room on cold days, cooking chamber with two doors is not only used For cooking but also serves as an oven, in which dry fruits and vegetables.
After the furnace normal furnace keeps the temperature in the house for 14-16h.
Materials and parts required for devices of such a furnace:
- cement M400 — 3-4 bag; .
- sand — 0,5 m3;
- ordinary clay, red — 6-8 buckets;
- brick red, on the stove — 500 pieces, the pipe — approximately 600 pieces, depending on height;
- fire door;
- poludverki blower;
- doors chimney cleaners — 3 PCs.;
- grate;
- the cast-iron stove 710×410 mm;
- cast iron gate valves — 4 PCs.;
- steel area 55x55x3300— 2 PCs.;
- steel area 45x45x850 — 4 PCs.;
- aluminum angle 4§х45х1550— 4 PCs.;
- area aluminum 25x25x1200— 2 PCs.;
- steel strip 370x60x2 — 8 PCs.
A trench filled with concrete or filled with rubble stone with pouring the cement mortar. The size of the Foundation should be 10-20 mm larger than the dimensions of the furnace, and from the inner walls of the room it needs to separate not less than 250 mm are an essential fire requirements.
In addition, the furnace Foundation should not come into contact with the house Foundation. The durability of the furnace depends on the quality of the brick.
For masonry should be applied to red, fine burnt brick — it has a pink color and when struck with a hammer emits a pure sound. Overburnt brick with a purple hue to the furnaces.
Nedozhzhenny brick has an orange-yellowish color and reduced strength, it breaks easily and is not suitable for laying pipes. It is desirable that the bricks were the same size, with smooth surface, without cracks and chips.
You have to remember that chipped or flattened surfaces of the bricks cannot be put in the side firebox or chimney. The masonry stove is drawing each row.
Marked out on the Foundation of the right rectangles of the size of the furnace, first lay a row of bricks without mortar to fit. Then a few bricks removed and immersed for 1-2 min in water.
The fact that the dry bricks are poorly connected with solution. At this time the vacant seat is placed an even layer of solution on it — soaked bricks. The excess solution was removed after a light push.
In the same way, stacked the remaining bricks of a number, all the joints should be filled with saline. Laid on the number stack three layers of roofing material (waterproofing), and then lay out the next row and continue the brickwork, checking for levelness after every two or three floors Radoi.
The inner surface of the furnace and chimneys should be immediately cleaned from the adhered mortar with a wet cloth/ or subsequently dried pieces will clog up the channel.
Fire doors, blower and cleaning or attached with special clips or annealed wire, laid in the joints between the bricks. The edges of the bricks of the sixth row stesyvajut to grate lay flush.
On top of the eleventh series of the solution is placed in the cast-iron stove. Sides and rear it overlaps the bricks, and the front does not reach 15-20 mm to the edge of the masonry.
Around the perimeter of the plate is laid an asbestos cord or cut strips of sheet asbestos, which are covered by the frame area 55×55. This will prevent the clutch from breaking during thermal expansion of cast iron.
Laying pipe, don't forget about fire cutting between the ceiling slab and brick lining of the pipe should be at least 20-30 mm gap filled with asbestos. The corners of the chimney masonry is protected from damage by the corners, which are bolted to the frame.
The cooking chamber is enclosed in the inside corners.
If desired, the stove can be plastered with mortar: 1 part clay, 2 parts sand, 1 part cement and 0.1 part of asbestos.
The surface of the oven before applying the mortar should be dry and warm, first applied liquid layer, and after drying more dense. Oven will reliably serve their masters, if to observe some simple rules of operation.
Once a season is necessary to clean flues, carefully concealing even the smallest cracks. In the garden, at the base, in the expedition can be folded oven for baking bread and cooking various dishes of Russian cuisine. It's either a brick oven or a more simple, does not require scarce materials, backfill.

Charging the furnace is better to build away from the house and outbuildings. This greatly simplifies the design and eliminates a number of fire prevention measures required when placing the furnace in the house.
Mound sand court size of 1.5×1.5 m, 10 cm thick, on top of the pad fits the rock is the Foundation of the furnace.
If there are no suitable stones, on top of the sand you can pour a layer of crushed stone or gravel with a thickness of 5-7 cm and leveling the ground with cement mortar. The Foundation established the furnace casing in a log or wooden boxes.
Its function is to hold the backfill and partly external insulation. Backfill (the backfill) duct stone, sand, gravel, crushed stone, gravel first to the floor(lower part, under furnace) furnace — about 40 cm from the Foundation.
Then laid the floor and shelf niches in front of him. This is best done red solid clay brick (silicate, perforated and slit are not suitable for masonry stoves).
On the floor is installed the metal insert or it is of brick, in a brick oven, is nailed to the casing tin plating niches, installed pipe, and the casing is filled to the top with stone or other filling. Metal furnace can be made of iron barrels (lower quarter), destroying it with a chisel or cutting torch.
Backfilling of the casing should be tight and play the role of insulation and heat accumulator. Stone and gravel must be dense rocks. Not suitable Sandstone, limestone, dolomite, diabase, shale, as when heated, they crack. This is particularly important in the area of the highest temperature in the pavement of the floor and filling the metal arch furnace.
The Foundation for the stationary brick kilns laid out in the same way as for charging, but it is advisable to pave it with cobblestones. Otherwise, you need to lay a layer of waterproofing (roofing felt, roofing material), since brick is absorbent.
A brick oven is placed not on the cement and clay mortar. To this end, two days before the beginning of the work clay pour water in a wooden or metal box. Periodically, two to three times a day, the clay should be mixed with a shovel. Then the clay is filtered through a grid cell of 3×3 mm.
Received a creamy mass is mixed with 1-2 parts of sand, sieved on a sieve with holes 1 mm. the Amount of sand the more, the fatter the clay.
See also:
Vacationers note: all of the STEPCHILDREN and not only
Frame pool on the site: how to cook pad under pool
A good solution does not contain lumps, has a rough surface does not stick to the shovel and is easily squeezed out from the seam when you press on a brick hand. The bricks prior to laying should be soaked in water until saturation (cease to stand out air bubbles). This increases the adhesion of the brick with the solution and, accordingly, the strength of masonry.published
P. S. And remember, only by changing their consumption — together we change the world! ©
Join us in Facebook , Vkontakte, Odnoklassniki
Source: vk.com/mydacha2?w=wall-86102607_18796
Tags
See also
How to build a winter garden with his own hands
How to build a timber frame bath with his hands
How to build a wooden garage with his own hands
How to make ground with their hands
Step by step instructions masonry BBQ brick
How to make a cheap solar power plant with your own hands
How to build outdoor kitchen with their hands
Suburban oasis: how to build a summer shower on the site
Summer shower with your hands
Their hands: Cellar glacier —dry freezer all year round