497
Led ceiling lighting with their hands
With the advent of LEDs, back in the seventies, the increasing popularity started to acquire led ceiling lights. And if the radio Amateurs were experimenting with the dramatic range of conventional LEDs, where the color selection was small, but now, with the advent of better LEDs, softer spectra, the room for creativity has expanded greatly.
Now widely available led strip and special controllers and also power packs for any taste and for any required capacity. Today it is possible to smoothly adjust the brightness and color, to create lighting scenes. In principle, any malomalski versed in the art of man is able to design and install an led light stretch or suspended ceiling.
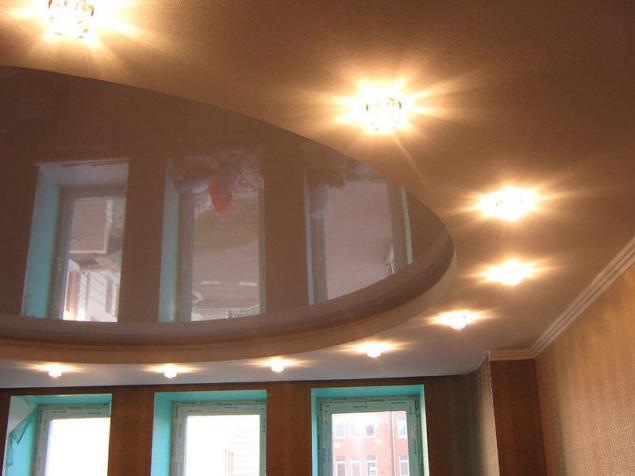
Most often implement one of the four popular options: contour diffuse illumination, directional illumination, curly lights, or starry skies — point lighting.
When contour illumination the LEDs have on the shelf, where they Shine on the ceiling from the bottom up, with the ceiling effect of continuous light strips along the contour. For directional lighting the LEDs mounted on the slope, and the light is distributed receiveaudio beams along the ceiling. For point illumination LEDs mounted on the ceiling so that they Shine straight down, like the stars in the sky. When you figure the backlight LEDs are located in the ceiling.

Contour illumination is easiest to produce with the use of led tape. For this design, choose the right ribbon, select the power supply, controller, mounting the tape, connecting, and lights ready.
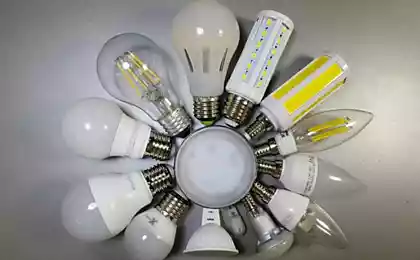
Usually choose full-color RGB led strip with controller. It is possible in principle to apply a few color strips, but think about whether it is advisable, if it is cheaper to buy the controller and a tri-coloured tape, and adjust the backlight color will be as your heart desires. Monochrome ribbons are more suitable for window dressing, for the home same it is better to have multi-color ribbon.
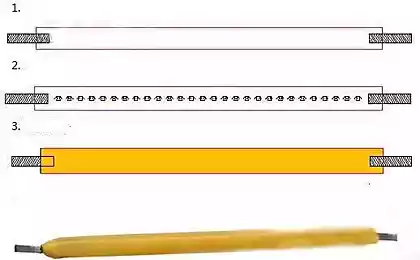
Led strips come with different density of emitters, i.e. with a different number of LEDs per meter strip. For contour illumination is better to choose 60 or 120 LEDs per meter, and directed quite 30 or 60.
If you want a combined illumination and contour and directed, can be directly mounted on the pair of strips on the slope and on the shelf, for example on the slope a couple of tapes 30 and 60 LEDs per meter, and a shelf or two with the density of emitters 60 and 120.
By connecting four power supply units and controllers, you will get the opportunity to adjust different lighting effects by adjusting the tape separately and together, combining color, intensity, fade twinkle etc, depending on the capabilities of the controller.
Power led strip, also differ. The documentation for the tape indicates the power meter of tape, and you will be able to choose. For directional illumination is about 5 watts per meter, for contour — 8 watts per meter. For contour illumination, to effect formation of the light strip, a power needed more watts to 25 on the meter, if the two tapes, and directed enough to 12 watts per meter — also a couple of tapes.
If you install tape in pairs, the brightness can be adjusted by the inclusion of strips individually, choosing one of two, or jointly, and so you'll be able to save money on the controller. This solution is applicable both for contour and for directional illumination.
SUBSCRIBE to OUR youtube channel that allows you to watch online, download from YouTube free video about the recovery, the rejuvenation of man. Love for others and ourselves, as the feeling of high vibrations — an important factor for improvement .
Put LIKES and share with your FRIENDS!
www.youtube.com/channel/UCXd71u0w04qcwk32c8kY2BA/videos
Based on the length of the strip backlight count total power. After measuring the length to determine how many meters of tape need to purchase, calculate the power by multiplying the square footage in the capacity of one meter of tape. On the power select the power supply and controller for each band illumination. The voltage of the power supply and the voltage which can be controlled by the controller should be: 5, 12 or 24 volts.

When mounting the led strips for contour or directional illumination of the difficulties would not arise if everything is done correctly and in order. Led strip has a back side under the protective sticky film coating which when applied just to the drywall will eventually come unstuck. For this reason, first, to drywall in the niche fasten small screws in the area of PVC, which is then bonded to the led strip.
Another reason why the area of PVC required — if the illumination of suspended ceiling need to be repaired, the area will be easy to remove, and then install it on the same place. If the tape is firmly adhered to the surface of the ceiling, how it then re-glue?
To solder wires to the ribbon, you need as carefully as possible, using fusible solder type POS-61, since the LEDs and the tape base can not tolerate prolonged overheating. Need to solder quickly and carefully. Best of all it will make, of course, an experienced master, or a person regularly dealing with soldering electronic components.
Do not mount tape the pieces more than 3 meters, this is a limitation of the current paths. It is best to divide the tape into sections of 2-3 meters, and each connect to the controller by individual conductors with the correct polarity in accordance with marking on the tape. If the tape must be cut, the cut should be exactly at the cutting lines on the tape are marked. By cutting of the edges of the tape can be cut not on the markup, but exactly in the middle between adjacent diodes.

Spotlighting a type of "starry sky" will require a special approach. Here we need the individual LEDs, which will also be powered by a power supply, and, if desired, and through the controller. The power supply should be 5 volts. If one led is designed to power 0.1 W, it's 10 LEDs at 1 watt power supply or 100 LEDs for 10 watts. Usually enough 20 LEDs to create a starry sky the middle of the square.
Controller circuit breaker from 4 to 8 sections of the LEDs will not hurt, it will give more realism to your starry sky: the stars will blink with a given frequency.
During the soldering process strictly observe the polarity, it is easy to determine — the positive terminal of the led is longer than the minus and the plus has a key. Every pin after soldering protect the insulating tube to preclude a short circuit between the legs.
SUBSCRIBE to OUR youtube channel that allows you to watch online, download from YouTube free video about the recovery, the rejuvenation of man. Love for others and ourselves, as the feeling of high vibrations — an important factor for improvement .
Put LIKES and share with your FRIENDS!
www.youtube.com/channel/UCXd71u0w04qcwk32c8kY2BA/videos
The suspended ceiling is easier to equip: basic overlap on the silicone glued the LEDs are then routed as needed. The drywall more difficult. Here we need the additional plate, which will need to be cut exactly under the ceiling of the niche, it has to neverlet holes for the LEDs, and close the front side of the translucent plate can be corrugated for better effect.
Then mount the wiring and then install the structure in a ceiling niche. This requires a special skill. The semitransparent plate, you can stick a picture of a real sky, and the LEDs positioning as well as real stars in the sky, then you will even be able to find on the ceiling of the Big dipper.
For figure highlighting need falshpotolok, which will need to neverlet large holes under a small dome which will house the LEDs. Popular solution when the interior light number of LEDs, each of whom shines in their favor, the effect of the beams along the ceiling. In General, it all depends on your taste and imagination.
When you configure the controller, remember that the flashing should not be sharp, and how hit frequency, for example will not work if the flashing occurs every two seconds, 2 times per second, or 7 times per second as it is very dangerous for the nervous system. It is best if the flashing is smooth, almost shimmering, but not sharp, and the need for this to the power supply controller, and not just the breaker as a led flashlight.
Colors also have value. Light-green light to relax you, yellow-orange, like the normal bulbs, would be neutral, the blue will give a soothing effect, set up a reflections, blue rather alarming. Yellow-blue avoid this combination irritating. Red suitable for bedrooms.
People with skills of home masters, will easily cope with the installation of led illumination on the ceiling. The led strip will greatly facilitate the installation process will open up opportunities to create interesting design. published
Source: electrik.info/main/lighting/1150-svetodiodnaya-podsvetka-potolka-svoimi-rukami.html
Now widely available led strip and special controllers and also power packs for any taste and for any required capacity. Today it is possible to smoothly adjust the brightness and color, to create lighting scenes. In principle, any malomalski versed in the art of man is able to design and install an led light stretch or suspended ceiling.
Most often implement one of the four popular options: contour diffuse illumination, directional illumination, curly lights, or starry skies — point lighting.
When contour illumination the LEDs have on the shelf, where they Shine on the ceiling from the bottom up, with the ceiling effect of continuous light strips along the contour. For directional lighting the LEDs mounted on the slope, and the light is distributed receiveaudio beams along the ceiling. For point illumination LEDs mounted on the ceiling so that they Shine straight down, like the stars in the sky. When you figure the backlight LEDs are located in the ceiling.

Contour illumination is easiest to produce with the use of led tape. For this design, choose the right ribbon, select the power supply, controller, mounting the tape, connecting, and lights ready.
Usually choose full-color RGB led strip with controller. It is possible in principle to apply a few color strips, but think about whether it is advisable, if it is cheaper to buy the controller and a tri-coloured tape, and adjust the backlight color will be as your heart desires. Monochrome ribbons are more suitable for window dressing, for the home same it is better to have multi-color ribbon.
Led strips come with different density of emitters, i.e. with a different number of LEDs per meter strip. For contour illumination is better to choose 60 or 120 LEDs per meter, and directed quite 30 or 60.
If you want a combined illumination and contour and directed, can be directly mounted on the pair of strips on the slope and on the shelf, for example on the slope a couple of tapes 30 and 60 LEDs per meter, and a shelf or two with the density of emitters 60 and 120.
By connecting four power supply units and controllers, you will get the opportunity to adjust different lighting effects by adjusting the tape separately and together, combining color, intensity, fade twinkle etc, depending on the capabilities of the controller.
Power led strip, also differ. The documentation for the tape indicates the power meter of tape, and you will be able to choose. For directional illumination is about 5 watts per meter, for contour — 8 watts per meter. For contour illumination, to effect formation of the light strip, a power needed more watts to 25 on the meter, if the two tapes, and directed enough to 12 watts per meter — also a couple of tapes.
If you install tape in pairs, the brightness can be adjusted by the inclusion of strips individually, choosing one of two, or jointly, and so you'll be able to save money on the controller. This solution is applicable both for contour and for directional illumination.
SUBSCRIBE to OUR youtube channel that allows you to watch online, download from YouTube free video about the recovery, the rejuvenation of man. Love for others and ourselves, as the feeling of high vibrations — an important factor for improvement .
Put LIKES and share with your FRIENDS!
www.youtube.com/channel/UCXd71u0w04qcwk32c8kY2BA/videos
Based on the length of the strip backlight count total power. After measuring the length to determine how many meters of tape need to purchase, calculate the power by multiplying the square footage in the capacity of one meter of tape. On the power select the power supply and controller for each band illumination. The voltage of the power supply and the voltage which can be controlled by the controller should be: 5, 12 or 24 volts.

When mounting the led strips for contour or directional illumination of the difficulties would not arise if everything is done correctly and in order. Led strip has a back side under the protective sticky film coating which when applied just to the drywall will eventually come unstuck. For this reason, first, to drywall in the niche fasten small screws in the area of PVC, which is then bonded to the led strip.
Another reason why the area of PVC required — if the illumination of suspended ceiling need to be repaired, the area will be easy to remove, and then install it on the same place. If the tape is firmly adhered to the surface of the ceiling, how it then re-glue?
To solder wires to the ribbon, you need as carefully as possible, using fusible solder type POS-61, since the LEDs and the tape base can not tolerate prolonged overheating. Need to solder quickly and carefully. Best of all it will make, of course, an experienced master, or a person regularly dealing with soldering electronic components.
Do not mount tape the pieces more than 3 meters, this is a limitation of the current paths. It is best to divide the tape into sections of 2-3 meters, and each connect to the controller by individual conductors with the correct polarity in accordance with marking on the tape. If the tape must be cut, the cut should be exactly at the cutting lines on the tape are marked. By cutting of the edges of the tape can be cut not on the markup, but exactly in the middle between adjacent diodes.

Spotlighting a type of "starry sky" will require a special approach. Here we need the individual LEDs, which will also be powered by a power supply, and, if desired, and through the controller. The power supply should be 5 volts. If one led is designed to power 0.1 W, it's 10 LEDs at 1 watt power supply or 100 LEDs for 10 watts. Usually enough 20 LEDs to create a starry sky the middle of the square.
Controller circuit breaker from 4 to 8 sections of the LEDs will not hurt, it will give more realism to your starry sky: the stars will blink with a given frequency.
During the soldering process strictly observe the polarity, it is easy to determine — the positive terminal of the led is longer than the minus and the plus has a key. Every pin after soldering protect the insulating tube to preclude a short circuit between the legs.
SUBSCRIBE to OUR youtube channel that allows you to watch online, download from YouTube free video about the recovery, the rejuvenation of man. Love for others and ourselves, as the feeling of high vibrations — an important factor for improvement .
Put LIKES and share with your FRIENDS!
www.youtube.com/channel/UCXd71u0w04qcwk32c8kY2BA/videos
The suspended ceiling is easier to equip: basic overlap on the silicone glued the LEDs are then routed as needed. The drywall more difficult. Here we need the additional plate, which will need to be cut exactly under the ceiling of the niche, it has to neverlet holes for the LEDs, and close the front side of the translucent plate can be corrugated for better effect.
Then mount the wiring and then install the structure in a ceiling niche. This requires a special skill. The semitransparent plate, you can stick a picture of a real sky, and the LEDs positioning as well as real stars in the sky, then you will even be able to find on the ceiling of the Big dipper.

For figure highlighting need falshpotolok, which will need to neverlet large holes under a small dome which will house the LEDs. Popular solution when the interior light number of LEDs, each of whom shines in their favor, the effect of the beams along the ceiling. In General, it all depends on your taste and imagination.
When you configure the controller, remember that the flashing should not be sharp, and how hit frequency, for example will not work if the flashing occurs every two seconds, 2 times per second, or 7 times per second as it is very dangerous for the nervous system. It is best if the flashing is smooth, almost shimmering, but not sharp, and the need for this to the power supply controller, and not just the breaker as a led flashlight.
Colors also have value. Light-green light to relax you, yellow-orange, like the normal bulbs, would be neutral, the blue will give a soothing effect, set up a reflections, blue rather alarming. Yellow-blue avoid this combination irritating. Red suitable for bedrooms.
People with skills of home masters, will easily cope with the installation of led illumination on the ceiling. The led strip will greatly facilitate the installation process will open up opportunities to create interesting design. published
Source: electrik.info/main/lighting/1150-svetodiodnaya-podsvetka-potolka-svoimi-rukami.html


Buckwheat noodles — healthy alternative to wheat pasta
Women's psychosomatic diseases at the Department of Oncology lead difficult experience