How to insulate wooden walls with their hands
 Bashny.Net
Buying or building a wooden country house, its owners pretty soon may be faced with the necessity of its warmth. The reasons for low temperature inside a wooden house can be quite a lot. Often it can be poor quality wood and the lack of thick logs. Therefore, in order to somehow rectify the situation, require insulation of the wooden walls of the house. Insulation of walls of wooden houses do not represent special complexity, it is important to understand the technology of thermal insulation of walls.
Features of thermal insulation of walls
Wood by its very structure has a number of unique qualities and requires a different approach to operate. The main feature of such material as wood, is its ability to "breathe". This means that wooden walls can regulate the microclimate in the house. Also, be aware natural origin of the logs that are susceptible to mold and rot. The naturalness of the wood imposes certain limitations on materials and methods for insulation of a wooden house.
Let's start with the materials for insulation of wooden houses. They should have the following characteristics:

In addition to insulation of a wooden house and can be used facing brick, aerated concrete blocks, siding. Of course, the stone with a heater will allow you to create the most effective insulation, but then have to sacrifice the external beauty of a wooden house.
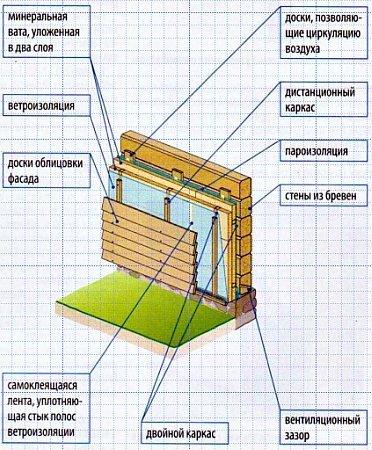
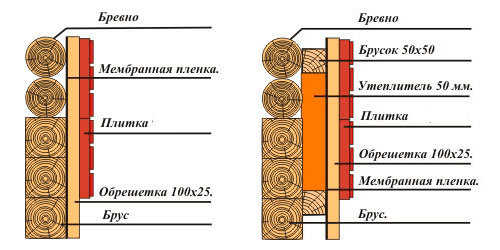
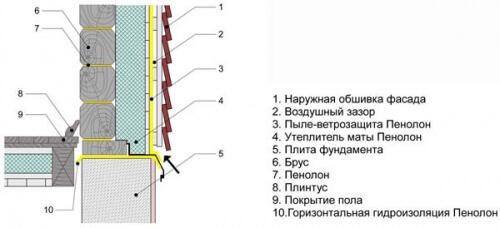
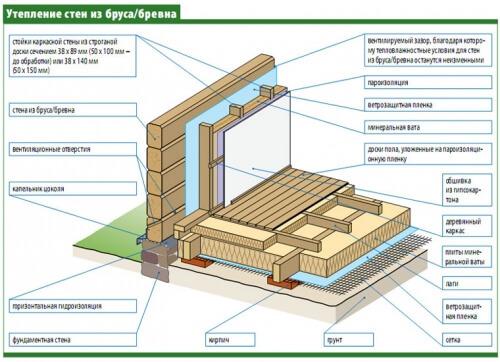
Important! But the use for thermal insulation of walls extruded polystyrene foam, polyurethane foam, foam, various sealants or foam is not recommended. These materials have extremely low rates of water vapor, which in turn might lead to the wood walls of the mold and mildew and ultimately rot.In preparation for the insulation of wooden walls, particular attention should be paid to technology of creation of the insulation layer. The main rule which should be comply with is: vapor permeability of each subsequent layer must be higher than the previous, in the direction from the inner areas to the street. According to this simple truth creates and insulation of a wooden house, which is a multi-layered cake. The structure of this cake for insulation of walls outside consists of a lathing and counter lathing, insulation, wind and waterproofing. Internal insulation of wooden walls is also subject to this rule, with the only difference that instead of the wind insulation is a vapor barrier.
Important! If you can not decide how best to insulate the wooden walls, inside or outside, the answer is definitely one you should choose insulation of wooden walls outside. This is due to several reasons:
The calculation of the insulation layer
The calculation of the optimum thickness of the insulation layer of one of the most important steps in winterizing your home, especially wood. This task must be approached with great responsibility, since the error in the calculations as a minimum entails extra financial costs for insulation, and at best will damage wooden walls. So, if You're not handy with formulas and calculations, it is better to contact the experts on this issue. We consider the example of calculation with comments and explanations by which to determine which layer of insulation you will need for your home.
To perform calculations you will need to refer to the SNiP 23-02-2003 "Thermal protection of buildings" as well as TSN (regional building regulations). These normative documents are given all the necessary initial data for calculations and methodology. The simulations themselves are based on teploproduktia materials that is constant and specific for each region. For example, in the Moscow region this figure amounts to 4,15 (m2*°C)/watt. It is also worth noting that the calculations should take into account teploproduktia ® each material in the insulation cake and sum them. To perform the calculations desired conductivity of the materials used and their thickness.
The formula for calculating the thermal resistance as follows R = P/ K.
Where P is the material thickness, K – coefficient of thermal conductivity of the material. For example, a wooden wall outside is finished with facing brick, and between them is placed a layer of mineral wool. Then the total heat-transfer resistance of the wall is equal to the sum of resistances of each material.
Based on the above formula will do the calculation for the thickness of the insulating layer. The formula for calculating the following P=R*K. Data on thermal conductivity are taken from table thermal conductivity material or packing material used, and teplopotreblenija from the regulations.
For example, for Moscow and area the resistance to heat transfer is equal to 4,15 (m2*°C)/watt. If we insulate mineral wool wooden wall thickness of 20 cm with a siding, to wood teploproduktia equal to AZN 0.806 (m2*°C)/W, and for mineral wool 0,045 (m2*°C)/watt. Accordingly, the insulation layer must have teploproduktia R=4,15-0,806-0,045=3,299 m2*°C.
Now, take thermal conductivity coefficient of mineral wool of 0.41 W/m*K and multiply by teploproduktia P = 3,299*0,041=0,135 m. similarly, we can calculate the layer thickness of any other insulation in various regions of the country.
It remains to calculate the area of insulation and purchase all the necessary materials. In the first place is itself is mineral wool, wind - and moisture - protection, and vapor barrier. In addition, you will need wooden slats with a thickness of 130х50 mm, a height equal to the height of the insulated wall, and fasteners for them. As a fastener for wood slats, you can use plain long screws or metal angles with holes for the screws. The number of strips is taken from the calculation that the distance between them should be 2 – 5 cm less than the width of insulation mats. Fasteners are procured at the rate of 1 – 2 mounting point at 1 m running. Also purchased Reiki 50х30 mm or mm 50х20 to kontrobreshetki. The total number of such strips is taken from the calculation that the frame kontrobreshetki consists of 3 horizontal rows around the perimeter of the house.
Insulation of wooden walls outside
As already mentioned, the insulation of wooden walls outside – the most simple and affordable method of insulation. To start the insulation of a wooden house should be a year or two. This is important because the tree during this time shrinks, which leads to the change of the height of the building. Moreover, shrinkage will be found the new gap, which will have to caulk.
Insulation of wooden walls with their hands outside can be accomplished in various ways. Consider the most common – insulation of mineral wool with a finish siding. Works are held in several stages:
1. Check the wall for the presence of cracks and the fit of logs or boards to each other.
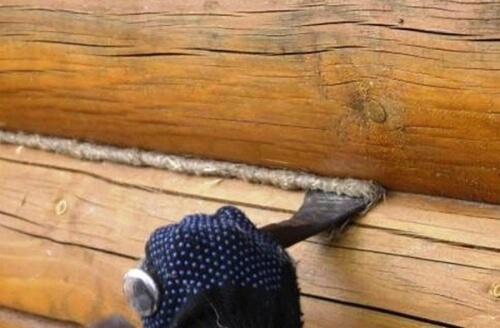
4. Apply a layout for the crate on the wall.2. If necessary prokonopachivajut all found the cracks.
3. First measure the total length of the wall from edge to edge. Then divide it into equal intervals of length 2 – 5 cm smaller than the Mat of mineral wool.
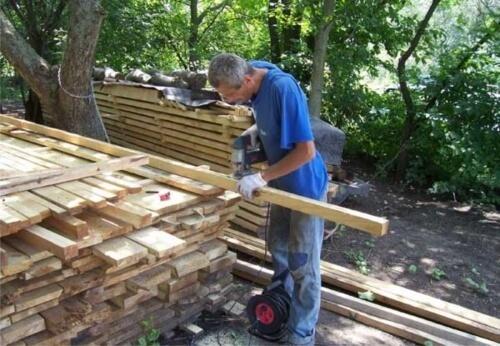
5. Prepare bars for lathing, cutting them to the required length.
6. At first, fasten the bars on the perimeter wall. One above the base, one under the canopy and two at the edges.
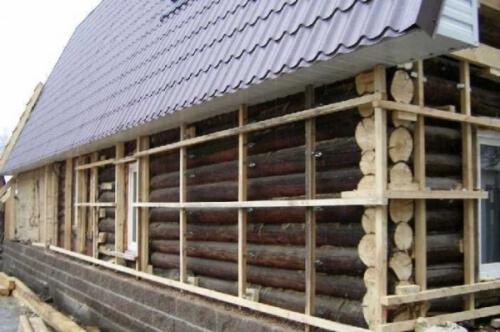
7. In the resulting box placed and fixed at first frame around window and door openings, and then the vertical bars of the crates according to the markings.
Important! If the length of one bar is not enough to cover the height of the wall, the missing pieces must be placed in a staggered manner in each subsequent stand. For example, the 1st hour is the bottom of a long, on top of short pieces, 2 front – bottom bar short, long on top.8. Now take the mats of mineral wool and insert them between the uprights of the frame. Since the distance between the bars is slightly less than the width of the Mat, the mineral wool will stay inside the strut. To reduce the number of thermal bridges, mineral wool can be laid in two layers. It's enough to buy the mats of lesser thickness. For example, when the total thickness of the insulation layer at 13 cm, you can use the mats with a thickness of 50 mm or 70 mm. At each successive layer is placed with an offset relative to the first.
9. On top of a heater covered with a layer of water and wind insulation of super-diffused membranes. Fasten it to the frame by means of staples.
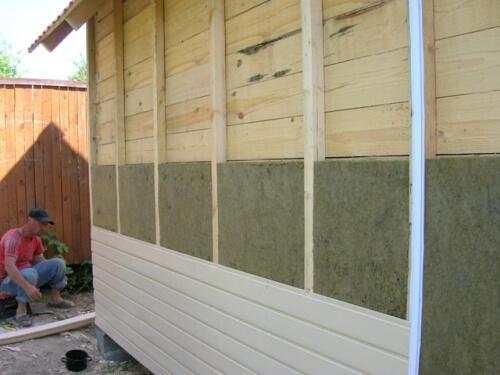
10. Fills rear the crate, thus creating a ventilation gap of 30 mm between the insulation and finishing material.
11. In the end, the facade of a finished siding.
If you plan to finish facing brick, as the insulation is better to use granules, cellulose fibre or sawdust-pellets. These materials, with the filling between the wooden wall and the cladding will fill all the voids, thereby creating a reliable thermal protection. Insulation of wooden walls outside of the mineral wool with a facing brick finish for its technology is similar to the trim siding. The difference lies in the used finishing materials and obligatory presence of the Foundation under the brick.
Insulation of wooden walls from the inside
As already mentioned, the insulation of wooden walls from the inside quite rare. Usually this method of insulation is chosen, it is not possible to do external insulation. Technology of execution of works is broadly similar to external insulation, but there are some differences. Let us consider the stages and peculiarities of execution of works for insulation of wooden walls from the inside:
1. After the shrinkage of the house check them for the presence of cracks and carefully konopatin them.
2. Serverlevel in the crown of small holes for ventilation.
3. Mark the locations for installation kontrobreshetki.
4. Cut into bars for kontrobreshetki and fasten them to the wall. This will create a ventilated gap between the wall and the insulation, which in turn enables you to save the wall from zaprevaniya inside.
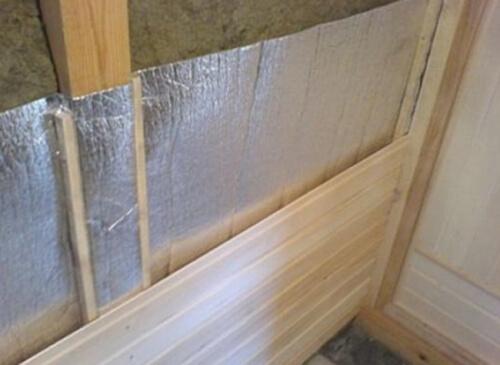
Important! As the heater will be located in the wall area, the natural cold bridges are floors, interior walls and ceiling. To cover them, you will need to insulate the ceiling surface and the floor. How this looks can be seen on demonstrating the internal insulation of wooden walls photo.
5. Sheathed kontrobreshetku super-diffused membrane and fasten it to the bars by means of staples.
6. Mark the locations for installation of main sheathing. Start from the corners and bring them to the center. Do not forget about the door and window openings. They bars will frame the opening around the perimeter.
7. At first, fasten the bars on the perimeter wall, and then set the vertical and openings. The distance between the bars take 2 – 5 cm less than the mats of insulation.
8. Take the insulation and insert it between the slats of the crates. As in the case of external insulation, lay insulation in two layers with offset to each other. Thus eliminate the possible cold bridges.
9. On top of the insulation covered with a vapor barrier and fasten it to the posts by means of staples.
10. After completion of wall insulation insulate the ceiling and floor. This will allow to have wall insulation for the floor and to eliminate the possible cold bridges.
11. Sheathe the walls with drywall and running trim.
The above-described method of insulation of wooden walls from the inside involves the use of mats of mineral wool. In addition it is also possible to use granules, cellulose fibre or sawdust-pellets. But unlike external insulation, the pellets will have to blow into the space between the wall and foil vapor barrier, which is somewhat inconvenient and requires special equipment.
Execution of works on warming the wooden walls requires a skillful handling of the instrument. Of course, comparing external and internal insulation, it is possible to note the complexity of implementation and requirements while performing work inside the house. So if You don't have enough experience, it is better to opt for external insulation, and if it is impossible to refer to more experienced artists. published
SUBSCRIBE to OUR youtube channel that allows you to watch online, download from YouTube free video about the recovery, the rejuvenation of man. Love for others and ourselves, as the feeling of high vibrations — an important factor for improvement .
http://cdn00.vidyomani.com/c/7/9/0/6hv9adn6wabt/index.html
Put LIKES and share with your FRIENDS!
www.youtube.com/channel/UCXd71u0w04qcwk32c8kY2BA/videos
Subscribe -https://www.facebook.com//
P. S. And remember, only by changing their consumption — together we change the world! ©
Source: strport.ru/klimat/uteplenie-derevyannykh-sten-svoimi-rukami
Features of thermal insulation of walls
Wood by its very structure has a number of unique qualities and requires a different approach to operate. The main feature of such material as wood, is its ability to "breathe". This means that wooden walls can regulate the microclimate in the house. Also, be aware natural origin of the logs that are susceptible to mold and rot. The naturalness of the wood imposes certain limitations on materials and methods for insulation of a wooden house.
Let's start with the materials for insulation of wooden houses. They should have the following characteristics:
- high water vapor permeability. Big or the same as the wood of 0.06 Mg/(m*h*PA);
- have a high moisture resistance;
- have a high fire safety;
- to be resistant to fungi and mold.
- mineral wool;
- ecowool;
- sawdust-pellets.

In addition to insulation of a wooden house and can be used facing brick, aerated concrete blocks, siding. Of course, the stone with a heater will allow you to create the most effective insulation, but then have to sacrifice the external beauty of a wooden house.
Important! But the use for thermal insulation of walls extruded polystyrene foam, polyurethane foam, foam, various sealants or foam is not recommended. These materials have extremely low rates of water vapor, which in turn might lead to the wood walls of the mold and mildew and ultimately rot.In preparation for the insulation of wooden walls, particular attention should be paid to technology of creation of the insulation layer. The main rule which should be comply with is: vapor permeability of each subsequent layer must be higher than the previous, in the direction from the inner areas to the street. According to this simple truth creates and insulation of a wooden house, which is a multi-layered cake. The structure of this cake for insulation of walls outside consists of a lathing and counter lathing, insulation, wind and waterproofing. Internal insulation of wooden walls is also subject to this rule, with the only difference that instead of the wind insulation is a vapor barrier.

Important! If you can not decide how best to insulate the wooden walls, inside or outside, the answer is definitely one you should choose insulation of wooden walls outside. This is due to several reasons:
- First, remain internal living space of the house.
- Secondly, due to the properties of wood to accumulate and release moisture, the most effective is external insulation.
- Thirdly, the outer insulation of the wooden walls a lot easier to create.
- Fourthly, with external insulation, the number of thermal bridges to a minimum.
The calculation of the insulation layer
The calculation of the optimum thickness of the insulation layer of one of the most important steps in winterizing your home, especially wood. This task must be approached with great responsibility, since the error in the calculations as a minimum entails extra financial costs for insulation, and at best will damage wooden walls. So, if You're not handy with formulas and calculations, it is better to contact the experts on this issue. We consider the example of calculation with comments and explanations by which to determine which layer of insulation you will need for your home.
To perform calculations you will need to refer to the SNiP 23-02-2003 "Thermal protection of buildings" as well as TSN (regional building regulations). These normative documents are given all the necessary initial data for calculations and methodology. The simulations themselves are based on teploproduktia materials that is constant and specific for each region. For example, in the Moscow region this figure amounts to 4,15 (m2*°C)/watt. It is also worth noting that the calculations should take into account teploproduktia ® each material in the insulation cake and sum them. To perform the calculations desired conductivity of the materials used and their thickness.
The formula for calculating the thermal resistance as follows R = P/ K.
Where P is the material thickness, K – coefficient of thermal conductivity of the material. For example, a wooden wall outside is finished with facing brick, and between them is placed a layer of mineral wool. Then the total heat-transfer resistance of the wall is equal to the sum of resistances of each material.

Based on the above formula will do the calculation for the thickness of the insulating layer. The formula for calculating the following P=R*K. Data on thermal conductivity are taken from table thermal conductivity material or packing material used, and teplopotreblenija from the regulations.
For example, for Moscow and area the resistance to heat transfer is equal to 4,15 (m2*°C)/watt. If we insulate mineral wool wooden wall thickness of 20 cm with a siding, to wood teploproduktia equal to AZN 0.806 (m2*°C)/W, and for mineral wool 0,045 (m2*°C)/watt. Accordingly, the insulation layer must have teploproduktia R=4,15-0,806-0,045=3,299 m2*°C.
Now, take thermal conductivity coefficient of mineral wool of 0.41 W/m*K and multiply by teploproduktia P = 3,299*0,041=0,135 m. similarly, we can calculate the layer thickness of any other insulation in various regions of the country.
It remains to calculate the area of insulation and purchase all the necessary materials. In the first place is itself is mineral wool, wind - and moisture - protection, and vapor barrier. In addition, you will need wooden slats with a thickness of 130х50 mm, a height equal to the height of the insulated wall, and fasteners for them. As a fastener for wood slats, you can use plain long screws or metal angles with holes for the screws. The number of strips is taken from the calculation that the distance between them should be 2 – 5 cm less than the width of insulation mats. Fasteners are procured at the rate of 1 – 2 mounting point at 1 m running. Also purchased Reiki 50х30 mm or mm 50х20 to kontrobreshetki. The total number of such strips is taken from the calculation that the frame kontrobreshetki consists of 3 horizontal rows around the perimeter of the house.
Insulation of wooden walls outside

As already mentioned, the insulation of wooden walls outside – the most simple and affordable method of insulation. To start the insulation of a wooden house should be a year or two. This is important because the tree during this time shrinks, which leads to the change of the height of the building. Moreover, shrinkage will be found the new gap, which will have to caulk.
Insulation of wooden walls with their hands outside can be accomplished in various ways. Consider the most common – insulation of mineral wool with a finish siding. Works are held in several stages:
1. Check the wall for the presence of cracks and the fit of logs or boards to each other.

4. Apply a layout for the crate on the wall.2. If necessary prokonopachivajut all found the cracks.
3. First measure the total length of the wall from edge to edge. Then divide it into equal intervals of length 2 – 5 cm smaller than the Mat of mineral wool.

5. Prepare bars for lathing, cutting them to the required length.
6. At first, fasten the bars on the perimeter wall. One above the base, one under the canopy and two at the edges.

7. In the resulting box placed and fixed at first frame around window and door openings, and then the vertical bars of the crates according to the markings.
Important! If the length of one bar is not enough to cover the height of the wall, the missing pieces must be placed in a staggered manner in each subsequent stand. For example, the 1st hour is the bottom of a long, on top of short pieces, 2 front – bottom bar short, long on top.8. Now take the mats of mineral wool and insert them between the uprights of the frame. Since the distance between the bars is slightly less than the width of the Mat, the mineral wool will stay inside the strut. To reduce the number of thermal bridges, mineral wool can be laid in two layers. It's enough to buy the mats of lesser thickness. For example, when the total thickness of the insulation layer at 13 cm, you can use the mats with a thickness of 50 mm or 70 mm. At each successive layer is placed with an offset relative to the first.
9. On top of a heater covered with a layer of water and wind insulation of super-diffused membranes. Fasten it to the frame by means of staples.

10. Fills rear the crate, thus creating a ventilation gap of 30 mm between the insulation and finishing material.
11. In the end, the facade of a finished siding.
If you plan to finish facing brick, as the insulation is better to use granules, cellulose fibre or sawdust-pellets. These materials, with the filling between the wooden wall and the cladding will fill all the voids, thereby creating a reliable thermal protection. Insulation of wooden walls outside of the mineral wool with a facing brick finish for its technology is similar to the trim siding. The difference lies in the used finishing materials and obligatory presence of the Foundation under the brick.
Insulation of wooden walls from the inside

As already mentioned, the insulation of wooden walls from the inside quite rare. Usually this method of insulation is chosen, it is not possible to do external insulation. Technology of execution of works is broadly similar to external insulation, but there are some differences. Let us consider the stages and peculiarities of execution of works for insulation of wooden walls from the inside:
1. After the shrinkage of the house check them for the presence of cracks and carefully konopatin them.
2. Serverlevel in the crown of small holes for ventilation.
3. Mark the locations for installation kontrobreshetki.
4. Cut into bars for kontrobreshetki and fasten them to the wall. This will create a ventilated gap between the wall and the insulation, which in turn enables you to save the wall from zaprevaniya inside.
Important! As the heater will be located in the wall area, the natural cold bridges are floors, interior walls and ceiling. To cover them, you will need to insulate the ceiling surface and the floor. How this looks can be seen on demonstrating the internal insulation of wooden walls photo.

5. Sheathed kontrobreshetku super-diffused membrane and fasten it to the bars by means of staples.
6. Mark the locations for installation of main sheathing. Start from the corners and bring them to the center. Do not forget about the door and window openings. They bars will frame the opening around the perimeter.
7. At first, fasten the bars on the perimeter wall, and then set the vertical and openings. The distance between the bars take 2 – 5 cm less than the mats of insulation.
8. Take the insulation and insert it between the slats of the crates. As in the case of external insulation, lay insulation in two layers with offset to each other. Thus eliminate the possible cold bridges.
9. On top of the insulation covered with a vapor barrier and fasten it to the posts by means of staples.

10. After completion of wall insulation insulate the ceiling and floor. This will allow to have wall insulation for the floor and to eliminate the possible cold bridges.
11. Sheathe the walls with drywall and running trim.
The above-described method of insulation of wooden walls from the inside involves the use of mats of mineral wool. In addition it is also possible to use granules, cellulose fibre or sawdust-pellets. But unlike external insulation, the pellets will have to blow into the space between the wall and foil vapor barrier, which is somewhat inconvenient and requires special equipment.
Execution of works on warming the wooden walls requires a skillful handling of the instrument. Of course, comparing external and internal insulation, it is possible to note the complexity of implementation and requirements while performing work inside the house. So if You don't have enough experience, it is better to opt for external insulation, and if it is impossible to refer to more experienced artists. published
SUBSCRIBE to OUR youtube channel that allows you to watch online, download from YouTube free video about the recovery, the rejuvenation of man. Love for others and ourselves, as the feeling of high vibrations — an important factor for improvement .
http://cdn00.vidyomani.com/c/7/9/0/6hv9adn6wabt/index.html
Put LIKES and share with your FRIENDS!
www.youtube.com/channel/UCXd71u0w04qcwk32c8kY2BA/videos
Subscribe -https://www.facebook.com//
P. S. And remember, only by changing their consumption — together we change the world! ©
Source: strport.ru/klimat/uteplenie-derevyannykh-sten-svoimi-rukami
Tags
See also
How to build a winter garden with his own hands
How to restore wood Windows: step by step instructions
How to insulate a house with plaster: tips and recommendations
How to insulate the house, quickly, simply and with a minimum budget
How to insulate an already built house
How to build outdoor kitchen with their hands
How to build a greenhouse dome with their hands
How to make an inexpensive greenhouse with their hands
How to insulate the apartment
Weather in the house: how to insulate the front door