How to prepare the bike for the season
 Bashny.Net
This review tells you about the most simple and basic bike maintenance of its preparations for the new season.
50 photos, the source

01. We will change the pedal, chain, cassette rear hub, tires, rope switch, grips, and make the necessary settings.

02. Necessary tools: a set of hexagons, the key 15, figured (Phillips) screwdriver, squeeze chain puller tape whip, adjustable wrench, wire cutters for wire rope.

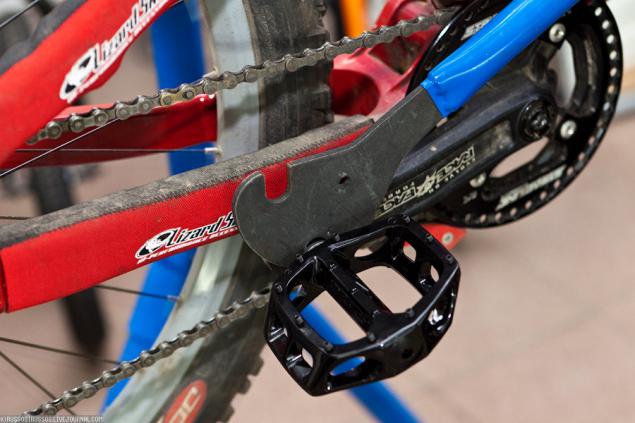
03. We begin with the replacement of the pedals - the simple operation often puts many at a standstill. The main cause of becoming the fact that the pedals varies depending on the direction of the thread from the side. On most pedals on the axis L and are labeled R, indicating, respectively, and the left and right sides.

04. In order to set the pedal or take them in most cases the key 15 mm.

05. Also, in some cases, this procedure can be done on a hexagon 6 mm.

06. Before setting on the thread should be applied grease - in the future it will greatly facilitate the replacement of the pedals.

07. A little trick: turning the pedals in the opposite direction (ie, as if you scroll them back during the ride), you can easily tighten them in the connecting rod.
08. One of the reasons for the poor shift is often worn chain. Very often stretched chain quickly wears the star. Therefore, for the chain is to constantly monitor and, if necessary, replace immediately. To determine the degree of wear of the chain, there are special tools, they cost little, but can save quite large sums of money.
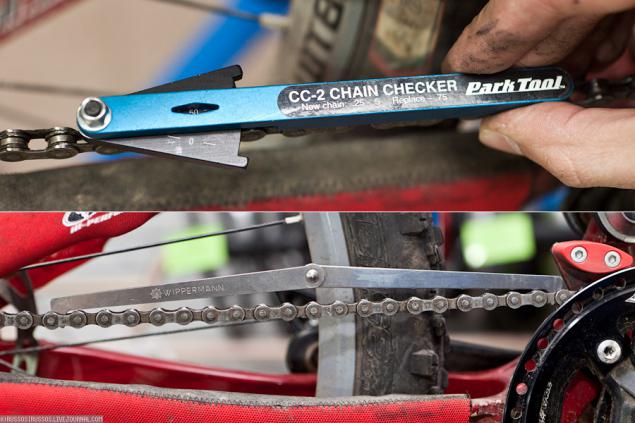
09. A number of manufacturers bundle their chain of quick-locks, they largely facilitate replacement.
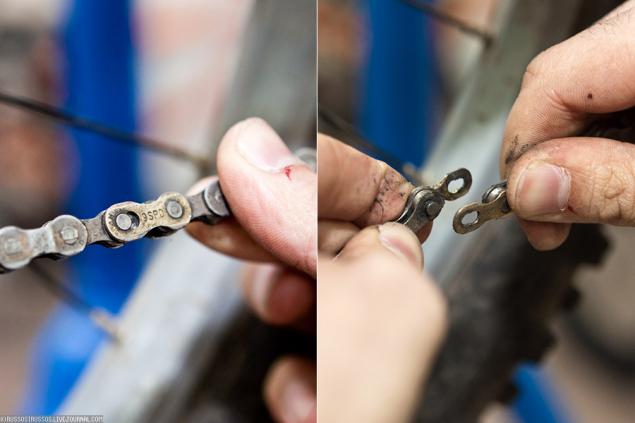
10. If there is no lock on the chain - you should use the squeeze.
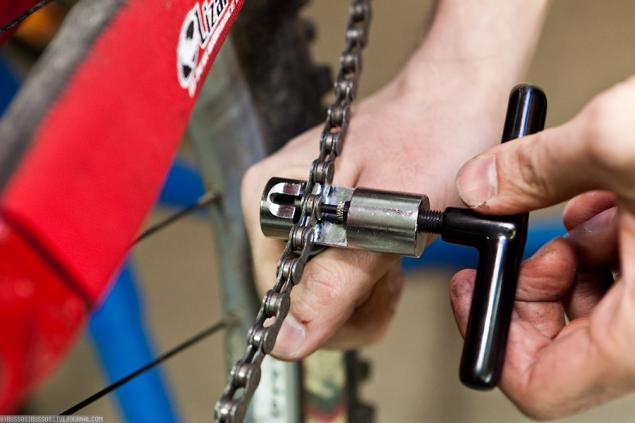
11. For the selection of the correct length of the chain there is a very simple way - a chain is put on the largest sprocket on the cassette and on the largest sprocket, and then she was selected to the maximum tension, and to get the length of two executives added.

12. In order to verify the correct selection of the circuit, it is enough to switch on the smallest star in the cassette, with the position of the foot switch must stand perpendicular to the floor. Bicycle having rear suspension, the selection of the chain length should add more units depending on the size of suspension travel. Otherwise, the chain may break with the full triggered suspension.

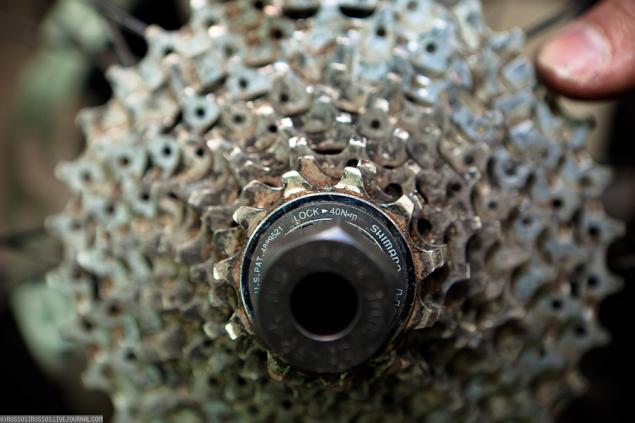
13. Also, from time to time should be changed, and the tape with the leading stars of detection of wear. Top stars in the cartridge can vary considerably in size - should be paid particular attention to this parameter, as this can greatly change the transmission values and greatly affect the usability of the bicycle.

14. In order to remove the tape from the back of the sleeve, you will need a special remover.
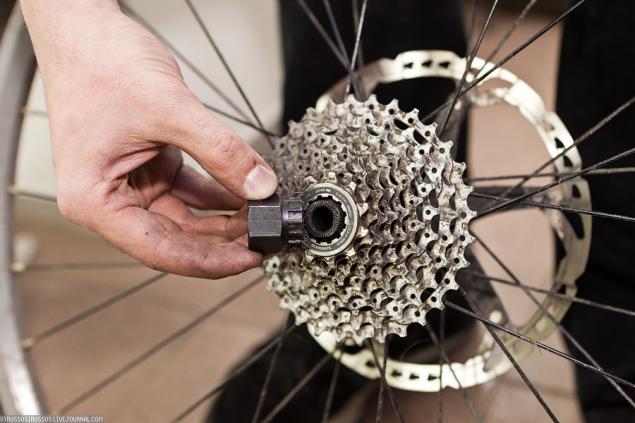
15. Retaining ring cartridge unscrewed counterclockwise. But you can always check yourself by looking labels on it.
16. In order for the tape does not rotate with the drum, it throws the whip and twisted a lock ring (other-clockwise).

17. Then remove the tape there is no difficulty.

18. When installing the tape should pay attention to the presence of a narrow ledge on the body of the drum and a corresponding groove on the cassette itself - it allows you to assemble a cassette with the correct positioning of the teeth of stars for a precise and fast switching.
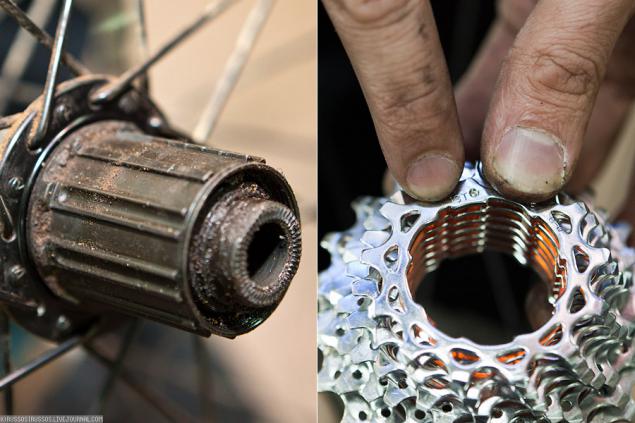
19. After installing the cartridge in the drum locking ring twists without using a whip.

20. To replace the tires or the camera on the wheel it is necessary to completely pull.
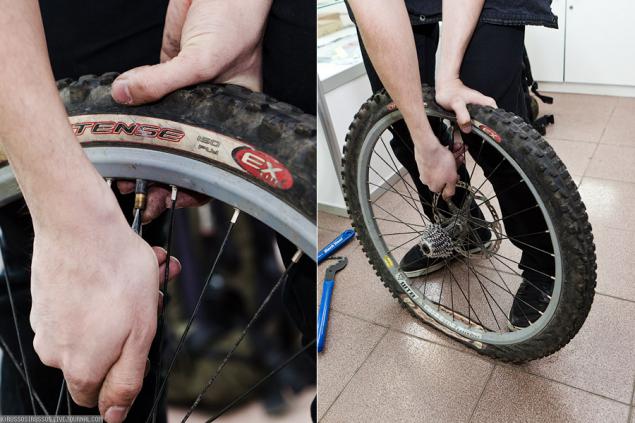
21. This is followed by promyat around the perimeter of the tire rim, she began to hang freely on it. This will remove it, in most cases without resorting to any tools.
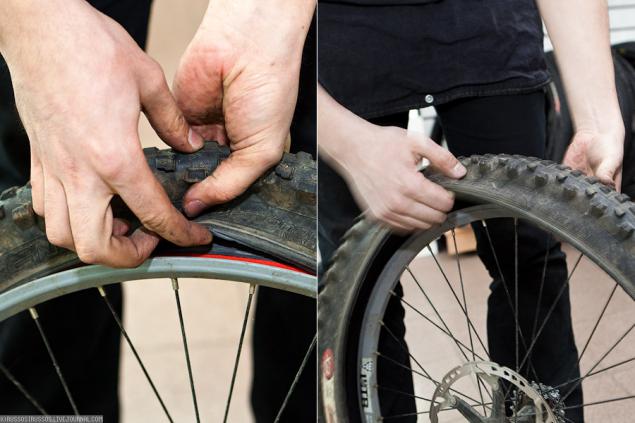
22. To facilitate the installation of a new camera or camera tires should be slightly inflated and in this state inserted into the tire.

23. A little trick: if you combine the nipple chamber with an inscription on the lid itself, its detection is easier when you need to pump up the wheel.

24. Before putting the tire on the rim with the camera, check that the direction of rotation of the wheels with the corresponding mark on the tire. In some cases, one tire may be specified a different direction for installation on the front and rear wheels.

25. Start the installation with the installation of the tires should be of the pin, followed by a fully zabortirovat one side of the tire. If you can not zabortirovat second side of the tire - after a while the camera.
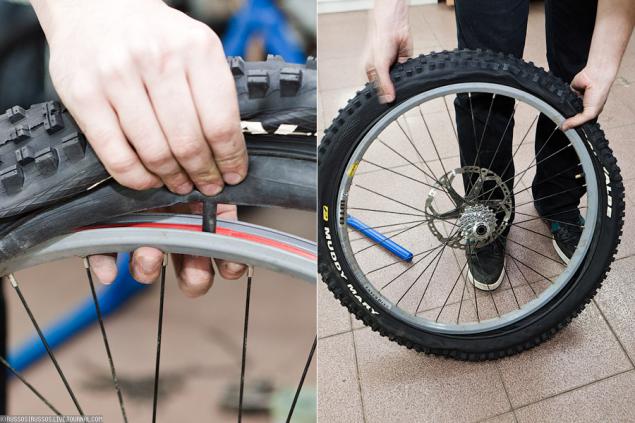
26. Permissible value of pressure in the tire shown on its sidewall.

27. The air pressure in the tire can vary within specified depending on your weight, coating a plurality of tracks and other conditions. Do not be afraid to experiment - the same tire may behave differently under the same conditions as a function of pressure in it.

28. Every time you change the chain, cassette, or simply take off the rear wheel to the bicycle should check the correctness of the switch settings. Here, we'll show you how to change the shift cable and configure the switch. First, you need to reset the chain on the smallest sprocket, just flip a coin switch. To remove the shift cable must be 5 mm Allen loosen the bolt that secures it to the switch.

29. In case a coin switch Phillips head screwdriver unscrewed cap covering the shift cable (on some coins need to disassemble part of the body, pre-read the instructions). Then remove the cable itself.

30. At the moment, two different kinds of cables switching - conventional steel and steel with Teflon coating.
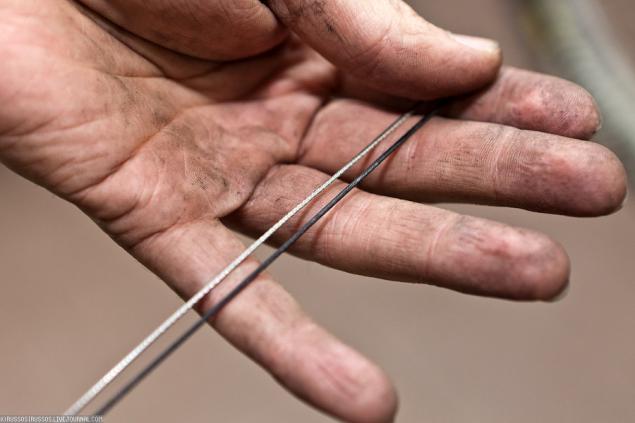
31. If you are using cables with Teflon coating should note that coverage is often blurred in places where the cable braid.

32. When installing a cable in a coin all the action is done in reverse order.

33. Thereafter, the cable is inserted into the braid. Previously it should drop a few drops of oil - it will facilitate the sliding of the rope and increase the clarity of switching.

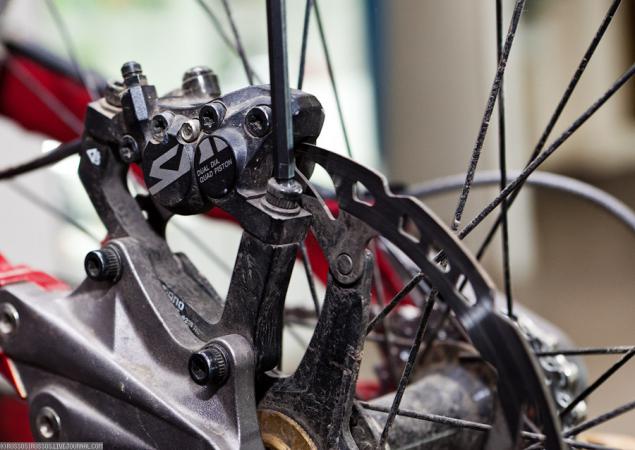
34. After the cable through the sheath, it should be fixed on the switch using a 5mm Allen key. If we fix the cable previously pulled his arm, you will greatly facilitate further adjustment.

35. If using a large star is late, increase the cable tension if delayed switching to lower - on the contrary weaken. To change the power cable tension, use the adjustment screw on the coin or the switch (if available).

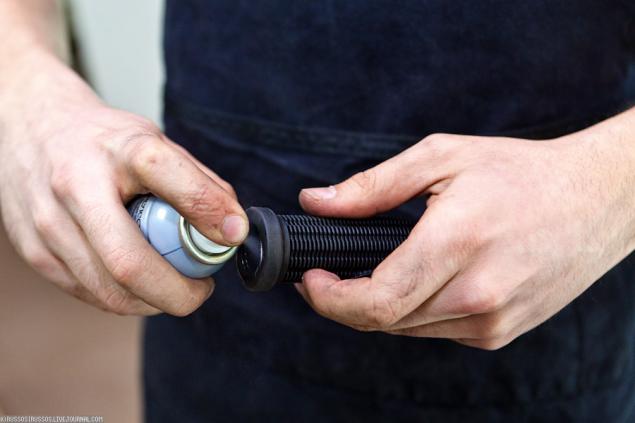
36. It should also be pay attention to limiting the adjustment screws on the switch. They did not allow him to get into the spokes and reset circuit with tape. Bolts are marked L and H. Bolt marked L does not allow the switch to get into the spokes, and marked H - throw off the chain with the smallest stars. Third bolt used to adjust the gap between the upper roller and the cassette switch, which should be about 5mm. In most cases, it does not have to touch it.

37. Once you have set up the switch, cut the cable, leaving the free end of a length of about 5 cm. To prevent it from unwinding at the end of the crimped aluminum cap.

38. It often happens that the disc brakes are starting to publish other sounds when the wheel rotates. The first thing to do - check to see whether the curved brake disc. If the brake rotor is smooth, it is necessary to center the brake caliper itself directly. To do this, loosen the bolts securing it.

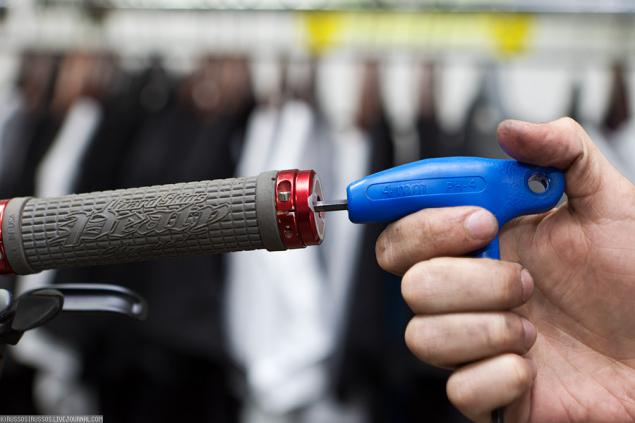
39. After that, turn the wheel and gradually tighten the brake, so he automatically is centered relative to the disc. Without releasing the brake lever, tighten the bolts. But we should not tighten them right up to the maximum, tighten them gradually. Then release the brake lever and spin the wheel to make sure that the pads do not touch the disc. Also, you can center the caliper and eyes. Simply put caliper in such a position that the rotor from the pad until there is an equal distance from each side.
40. Also, there are often problems with the replacement Grips on the steering wheel. If your grips have no retaining ring (lok'onami), their installation on the steering wheel will facilitate an ordinary hair spray.

41. Simply sprinkle into the grips and as the varnish is not dried up, put it on the wheel.
42. After some time, the varnish has dried, glued and grips will not rotate. To remove them, it suffices to sprinkle them with water under the same or varnish.

43. If your grips have the locking ring, then install them enough to tighten the screws on them.

44. Always place the cap for steering - it will protect your wheel from damage, and you - from injury.
45. Check the Group of Eight on the wheel is quite simple. It is enough to fix a short distance from a screwdriver or Allen key and scroll wheel. If you have eight, you see how the distance between him and the rim to reduce or increase - this is vosmerka. To fix it you need to key-spoke.

46. If you have a machine for spitsovki wheels, it will greatly facilitate this process.

47. If the rim is displaced in rotation to the left - should increase the tension of the spokes on the right side and out on the left (or vice versa - when shifted to the right). To increase the tension of the spokes is the key to rotate counter-clockwise to decrease - on the contrary.

48. If you do not have a machine for spitsovki - still enough to fix the line on the bicycle frame or fork. The marks on the ruler will allow you to navigate and most accurately straighten the wheel.

Tricks of the Trade.
49. In order to have a fall did not break equipment on the steering wheel should not be much to fix it so that it can rotate freely.
If you want to make a beautiful baykchek the iron horse, then make sure that all read the inscription on the rim on one side and match the labels on tires.

50. And also to read the inscriptions on the rods without effort.
Well, quite a little secret: if your wheels are collected according to the rules - the inscription on the sleeve is easily read through the hole for the camera in the rim. This is done to the sleeve when photographing the background were easily distinguishable labels on the rim. On the strength of the wheel is not affected, but shoubayka is quite an important point.
The review was prepared in conjunction with the store mtbshop.ru

Source:
50 photos, the source

01. We will change the pedal, chain, cassette rear hub, tires, rope switch, grips, and make the necessary settings.

02. Necessary tools: a set of hexagons, the key 15, figured (Phillips) screwdriver, squeeze chain puller tape whip, adjustable wrench, wire cutters for wire rope.

03. We begin with the replacement of the pedals - the simple operation often puts many at a standstill. The main cause of becoming the fact that the pedals varies depending on the direction of the thread from the side. On most pedals on the axis L and are labeled R, indicating, respectively, and the left and right sides.

04. In order to set the pedal or take them in most cases the key 15 mm.

05. Also, in some cases, this procedure can be done on a hexagon 6 mm.

06. Before setting on the thread should be applied grease - in the future it will greatly facilitate the replacement of the pedals.

07. A little trick: turning the pedals in the opposite direction (ie, as if you scroll them back during the ride), you can easily tighten them in the connecting rod.

08. One of the reasons for the poor shift is often worn chain. Very often stretched chain quickly wears the star. Therefore, for the chain is to constantly monitor and, if necessary, replace immediately. To determine the degree of wear of the chain, there are special tools, they cost little, but can save quite large sums of money.

09. A number of manufacturers bundle their chain of quick-locks, they largely facilitate replacement.

10. If there is no lock on the chain - you should use the squeeze.

11. For the selection of the correct length of the chain there is a very simple way - a chain is put on the largest sprocket on the cassette and on the largest sprocket, and then she was selected to the maximum tension, and to get the length of two executives added.

12. In order to verify the correct selection of the circuit, it is enough to switch on the smallest star in the cassette, with the position of the foot switch must stand perpendicular to the floor. Bicycle having rear suspension, the selection of the chain length should add more units depending on the size of suspension travel. Otherwise, the chain may break with the full triggered suspension.

13. Also, from time to time should be changed, and the tape with the leading stars of detection of wear. Top stars in the cartridge can vary considerably in size - should be paid particular attention to this parameter, as this can greatly change the transmission values and greatly affect the usability of the bicycle.

14. In order to remove the tape from the back of the sleeve, you will need a special remover.

15. Retaining ring cartridge unscrewed counterclockwise. But you can always check yourself by looking labels on it.

16. In order for the tape does not rotate with the drum, it throws the whip and twisted a lock ring (other-clockwise).

17. Then remove the tape there is no difficulty.

18. When installing the tape should pay attention to the presence of a narrow ledge on the body of the drum and a corresponding groove on the cassette itself - it allows you to assemble a cassette with the correct positioning of the teeth of stars for a precise and fast switching.

19. After installing the cartridge in the drum locking ring twists without using a whip.

20. To replace the tires or the camera on the wheel it is necessary to completely pull.

21. This is followed by promyat around the perimeter of the tire rim, she began to hang freely on it. This will remove it, in most cases without resorting to any tools.

22. To facilitate the installation of a new camera or camera tires should be slightly inflated and in this state inserted into the tire.

23. A little trick: if you combine the nipple chamber with an inscription on the lid itself, its detection is easier when you need to pump up the wheel.

24. Before putting the tire on the rim with the camera, check that the direction of rotation of the wheels with the corresponding mark on the tire. In some cases, one tire may be specified a different direction for installation on the front and rear wheels.

25. Start the installation with the installation of the tires should be of the pin, followed by a fully zabortirovat one side of the tire. If you can not zabortirovat second side of the tire - after a while the camera.

26. Permissible value of pressure in the tire shown on its sidewall.

27. The air pressure in the tire can vary within specified depending on your weight, coating a plurality of tracks and other conditions. Do not be afraid to experiment - the same tire may behave differently under the same conditions as a function of pressure in it.

28. Every time you change the chain, cassette, or simply take off the rear wheel to the bicycle should check the correctness of the switch settings. Here, we'll show you how to change the shift cable and configure the switch. First, you need to reset the chain on the smallest sprocket, just flip a coin switch. To remove the shift cable must be 5 mm Allen loosen the bolt that secures it to the switch.

29. In case a coin switch Phillips head screwdriver unscrewed cap covering the shift cable (on some coins need to disassemble part of the body, pre-read the instructions). Then remove the cable itself.

30. At the moment, two different kinds of cables switching - conventional steel and steel with Teflon coating.

31. If you are using cables with Teflon coating should note that coverage is often blurred in places where the cable braid.

32. When installing a cable in a coin all the action is done in reverse order.

33. Thereafter, the cable is inserted into the braid. Previously it should drop a few drops of oil - it will facilitate the sliding of the rope and increase the clarity of switching.

34. After the cable through the sheath, it should be fixed on the switch using a 5mm Allen key. If we fix the cable previously pulled his arm, you will greatly facilitate further adjustment.

35. If using a large star is late, increase the cable tension if delayed switching to lower - on the contrary weaken. To change the power cable tension, use the adjustment screw on the coin or the switch (if available).

36. It should also be pay attention to limiting the adjustment screws on the switch. They did not allow him to get into the spokes and reset circuit with tape. Bolts are marked L and H. Bolt marked L does not allow the switch to get into the spokes, and marked H - throw off the chain with the smallest stars. Third bolt used to adjust the gap between the upper roller and the cassette switch, which should be about 5mm. In most cases, it does not have to touch it.

37. Once you have set up the switch, cut the cable, leaving the free end of a length of about 5 cm. To prevent it from unwinding at the end of the crimped aluminum cap.

38. It often happens that the disc brakes are starting to publish other sounds when the wheel rotates. The first thing to do - check to see whether the curved brake disc. If the brake rotor is smooth, it is necessary to center the brake caliper itself directly. To do this, loosen the bolts securing it.

39. After that, turn the wheel and gradually tighten the brake, so he automatically is centered relative to the disc. Without releasing the brake lever, tighten the bolts. But we should not tighten them right up to the maximum, tighten them gradually. Then release the brake lever and spin the wheel to make sure that the pads do not touch the disc. Also, you can center the caliper and eyes. Simply put caliper in such a position that the rotor from the pad until there is an equal distance from each side.

40. Also, there are often problems with the replacement Grips on the steering wheel. If your grips have no retaining ring (lok'onami), their installation on the steering wheel will facilitate an ordinary hair spray.

41. Simply sprinkle into the grips and as the varnish is not dried up, put it on the wheel.

42. After some time, the varnish has dried, glued and grips will not rotate. To remove them, it suffices to sprinkle them with water under the same or varnish.

43. If your grips have the locking ring, then install them enough to tighten the screws on them.

44. Always place the cap for steering - it will protect your wheel from damage, and you - from injury.

45. Check the Group of Eight on the wheel is quite simple. It is enough to fix a short distance from a screwdriver or Allen key and scroll wheel. If you have eight, you see how the distance between him and the rim to reduce or increase - this is vosmerka. To fix it you need to key-spoke.

46. If you have a machine for spitsovki wheels, it will greatly facilitate this process.

47. If the rim is displaced in rotation to the left - should increase the tension of the spokes on the right side and out on the left (or vice versa - when shifted to the right). To increase the tension of the spokes is the key to rotate counter-clockwise to decrease - on the contrary.

48. If you do not have a machine for spitsovki - still enough to fix the line on the bicycle frame or fork. The marks on the ruler will allow you to navigate and most accurately straighten the wheel.

Tricks of the Trade.
49. In order to have a fall did not break equipment on the steering wheel should not be much to fix it so that it can rotate freely.
If you want to make a beautiful baykchek the iron horse, then make sure that all read the inscription on the rim on one side and match the labels on tires.

50. And also to read the inscriptions on the rods without effort.
Well, quite a little secret: if your wheels are collected according to the rules - the inscription on the sleeve is easily read through the hole for the camera in the rim. This is done to the sleeve when photographing the background were easily distinguishable labels on the rim. On the strength of the wheel is not affected, but shoubayka is quite an important point.
The review was prepared in conjunction with the store mtbshop.ru

Source:
Tags
See also
As One Who shifts the Upstairs card: 2 amusing stories of life
Tips for a beginner: how to prepare for your first yoga tour
15 reasons why rich people are not so carefree as it seems
How to rid yourself of anxiety?
Matt McInnis: 3 bad habits I learned growing up in the Apple — and how I got rid of them
Insulation of floor in a wooden house
The artist as much as 2 months Dress plunged into the Dead Sea, and this is what came out of it
That often buy in the Internet
7 survival rules seasonal business