786
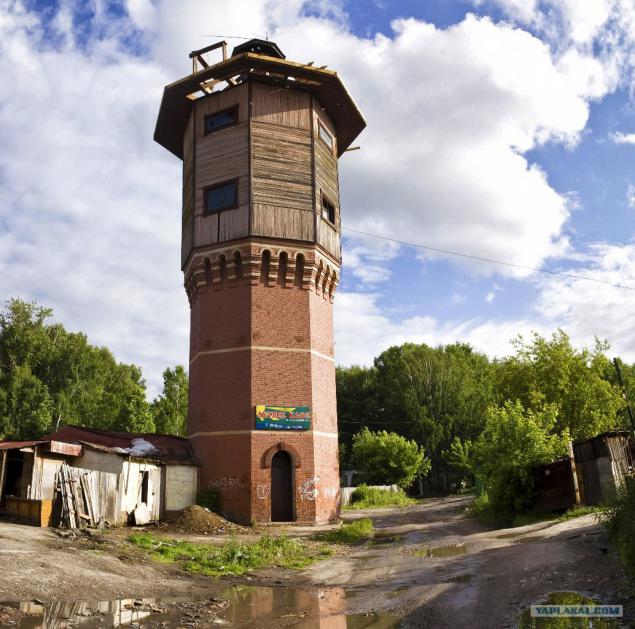
Lunev Tower
The last part of this portion of the reporting year work
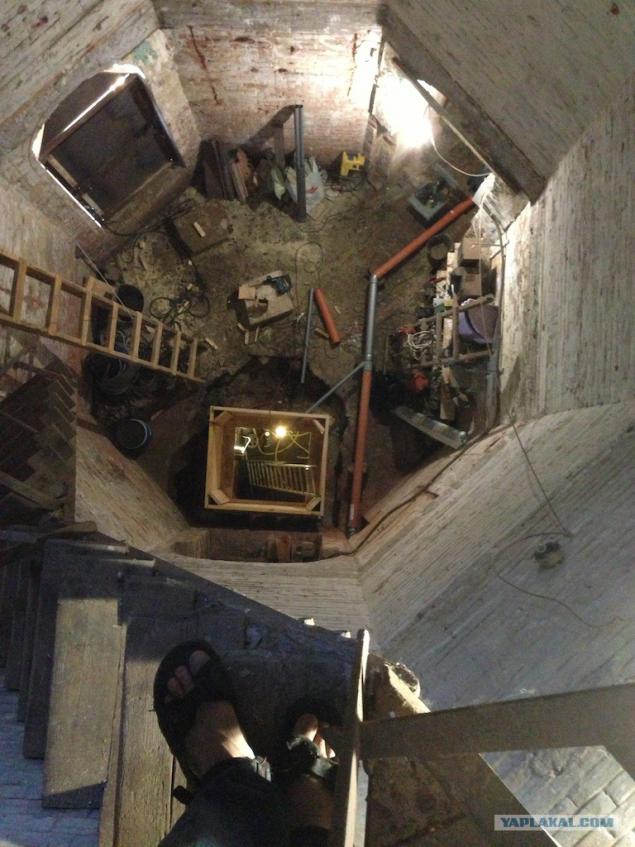
The main impression of the summer - alone everything is done very slowly. I had never engaged in the construction and repair, and, as it turned out, my expectations regarding labor productivity been greatly overstated. 90% of the time I work with a pair of hands, and even that is sometimes injured (already wrote about burns). For example, I was hoping to have time to warm the cold wood of the tower ... But this is still very far away. By and large, over the summer managed to fulfill most of the work on the roof and the attic, but a little to bring to mind the first level. On this and tell.
Realizing that in the summer I'd have to make a little, I set a minimum two objectives - to make a normal floor on the first level and to ensure that the winter in the tower to maintain a positive temperature. It would be, of course, 23, but it is much to be found on the street million above zero - then you can normally work with concrete, the water does not freeze. Yes, and most will be easier in the winter sweater instead kombeza.
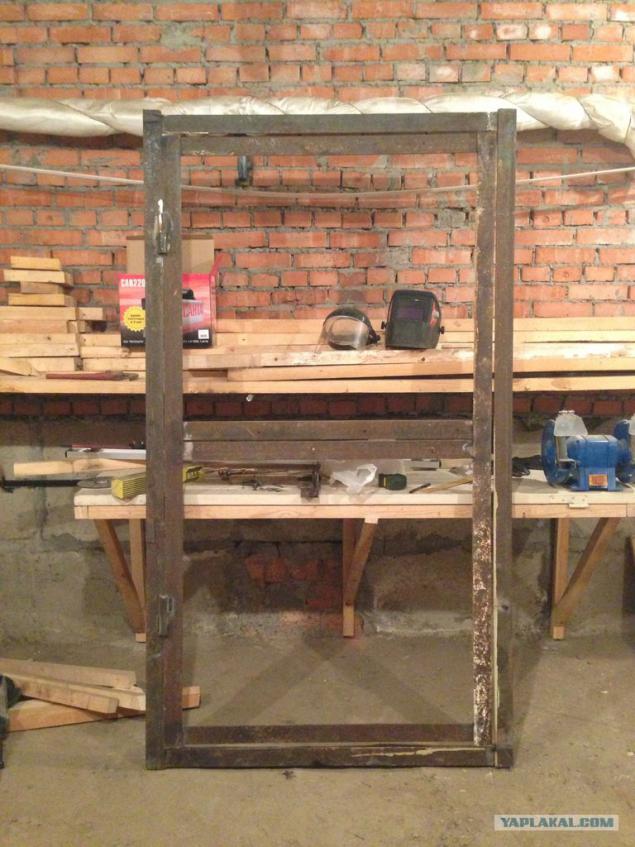
But first of all - the entrance to the tower.
I originally wanted to entrance was located on the spot where for many years there was a window. But for this it was necessary to make at least a temporary (but solid) door. So I became a welder.
24 photo. Source
I originally wanted to entrance was located on the spot where for many years there was a window. But for this it was necessary to make at least a temporary (but solid) door. So I became a welder.
03.
Then came the turn of the floor and the opening leading to the basement. Let me remind you, before the floor of the tower was a wooden chairs on the brick. Here's how it looked originally:

Once we removed the planks and logs:
05.
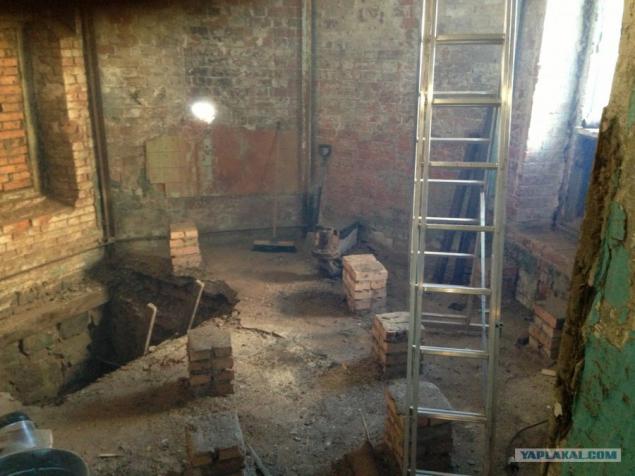
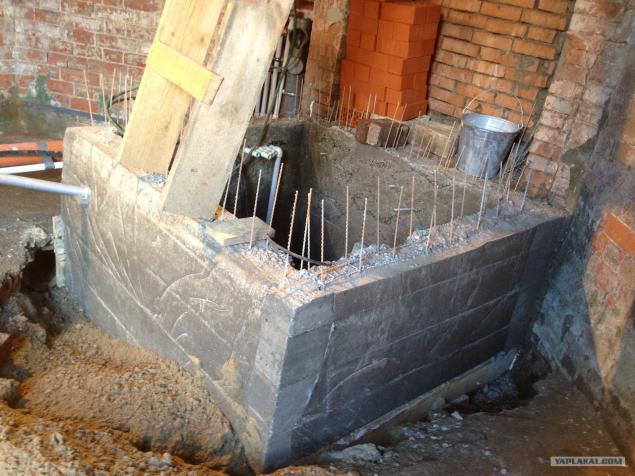
Finished floor level is expected at a height threshold, it means that we must make a choice. A more simple and rational way was on available chairs to lay brick, steel beams and pour concrete. But it would remain under the floor void. And I do not like being under the floor is empty, there definitely will live mice or rats. So I decided to zamorochitsya for leveling sand floor. But before dumping the sand needed to make concrete support wall around the basement. It was the first time in my life, concrete works, so I did almost all possible errors
06.

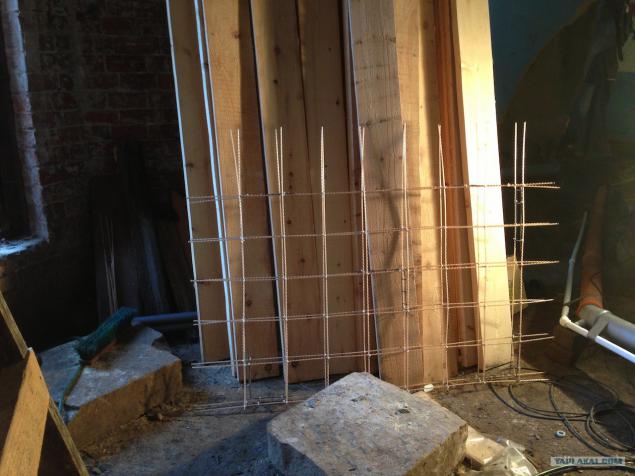
With reinforcement, I decided to show off and use composite instead of steel reinforcing bars. Of course, it is much easier to carry and cut. But the first segment of reinforcement I assemble and disassemble 4 (four!) Times, he gets terribly uneven. A uniformity of power elements is important for reinforcing concrete. Distortions were obtained due to the fact that composite rebar is sold and transported to the bays. When you cut from a piece of bays meter rod, it turns slightly curved. And now assemble such flat bars 6x8 grid. Now tie the two such lattices? On the fourth time I have more or less mastered the technology. Especially helps to mark the point of intersection of the pre-marker. For bundles using conventional collars, ties, familiar to anyone who has worked with communication cables
07.
(clearly visible sewage pipes, which together with the plumbing stack in a day Tahir)
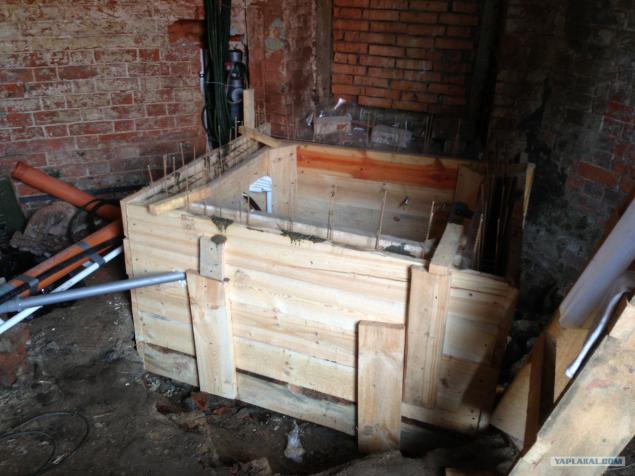
Somehow, I connected the four segments of the double reinforcement bars, and then set the outer wall formwork.
08.
Posted in [mergetime] 1386047987 [/ mergetime]
Decking the inside was covered with polythene to prevent premature loss of laitance and water. After that I prepared inserts to maintain a steel lid opening.
Now I have experienced and intelligent, well aware that the formwork can be easily done from a thin boards, but it was necessary to strengthen the struts ... But then I did not know. And the day I brought the X 1, 1 cubic meter of concrete, and we with Denis Chernov begin very quickly to run with heavy buckets of receiving bath to formwork:
09.
10.
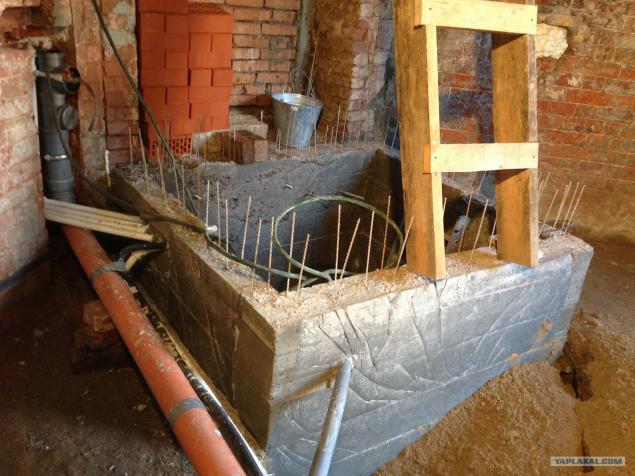
When the mold was filled with little more than half, started to come off the bottom of the board because of the severity of the concrete. We quickly built a few struts and thereby saved the shuttering of the final razvalivanie (and it would be a complete disaster for me). Two days later I tore off the board and saw paunchy freak. Puzo bottom was formed because of the strong deflection of boards:
11.
12.
13.
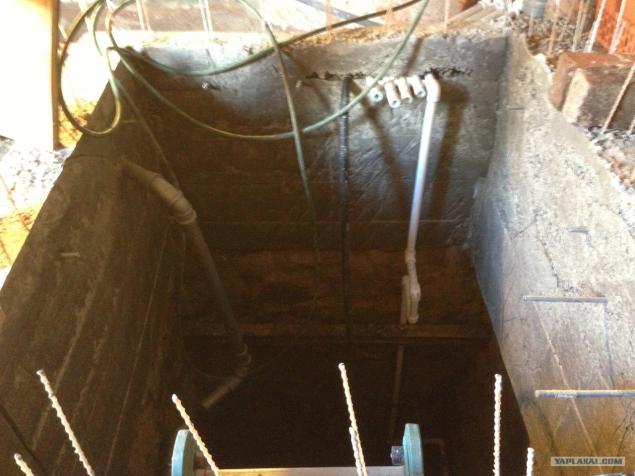
(from right to left: water pipes, four back-up pipes, corrugated cable for the power supply of the basement, the pipe for drainage pumping from the basement)
Since I wanted to make a door in the basement is much less than the existing opening, I needed to make a solid (first of all - hard) cover on the "extra" area of the opening. I cooked the framework of the existing abundant corner-fives, welded it to the mortgage details on the inner walls of the opening, and on top of the frame welded sheet steel with a thickness of 4 mm. Since the cover will be living on the border between the temperature and the first basement level, and in the cellar is sure to be high humidity, all steel elements of I covered nintendo protective paint (not rusted and looked stylish):
14.

(here is immediately obvious, and the frame, and sand, and the top of the retaining wall and Stroebe a communication in the wall)
The last photo yet careful observer will notice that the floor level became higher! This is covered with 9 cubic meters of sand. For the dumping I rented for two days petrol tamping machine weighing about a hundred kilos. The process looks like this: a truck dumped the sand in front, I threw it into the shovel, trying to fall asleep more or less evenly. Every 20 centimeters of height included rammer and held it the entire area. All pipes have disappeared under the sand, the thickness of the final layer was 60-70 cm (ground floor was uneven), and near the supporting walls - nearly a meter.
Then I put a 15-cm layer of special, durable foam. Its density is 35 kg / cubic meter. We had to take the fifties, but it would have to wait too long. In any case, the strength of the foam used to fill already allows him tie. But I'm afraid fumes which can produce foam, so it was laid on top of another 5 cm Penoplex. At the same time between the layers of insulation was paved a thin layer of sand to reduce irregularities. Plus the fact that the seams between the sheets in the layers do not coincide, this desynchronization useful for thermal insulation.
15.
16.
(laid penoplex, can be clearly seen how small was the doorway to the basement)
After I put Penoplex masonry net and attaching the heating cable. Yes, I know that the electric floor heating - it slabodushnoe decision. But to bother this year on water heating and more energy-efficient heat sources I had neither the time nor the money.
17.
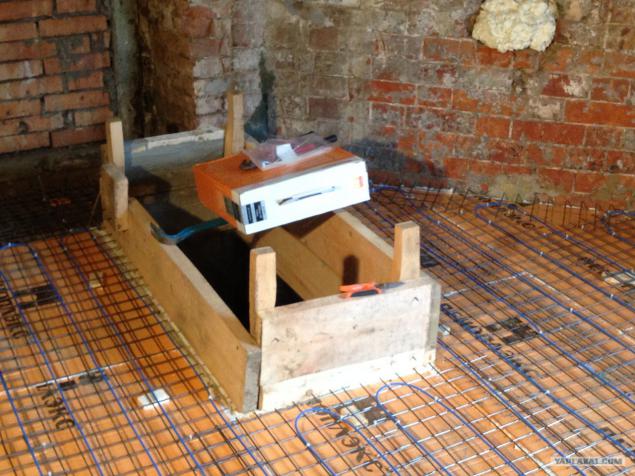
Power 115-meter cable is 2, 3 kW. I hope to maintain zero temperature at the bottom of the tower that will be enough remains to establish the grid after lighthouses and fill screed:
18.
(forgot to tell you about a damper tape around the perimeter of her little seen in this photo)
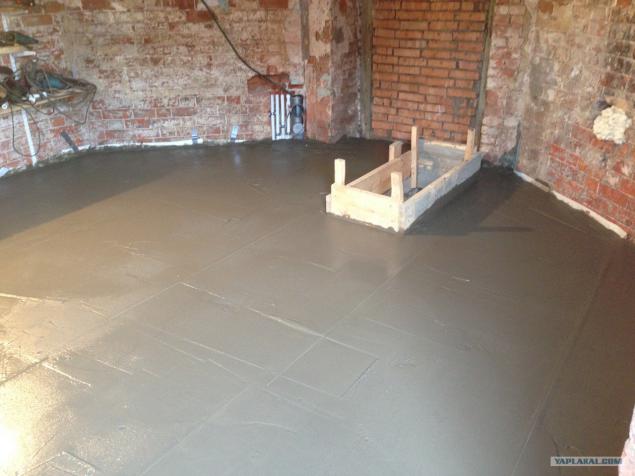
On the receiving floor there are irregularities (but polished diamond bowl on Bulgarian), elevation to the centimeter. If the screed will survive the year, it will be filled with a mixture of self-leveling finish. In fact, I was really worried. The thickness of the screed with a single reinforcement mesh of 6-8 cm, it is laid on a weak base (sand, foam, penoplex), so there is every chance that within a year it will snap. But you'll be rooting for something that is not broke, right?
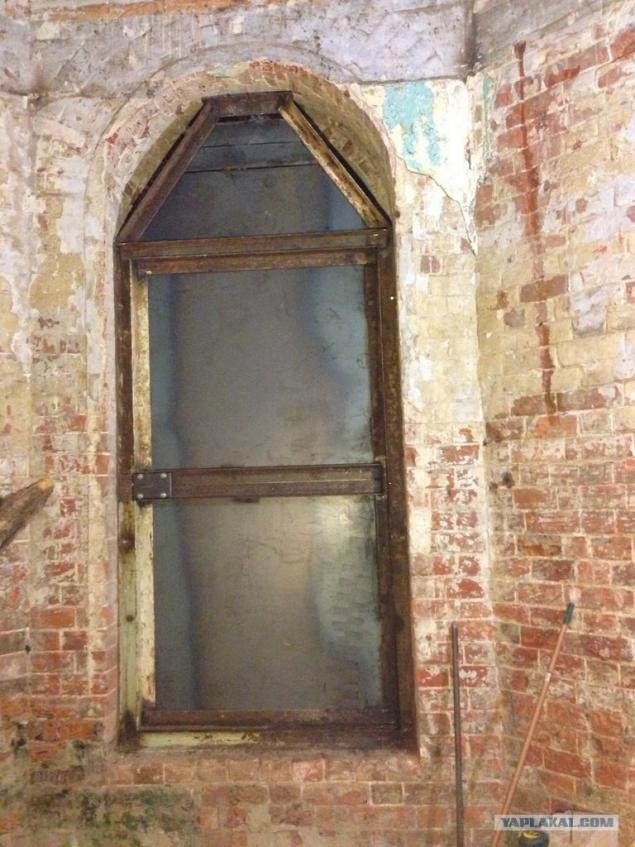
Upon completion of the floor it's time to close the door that leads to the extension-shed. Previously, it looked like this:
19.
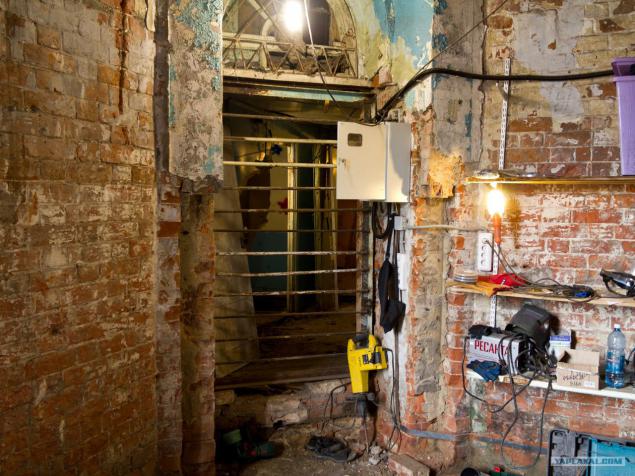
Note the switchboard and on the right side of the grille covering the opening. In summer, some good people broke the lock on the door of the building, came from the other side to the bars and pulled out a stick between the bars my svarochnik (Resanta, pictured standing on the bottom shelf). I hope that one day it will explode in their hands during welding. Anyway, for safety reasons, heat savings, as well as agreeing with the project, the opening had to lay bricks. To perform this work, I turned to the Dime Chelovekovu. This is a nice humble guy, I strongly recommend to anyone who will need to work with a brick. Here is the result of his labors:
20.
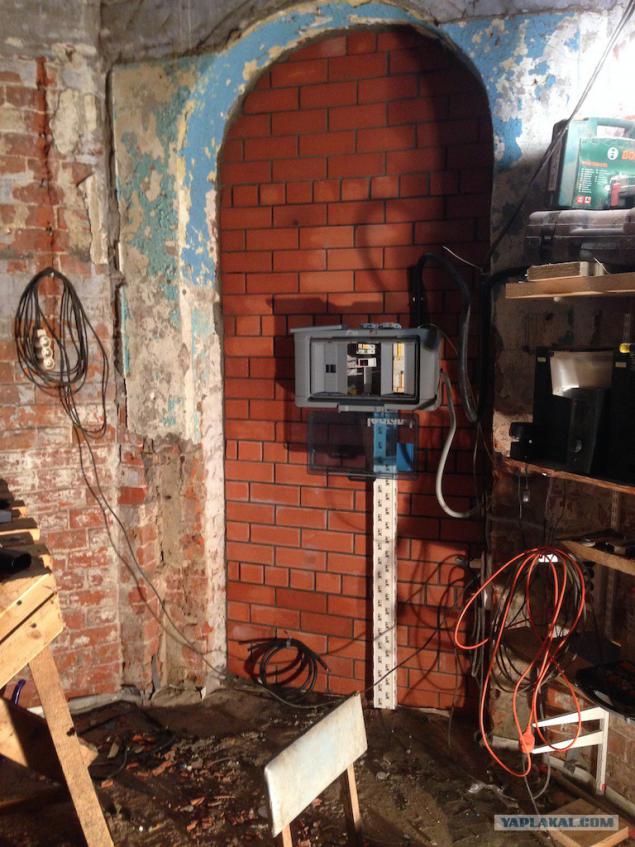
New switchboard, however, established myself Yes, after I had such a great wall, it was decided to brutally alter the design solution for electric inputs. First, I bought a good distribution CD cabinet Legrand, secondly, threw out the ASP counter (I still on the pole hangs doroguschy counter with taking readings remote control), and thirdly, to install more machines and CD-counter on one unit for underfloor heating. Next to him, I put the thermostat under the DIN-rail in Belarus. It turned out to be a very brutal thing. Conventional floor heating thermostat can change the temperature in the range of 10-35 degrees above zero. Belarusian teormoregulyator can regulate everything - refrigerators, stoves, anything. The range of his adjustments - from minus 30 to plus 150!
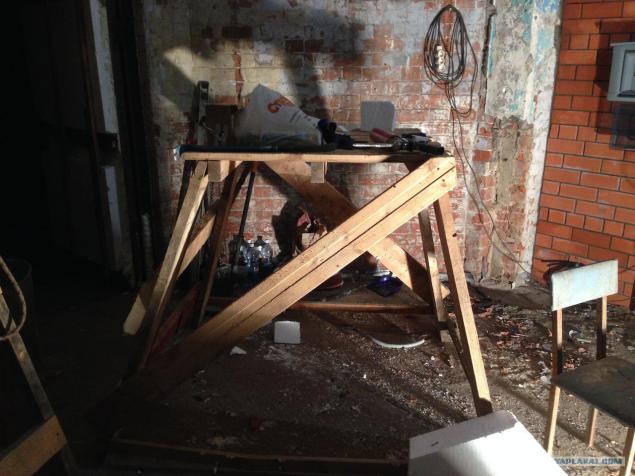
For calculations of the upper part of the walls and the upcoming work on the joists, I rolled titanic goats, who now can not normally move only with the help of the winch:
21.
Also in preparation for the cold season, I rearranged my miracle winch from the attic almost to the level of fresh sex. She works now through two blocks and 25-foot extension cord. And last chord - insulated doors, cracks, place thin walls and all nine window openings remnants of the foam and lots of foam. It looks terrible, but should prevent heat loss. Here are pictures taken with a break of three days:
22.
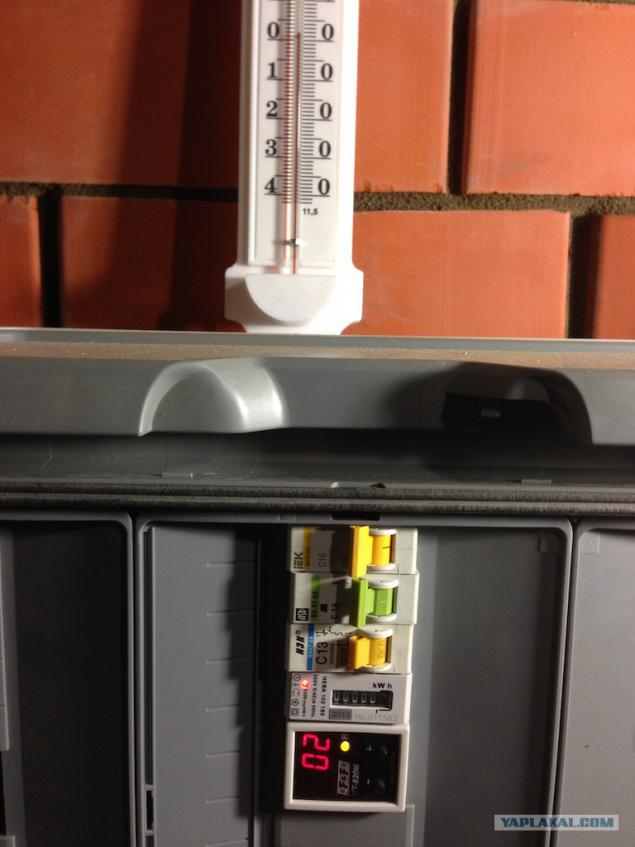
(on the street near zero, the floor temperature of 2 degrees, the air temperature is the same)
23.

(on the street near zero, the floor - 27 degrees, the air - 10 degrees)
Now we have dokonopatit small gap at the bottom and top of the tower, as by powerful thrust any lye turns into a source of fierce drafts, heat outflow. Let's see what will be the inside temperature at minus 30 Actually, now we can move on to the chiselling the wall under the pouring of concrete pads on which will be installed floor joists. The first floor also allow for the insulation space with a volume of about 60 cubic meters (currently the total internal volume of about 550 cubic meters). Tomorrow, I will lay out more Video tour of the tower (Moscow friend requests), and yet cease to torment you with my adventures building
Finally photo of the sunset from the tower:
24.

Source:
The main impression of the summer - alone everything is done very slowly. I had never engaged in the construction and repair, and, as it turned out, my expectations regarding labor productivity been greatly overstated. 90% of the time I work with a pair of hands, and even that is sometimes injured (already wrote about burns). For example, I was hoping to have time to warm the cold wood of the tower ... But this is still very far away. By and large, over the summer managed to fulfill most of the work on the roof and the attic, but a little to bring to mind the first level. On this and tell.
Realizing that in the summer I'd have to make a little, I set a minimum two objectives - to make a normal floor on the first level and to ensure that the winter in the tower to maintain a positive temperature. It would be, of course, 23, but it is much to be found on the street million above zero - then you can normally work with concrete, the water does not freeze. Yes, and most will be easier in the winter sweater instead kombeza.
But first of all - the entrance to the tower.
I originally wanted to entrance was located on the spot where for many years there was a window. But for this it was necessary to make at least a temporary (but solid) door. So I became a welder.
24 photo. Source

I originally wanted to entrance was located on the spot where for many years there was a window. But for this it was necessary to make at least a temporary (but solid) door. So I became a welder.

03.

Then came the turn of the floor and the opening leading to the basement. Let me remind you, before the floor of the tower was a wooden chairs on the brick. Here's how it looked originally:

Once we removed the planks and logs:
05.

Finished floor level is expected at a height threshold, it means that we must make a choice. A more simple and rational way was on available chairs to lay brick, steel beams and pour concrete. But it would remain under the floor void. And I do not like being under the floor is empty, there definitely will live mice or rats. So I decided to zamorochitsya for leveling sand floor. But before dumping the sand needed to make concrete support wall around the basement. It was the first time in my life, concrete works, so I did almost all possible errors
06.

With reinforcement, I decided to show off and use composite instead of steel reinforcing bars. Of course, it is much easier to carry and cut. But the first segment of reinforcement I assemble and disassemble 4 (four!) Times, he gets terribly uneven. A uniformity of power elements is important for reinforcing concrete. Distortions were obtained due to the fact that composite rebar is sold and transported to the bays. When you cut from a piece of bays meter rod, it turns slightly curved. And now assemble such flat bars 6x8 grid. Now tie the two such lattices? On the fourth time I have more or less mastered the technology. Especially helps to mark the point of intersection of the pre-marker. For bundles using conventional collars, ties, familiar to anyone who has worked with communication cables
07.

(clearly visible sewage pipes, which together with the plumbing stack in a day Tahir)
Somehow, I connected the four segments of the double reinforcement bars, and then set the outer wall formwork.
08.
Posted in [mergetime] 1386047987 [/ mergetime]
Decking the inside was covered with polythene to prevent premature loss of laitance and water. After that I prepared inserts to maintain a steel lid opening.
Now I have experienced and intelligent, well aware that the formwork can be easily done from a thin boards, but it was necessary to strengthen the struts ... But then I did not know. And the day I brought the X 1, 1 cubic meter of concrete, and we with Denis Chernov begin very quickly to run with heavy buckets of receiving bath to formwork:
09.

10.

When the mold was filled with little more than half, started to come off the bottom of the board because of the severity of the concrete. We quickly built a few struts and thereby saved the shuttering of the final razvalivanie (and it would be a complete disaster for me). Two days later I tore off the board and saw paunchy freak. Puzo bottom was formed because of the strong deflection of boards:
11.

12.

13.

(from right to left: water pipes, four back-up pipes, corrugated cable for the power supply of the basement, the pipe for drainage pumping from the basement)
Since I wanted to make a door in the basement is much less than the existing opening, I needed to make a solid (first of all - hard) cover on the "extra" area of the opening. I cooked the framework of the existing abundant corner-fives, welded it to the mortgage details on the inner walls of the opening, and on top of the frame welded sheet steel with a thickness of 4 mm. Since the cover will be living on the border between the temperature and the first basement level, and in the cellar is sure to be high humidity, all steel elements of I covered nintendo protective paint (not rusted and looked stylish):
14.

(here is immediately obvious, and the frame, and sand, and the top of the retaining wall and Stroebe a communication in the wall)
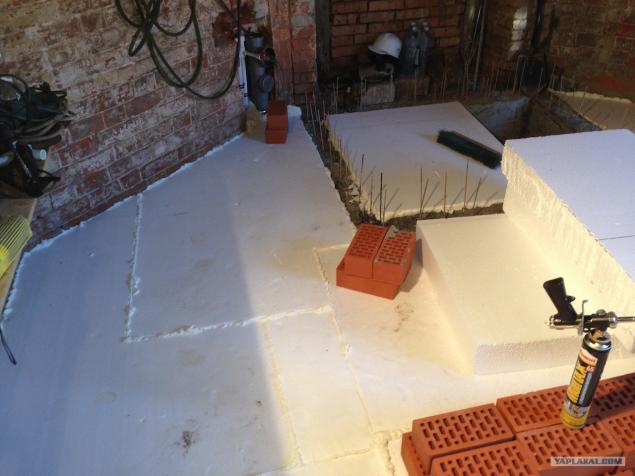
The last photo yet careful observer will notice that the floor level became higher! This is covered with 9 cubic meters of sand. For the dumping I rented for two days petrol tamping machine weighing about a hundred kilos. The process looks like this: a truck dumped the sand in front, I threw it into the shovel, trying to fall asleep more or less evenly. Every 20 centimeters of height included rammer and held it the entire area. All pipes have disappeared under the sand, the thickness of the final layer was 60-70 cm (ground floor was uneven), and near the supporting walls - nearly a meter.
Then I put a 15-cm layer of special, durable foam. Its density is 35 kg / cubic meter. We had to take the fifties, but it would have to wait too long. In any case, the strength of the foam used to fill already allows him tie. But I'm afraid fumes which can produce foam, so it was laid on top of another 5 cm Penoplex. At the same time between the layers of insulation was paved a thin layer of sand to reduce irregularities. Plus the fact that the seams between the sheets in the layers do not coincide, this desynchronization useful for thermal insulation.
15.

16.

(laid penoplex, can be clearly seen how small was the doorway to the basement)
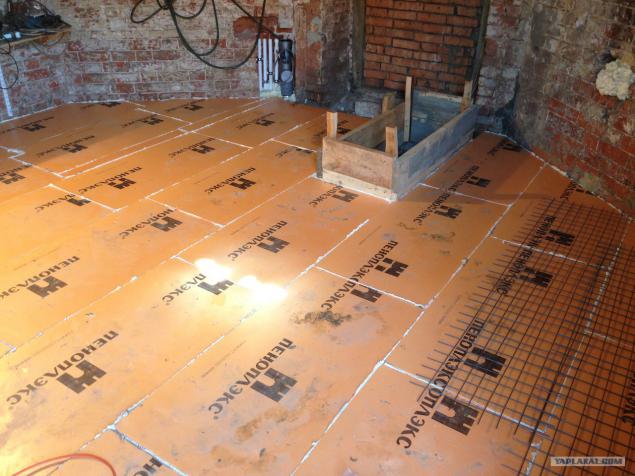
After I put Penoplex masonry net and attaching the heating cable. Yes, I know that the electric floor heating - it slabodushnoe decision. But to bother this year on water heating and more energy-efficient heat sources I had neither the time nor the money.
17.

Power 115-meter cable is 2, 3 kW. I hope to maintain zero temperature at the bottom of the tower that will be enough remains to establish the grid after lighthouses and fill screed:
18.

(forgot to tell you about a damper tape around the perimeter of her little seen in this photo)
On the receiving floor there are irregularities (but polished diamond bowl on Bulgarian), elevation to the centimeter. If the screed will survive the year, it will be filled with a mixture of self-leveling finish. In fact, I was really worried. The thickness of the screed with a single reinforcement mesh of 6-8 cm, it is laid on a weak base (sand, foam, penoplex), so there is every chance that within a year it will snap. But you'll be rooting for something that is not broke, right?
Upon completion of the floor it's time to close the door that leads to the extension-shed. Previously, it looked like this:
19.

Note the switchboard and on the right side of the grille covering the opening. In summer, some good people broke the lock on the door of the building, came from the other side to the bars and pulled out a stick between the bars my svarochnik (Resanta, pictured standing on the bottom shelf). I hope that one day it will explode in their hands during welding. Anyway, for safety reasons, heat savings, as well as agreeing with the project, the opening had to lay bricks. To perform this work, I turned to the Dime Chelovekovu. This is a nice humble guy, I strongly recommend to anyone who will need to work with a brick. Here is the result of his labors:
20.

New switchboard, however, established myself Yes, after I had such a great wall, it was decided to brutally alter the design solution for electric inputs. First, I bought a good distribution CD cabinet Legrand, secondly, threw out the ASP counter (I still on the pole hangs doroguschy counter with taking readings remote control), and thirdly, to install more machines and CD-counter on one unit for underfloor heating. Next to him, I put the thermostat under the DIN-rail in Belarus. It turned out to be a very brutal thing. Conventional floor heating thermostat can change the temperature in the range of 10-35 degrees above zero. Belarusian teormoregulyator can regulate everything - refrigerators, stoves, anything. The range of his adjustments - from minus 30 to plus 150!
For calculations of the upper part of the walls and the upcoming work on the joists, I rolled titanic goats, who now can not normally move only with the help of the winch:
21.

Also in preparation for the cold season, I rearranged my miracle winch from the attic almost to the level of fresh sex. She works now through two blocks and 25-foot extension cord. And last chord - insulated doors, cracks, place thin walls and all nine window openings remnants of the foam and lots of foam. It looks terrible, but should prevent heat loss. Here are pictures taken with a break of three days:
22.

(on the street near zero, the floor temperature of 2 degrees, the air temperature is the same)
23.

(on the street near zero, the floor - 27 degrees, the air - 10 degrees)
Now we have dokonopatit small gap at the bottom and top of the tower, as by powerful thrust any lye turns into a source of fierce drafts, heat outflow. Let's see what will be the inside temperature at minus 30 Actually, now we can move on to the chiselling the wall under the pouring of concrete pads on which will be installed floor joists. The first floor also allow for the insulation space with a volume of about 60 cubic meters (currently the total internal volume of about 550 cubic meters). Tomorrow, I will lay out more Video tour of the tower (Moscow friend requests), and yet cease to torment you with my adventures building
Finally photo of the sunset from the tower:
24.

Source: