451
Much odusevljen repair: clay plaster with own hands
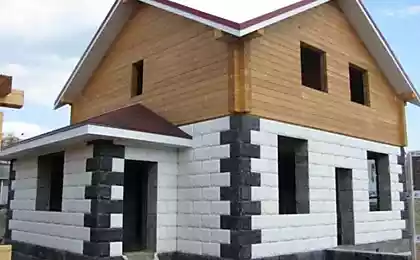
Recently become increasingly popular sustainable living. To live in a house made of environmentally friendly materials is not only useful but also fashionable. They are often built of straw bales, over which is applied a thick layer of clay plaster. So, for this method of construction (which is actually old) is slowly returning to Europe. In Russia, too, there are a few buildings made in this way. Increasingly utility buildings or sheds, and very rarely at home. In this article, we will tell you about clay plastering, as the main material for finish of the straw walls.
Clay plaster: identifying the advantages of the material
Subscribe to our youtube channel
www.youtube.com/channel/UCXd71u0w04qcwk32c8kY2BA/videos
Plaster clay solution solves several issues. First, there is no need to search for and buy the mix works. Clay is a natural material that you can find on your land. It is enough to dig a hole to a depth of 1.5 meters. In the process of preparation of the solution it added some ingredients. But, anyway, you can do it with my hands. Secondly, clay is an environmentally friendly material. It does not cause any harm to human health. Thirdly, through the use of natural materials greatly reduces the cost of repair (because the plaster does not need to buy). In addition, clay has a number of positive performance properties:

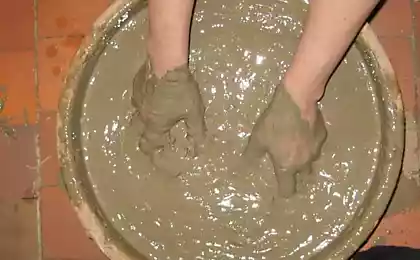
Plaster clay: preparation of the solution so, how to prepare clay plaster? Turned out to be very simple. There are three recipe:
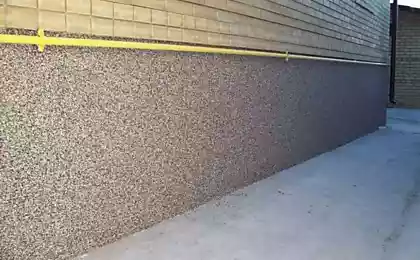
How is the clay plaster walls? The above formulation has been described to ensure that you have an idea of what kind of structure you need. Once the mixture is ready, begins to plaster the walls with clay. Apply it in several layers directly on a straw wall. Alternatively you can apply the mixture on a metal mesh that was previously attached to the base. It is most convenient to do it down at the base and corners. In some cases, the grid replaces the crate, made of thin slats. But, in fact, it does not matter. Even if you put plaster on a straw blocks, it will perfectly adhere with the ground.
Note! Clay plaster is not only suitable for thatched walls, and brick, wood and other bases. Immediately after the installation of lathing or mesh starts to plaster the walls. The mixture is applied with a certain force to the wall surface so that there is a good grip. The first layer is left rough (to provide adhesion for the second layer). After it dries, apply a second coat with your hands and spread with tool (metal spatula). In that case, if you intend to smooth or colored coating, that is applied and the third layer. However, it needs to be as thin as possible. In this part you can add a little lime. Or even to cover the wall only lime plaster. In the final stage of the coating allow time for drying. published
P. S. And remember, only by changing their consumption — together we change the world! ©
Join us in Facebook , Vkontakte, Odnoklassniki
Source: mastter.ru/84-glinjanaja-shtukaturka-sten.html
Clay plaster: identifying the advantages of the material
Subscribe to our youtube channel
www.youtube.com/channel/UCXd71u0w04qcwk32c8kY2BA/videos
Plaster clay solution solves several issues. First, there is no need to search for and buy the mix works. Clay is a natural material that you can find on your land. It is enough to dig a hole to a depth of 1.5 meters. In the process of preparation of the solution it added some ingredients. But, anyway, you can do it with my hands. Secondly, clay is an environmentally friendly material. It does not cause any harm to human health. Thirdly, through the use of natural materials greatly reduces the cost of repair (because the plaster does not need to buy). In addition, clay has a number of positive performance properties:
- Has high elasticity and flexibility. The indicator of flexibility is about the same as with lime plasters. In the process of operation the coating does not get cracks. That's because it can be used in seismically active regions.
- Durability in any weather phenomena. She fears neither high humidity nor temperature changes or strong winds. It permanently retains a magnificent appearance.
- Recoverability of material. Unlike plaster, cement and lime, clay simply restored. It is not necessary to change all the floors, enough to restore those areas that need it.
- Moisture, vapor and air permeability. If to speak about the water vapor permeability of clay, it has a median. But is equipped with excellent hygroscopic properties. Thus the plaster will be like pulling the moisture to the outside and pass it through itself.
- Provides excellent protection from insects and other pests. All this is achieved due to the structure of ionic bonds.

Plaster clay: preparation of the solution so, how to prepare clay plaster? Turned out to be very simple. There are three recipe:
- sandy-clay;
- sandy-clay with the addition of sawdust, straw, pine needles;
- clay with straw, sawdust, pine needles.
How is the clay plaster walls? The above formulation has been described to ensure that you have an idea of what kind of structure you need. Once the mixture is ready, begins to plaster the walls with clay. Apply it in several layers directly on a straw wall. Alternatively you can apply the mixture on a metal mesh that was previously attached to the base. It is most convenient to do it down at the base and corners. In some cases, the grid replaces the crate, made of thin slats. But, in fact, it does not matter. Even if you put plaster on a straw blocks, it will perfectly adhere with the ground.
Note! Clay plaster is not only suitable for thatched walls, and brick, wood and other bases. Immediately after the installation of lathing or mesh starts to plaster the walls. The mixture is applied with a certain force to the wall surface so that there is a good grip. The first layer is left rough (to provide adhesion for the second layer). After it dries, apply a second coat with your hands and spread with tool (metal spatula). In that case, if you intend to smooth or colored coating, that is applied and the third layer. However, it needs to be as thin as possible. In this part you can add a little lime. Or even to cover the wall only lime plaster. In the final stage of the coating allow time for drying. published
P. S. And remember, only by changing their consumption — together we change the world! ©
Join us in Facebook , Vkontakte, Odnoklassniki
Source: mastter.ru/84-glinjanaja-shtukaturka-sten.html


Poisonous People: How Much Business Hurt Does Every “Toxic” Employee
Ecocosmetics for all occasions. From personal experience.