How to make a garden path
 Bashny.Net
For garden paths, which is always in adverse weather conditions will not be suitable for any brick. Buy special clay paving stones. Yes it is expensive but trying to save money is to use a simple brick is doomed to failure.
After the first year will crack, and if the brick Nideggen or overheated, it will generally fall apart after the first winter. Recommend laying walkway brick cottages in Northern climates can only be verified, a long time working in this segment producers. The size of the paving bricks normally 20x10 see

Similar results can be obtained by laying a garden path of conventional paving slabs. This area of the individual element looks more advantageous than small paving stone.
A path of paving blocks is too riddled with seams, resulting in loss of visual integrity of the structure.
An important part of garden paths is the location of the junction with the lawn. It is from the strength of the joint depends, not whether or not to crawl extreme the bricks, and the entire track as a whole.
It is therefore recommended that extreme bricks to put on the end, and the outside further back is recessed to the level of the pitch Board, which is fixed, hammered into the earth by wedges.
The Board needs to protect antiseptic. Two years later, when the paved path to finally "settle", it can be removed, and to fill the void with crushed granite.
Board thickness 2.5 cm, height of brick + thickness of sand layer pillow.
Board at the same time will serve as a guide when creating a flat sandy plane, which will be laid the brick road.
When planning the location of the garden path, try to lay it so that it did not come close to large trees. Their roots will easily pick up that brick, violating the integrity of the surface.

But the main threat is water. In addition to direct degradation of the Foundation of the water that collects around the brick will lead to its deep impregnation. In the winter, the cycle of freezing / thawing will break the brick into pieces.
Therefore, if the topography of the site is that the water has free flow capability, with one or both of the parties need to dig an extra deep trench.
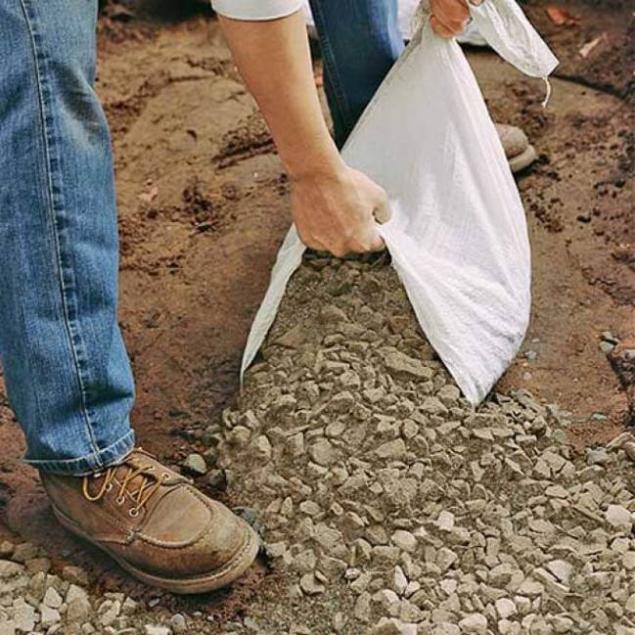
The base track consists of two layers. The bottom is a mixture of pest with gravel or granite grit.
After removing the soil, fill gravel and pass with a tamper. In case of manual compaction for the best seal it is necessary to water the surface water.
The thickness of the gravel layer may not be recommended definitely. It all depends on the terrain, type of soil, the availability of comprehensive drainage area.
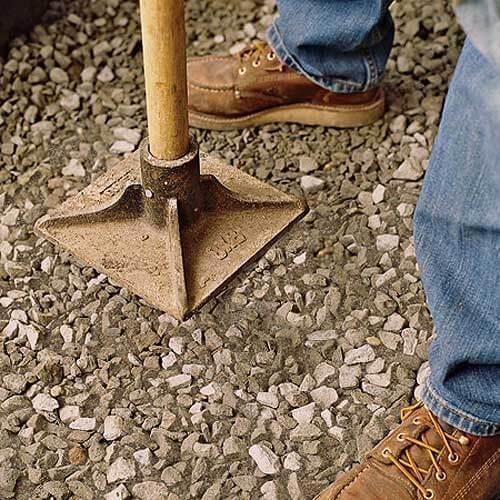
You can only say on the minimal layer. Do the initial shaping you need with a minimum thickness of 5 cm under ideal conditions.
In practice, for the average suburban area to do podsypku of 10-15 cm
The top layer is made of coarse-grained (better – alluvial) sand. The thickness of the layer is equal to the difference between the height and the thickness of the brick, plus 2-4 cm Before laying the sand must be very well moistened with water.
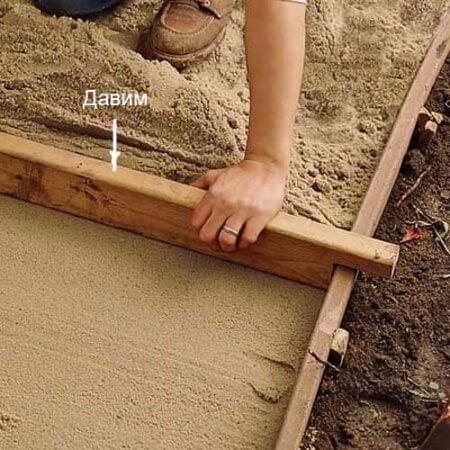
The sandy base layer are aligned, as shown in the pictures. For a better seal need not just to smooth out the sand, pulling the surplus to themselves, but to first push arbitrarily filled with the sand rule, and then flatten, stretching the rule itself.
Do not try to flatten a large area. Cycle push-pull do 5-10 cm.
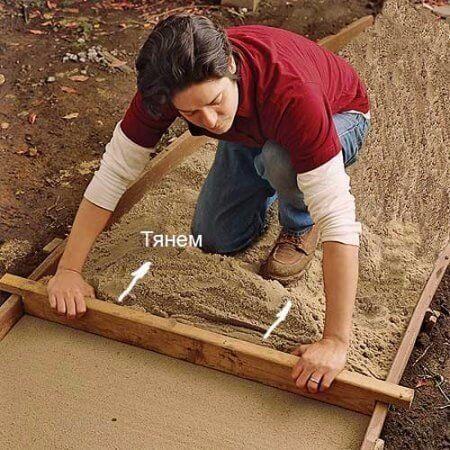
Exactly how much will have to be solved empirically. Plays a role the width of the track, humidity, sand and grit. Remember — a lot of effort to make not necessary – full, the sand will be compacted in the next stage of laying the bricks.
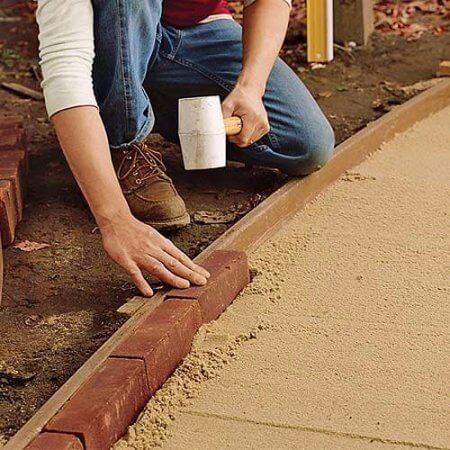
After the sand is laid, gently, a small shovel, take out the part sand along the rails of the boards, to lay lateral lines of the brick.
Begin to lay the brick border. Put it in place, not strong, but sharp blows to drive it to be at a desired level in height.
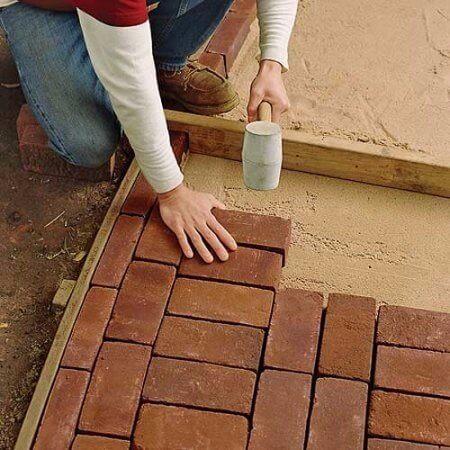
After side stones, you can start laying the main plane of the track. The drawing has to be thought out in advance, and try not to fall into the temptation of putting some complex pattern. For the linear elements of brick ornateness is just prohibited.
Check each brick for level. Drive into sand with a hammer slowly. It is important not to overdo it, otherwise, squeeze the sand, the bricks will fall below the mark of the planning of the track. Of course, it's not fatal, you will have to remove the bricks, leveled the sand and set it in the new one.
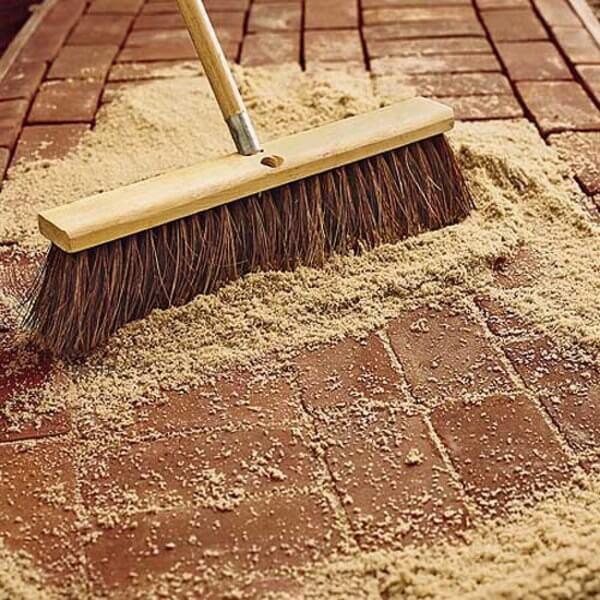
The last stage of construction – filling of vertical joints between blocks. This is the easiest and most pleasant stage of the work. The finished track is filled with sand and "chasing" a MOP on the surface until you have filled all the voids. Then the track will only be watered with water.
This track will decorate that in any country, and the most expensive cottage. By the way, brick can be spread not only track, but also a terrace.published
The grill house: step by step instructions
10 energy-efficient ways to keep your home cool in the hot summer
P. S. And remember, just changing your mind — together we change the world! ©
Source: vk.com/dacha_stroi?w=wall-90351338_71117
After the first year will crack, and if the brick Nideggen or overheated, it will generally fall apart after the first winter. Recommend laying walkway brick cottages in Northern climates can only be verified, a long time working in this segment producers. The size of the paving bricks normally 20x10 see

Similar results can be obtained by laying a garden path of conventional paving slabs. This area of the individual element looks more advantageous than small paving stone.
A path of paving blocks is too riddled with seams, resulting in loss of visual integrity of the structure.
An important part of garden paths is the location of the junction with the lawn. It is from the strength of the joint depends, not whether or not to crawl extreme the bricks, and the entire track as a whole.
It is therefore recommended that extreme bricks to put on the end, and the outside further back is recessed to the level of the pitch Board, which is fixed, hammered into the earth by wedges.
The Board needs to protect antiseptic. Two years later, when the paved path to finally "settle", it can be removed, and to fill the void with crushed granite.
Board thickness 2.5 cm, height of brick + thickness of sand layer pillow.
Board at the same time will serve as a guide when creating a flat sandy plane, which will be laid the brick road.
When planning the location of the garden path, try to lay it so that it did not come close to large trees. Their roots will easily pick up that brick, violating the integrity of the surface.

But the main threat is water. In addition to direct degradation of the Foundation of the water that collects around the brick will lead to its deep impregnation. In the winter, the cycle of freezing / thawing will break the brick into pieces.
Therefore, if the topography of the site is that the water has free flow capability, with one or both of the parties need to dig an extra deep trench.

The base track consists of two layers. The bottom is a mixture of pest with gravel or granite grit.
After removing the soil, fill gravel and pass with a tamper. In case of manual compaction for the best seal it is necessary to water the surface water.
The thickness of the gravel layer may not be recommended definitely. It all depends on the terrain, type of soil, the availability of comprehensive drainage area.

You can only say on the minimal layer. Do the initial shaping you need with a minimum thickness of 5 cm under ideal conditions.
In practice, for the average suburban area to do podsypku of 10-15 cm
The top layer is made of coarse-grained (better – alluvial) sand. The thickness of the layer is equal to the difference between the height and the thickness of the brick, plus 2-4 cm Before laying the sand must be very well moistened with water.

The sandy base layer are aligned, as shown in the pictures. For a better seal need not just to smooth out the sand, pulling the surplus to themselves, but to first push arbitrarily filled with the sand rule, and then flatten, stretching the rule itself.
Do not try to flatten a large area. Cycle push-pull do 5-10 cm.

Exactly how much will have to be solved empirically. Plays a role the width of the track, humidity, sand and grit. Remember — a lot of effort to make not necessary – full, the sand will be compacted in the next stage of laying the bricks.
After the sand is laid, gently, a small shovel, take out the part sand along the rails of the boards, to lay lateral lines of the brick.
Begin to lay the brick border. Put it in place, not strong, but sharp blows to drive it to be at a desired level in height.

After side stones, you can start laying the main plane of the track. The drawing has to be thought out in advance, and try not to fall into the temptation of putting some complex pattern. For the linear elements of brick ornateness is just prohibited.
Check each brick for level. Drive into sand with a hammer slowly. It is important not to overdo it, otherwise, squeeze the sand, the bricks will fall below the mark of the planning of the track. Of course, it's not fatal, you will have to remove the bricks, leveled the sand and set it in the new one.

The last stage of construction – filling of vertical joints between blocks. This is the easiest and most pleasant stage of the work. The finished track is filled with sand and "chasing" a MOP on the surface until you have filled all the voids. Then the track will only be watered with water.

This track will decorate that in any country, and the most expensive cottage. By the way, brick can be spread not only track, but also a terrace.published
The grill house: step by step instructions
10 energy-efficient ways to keep your home cool in the hot summer
P. S. And remember, just changing your mind — together we change the world! ©
Source: vk.com/dacha_stroi?w=wall-90351338_71117
Tags
See also
Garden path made of pebbles – stunning ideas for your backyard
Unique garden paths of stone with his own hands
How to make a Dance pad for Dance Dance Revolution
15 garden of inventions, which is worth a look
How to make a dumbbell (8 photos)
Bicycle path which saves the light
How to make a garden right at home — 18 cool ways
French garden ideas for landscaping