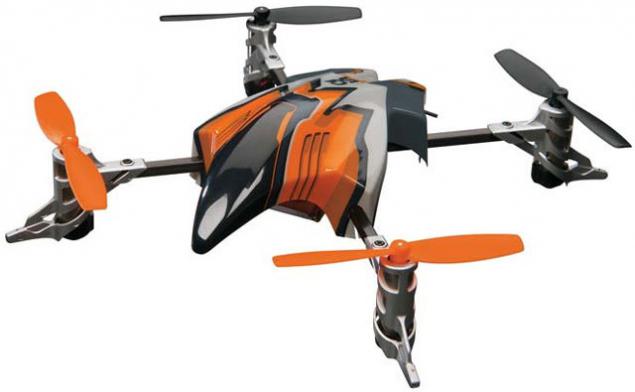
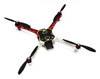
Homemade autonomous flying machine from the Android smartphone
 Bashny.Net
Fun with autonomous aircraft - is, of course, have fun, but to create them yourself more fun! This article is written for those who want to develop their own intellectual copter and contains a set of simple instructions on how to achieve results with the use of a smartphone on Android, OpenCV, C ++ and Java. Well, if you can take the first steps and wish to further improve their administration - at the end of the post, you will find helpful links and some food for thought.
Autonomous and Intelligent? H4> To copter could fly on their own, it must include all the necessary sensors, sufficient computing power and communications. Like, not so much, but almost all of the commercially available models do not. There are, for example, the model motion determining sensors located in the premises. Another option - control via GPS. GPS Receiver is cheap and easy to use, but has long delays in data availability and is not accurate enough. All this we will not do.
To carry the title of "smart" your copter must be able to perceive and analyze the surrounding reality. This requires not only a powerful processor, high-capacity battery, the camera quality and sufficient set of sensors, and fast communication devices. And of course, the whole system must be well managed and easy to program. So we come to the conclusion: Do not implement a think tank copter based smartphone? The preferred use of the device based on Android, because under this OS are convenient development tools and software components, such as the Intel Integrated Performance Primitives (Intel IPP) or OpenCV. Modern smart phone has all the needed hardware components, so completely reinvent the wheel is not necessary.
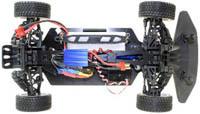
Motor Control h4> So, the control center is chosen, we must now connect it to the motor. We chose Pololu Maestro servo controller cost about $ 5, it connects via USB and in addition has a Bluetooth interface. With the help of this card will be controlled by a standard servo drives. Using Pololu Maestro servo controller and the smartphone is relatively easy to alter drone in standalone.
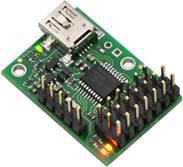
With a few lines of code and standard Android USB means we will control the servo motors and thus the movement copter. Just a few lines of code - and we get access to the GPS, the camera and data transfer over the network.
Call controlTransfer of UsbDeviceConnection:


 & lt; code class = & quot; java & quot; & gt; import android.hardware.usb.UsbDeviceConnection; // ... Private UsbDeviceConnection connection; // ... Connection.controlTransfer (0x40, command, value, channel, null, 0, 5000); & Lt; / code & gt;  pre>

 The controller allows you to control the servo drives, setting the target position, velocity and acceleration - all you need for a smooth move. The argument command can take one of three values:
& lt; code class = & quot; java & quot; & gt; public static final int USB_SET_POSITION = 0x85; public static final int USB_SET_SPEED = 0x87; public static final int USB_SET_ACCELERATION = 0x89; & Lt; / code & gt; pre> Select the appropriate values and pass them to the desired servo motor, using the argument channel. Link to the full source code and configuration USB access the application manifest, see the end of the post.
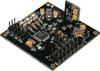
Features quadrocopter h4> So far, so good. The hardware components are connected to each other without problems, programming is easy, since all the means implemented Android. However, there is one feature associated with the construction quadrocopter. Unlike simpler models, such as a car or plane, quadrocopter must constantly monitor their stability. That is why it is a necessary component of the stabilization module. Of course, the stabilizer can be done programmatically by writing a bunch of code in C ++ or Java. But it's much easier to buy for a few dollars a card stabilizer is connected directly to the Pololu and control four servo drive unit. Everything else can be done with simple commands such as ± altitude, ± speed /, ± inclination and ± direction.
If you create a quadrocopter note: this card is great to make your life easier. All you need - to hold its initial calibration and then forget about it.
Putting it all together h4> So, as a result of the first phase of the construction of an autonomous quadrocopter, we have the following hardware chain:
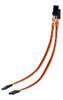
Smartphone & lt; & gt; micro USB-USB adapter & lt; & gt; Cable USB-mini USB & lt; & gt; Pololu Maestro card & lt; & gt; 4 cable JR & lt; & gt; map stabilization & lt; & gt; cables JR & lt; & gt; Servo Drives & lt; & gt; Engines i>


In the case of a simple device chain is shorter:
Smartphone & lt; & gt; micro USB-USB adapter & lt; & gt; Cable USB-mini USB & lt; & gt; Pololu Maestro card & lt; & gt; cables JR & lt; & gt; Servo Drives & lt; & gt; Engines i>
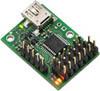

In addition, you can install other drives on your flying device, such as flaps or landing gear. Pololu Maestro card has support for managing up to 24 drives - for our project, it's probably even too much.
The base platform is created. Now it's time to equip our vision device.


Computer Vision h4> It is obvious that without a system of intelligent computer vision device can not be regarded as such. Our copter should be able to not just take pictures, but also to analyze them - for this we use the capabilities of OpenCV.
OpenCV - is an open source software library for image analysis underlying the countless implementations of systems of computer vision and virtual reality. Originally developed by Intel, now it is available for a variety of hardware platforms and operating systems.
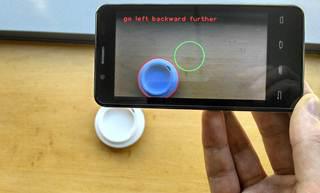
For practice, try to recognize the simple sign in the form of a circle and stay in front of this sign at a certain distance. To simplify the test task, move the smartphone will hand.
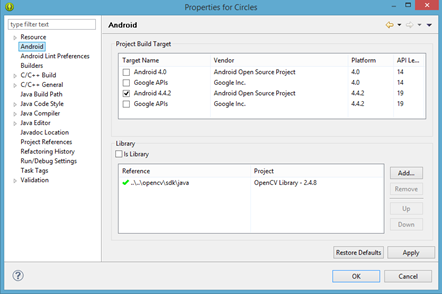
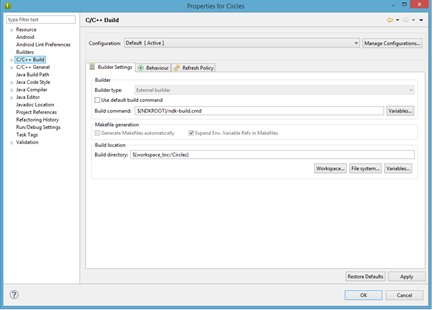
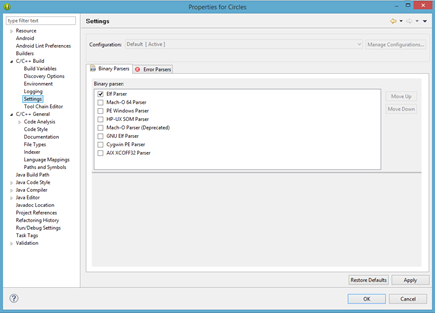
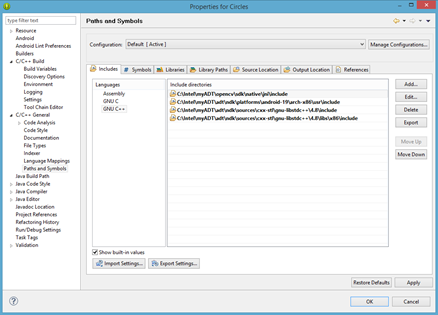
OpenCV library is not directly accessible by Java Android. This native library of commonly used programs in C ++, so we need Android NDK. Taking Pictures and visualization will be done in Java, for the interaction between Java and C ++ will use JNI. We will have to install Android NDK and the Android SDK, create a new project Circles, add component C / C ++ and modify the properties of the project to use the library OpenCV, as shown in the screenshot below:
As a result, your project will be:
The main Java file «Src / MainActivity.java»
File markup XML «Res / layout / activity_main.xml» manifesto and
Two Makefile «Jni / Android.mk» and «Jni / Application.mk»
Code cpp «Jni / ComputerVision_jni.cpp» and header «Jni / ComputerVision_jni.h» i>
Unlike Java, C ++ should be compiled for a particular processor. Setting is done by editing the file variable APP_ABI Application.mk. If you have a smartphone platform, Intel, the correct value is x86. Next NDK will do everything himself.


Deployment h4> OpenCV - library used an infinite number of Android applications, and the version of the library can be used by them is different. As a developer, you can link your application with a specific version of OpenCV, but there is a better option. Use the dependency manager, called «OpenCV Manager». This Android application that determines what you now need OpenCV and loads exactly the version you want.
We want to detect circles in OpenCV, to determine their center and radius and display instructions to the operator to achieve smartphone centered circle the correct size. The following Java code to acquire images from the camera using the Java API for Android, calls a function in C ++ through JNI and attaches a pointer to the image in memory. C ++ code for implementing the processing of the image in order to detect circles. Then again, called Java, to display the detected circles and comments.
Code Java:
& lt; code class = & quot; java & quot; & gt; ... // capture images from the camera import org.opencv.Android.CameraBridgeViewBase; // Load OpenCV native dependancy import org.opencv.Android.OpenCVLoader; ... Public void onResume () {super.onResume (); // OpenCV loading with a callback // non typical code specific to OpenCV OpenCVLoader.initAsync (OpenCVLoader.OPENCV_VERSION_2_4_6, this, mLoaderCallback); } ... // Once the OpenCV manager link established, // we can load the dynamic library System.loadLibrary (& quot; jni_part & quot;); ... & Lt; / code & gt; pre> Code C ++
& lt; code class = & quot; cpp & quot; & gt; ... // typical for JNI: Java class method name // pointer to RGB image as argument JNIEXPORT int JNICALL Java_com_example_circles_MainActivity_process (JNIEnv * jenv, jobject obj, jlong addrGray, jlong addrRgba ) ... // Get the bitmap from pointer Mat & amp; mRgb = * (Mat *) addrRgba; // Blur, required before detecting circles medianBlur (mGr, mGr, 5); // OpenCV detection - Hough transformation HoughCircles (mGr, // grayscale input image * circles, // output vector CV_HOUGH_GRADIENT, // detection method to use 4, // inverse ratio of the accumulator resolution to the image mGr.rows / 8 // min distance between centers of detected circles 220, // higher threshold of the two passed intern canny edge detector 200, // accumulator threshold of 20 100, // min radius mGr.cols / 8 // max radius); & Lt; / code & gt; pre>
To test, I moved the sheet of paper in front of a smartphone with a printed circle. We assume a distance of 20 cm image circle will have a size of 300 pixels - we assume this is the correct position. If the circle is smaller smartphone must push closer if more - then on. This is the easiest option. You can use the two concentric circles that are great for navigation over long distances, less - in the Middle. Nothing prevents recognize other specific shapes such as arrows. Ultimately we need to get a system that uses the data GPS, and the color information from the camera.
Future Plans h4> Set the OpenCV Manager and your APK file from Eclipse. Run it and go through all the configuration steps. It will determine the range of the field of view and guide the movement of the smartphone in the center circle of a given diameter.
On test smartphone we have received and processed the picture every 8 hundredths of a second - 12.5 fps. This proves that the computer vision for copter - a very real thing even with limited time and financial resources.
Opportunities for further development is very broad. OpenCV - is an open source library, ported to many platforms. In addition, Intel IPP replaces some low-level calls to OpenCV and speeds up your code, inserting functions well optimized for processors Intel. You can save the code portability - in the future, you may need a more powerful smartphone.
But what to do next - you prompt materials from the site Intel . It is written in great detail how to build a flying machine and what to teach him.
Now some more specific links:
Оригинал this article in English in PDF Исходный code copter Тестовый ARC Source: habrahabr.ru/company/intel/blog/230299/
Tags
See also
Wozniak: Apple to do on your Android smartphone
What's so complicated, or how I broke a new quadrocopter
Multicopter transformer SkyProwler VTOL
10 of the most interesting technologies in 2015
15 jobs for flying drones
Electree Mini green charger for smartphone
CES 2017: new year with new gadgets. Innovations and expectations
UFOs exist!
Quadrocopter DJI Phantom FC40 - mini razboksing and first flight
Shooting the counter on the phone with the subsequent recognition