1300
Live books (a small tutorial on book production, with its tricks)
Articles on this topic are not many, but they are. The truth is in my opinion, since almost all of them are based on the actual printing methods for small-scale and even more individual production described technology is not always easy, especially when the hand but the desire and there is nothing else.
Therefore, I share the know-how, especially for one-off jobs.
In this case, we consider the production of this very well, booklets, right at home, right from paper with a minimum of equipment.
230 pages of A5, softcover, 4, 5:00.
I like to do a book with their own hands. Is this some kind of confrontation over the coming electronic goods, which are here and everything is optimized, and only really unnecessary or harmful to human processes, but also quite natural, and without which man becomes more and more like a vegetable.
That electronic queue, for example, which is now ubiquitous vpendyurivayut where necessary and not necessary. At the health center or to the bank branch. Why? ..
Whether it before ... First you train the brain and eyes, for whom he held, how many people were standing behind him, but moved to another department, office, in cases where he has got to do, because I was only here ?! And you were not here at all!
So you can talk (live mind you), and be happy, and sad. Soul, in general, live.
And now - I take the voucher, and stupidly sit in silence, staring at the scoreboard, and nothing and no one in the queue you are no longer interested. Only the board. And thee only it manages. And boards do not care if you live or have a vegetable.
That's the same with books. The paper volumes have still some romance, some mystery and nobility, if you want.
A electronic books do not. Only the notorious convenience for hands, brain, pocket or bag, the current to less strain ... For them it is not necessary to follow in order not to become wet, do not blow off the dust, do not put under glass - boring in general ... and the fear of not today- Tomorrow Google-Glass will implant in the hospital and Johnny Mnemonic is not a character from the movie, and your particular offspring.
I'm doing a book rare. And do generally rare, those that have never been published in the Soviet Union, or those that are published only once and for reprinting no longer planned.
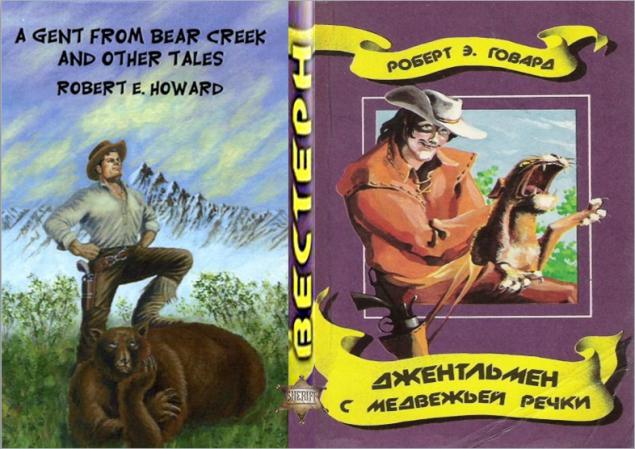
Since the last time, on the basis of private transfers from the club tolkinistov, I made the 650i-page book "Unfinished Tales of Middle-earth" - the work of Christopher Tolkien on drafts of his father, hardcover and color illustrations by Alan Lee (Alan Lee) and John Howe (John Howe ), arranged thematically in the text.
The club several years ago and had his own small circulation, but without illustrations, including me my IMHO much nicer))
It took more than one day and demanded a sophisticated manufacturing equipment for hard cover of this thickness (clutches, etc.).
Generally, all you need to know as a new home knigodelu can be found here (thank comrade. Jim aka Jim). Actually, before I somehow followed precisely this technology. But as you can see, the technology is not trivial, it requires scrupulous accuracy, time and some equipment. Especially for the hardcover. So over time, trying to optimize something out there, there, there, and its own work, it is in relation to the work at home.
And last long-standing promise to make hendmade book coincided with a colleague approaching DR. Time is not much, and not shelving them, proceed to production.
1. Preparation h5> To produce 230str. A5 in a soft, pleasant to the touch cover, we need:
Therefore, I share the know-how, especially for one-off jobs.
In this case, we consider the production of this very well, booklets, right at home, right from paper with a minimum of equipment.
230 pages of A5, softcover, 4, 5:00.

I like to do a book with their own hands. Is this some kind of confrontation over the coming electronic goods, which are here and everything is optimized, and only really unnecessary or harmful to human processes, but also quite natural, and without which man becomes more and more like a vegetable.
That electronic queue, for example, which is now ubiquitous vpendyurivayut where necessary and not necessary. At the health center or to the bank branch. Why? ..
Whether it before ... First you train the brain and eyes, for whom he held, how many people were standing behind him, but moved to another department, office, in cases where he has got to do, because I was only here ?! And you were not here at all!
So you can talk (live mind you), and be happy, and sad. Soul, in general, live.
And now - I take the voucher, and stupidly sit in silence, staring at the scoreboard, and nothing and no one in the queue you are no longer interested. Only the board. And thee only it manages. And boards do not care if you live or have a vegetable.
That's the same with books. The paper volumes have still some romance, some mystery and nobility, if you want.
A electronic books do not. Only the notorious convenience for hands, brain, pocket or bag, the current to less strain ... For them it is not necessary to follow in order not to become wet, do not blow off the dust, do not put under glass - boring in general ... and the fear of not today- Tomorrow Google-Glass will implant in the hospital and Johnny Mnemonic is not a character from the movie, and your particular offspring.
I'm doing a book rare. And do generally rare, those that have never been published in the Soviet Union, or those that are published only once and for reprinting no longer planned.
Since the last time, on the basis of private transfers from the club tolkinistov, I made the 650i-page book "Unfinished Tales of Middle-earth" - the work of Christopher Tolkien on drafts of his father, hardcover and color illustrations by Alan Lee (Alan Lee) and John Howe (John Howe ), arranged thematically in the text.
The club several years ago and had his own small circulation, but without illustrations, including me my IMHO much nicer))
It took more than one day and demanded a sophisticated manufacturing equipment for hard cover of this thickness (clutches, etc.).
Generally, all you need to know as a new home knigodelu can be found here (thank comrade. Jim aka Jim). Actually, before I somehow followed precisely this technology. But as you can see, the technology is not trivial, it requires scrupulous accuracy, time and some equipment. Especially for the hardcover. So over time, trying to optimize something out there, there, there, and its own work, it is in relation to the work at home.
And last long-standing promise to make hendmade book coincided with a colleague approaching DR. Time is not much, and not shelving them, proceed to production.
1. Preparation h5> To produce 230str. A5 in a soft, pleasant to the touch cover, we need:
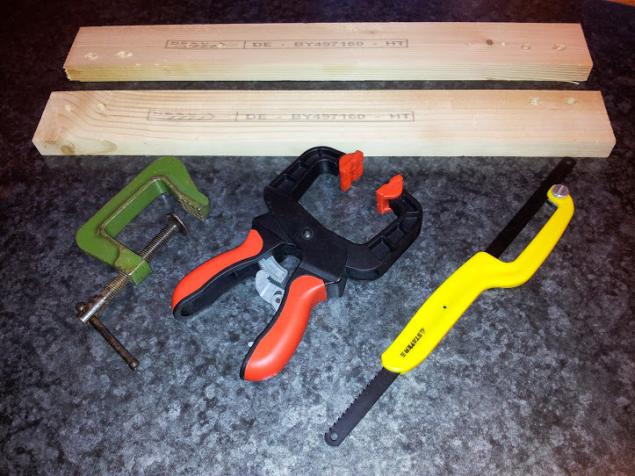
- a pair of flat smooth plates;
- clamp regular;
- clamp ratchet (well, very good. useful and convenient vesch);
- hacksaw (for metal);
- brush, small, flat, drawing with artificial bristles (you can take a child digging in his desk);
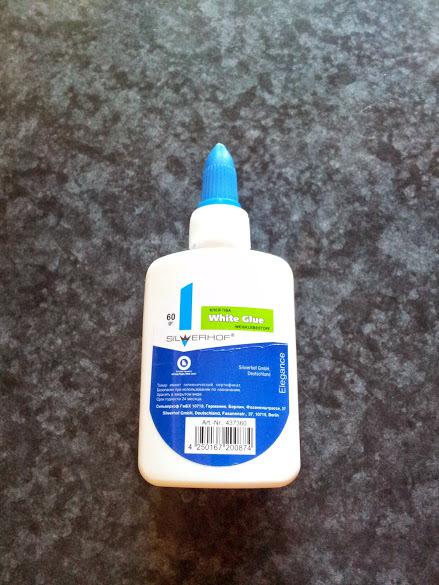
- Clerical glue (office); li >
- A4 paper ordinary;
- A4 paper textured inkjet (yes, there are such);
- Laser printers and color inkjet.
With glue has subtlety. It must be a PVA, but it is desirable office and imported. Such PVA during the solidification does not turn yellow and become translucent matte that is just perfect for knigodela - marks on the paper is not visible. Plus, it becomes a durable, but flexible enough, unlike the furniture PVA - points to cover are not cracked or crumbled over time.
Well, a table, a flat wooden stool, a laser printer (at work), the printer is a color inkjet (home), and a few hours of family peace, I think you can afford to provide. Try bartering, if there are claims from other parties))
2. Typeset text h5> typeset text is commonplace in Worde. But!
Choose the size of A4 paper, and in the settings page (press) just set the printing method "Brochure" and - the first know-how!
Know-how №1 h6> Select the number of pages in the brochure is not 32, as it should be in a classic typography and 4. That is, on a sheet of A4 will print 4 pages A5, on both sides, so that we then each such sheet just folded in half and then each other.
Duplex printing is done on the long side. I>
Why do it? Then, we will book sheets A5. This is a good, convenient format, easy to handle, you can even put in a handbag at a certain skill. Do not cut paper A4 or look for rare and expensive packs of A5 paper.
Another advantage of this approach is that we have every two sheets are bonded to each other ply of the paper itself, not only glued spine. Oh! Believe me, it's a big plus to the durability of our folio)) Especially when you consider that the sheets are stapled directly to each other, we will not only prokleivat end of the spine, although thread we still need.
After these settings Worde we see before us a sheet of A5, and are set it. Do not forget to add headers and footers with the author's name, title, title and chapter number and page number. It's a good tone.
Then print ready file. Plain text - on a laser printer and plain paper. Pictures on a color printer and photo paper (which we then simply put between the pages in the right place), it gives the publication of solidity and just a pleasure to watch.
3. Cooking block of pages h5> For 230i page book, I spent 30 minutes. folding on all 58 sheets. Yes, just take a sheet and fold it on a flat surface, on the table in half.

And a little advice:
Know-how №2 h6> Put in front of some smooth stop, rail or even a piece of cardboard. Then, when you're folding the top of the sheet is pressed against the fence and it was equal to both edges of the folded sheet. When combined edge, take a plastic ruler and spend a couple of times on the first line of the fold flat, then a couple of times an edge line (but not too sharp not to damage the paper itself at the fold). Then fold will be just perfect and very thin and the edges will remain where you have fixed them by hand. I>
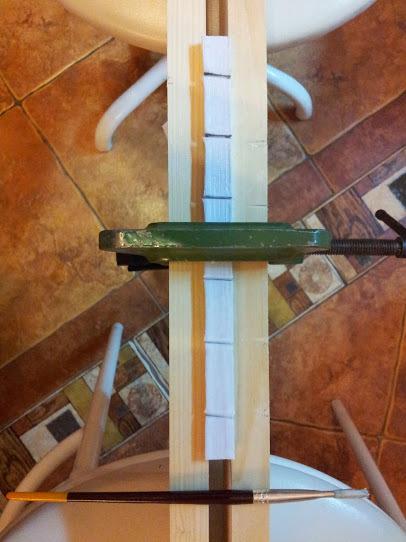
Next, block pages you want to finally collect, align and lock ratchet clamp, in the middle of the block.
There will recommend not to philosophize sly and use the know-how to third.
Know-how №3 h6> If one side (and partly the second, if the dimensions are the same page), you can equalize just putting the unit on the edge of a flat surface - on the table, then the second (lateral) surface can be leveled pressing unit in this position against the wall, after placing the wall vertically another flat flat tablet (wallpaper not always smooth flat).

After aligning the pages in the block it is necessary to fix the ratchet clamp, in the middle. I>
So, ready to block pages. It's time to prokleivat spine.
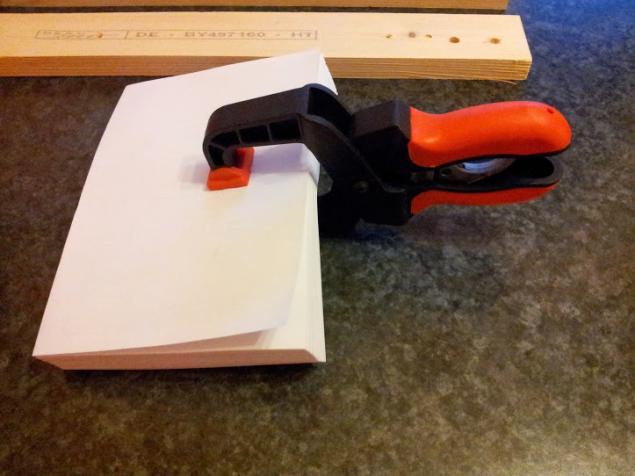
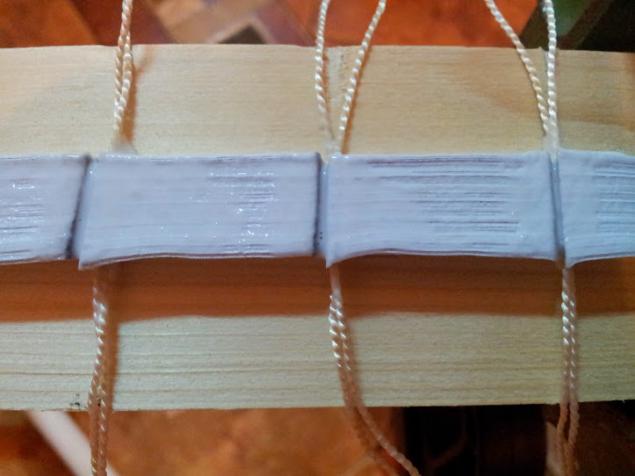
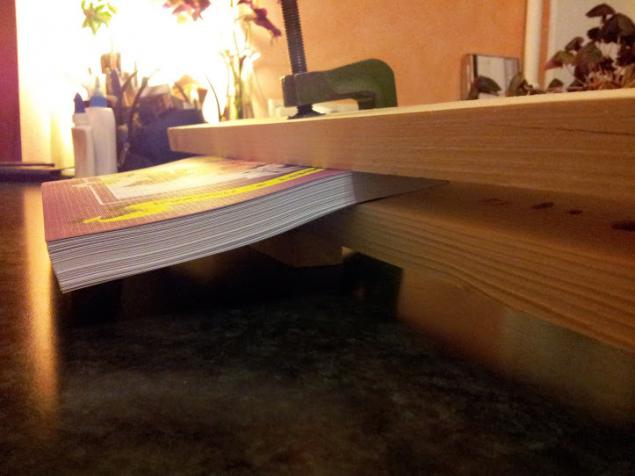
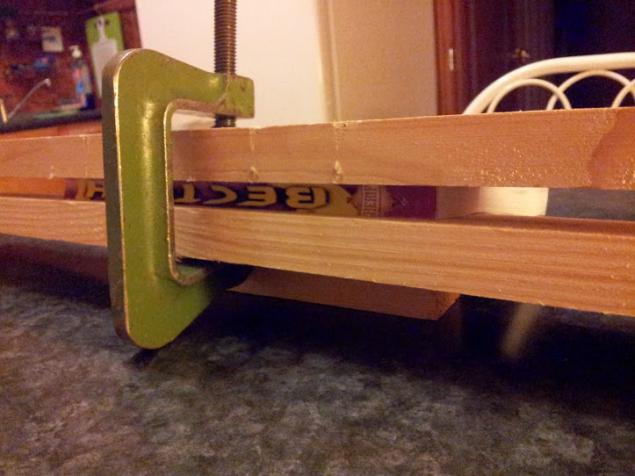
4. Sizing root h5> In the first place, hold our block between two flat boards, leaving 5mm spine outdoor areas, and tightens the usual clamp.
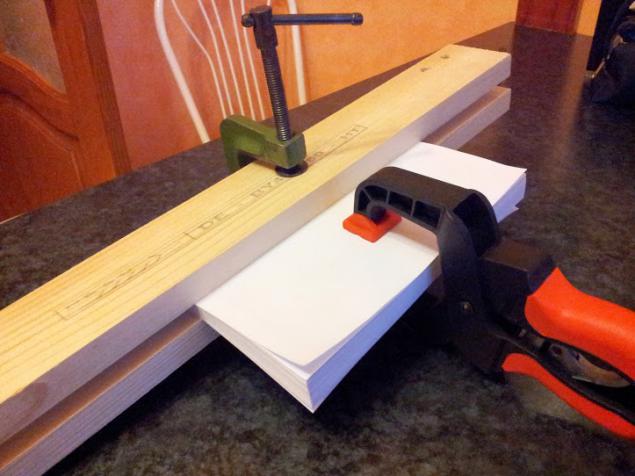
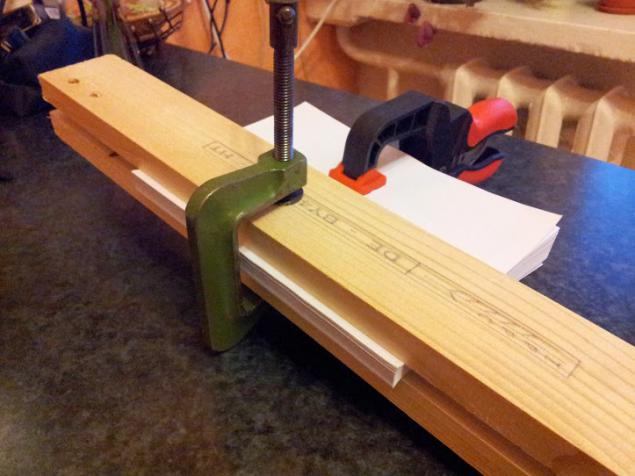
Ratchet not touch, let hang for reliability.
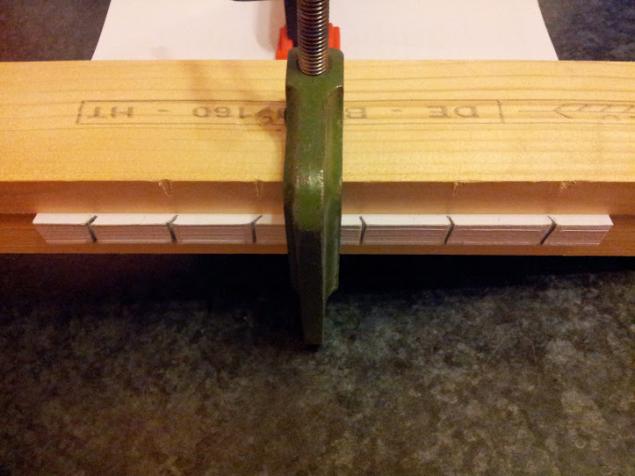
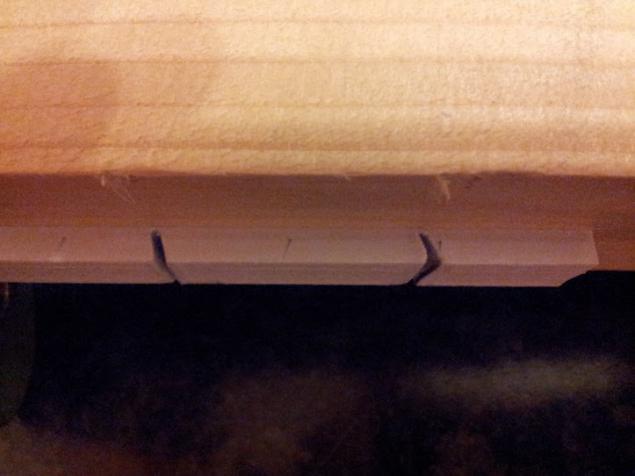
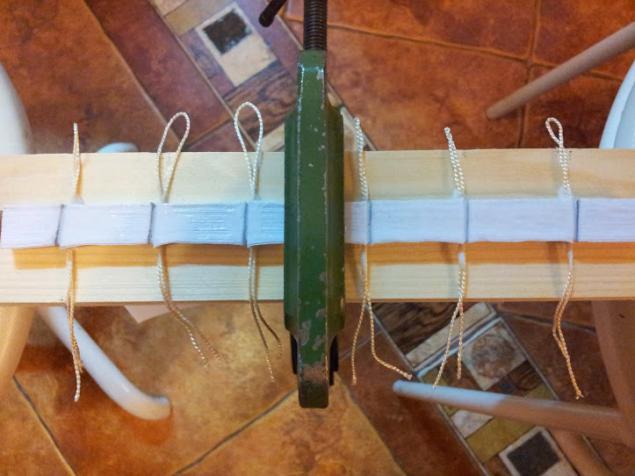
Then we take a hacksaw and make a few cuts on the spine, where we then insert pieces for the strength of the rope for the pseudo-crosslinking so to speak.
And it is here that perhaps the basic know-how!
Know-how №4, basic h6> Do not you once saw in life, paperback books where the pages are not stapled and glued only at the ends of the spine, tend with time and intensive operation to crumble - corny pages fall out of the book, particularly at high spread. So to avoid this, and in general to reduce the likelihood of the confluence of the physical zero, in contrast to the popular printing technology, which cuts are made perpendicular to the end, we will make cuts at an angle. Moreover, on the one hand under the "right" angle and the other a "left." In this case, after the installation propyl thread (or steampunk edition - wooden peg) page will not be able to drop out of the block even if the glue is completely rassohnetsya and come to naught - page just stuck, because cuts from different angles taken from different angles)) i>
Now we take bold and PVA glue to put it on the end of a cut. Brush carefully smear glue, so he got into all the slits between the villages of the spine, especially in the cuts.

Give the glue to dry minutes 30.
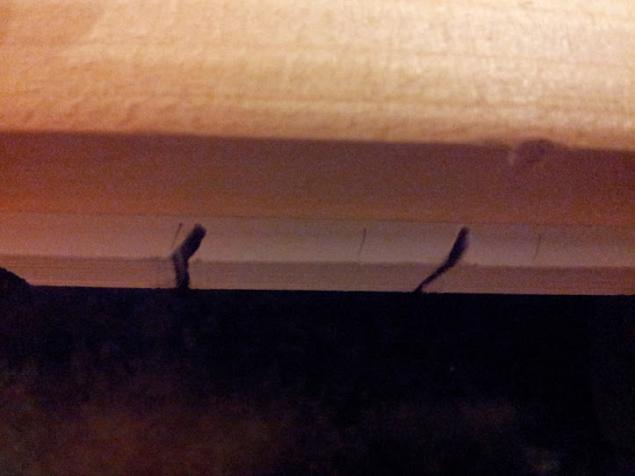
During this time, cut into strands of 10-15cm by the number of cuts. It is better to use natural yarn, which is friends with PVA, but you can use nylon. Practice shows that caproic also sits firmly.
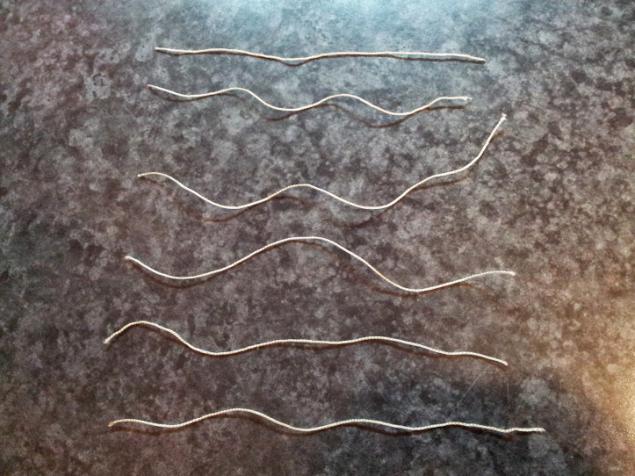
Now once again drip into each propyl PVA, turn the thread in half, a little curl in multiple passes, the thread of time to soak up the required length, inserted into each cut. Once again drip into the top of the thread propyl and smeared PVA brush.
As such, the reserve unit to dry for a couple of hours.
5. Cooking binding h5> While drying unit can do printing and binding preparation. As we have decided earlier, will be soft cover.
Well, take a special textured paper. A? No? And there is such a)) is dense, textured, soft to the touch for body and soul.
Here's a , for example. Generally, Lomonda sorts of goodies for knigodela and generally, for fine arta recommend.
But this, too, A4 paper, and with binding we need a little longer. What to do? Do not worry, we glue the cover of two parts. A line break will make the back of the book in place of bonding the cover to the last page of the block, departing about 1cm from the edge. Ie we will have to impose and print two covers. You can, too, in Worde. One home, which will be completely up front, spine and put back. And the other only with the full back cover.
The width of the front (and rear), and the cover of your page - (297/2) + 1.5mm (to fold) = 150mm.
Width = thickness of the spine unit + 1mm (on reserve, because the spine swell of glue). I>
Cover Home i>
The back of the i>
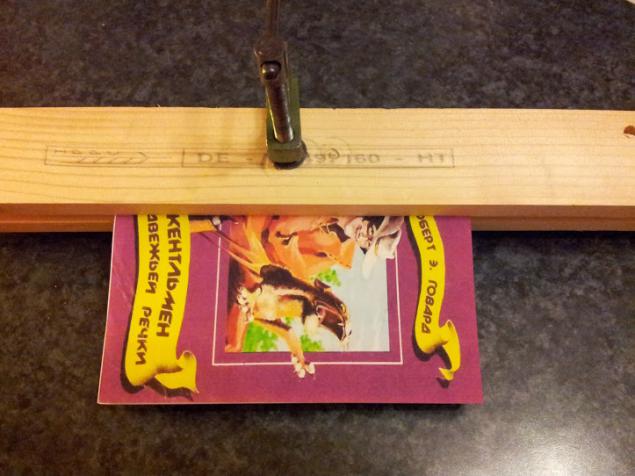
Now we need to turn to the dried block pages. Take a sharp knife and carefully building cut off flush thread. If you notice root block a little swollen from the adhesive and dispersed. To fix it you need to completely pushed between the planks and again squeeze clamp for 5-10 minutes.
After that, the unit can be completely free from the clamps and gently bend it on the main cover. For a "rolling" fold, you can use a ruler, as described above, but without the passage of the rib - the cover must be "soft" on the spine fold, so that the paper or the paint will crack and flake off at the sharp crook in the operation books.
Now the important point. It is necessary to cut most of the back cover of the main, and cut off a small portion of the rear cover of the optional. Well, with that, I think, all right. For convenience, put the cover back on each other, align with the unit, and a couple of scratches cherkanite pencil on the end of both sheets cover, above and below, in the right place. It is better if this place is in the middle of gluing the back cover to the last page of the block, about 1cm from the edge of the retreating spine. Then to these risks and the line neatly cut sheets in the same building sharp knife. Do not forget in the process of cutting put under the cover of a thicker piece of cardboard, and you know the dining table, polished ...
Do not use scissors for cutting sheets. The line of the cut will be uneven. A knife blade construction regularly update (break off another piece) every 20-25 cuts.
6. Glue binding h5> Hardcover sticking in the following order.
Please abundant grease with a brush PVA glue the first page and the spine of the block. On the first page smear strip 2 cm wide from the edge of the spine.
Then glue the main cover, pre-trimmed and bent on the spine. I recall that we first bent all you need to bend and then cut off part of the back cover.
Now we coat the last sheet of the unit, as a strip 2 cm from the edge of the spine. Nestles a small piece of the back cover (which remained with the main). Take some large portion of the rear cover, and align with the image into small pieces until the glue has not yet frozen.
Then please do not forget about nuance, it is in any guide book production, so I dropped him at the beginning. The first and last sheets unit must always be blank on both sides. Such a rule, and soft and hard cover. These sheets once again and glued cover. The maximum that can be printed on them, this kind of information about printing and circulation, sometimes printed in small type annotation to the book. But it is better to leave them blank (ph such technical sheets).
Now that we are all combined, we put our already book again between two planks and clamping clamp, but not as much as when sizing spine. And leave for 2-3 hours.
Another know-how, about which the author himself forgotten and remembered only afterward.
Know-how №5 h6> to glue impregnated paper (cover or block) is not glued to the vise-board, pre-wrap boards polyethylene, and secure it with tape or a staple gun at the edges. Well suited from polyethylene freezer bags of food, it is more dense and does not last. I>
Otherwise you risk damaging the cover when you're ready to take out a book from the grip that the author did. However, in this situation, there is even an original and beautiful output.
Know-how №6 h6> Again, appeal to the child's desk and find the package in the bins with the old markers. Carefully select the color markers damaged cover, if necessary, damp tongue, and paint cover the damaged areas.
After this procedure, the cover acquires a vintage look)) Ie book no matter how new, fragmentation of lines and glossy, and quite grown up and battered. In other words - we had aged book. And it turned out beautifully IMHO, it made the book alive. I>
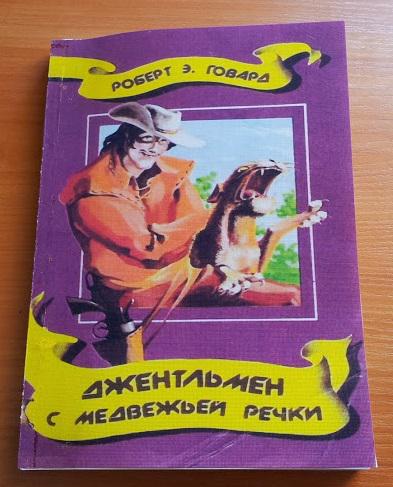
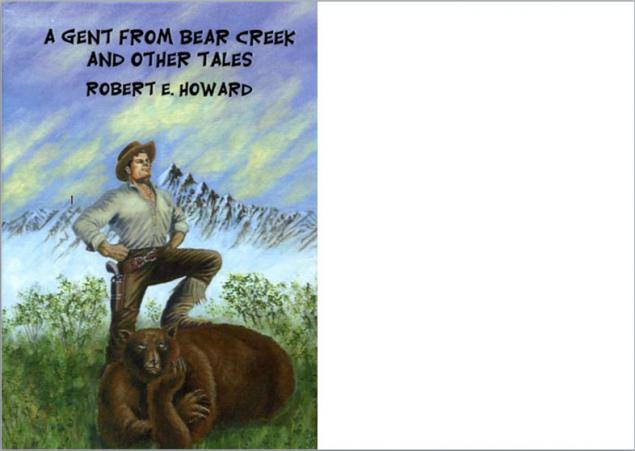
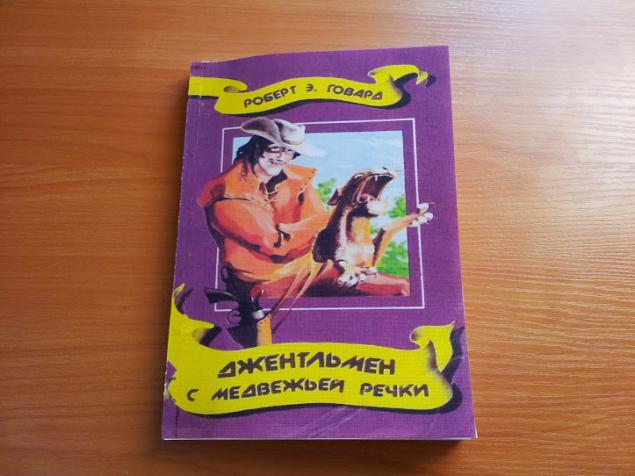
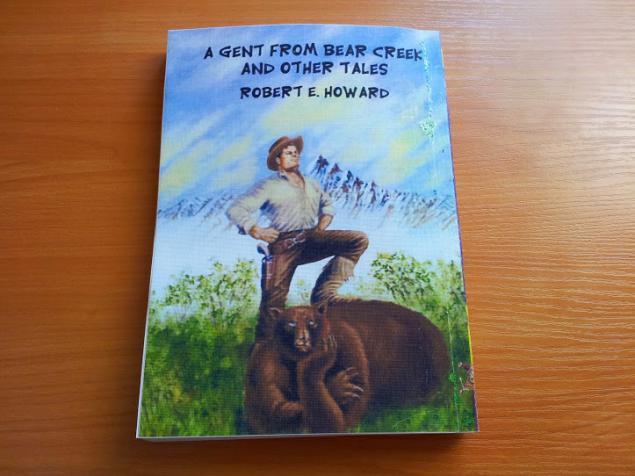
With this book I still have a little bit lucky because the only image found the front cover, suitable for printing, this turned out to be scanned blank, battered books, ie even with folds, creases, and so on. In the end, this is the best complement our vintage image.
And the long-awaited result!

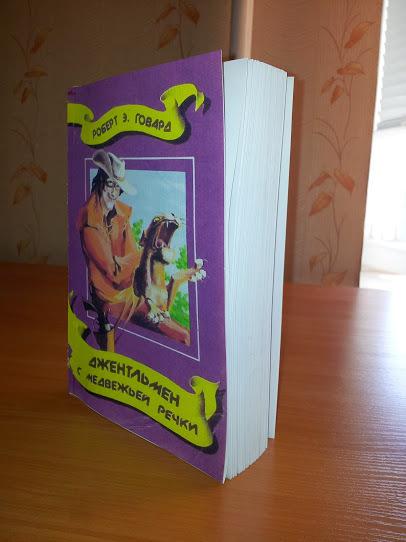
P.S. The gift was a success, and the owner came to liking)
Language after the markers during the day try not to stick out, especially at work. Houses - possible.
Robert E. Howard - author of the first novels about Conan. Yes Yes! Conan the Barbarian and Conan the Destroyer - is for his work. And Red Sonja too) i>
Source: habrahabr.ru/post/223911/


