As I was doing a second monitor of a laptop display
 Bashny.Net

It so happened that in my hands was a dead laptop HP 625 with matrix 15.6 "LCD panel and controller NTA92C VGA / DVI.Tratitsya to restore the laptop had no desire, so it was decided to sculpt the details of the above second monitor, so much so that VESA mount with a regular monitor. With minimal for me time and financial costs in the framework of the "Project of the day».
«Weekend Project" - this is what I do a small amount of time (weekend or within 1 -2 weeks) in order to solve unusual problems for me. Main goal: to solve the problem, get the experience and skills to expand their "toolbox». I> blockquote> Connectivity notebook display to a computer (VGA / DVI / HDMI) provide various kinds of controllers LCD panels. For my display was the best controller NTA92C (you can buy on ebay, aliexpress, etc.)
Starting materials
Display 15, 6 " The controller NTA92C The power supply controller 12V 4A The metal profile for drywall 60h27 < The metal profile for drywall 28h27 Drill Zaklepochnik Tap Tapping Metal shears pliers and screwdrivers in the range of The glue gun The display will be attached to the monitor in place for VESA mounting and stick to the side as the ear. It weighs not small, and thus will skew monitor. To avoid skewing need to add a counterweight on the other side.

All suspensions and Pomeroy's what I got:
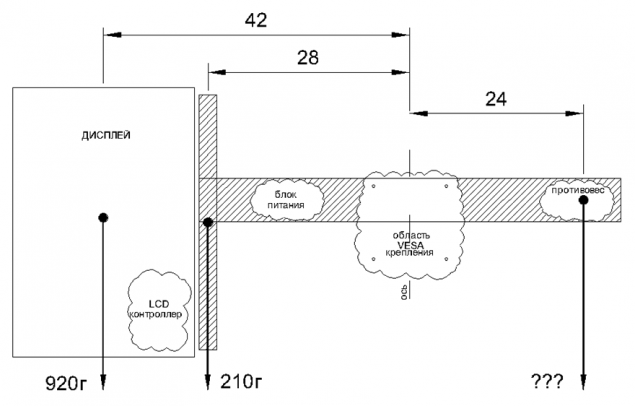
42cm * 28cm * + 920gramm 210gramm = 24cm * Xgramm
X = 42cm * 28cm * + 920gramm 210gramm / 24cm = 1855 g blockquote> This is the figure which I was guided in the collection of the counterweight. From scrap materials for the counterweight, I took the coins.

Practical part
Display
Laptop display is removed together with the body portion and a loop (so like aesthetically). Hinged have restrictor opening the lid and it is impeding us, because now they will be opened at angles greater than 140 degrees.

The limiter is a projection in the frame. It may or grind off or hammer back, like I did.

Next, build it for the LCD controller from the chassis of the power adapter (yes, I examine the power adapter) I attached the whole thing to the back of the display glue gun. On this display was over.
Frame

Putting the square of the profile 28h27. It must firstly because the display hinges and the profile 60h27 mounted on opposite sides of a square. And secondly, to increase the thickness of the metal under the threads for bolts. Profile fastened together in a square using the rivet, then threaded under the bolts.

The profile 60h27 make 2 holes for VESA mount (I have it VESA MIS-D, 100, C - ie holes 10 cm apart) and fastened with rivets previously manufactured square.
Power supply
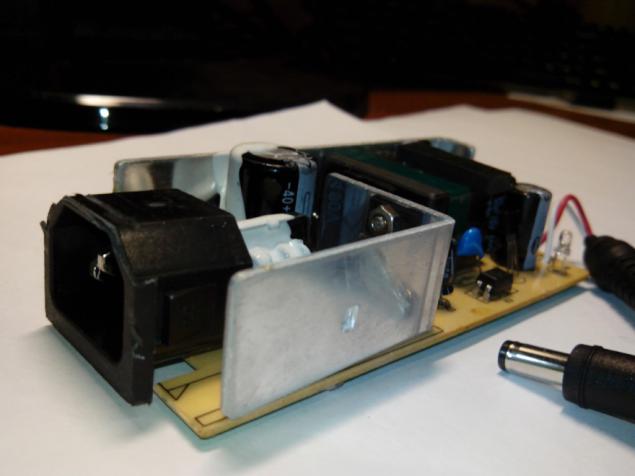
Power supply enclosure was dismantled for further space inside the PSU Profile 60x27 (with a body he climbed)

Korpusozamenitel (as insulation) I made out of cardboard and stuck a gun to my profile. The power supply unit is glued to the cardboard for corners.

In the end, I got this "shovel».
Installation and connection
Screwed "shovel" to the main monitor bolt (on some furniture left) to VESA. Fasten counterweight. Connecting the DVI and nutrition.

The display is not immediately determined. Go here: Control Panel → Display → Adjust resolution → Find and customizable to fit your needs. Everything! Our second monitor is ready!

Disadvantages
Not a good matrix. Firstly it is glossy and because of this glare. Second is not very good viewing angles (good loops that have not lost their ability to rotate the display under the right angle).
Because of the difference in the relationship of the parties displays (main 1920x1080, second 768h1360) No effect of a single display. Yes, I did 768h1024 resolution - much better than a monolithic, but the picture did not work for me on quality (letters swam a bit).
My design of the profiles is not very good because it is poorly resistant to twisting that occurs due to its characteristics and method of application of the loads therein. This problem can be avoided priladit second profile to the lower two holes VESA mount and all riveted in a rigid structure.By the way: I do not know whose it can not, but when connecting my display to the VGA output of the laptop Samsung R519 under Xubuntu colors on display were very strange. i> blockquote> Conclusions
A regular "project" and the end result.
The total cost of construction at a price matrix in 1000 ~ 1500 ~ 900rub controller, power supply with cord and consumables 400rub ~ 50 ~ 100 rubles is 1950 ~ 2500rub. For the money (well, maybe a little added) can be purchased quite sane second monitor. I got a second display to nothing (only spend 25rub on small drill well and coins rubles to 150 ~ 200 rubles). Everything else anyway I had. Only required to delve into the drawers.
If you had to do a second time, then I would have used aluminum angles or squares.
Source: habrahabr.ru/post/199148/


Tags
See also
Dissenting opinion makes a second attempt
Madagascar. How are things pan
As I was doing repairs in the bathroom.
Robert S. Mendelsohn: How doctors make healthy kids sick
Great photo shoot - how to do it and what happens.
That's how things work in real life!
How do I make furniture
The beauty of your hands
As we did my very first layout
How to do lunges