Swedish wall with a horizontal bar with your hands.
 Bashny.Net
Will be 25 photos.
A detailed description of the idea of a bearing is lowered to the bottom of the post, that there was no yelling, "Many Buka", "niasilil" etc. Who cares honor.
Materials: plywood 1, 2 cm - 1 sheet (130grn.), Sides - 3 pine, 5 * 12 * 230sm. 2 pcs. (40 UAH.),
crossbar (spade handles), beech, diameter 4cm. 12p (132grn.), Fixing materials and stain ~ (90grn.), Set the tree crowns (32grn.), Beer (a lot ....), The work (for free).
Total: 424grn. + Petrol rather gas.
Dimensions: 81 230sm.h sm.h 12 cm. Removal of the horizontal bar 60 cm.
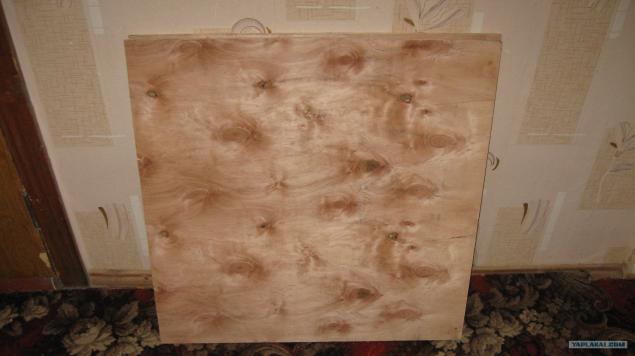
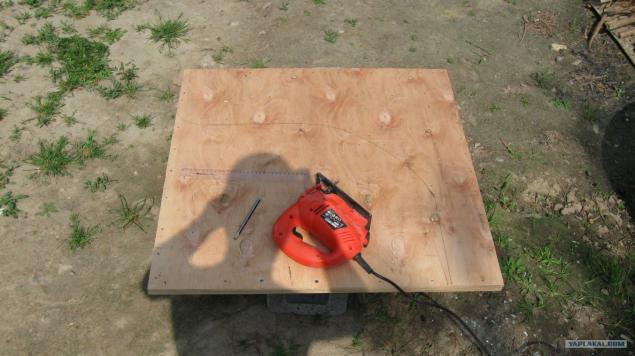
Plywood cut into four equal squares. It would be better to take the 22-ku, but the toad a little crushed. Photo 2 square.
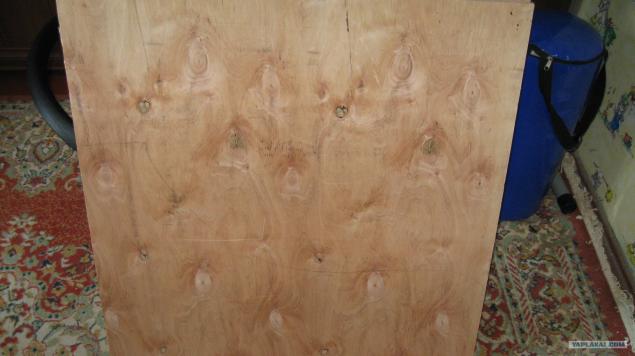
Plotted the contours of the future "ear." To this place has been free of the screws that will fasten the plywood after gluing.
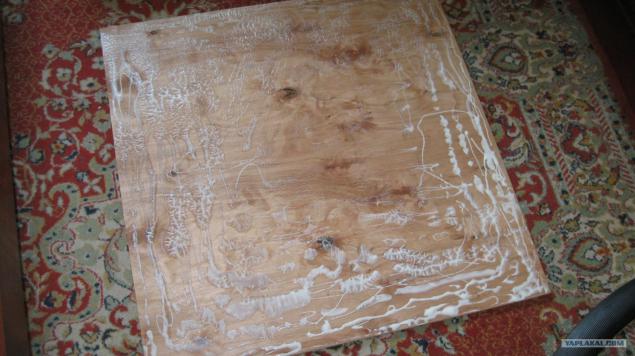
Coat with glue. I used ordinary PVA. By the way, after I drank too much, for plywood gluing broken. But only factory gluing.
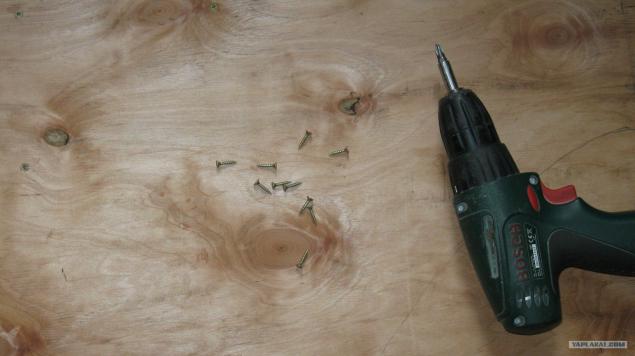
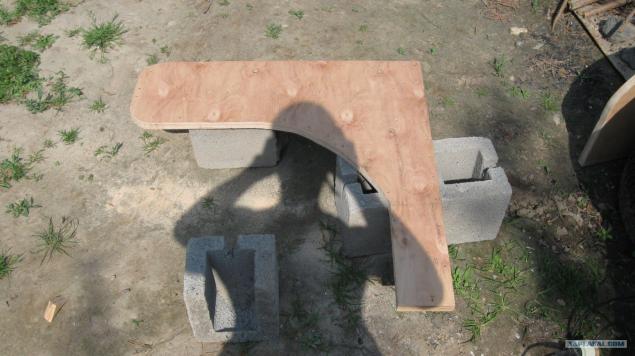
Then connected with screws. In the absence of clamps. It was possible, would likely do it again. But the savings .........
And after a week of drying before removing the excess by jigsaw.
The lower part, the one that goes from the bend, at first wanted to cut. But then, in consultation with the father - decided to leave. It will be harder to keep
Cropped excess And already we get quite a nice piece. But do not throw away the excess. A little later, we make him a child hinged horizontal bar.
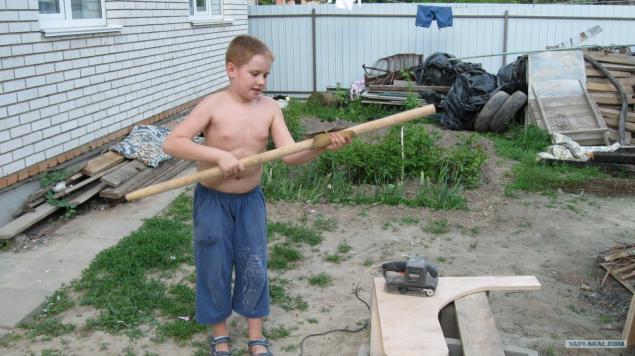
Processing sander. I even can not imagine how much work it took to manually nazhdachkoy grout.

Eldest child tries hard. SKINS future crossbar. He knows what to do for themselves.
Preparation for pilot drilling recesses for the spokes. Zasverlival to a depth of 2 cm. For the same size all the blanks on the crown wrapped electrical tape. In the photo you can see it.
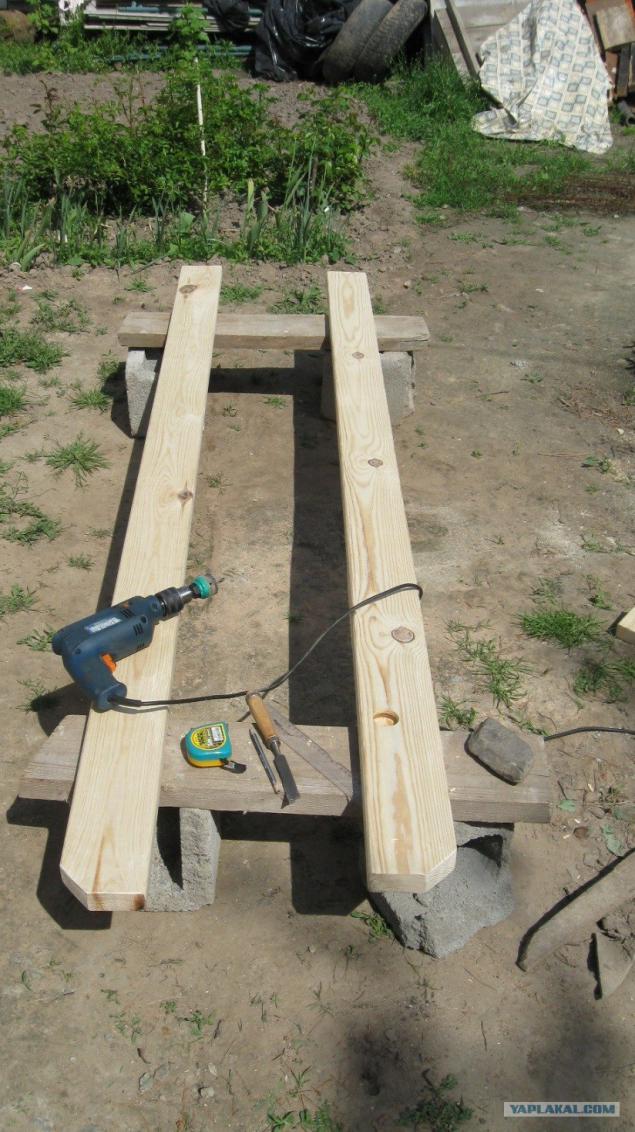
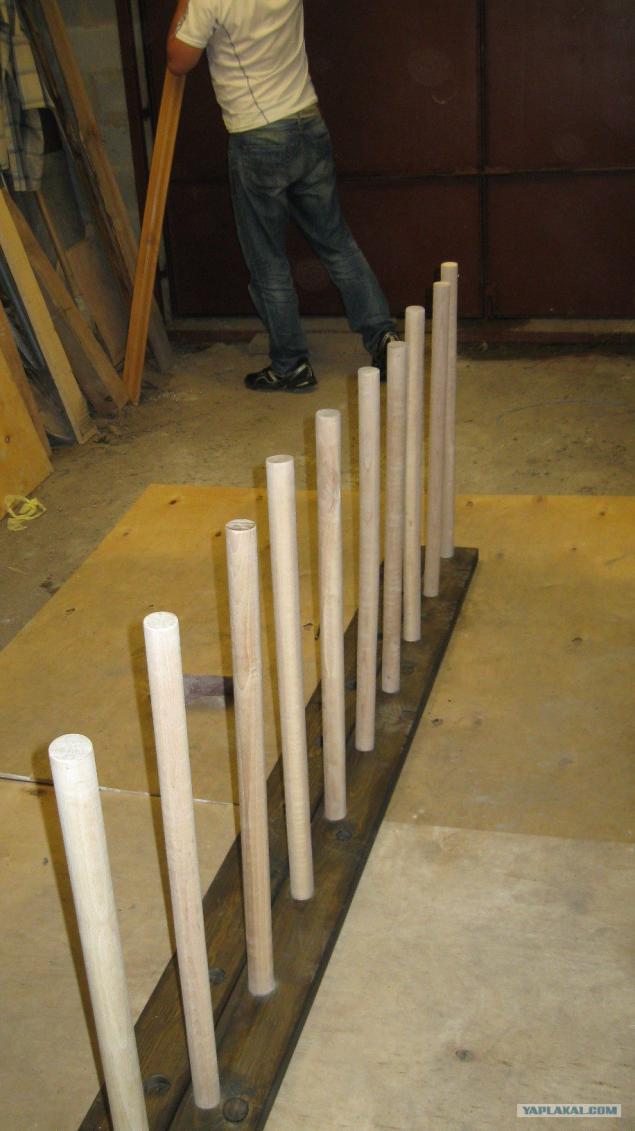
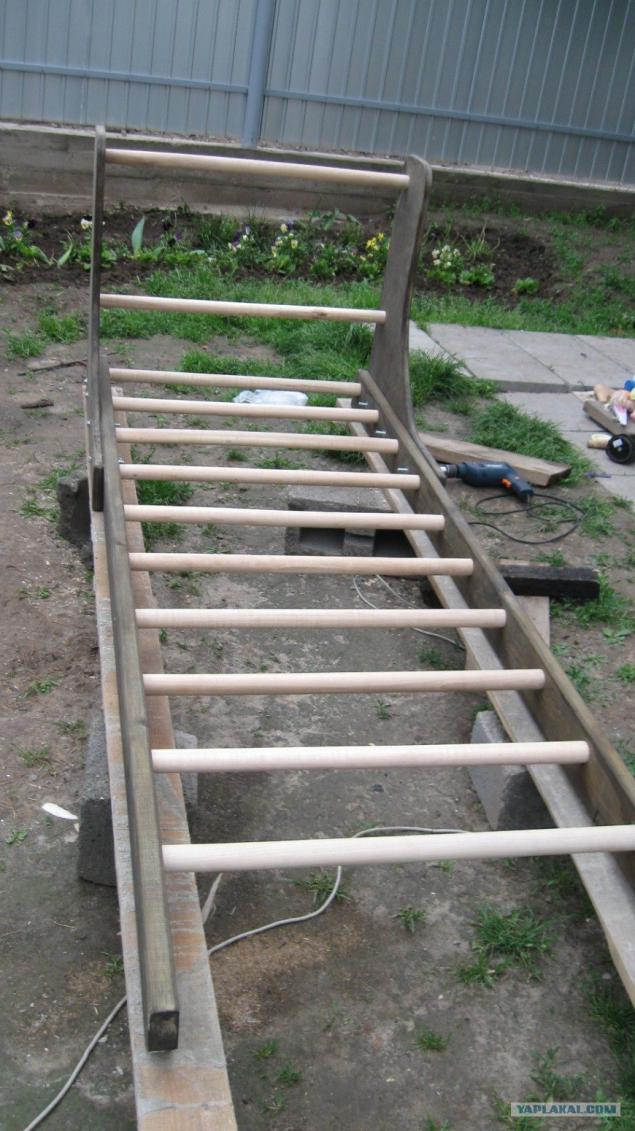
Type two workpieces after processing. The distance between the centers of the bars turned 21.5cm. And do not crossbar decided to strengthen the middle and closer to the edge. To the feet were placed.
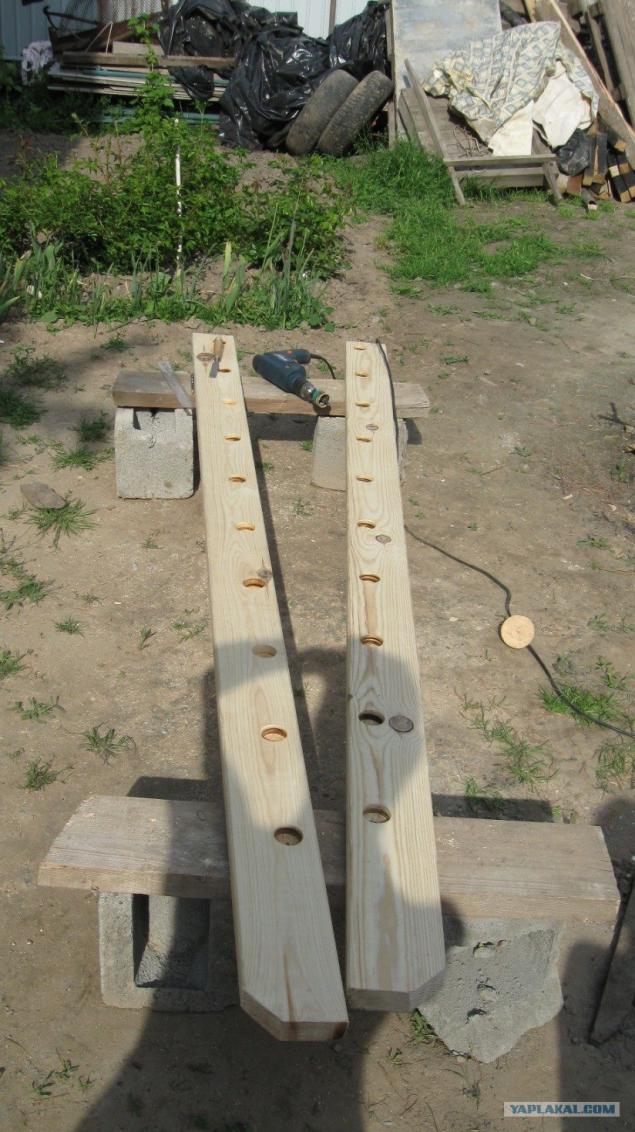
The treated billet at the wall. It seems that rain is planned ......
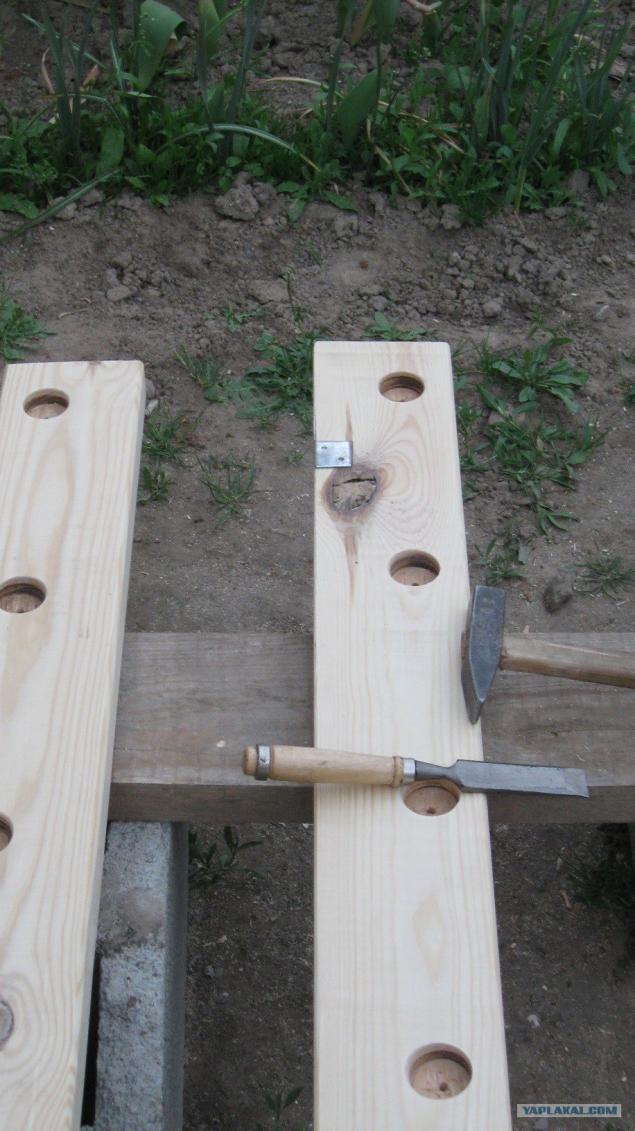
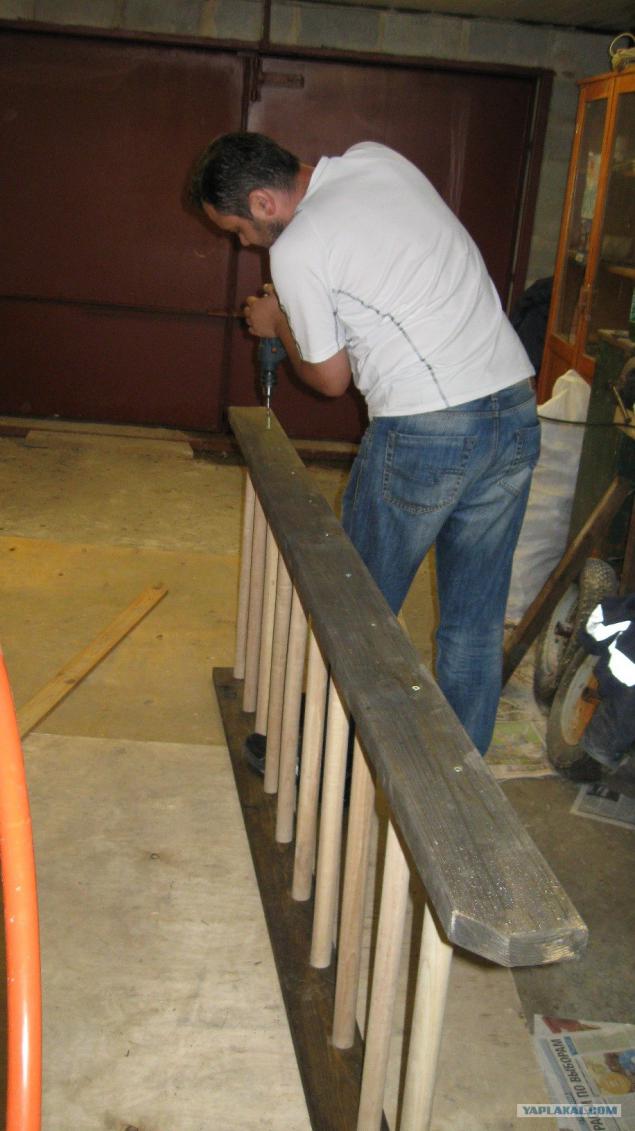
Rain has not begun. Need to work…. Fasten the corners, I love to do everything "flush".
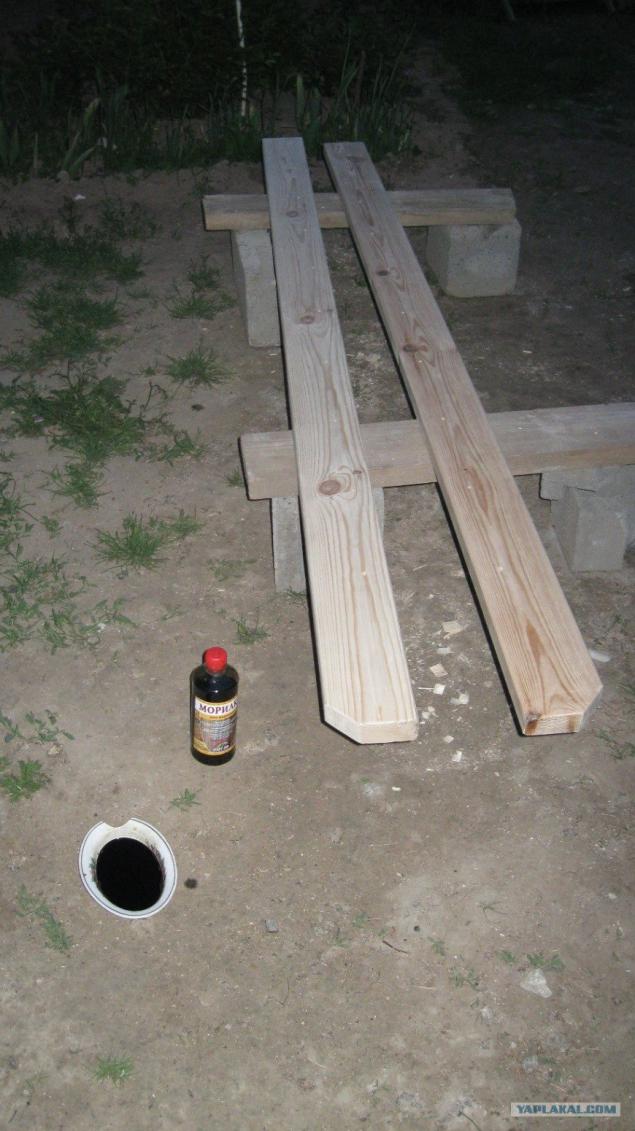
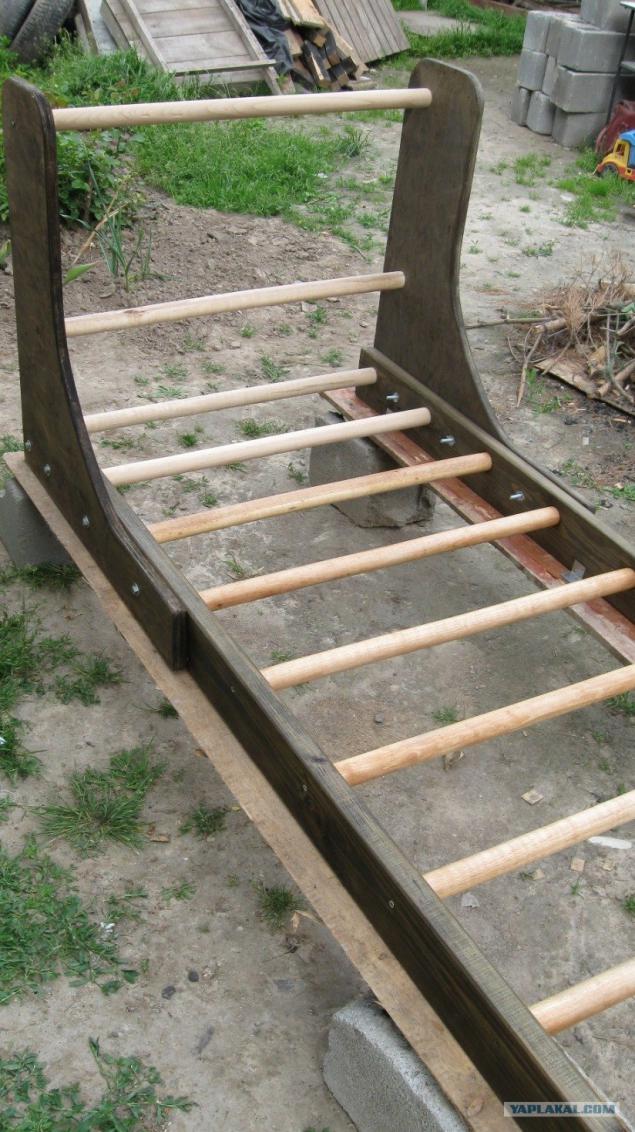
The last phase of work planned for the day. Opening stain - walnut.
But somehow the color of the furniture, "nut" and stain ultimately not quite match. But an honest attempt took place to be ......
After a few days, I took all the willpower ...... (Power is the will to eat. And willpower is not!) Have to start all this constructor "Lego" to bring to the assembled state.
Because of the dampness in the garage, porazbuhali crossbar. A lot of time was spent on trying to put the pieces together. But we eventually all started to turn. Here Andrey drills holes Confirmates.
And that I have drilled the other side:
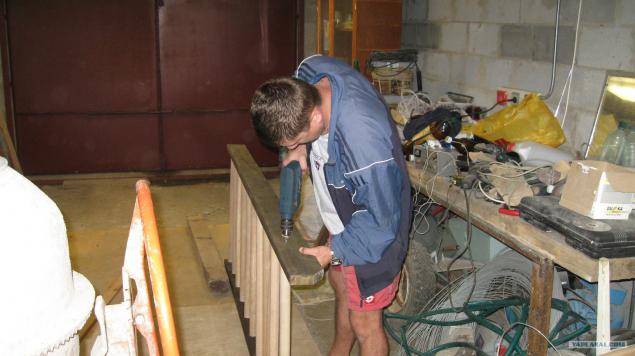
I asked Andrew to pose little. Screwdriver and bits.

Victory Day. All the parade. And we ...
Fasten own ears to the wall using - "nut pile furniture (flush). Nut furniture pile has special teeth to prevent rotation of the nut, which allows installation on one side. Before installing the screws, drill hole. The nut used in the manufacture of furniture using metric fasteners. "Took the description in the net, as the process forgot to take a picture.
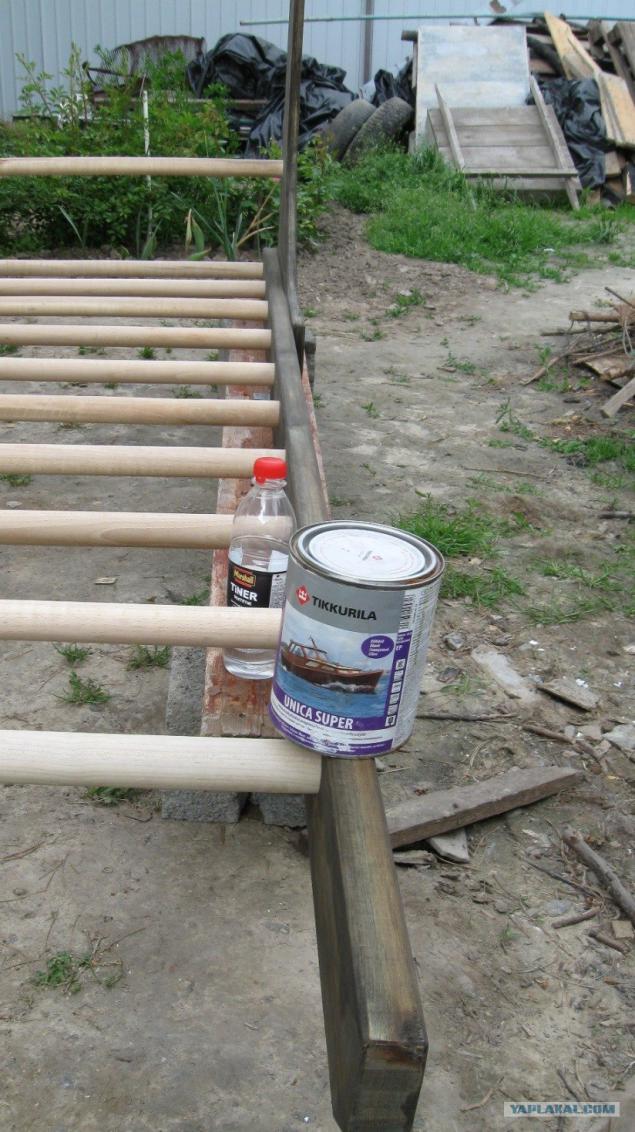
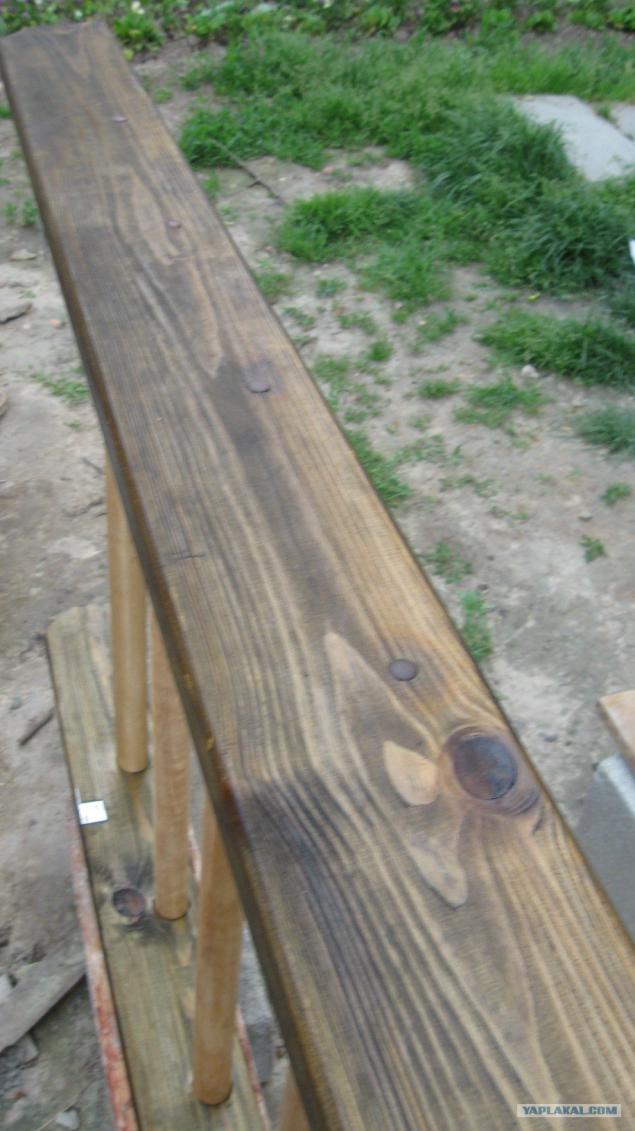
Before lacquering. Varnish used 'Tikkurila' - Yachting. Such things are recommended to open a water-based varnish. But I used the leftovers after the balcony clapboard upholstery. In principle, complaints to him for two years, did not arise. And allergic reactions, too.
After the first, ground-lacquering. Wood already began to play a little bit.
Do not forget to close the head Confirmates plastic plugs.
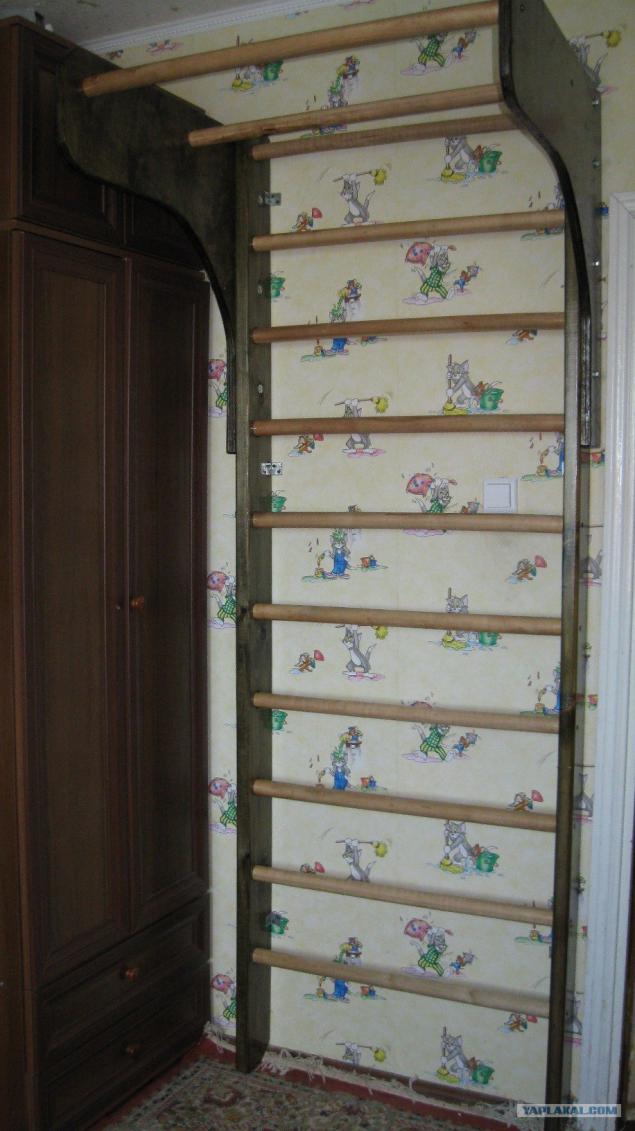
The process subsequent varnishing will not show. And so everything is clear. Here at last, after a week of drying, "provonki" from varnish. Today, tacked to the wall.

The place was chosen - is temporary. In the autumn I plan to move to another corner.
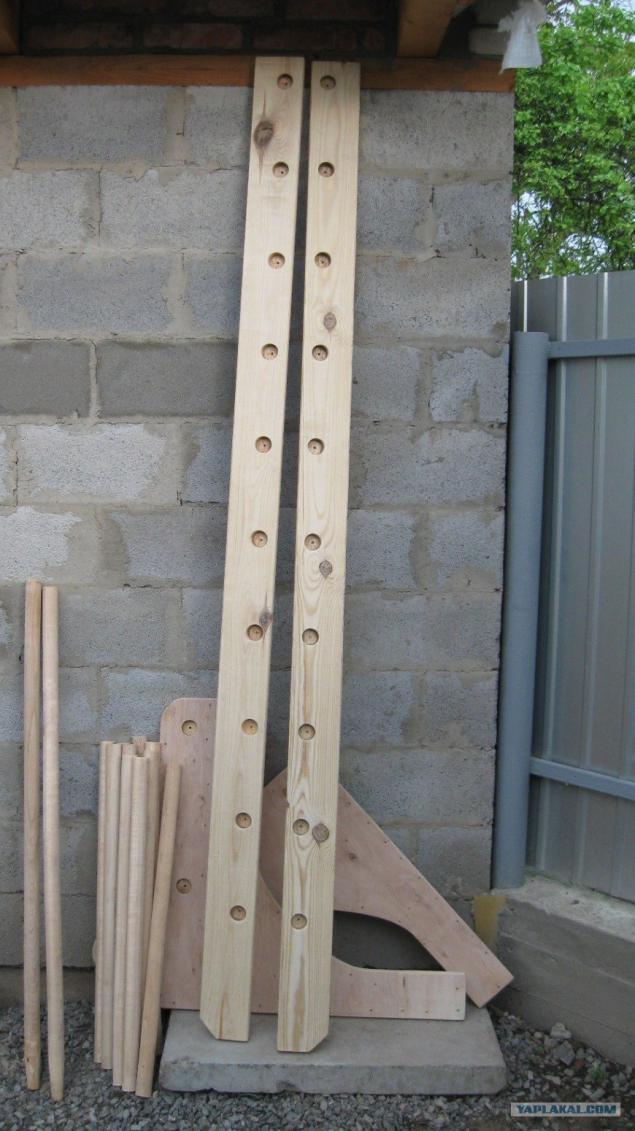
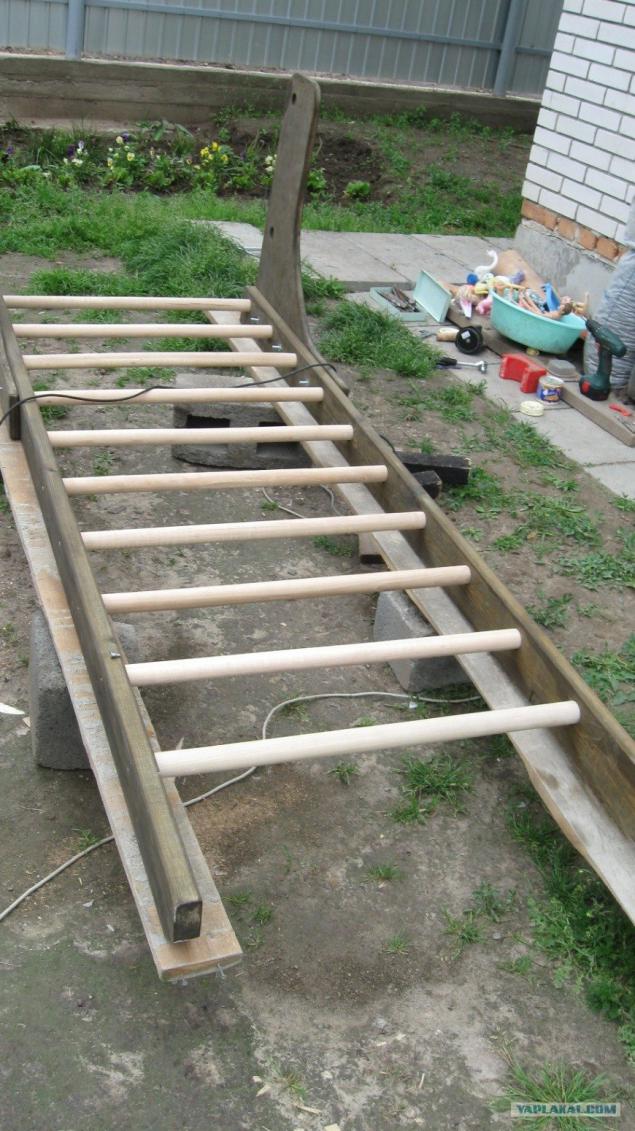
Older me, + - withstand without any problems ~ 115 kg. On the side ears planned to hang a rope ladder and rope. And the residue of plywood do kids hinged horizontal bar.
Home-continued ..........
The idea arose purchase this device has a long and occasionally forgotten,
there were even attempts to order, buy, but somehow it all did not develop and was postponed.
And then came the day when the idea of the wall bars again crept into my head
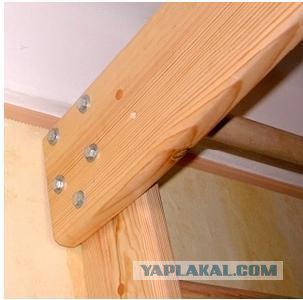
Children grow up, to think about their physical health, from the very beginning back problems. In general, first sat down at the internet - is now a huge choice, decided on some models. Then he traveled to the shops to see it all live, to feel. Metal does not like, much colder. But there is one advantage - take up much less space than wood. The choice fell on the wooden wall. Wooden things much "warmer" and well-treated nicer touch. Just stopped by two points: top-mount remote horizontal bar and the price of 1500 UAH., $ 200. If the price of creaking heart could accept, then mount caused some concern.
The fact that the fixture "D" -shaped horizontal bar - the board to the board at 90 degrees for 4, 5 bolts (as in the picture):
Posted in [mergetime] 1337975845 [/ mergetime]
I called my concern about the reliability and durability of the horizontal bar. Pine rassohnetsya over time and begin to crack under heavy braking. Chat with other childhood carpenter, he said that these things are best done out of plywood 22-ki. And I decided to create his own wall. What does this all work out, look at the pictures above.
ZY Many thanks friend Andrey - for help in the work (even on May 9), Ruslan kumu -
for help with side racks, plywood and ideas. And kumu Pasha for his help with the tool.
But special thanks to Oleg and his brother-in family for giving his yard at work. And the fact that they suffered a lot of my days and evenings.
That's all I wanted to say!
Source:
A detailed description of the idea of a bearing is lowered to the bottom of the post, that there was no yelling, "Many Buka", "niasilil" etc. Who cares honor.
Materials: plywood 1, 2 cm - 1 sheet (130grn.), Sides - 3 pine, 5 * 12 * 230sm. 2 pcs. (40 UAH.),
crossbar (spade handles), beech, diameter 4cm. 12p (132grn.), Fixing materials and stain ~ (90grn.), Set the tree crowns (32grn.), Beer (a lot ....), The work (for free).
Total: 424grn. + Petrol rather gas.
Dimensions: 81 230sm.h sm.h 12 cm. Removal of the horizontal bar 60 cm.
Plywood cut into four equal squares. It would be better to take the 22-ku, but the toad a little crushed. Photo 2 square.

Plotted the contours of the future "ear." To this place has been free of the screws that will fasten the plywood after gluing.

Coat with glue. I used ordinary PVA. By the way, after I drank too much, for plywood gluing broken. But only factory gluing.

Then connected with screws. In the absence of clamps. It was possible, would likely do it again. But the savings .........

And after a week of drying before removing the excess by jigsaw.
The lower part, the one that goes from the bend, at first wanted to cut. But then, in consultation with the father - decided to leave. It will be harder to keep

Cropped excess And already we get quite a nice piece. But do not throw away the excess. A little later, we make him a child hinged horizontal bar.

Processing sander. I even can not imagine how much work it took to manually nazhdachkoy grout.

Eldest child tries hard. SKINS future crossbar. He knows what to do for themselves.

Preparation for pilot drilling recesses for the spokes. Zasverlival to a depth of 2 cm. For the same size all the blanks on the crown wrapped electrical tape. In the photo you can see it.

Type two workpieces after processing. The distance between the centers of the bars turned 21.5cm. And do not crossbar decided to strengthen the middle and closer to the edge. To the feet were placed.

The treated billet at the wall. It seems that rain is planned ......

Rain has not begun. Need to work…. Fasten the corners, I love to do everything "flush".

The last phase of work planned for the day. Opening stain - walnut.
But somehow the color of the furniture, "nut" and stain ultimately not quite match. But an honest attempt took place to be ......

After a few days, I took all the willpower ...... (Power is the will to eat. And willpower is not!) Have to start all this constructor "Lego" to bring to the assembled state.

Because of the dampness in the garage, porazbuhali crossbar. A lot of time was spent on trying to put the pieces together. But we eventually all started to turn. Here Andrey drills holes Confirmates.

And that I have drilled the other side:

I asked Andrew to pose little. Screwdriver and bits.

Victory Day. All the parade. And we ...

Fasten own ears to the wall using - "nut pile furniture (flush). Nut furniture pile has special teeth to prevent rotation of the nut, which allows installation on one side. Before installing the screws, drill hole. The nut used in the manufacture of furniture using metric fasteners. "Took the description in the net, as the process forgot to take a picture.

Before lacquering. Varnish used 'Tikkurila' - Yachting. Such things are recommended to open a water-based varnish. But I used the leftovers after the balcony clapboard upholstery. In principle, complaints to him for two years, did not arise. And allergic reactions, too.

After the first, ground-lacquering. Wood already began to play a little bit.

Do not forget to close the head Confirmates plastic plugs.

The process subsequent varnishing will not show. And so everything is clear. Here at last, after a week of drying, "provonki" from varnish. Today, tacked to the wall.

The place was chosen - is temporary. In the autumn I plan to move to another corner.
Older me, + - withstand without any problems ~ 115 kg. On the side ears planned to hang a rope ladder and rope. And the residue of plywood do kids hinged horizontal bar.

Home-continued ..........
The idea arose purchase this device has a long and occasionally forgotten,
there were even attempts to order, buy, but somehow it all did not develop and was postponed.
And then came the day when the idea of the wall bars again crept into my head
Children grow up, to think about their physical health, from the very beginning back problems. In general, first sat down at the internet - is now a huge choice, decided on some models. Then he traveled to the shops to see it all live, to feel. Metal does not like, much colder. But there is one advantage - take up much less space than wood. The choice fell on the wooden wall. Wooden things much "warmer" and well-treated nicer touch. Just stopped by two points: top-mount remote horizontal bar and the price of 1500 UAH., $ 200. If the price of creaking heart could accept, then mount caused some concern.
The fact that the fixture "D" -shaped horizontal bar - the board to the board at 90 degrees for 4, 5 bolts (as in the picture):
Posted in [mergetime] 1337975845 [/ mergetime]
I called my concern about the reliability and durability of the horizontal bar. Pine rassohnetsya over time and begin to crack under heavy braking. Chat with other childhood carpenter, he said that these things are best done out of plywood 22-ki. And I decided to create his own wall. What does this all work out, look at the pictures above.
ZY Many thanks friend Andrey - for help in the work (even on May 9), Ruslan kumu -
for help with side racks, plywood and ideas. And kumu Pasha for his help with the tool.
But special thanks to Oleg and his brother-in family for giving his yard at work. And the fact that they suffered a lot of my days and evenings.
That's all I wanted to say!

Source:
Tags
See also
Their hands: Cellar glacier —dry freezer all year round
Repairs in the bathroom with their hands
Frying pan with your own hands
Ventilation in the kitchen with their hands: what you need to know
How to make a wood chipper with your hands
Installation of induction heating boiler with their hands
How to make stove water heating with his own hands
Vases for garden with your own hands
How to make oven Lacireno their hands
Arrangement of country soul with his own hands