As I washed down with a guitar
 Bashny.Net
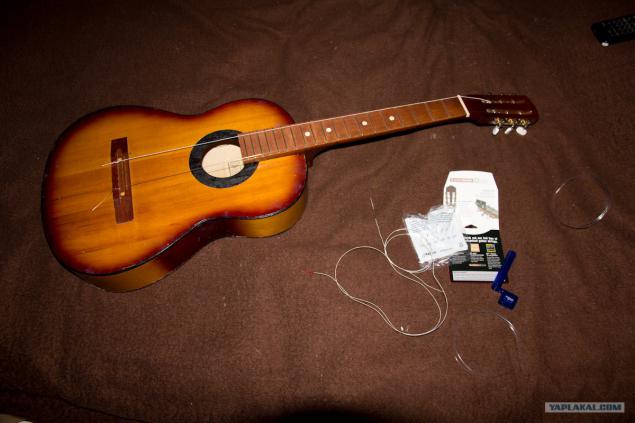
Today I tell you how I saved one guitar. The purpose thereof was to bring in a normal operating state with the lowest reasonable cost. Paint that is left 'as is' not a name at this point the room for painting and lack of free time. Repair the guitar slowly about 4 months as they become available free time (I hope will be able to still make a good lacquering and write about it a separate article). Something was not done according to the canons, or rather some things no one else does so, but I did for myself, and I was happy with everything. Currently guitar revived and rebuilt and arrives in full combat readiness and will now be described as it was.
Will be 65 photos.
2.
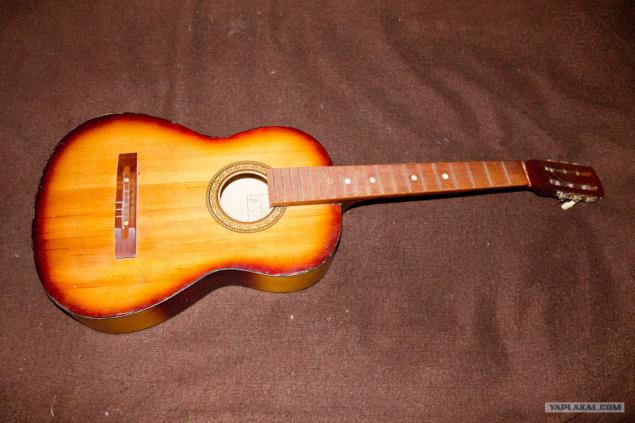
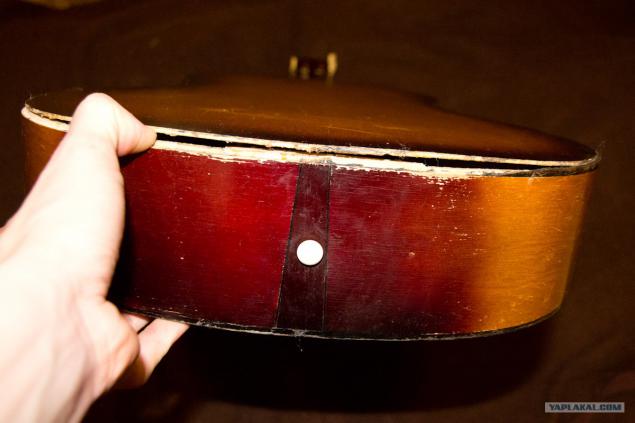
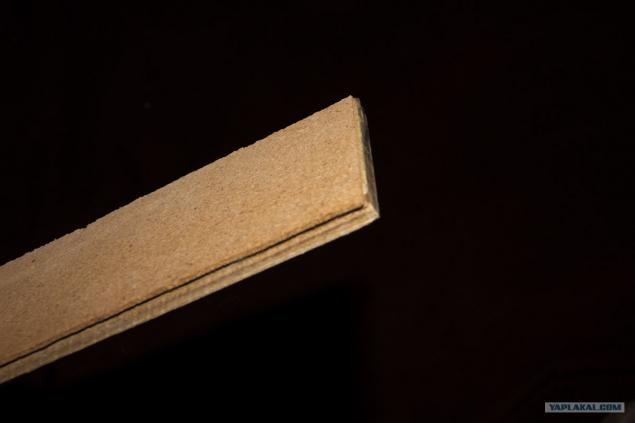
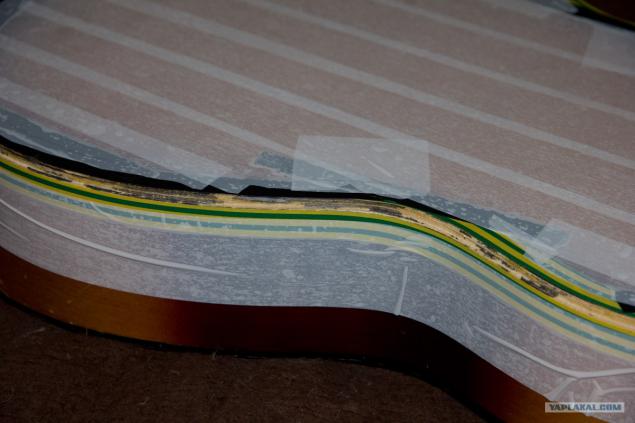
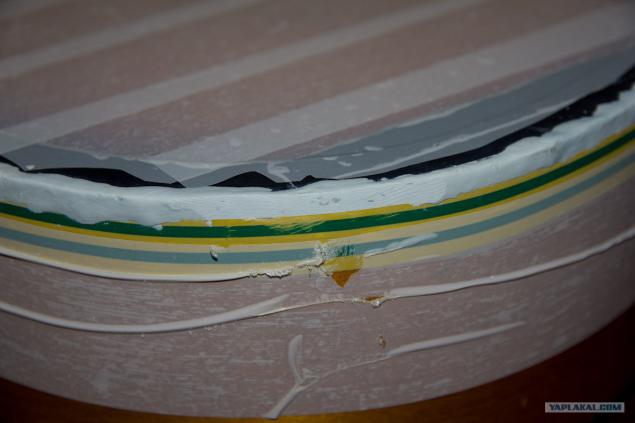
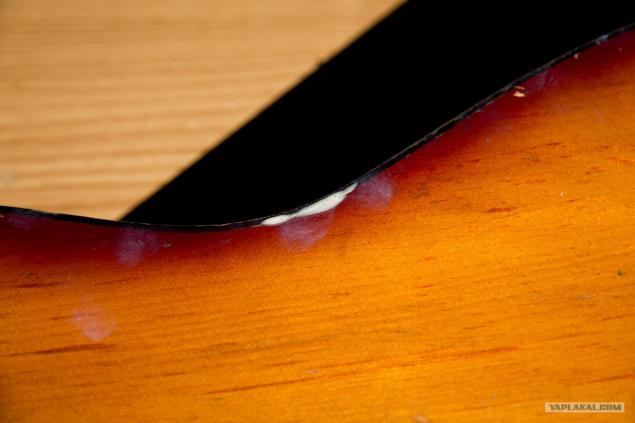
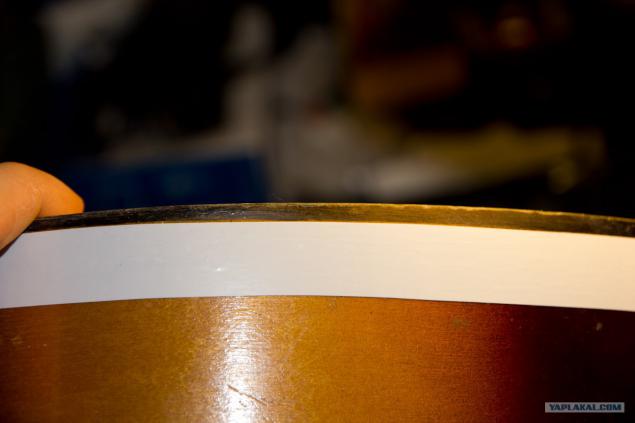
This guitar has got to me for free, but it was a few stocks. The first - a peelable edge in several places.
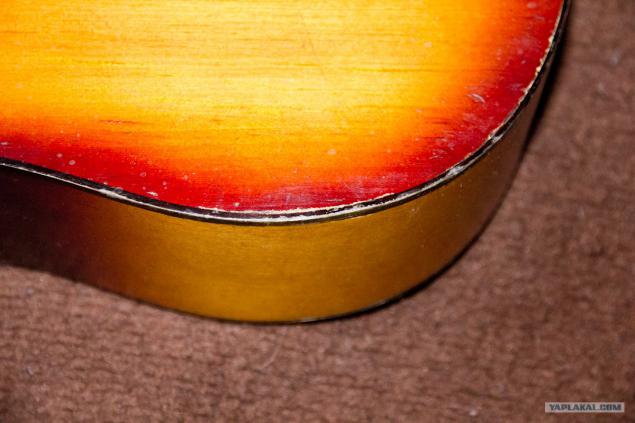
3.
From a different angle.
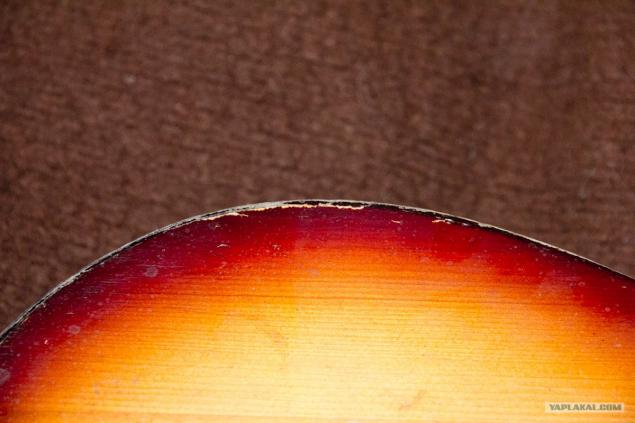
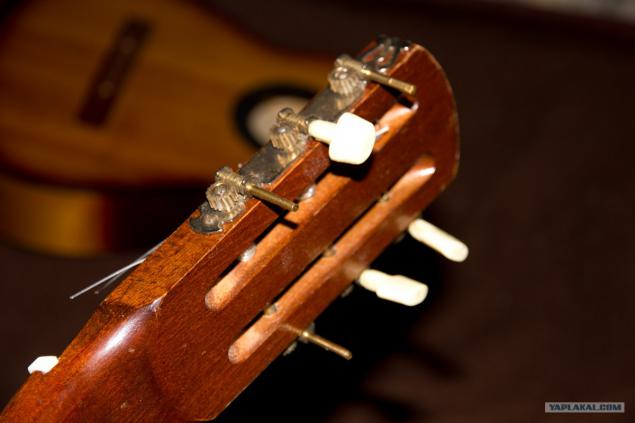
4.
Killed in the trash Pegs mechanics.
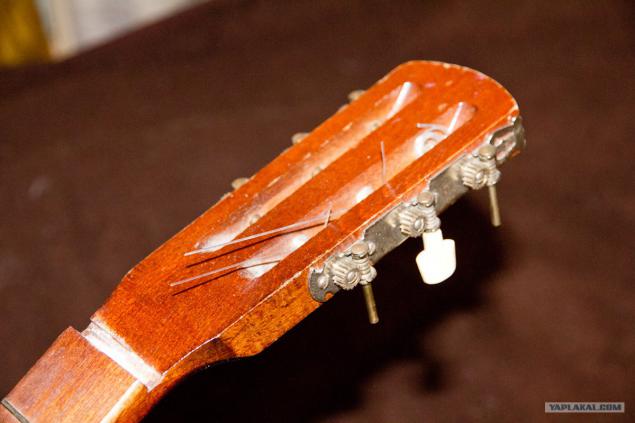
5.
She is.
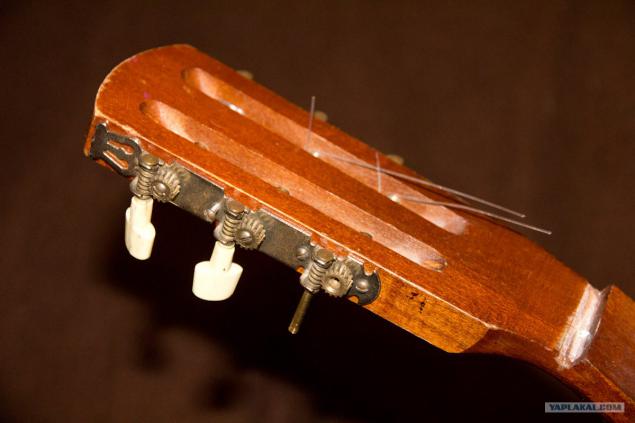
6.
The bursting of the nut. (Inside was a hollow - to such an economy already cheap plastic still had to guess at the expense of strength.)

7.
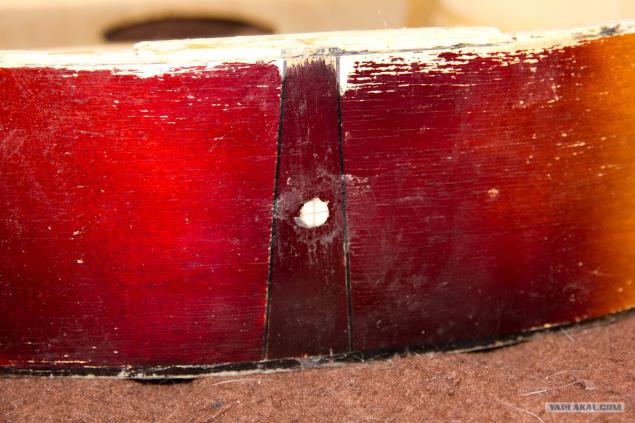
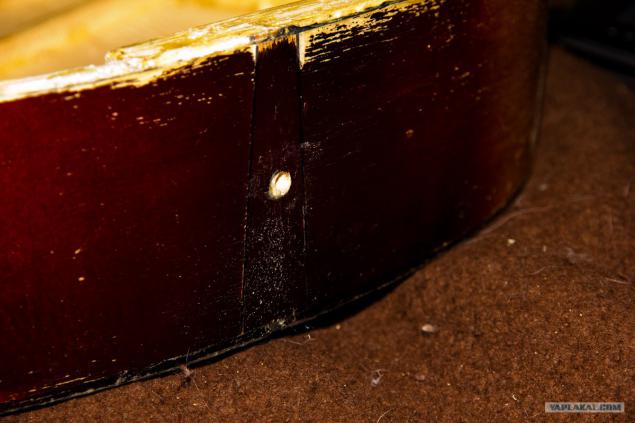
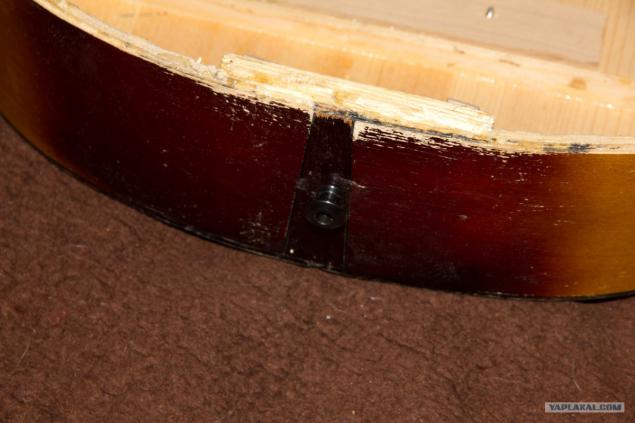
And nail numbers. The guitar has fallen from a high cabinet to the lower part of the back deck and then was badly glued do not understand how the first available glue. Clay eventually fell behind. And now we have the missing piece of the rim, and a gaping hole torn average spring rear decks (for those who do not know is such thin reinforcing structure reechki part of pine, where the wood is very thin veins.)
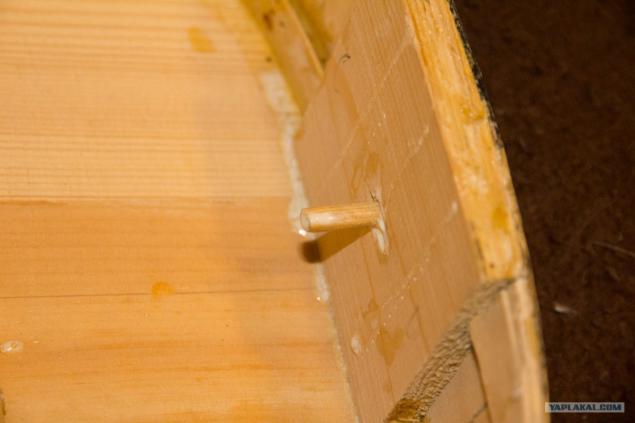
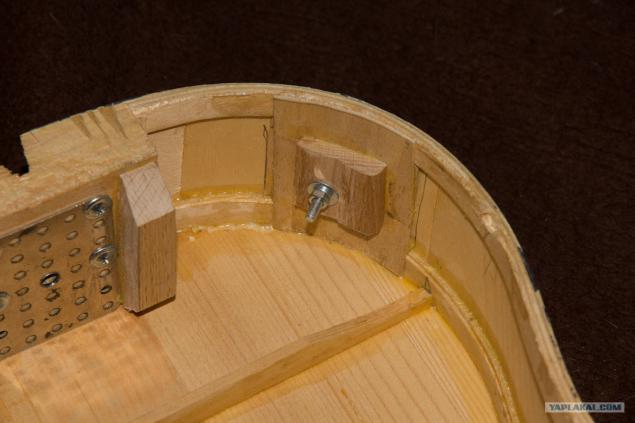
8.
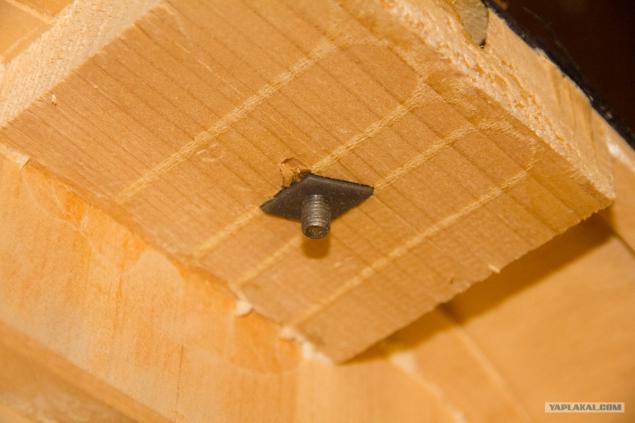
Cut off gently with a scalpel below the remains of the rim and a little - a little tear off along the seam of the rear deck. It was not possible to shoot t. To. To keep the camera and a sharp knife was very uncomfortable. The first thing we see is the mount neck to the drum (body of the guitar.) There he is not glued, and bolchёnoe. Each type of attachment has its supporters, but here we have something that is. And as we see the puck is not very big in size and have decent vmyali tree. It is fraught with rupture klёtsa or as it is called biscuit. Their two. In the upper neck cuts. At the bottom is usually inserted strep-pin for fastening the belt.
9.
Remove the old screw and nut. Yes, and here is useful remains of the beloved childhood constructor. So fasten the plate on the 4 short screw. Trying on new screw and nut elongated, not forgetting to put a lock washer.

10.
glue flakes while removing the deck and clamping piece clamp.
11.
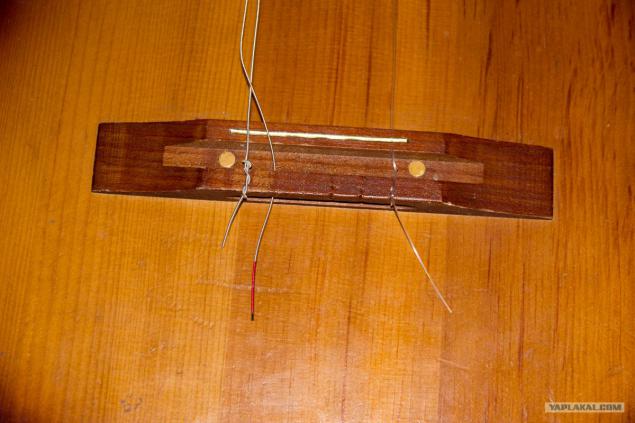
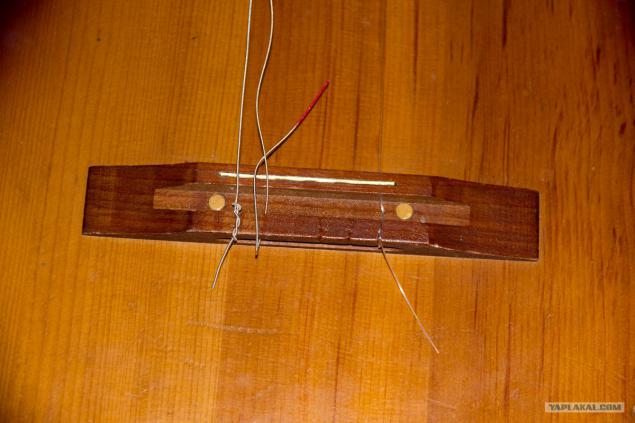
Clean out glue residue from unsuccessful repair. Coat with all the new and Klets kontrobechayku (a narrow strip of wood that runs along the entire seam gluing the deck and shell (end) of the guitar and enhances the design.) And again clamps stifle placing pieces of wood for the uniform distribution of pressure and not to leave dents.
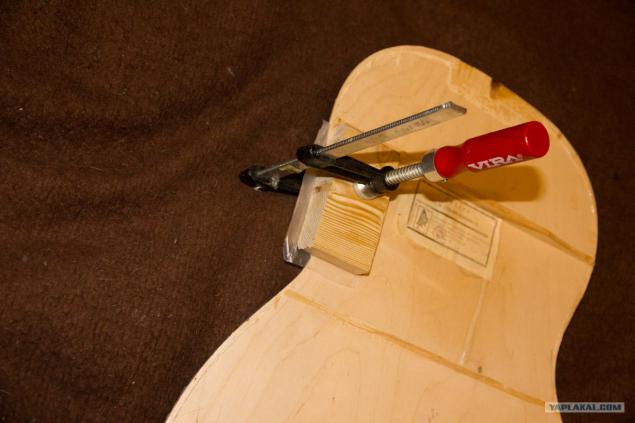
12.
While the glue dries under the clamps we coat all splices for reinsurance. Yes, I almost forgot the glue first available, write about it below.

13.
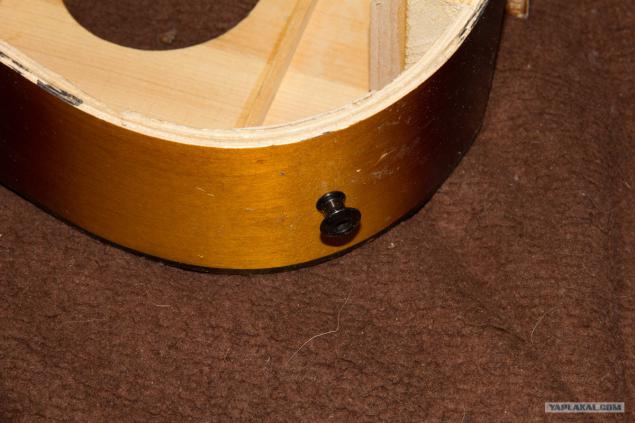
We take out the old belt holder and put the cap - t. To. For strep pin hole is too large.
14.
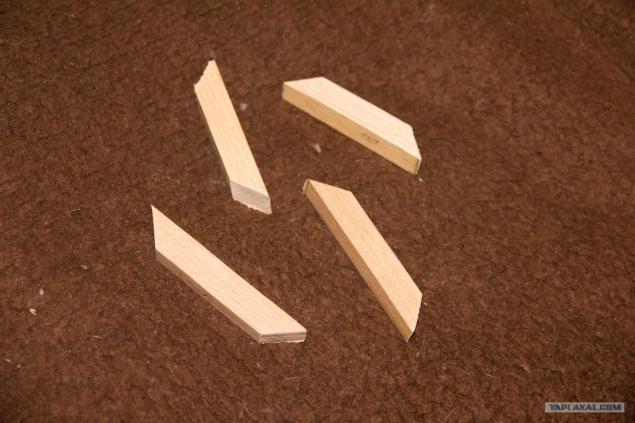
While the glue is still dry (as it should be at least 12 hours, preferably daily) Take a little bit and we shall cut beech amplifiers for klёtsov. They will be glued across the fibers. I would not bother, but this guitar they began to bend and deform - which is not gud.
15.
Guitar undertook not to repair a running and intelligent reading forums and personal websites luthier. And there came across this cunning technique. To. Beech tree tight, then glue it absorbs much worse than the same pine or spruce, and even desensitization large cloth does not give the desired effect, but if you make cuts with a sharp knife in the photo then the problem is solved with a bang.
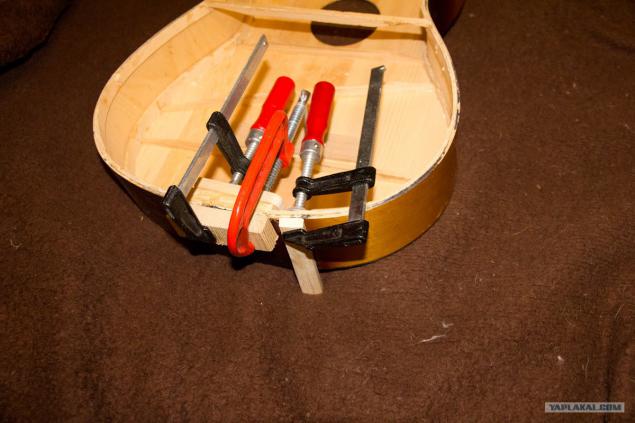
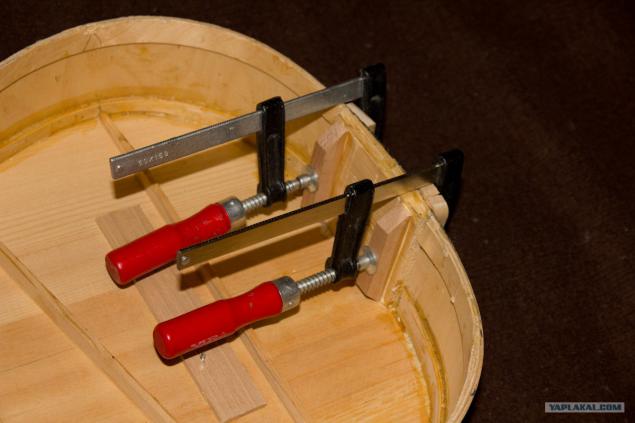
16.
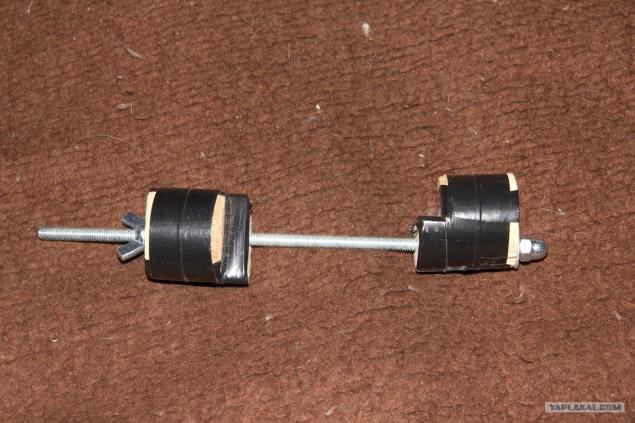
Sticking amplifiers lower klёtsa.
17.
And the top. Do not forget to enclose a piece of wood - then do not smooth out the dent.

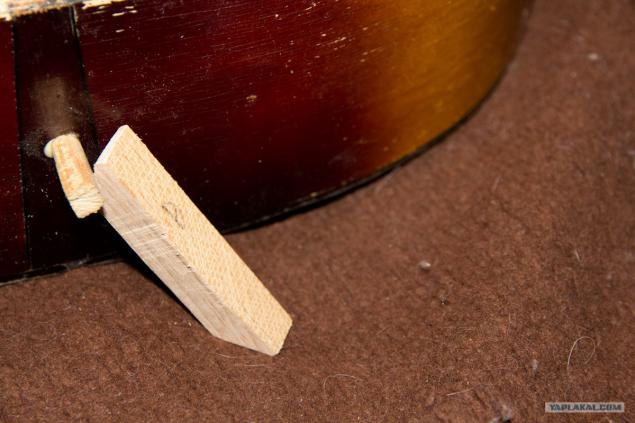
18.
Puts a cap on top of a piece of beech wood, which has been mounting a guitar strap. Why do you need to see below.
19.
Clay dry - remove the clamp. On top klёtsa (the shot hit the very torn average spring rear deck.)

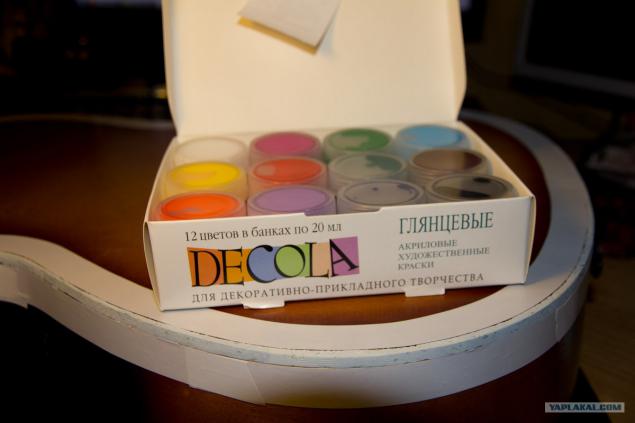
20.
And from the bottom. Everything is neatly and without smudges of glue. They should be wiped immediately after tightening the clamps and other gluing different then going to be fun to cut the solidified drops.
21.
Since strep two pins will prepare the material under the mounting invaded. Cut the plywood exfoliated - into the thick veneer and prepare a piece of beech.
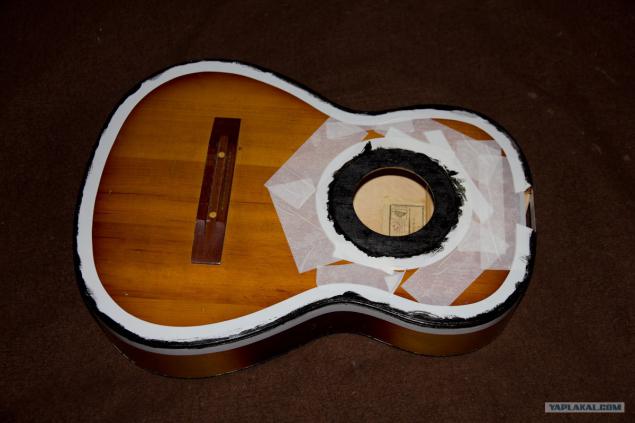
22.
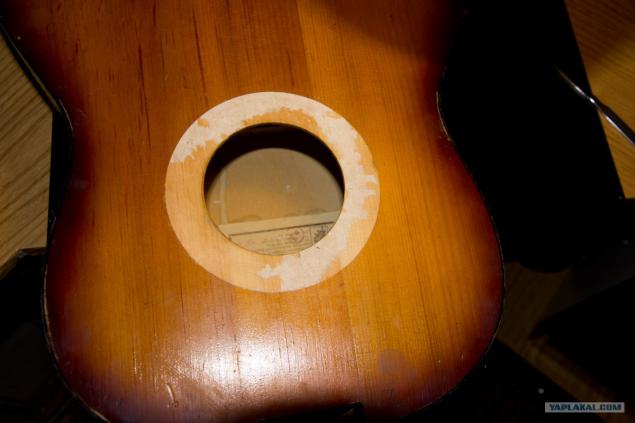
and glue in this case.
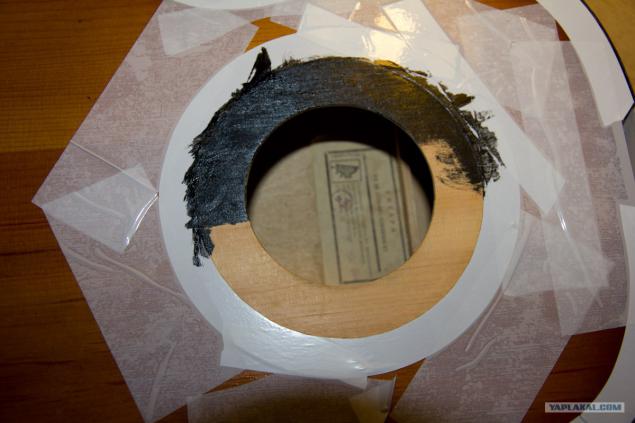
23.
Meanwhile, carefully cut away the excess plug holes and emerging middle.
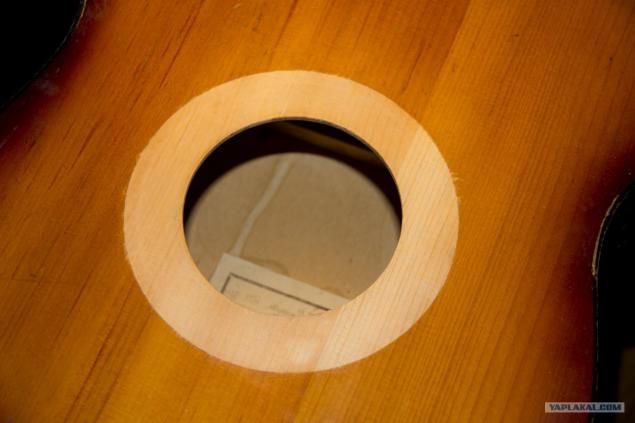
24.
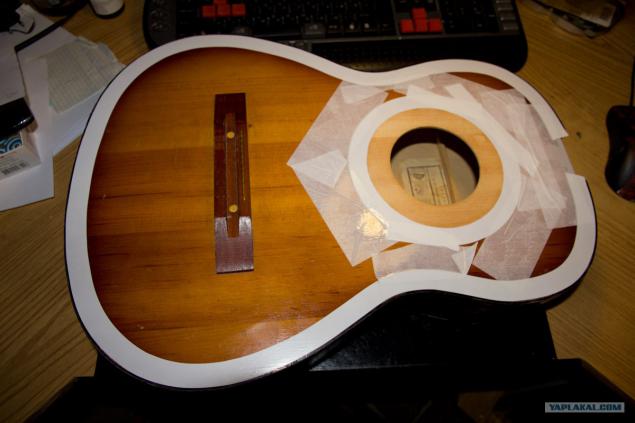
And drill a hole smaller diameter screw.
25.
Glue torn from the back deck spring. And how many of these clamps with long legs do not have at my disposal, I use a flat surface of the table and pressed gluing 3-liter jar. And yes a couple of words about the glue. He just got in the top right frame. Yes, it is red taytbond. There are in brown package specifically for musical instruments, but was only able to buy this, and then only in one store - the city we are relatively large. Why is this glue? .. I explain - there anyhow which glue is not suitable. The structure glue for musical instruments after drying should not be plastic, it can be said with the heavy load he must crumble or burst it has to be hard. Tk plasticity kills all rezonatsiyu housing deck acts as a vibration damper, which is a very bad effect on the sound. Therefore, 95% of joiner favorite PVA adhesives including - in the furnace. Gluing can be: red taytbontom (white bubble red sticker is completely red), but better brown (IMW ideal), some brands of epoxy (not like zaparivatsya - in this case 10 minutes at curing too fast.) Super glue in tubes of 3 gram (not so very surprised that for minor repairs - after drying the consistency right.) And the best option - the glue on the bone meal (but for gourmets. Cooking is simple but long, and kept it on the strength of two well month- and then refrigerator - then in the trash and can not be diluted, as it thickens.)

26.
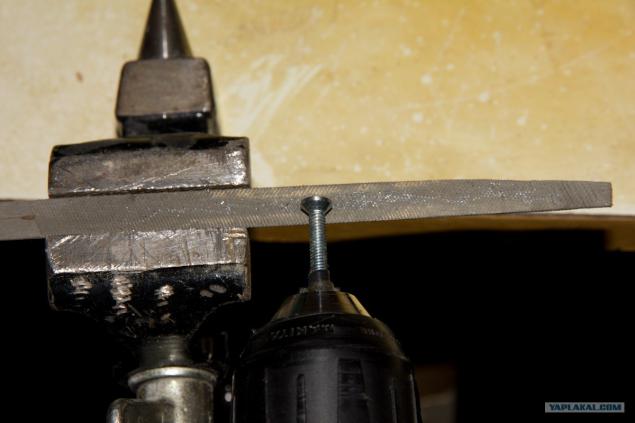
Something we digress. I bought strep pins, but they are complete with screws at the electric guitar solid body, and there is not a ride. Therefore, I will mount screws with nuts and washers, but the screw heads do not pass into the recess in the strep Pina. The solution is simple wrap screw tape so as not to damage the threads. Yes, the little blue was not, not veins Shui)))) is clamped in the chuck screwdriver and grind on file recorded in a vise.
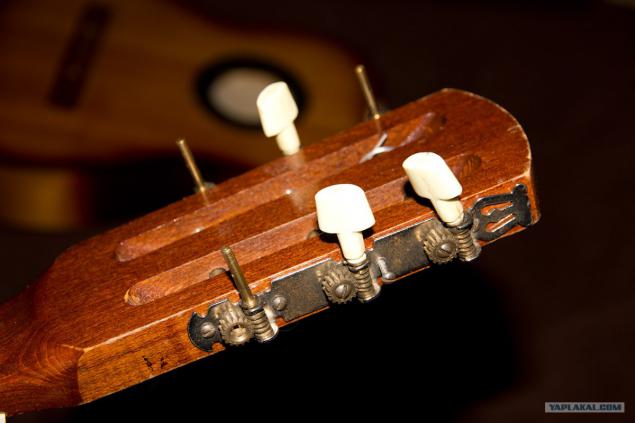
27.
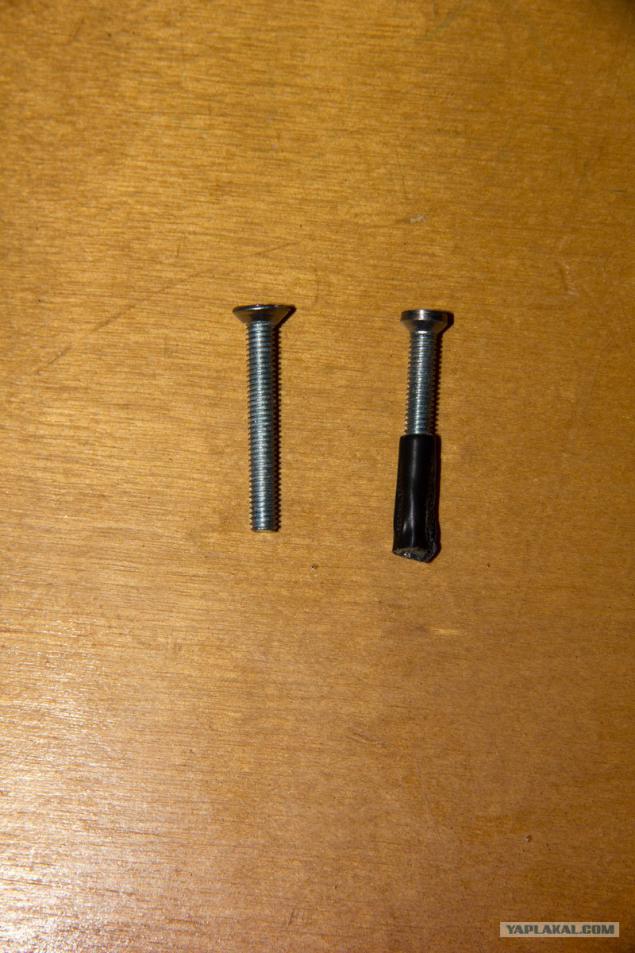
Two screws before and after.
28.
Well, here's one belt holder is in place. Wrapped on the screw and nut through the washer and Grover.
29.
it is on the other side.
30.
Second on the lower klёtse. Beech lining does not need to push Klets, then he does not pine And with the small veins, and it is bad. Guitar for more expensive it is made of solid wood.

31.
It is, from another angle.
32.
Well, everything is fixed and the glue has dried. It remains one of the most important actions - stick back deck. But before that cleans remnants of the old glue - nothing should interfere with the gluing. And yes the photo shows the front deck of the spring - just curious can see what's inside the guitar. But I say, that it is the easiest option classics - Antonio Torres as it does not approve of) - there is a better arrangement of the edges, but significantly increases the cost of the guitar and increases man-hours of production. Speakers on metal strings has a more powerful spring located the letter X for the load on the deck on nylon average 40-50 kg, also on metal and 80 limit. Then the race a little perёd and say that I plan another big post: I'm just in the remaking of classical acoustics another guitar. (For those who do not still do not understand the difference Classical guitar neck a string nylon - metal for her murder because tears deck breaks klёtsy leading arc and screw neck. And the acoustics it is a concert, usually, but not always, a narrow neck and metal strings. Nylon does not pose such because the sound will quiet them deaf, they do not rock the reinforced deck - not enough tension.)
33.
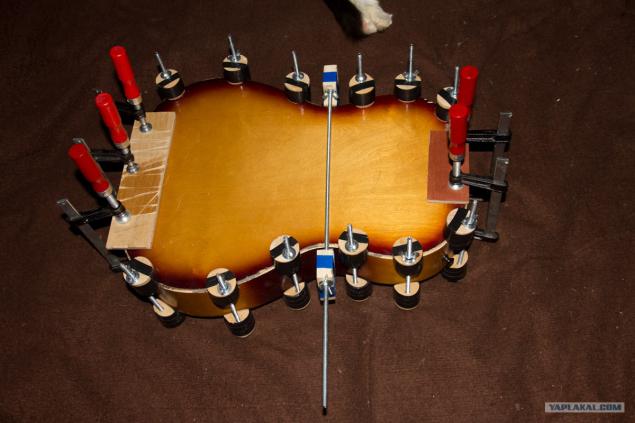
For fixing glue will use clamps, but in order not to promyat thin wood deck and evenly distribute the load will lay a plate of plywood on the one hand pasted cork backing for laminate. They shall enclose in place klёtsev gluing.
34.
On the perimeter will be put here such clips. Made of studs M6 blind nuts and washers sheep. Sami clamps made from chopped and drilled cuttings shovels. The idea is not mine - podglyadel honestly one of the sites on the subject, but slightly improved design - made excavation and pasted cork lining in the recess.
35.
The process of gluing. So I leave for a couple of days to grab stronger.
36.
Remove the clips and clamps. Guitar asks edge.
37.
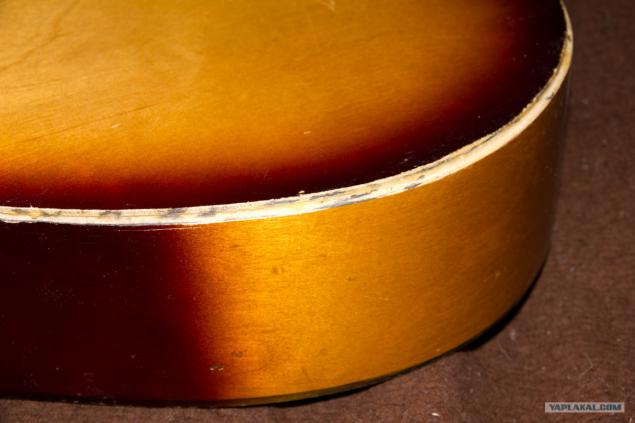
For some reasons, and the lack of available materials I will not do edging of wood and epoxy filled with consistency like plasticine. I paste on a path which will edge protective film and flexible izolenotoy. And yes, again on Feng Shui is not - not blue.
38.
I take a moment epoksilin - price / quality / strength for me. The recesses are filled and forms. I am waiting for curing. 15-20 minutes is already hard, a few hours later as a stone, a file you can remove the excess, the film [ censorship i>] does not give time to scratch the paint.
39.
Grind fine sandpaper and remove the tape. It turns out like this. For those interested: yes firmly, there does not fall off, maintaining a decent shots.
40.
Again the contour paste tape.
41.
Take acrylics universal light and water resistant.
42.
And we put something like this without leaving smudges and marks bristle brush.
43.
It turns out like this.
44.
We are waiting for drying - a couple of hours is enough. And removes the tape. - Result in the photo.
45.
Cracks and peeling edge pour glue.

46.
Like this. Do not forget to remove the excess glue and topped up as a new drying.
47.
Remove and so almost dumps inlay rosette. The paper comes off easily.
48.
Remains of the scraping blade and align fine sandpaper to clean wood.
49.
Pure wood and glued around the outlet edge of the contour sizing tape.
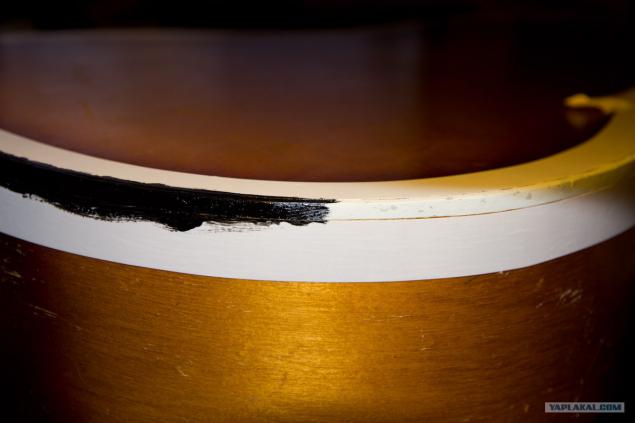
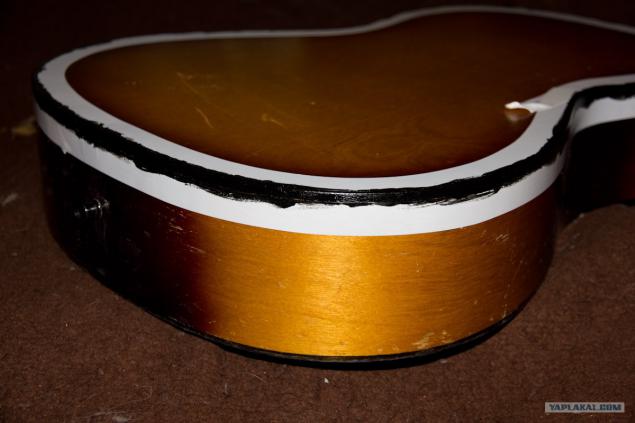
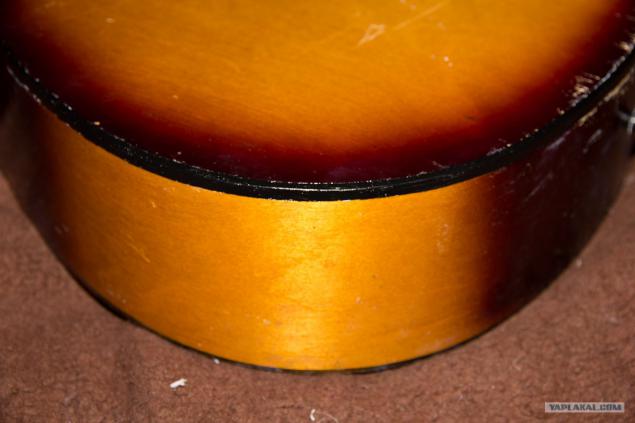
50.
Kant pass medium sandpaper. First remove the old paint bad powers, and secondly creates a matte surface that is best for the new paint hooked.
51.
Apply the paint to the deck.
52.
And on the edge. And while put aside the drum guitar.
53.
And we take over the fretboard. More specifically for the new top nut. I decided not to izgolyatsya and bought a synthetic bone - the best option for small money. Neck Width standard because there were no problems as I had a very old guitar. There is already a vulture than a new classical but noticeably wider than the speaker. And had to be cut from the bone nut, precisely because of the dense part of the horn, and the smell, I can tell you that even if this operation.

54.
Clear the seat of the old adhesive to clean. Apply new. Tsentruem nut. Edges slightly in favor of the neck neck - it's not scary. And press down until the glue dries. Then, a thin needle files eat through the guide groove strings to the desired depth, the main thing is not to overdo it, and that will hurt the open string for the frets and will bounce. Then we have to change the nut again.

55.
Once again I show a dead mechanics.
56.
And on the other hand. Remove it and send in the trash where it is the place.
57.
The new kit. Not advertising). When selecting a new size, it is important to know. The distance between the two extreme stud shafts. A total of 3 types. 60, 70 and 80. The last no longer do, and if you change this, you're out of luck. There are two choices: buy the first mechanic where each peg it separately under the head of classical guitar with slits or score on the glue tubes and solid-wood peresverlit holes. The second option is more time consuming, but not a single mechanic can always be found. I recommend to pay attention to the material shafts - from plastic to refrain. But we were lucky, we have a guitar is not the time of the dinosaurs, and we just went on the size of 70 mm. Peresverlivaem holes for new mechanics and put on the new screws from the kit. Trying not to put, even if they look impressive. Usually they break staying in a tree for the flush and despicable hat falls off.

58.
Set neck in place. With strings wise and decided not to take simple D`addario classic nylon (again not advertising, and personal preferences). Cheaper strings take themselves to the detriment of the same - more on this guitar did not make sense. For those who are not in the subject sinenkaja little trick - a turntable for Strings. It helps rapidly spinning pegs to pull the strings, we can without it but -4y third string you curse everything (seasoned web guitarists does not apply - it is too tough)

59.
Already delivered mechanics. But it's not all. It is necessary to scroll through the idle a few turns to shake off metal dust, cause quite a bit grafitki and scroll through a few revolutions. So it will spin smoothly without failures and jerks and last longer. Of course I can dust and tipped, but all still require lubrication mechanic in this case is far from hi-end.

60.
Cleans dirt from modal pads and polish themselves to a pure brilliance frets and lower brass nut on the bridge - everything should be clean. We start to put strings. The slots on the nut, it is desirable to rub pencil lead fatter. Under the wound strings with a metal can grafitki little, just a little bit. Again, this is not required, but the same nut will last a little longer.
61.
Knit strings. Some think a couple of knots tightened and regulations - but no! It makes a special loop. Hammers made only on the metal strings, and as already wrote here they do not give. Now run across those who will shout and how the Soviet guitar -on which was metal. Yes, standing, but not a good life - becoming, what was in there, but in fact a mockery metal kept only expensive guitar like Leningradka and the like in the other parts vultures or pull up the lower bridge or worse bolt neck broke out Klets with a piece of front deck. Who cares then show how it should be. Many people have noticed that the tips of colored strings is fishechki D`addario. - Not beauty - is marking the thickness of the string, for a quick installation - convenient.
And so again: the string is threaded through the hole bridge
62.
Two: the plant loop.
63.
Three: threaded twice.
64.
And delays.
65.
We stretch it all the strings gradually increasing tension alternately all along the way and do not forget to adjust the screw in the heel of the neck height above the modal overlay. And We build them on the tuner. And give guitar night stand then again We build - you need to take the form of nylon and tension, and he needed a little stretch. That's why you can not put the old string re - operation will crawl and guitar crap. Well, the last shtrishok - to taste bite tails strings).
Posted in [mergetime] 1391893152 [/ mergetime]
Inspiration drew on many resources, but mostly
here:
crashguitars.ru
and then:
mastergitar.com
The authors of all the websites that have helped me with their materials many thanks for the information
poleznuiyu Thank you for your attention, you can still kicking!)

Source:
Will be 65 photos.

2.
This guitar has got to me for free, but it was a few stocks. The first - a peelable edge in several places.

3.
From a different angle.

4.
Killed in the trash Pegs mechanics.

5.
She is.

6.
The bursting of the nut. (Inside was a hollow - to such an economy already cheap plastic still had to guess at the expense of strength.)

7.
And nail numbers. The guitar has fallen from a high cabinet to the lower part of the back deck and then was badly glued do not understand how the first available glue. Clay eventually fell behind. And now we have the missing piece of the rim, and a gaping hole torn average spring rear decks (for those who do not know is such thin reinforcing structure reechki part of pine, where the wood is very thin veins.)

8.
Cut off gently with a scalpel below the remains of the rim and a little - a little tear off along the seam of the rear deck. It was not possible to shoot t. To. To keep the camera and a sharp knife was very uncomfortable. The first thing we see is the mount neck to the drum (body of the guitar.) There he is not glued, and bolchёnoe. Each type of attachment has its supporters, but here we have something that is. And as we see the puck is not very big in size and have decent vmyali tree. It is fraught with rupture klёtsa or as it is called biscuit. Their two. In the upper neck cuts. At the bottom is usually inserted strep-pin for fastening the belt.

9.
Remove the old screw and nut. Yes, and here is useful remains of the beloved childhood constructor. So fasten the plate on the 4 short screw. Trying on new screw and nut elongated, not forgetting to put a lock washer.

10.
glue flakes while removing the deck and clamping piece clamp.

11.
Clean out glue residue from unsuccessful repair. Coat with all the new and Klets kontrobechayku (a narrow strip of wood that runs along the entire seam gluing the deck and shell (end) of the guitar and enhances the design.) And again clamps stifle placing pieces of wood for the uniform distribution of pressure and not to leave dents.

12.
While the glue dries under the clamps we coat all splices for reinsurance. Yes, I almost forgot the glue first available, write about it below.

13.
We take out the old belt holder and put the cap - t. To. For strep pin hole is too large.

14.
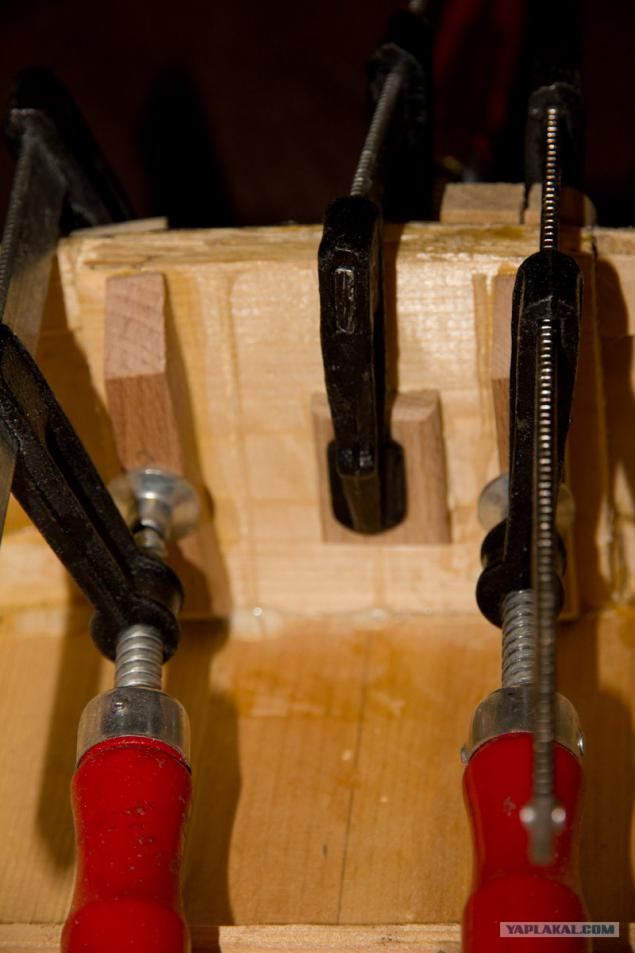
While the glue is still dry (as it should be at least 12 hours, preferably daily) Take a little bit and we shall cut beech amplifiers for klёtsov. They will be glued across the fibers. I would not bother, but this guitar they began to bend and deform - which is not gud.

15.
Guitar undertook not to repair a running and intelligent reading forums and personal websites luthier. And there came across this cunning technique. To. Beech tree tight, then glue it absorbs much worse than the same pine or spruce, and even desensitization large cloth does not give the desired effect, but if you make cuts with a sharp knife in the photo then the problem is solved with a bang.

16.
Sticking amplifiers lower klёtsa.

17.
And the top. Do not forget to enclose a piece of wood - then do not smooth out the dent.

18.
Puts a cap on top of a piece of beech wood, which has been mounting a guitar strap. Why do you need to see below.

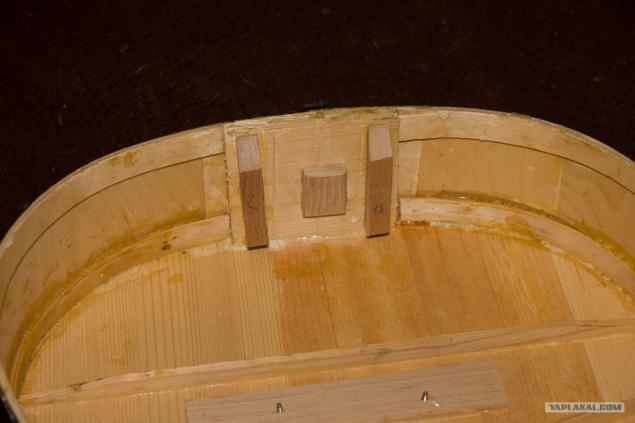
19.
Clay dry - remove the clamp. On top klёtsa (the shot hit the very torn average spring rear deck.)

20.
And from the bottom. Everything is neatly and without smudges of glue. They should be wiped immediately after tightening the clamps and other gluing different then going to be fun to cut the solidified drops.

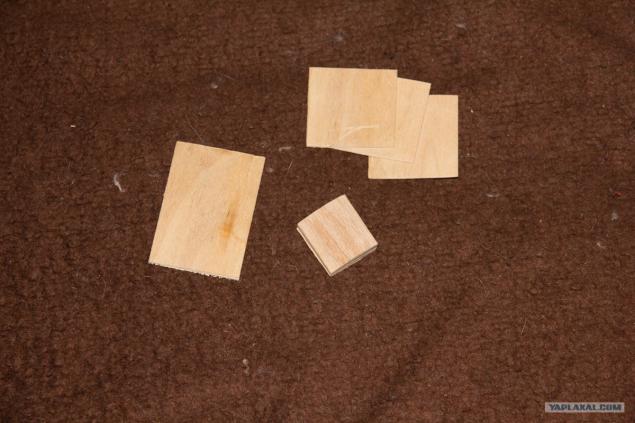
21.
Since strep two pins will prepare the material under the mounting invaded. Cut the plywood exfoliated - into the thick veneer and prepare a piece of beech.

22.
and glue in this case.

23.
Meanwhile, carefully cut away the excess plug holes and emerging middle.

24.
And drill a hole smaller diameter screw.

25.
Glue torn from the back deck spring. And how many of these clamps with long legs do not have at my disposal, I use a flat surface of the table and pressed gluing 3-liter jar. And yes a couple of words about the glue. He just got in the top right frame. Yes, it is red taytbond. There are in brown package specifically for musical instruments, but was only able to buy this, and then only in one store - the city we are relatively large. Why is this glue? .. I explain - there anyhow which glue is not suitable. The structure glue for musical instruments after drying should not be plastic, it can be said with the heavy load he must crumble or burst it has to be hard. Tk plasticity kills all rezonatsiyu housing deck acts as a vibration damper, which is a very bad effect on the sound. Therefore, 95% of joiner favorite PVA adhesives including - in the furnace. Gluing can be: red taytbontom (white bubble red sticker is completely red), but better brown (IMW ideal), some brands of epoxy (not like zaparivatsya - in this case 10 minutes at curing too fast.) Super glue in tubes of 3 gram (not so very surprised that for minor repairs - after drying the consistency right.) And the best option - the glue on the bone meal (but for gourmets. Cooking is simple but long, and kept it on the strength of two well month- and then refrigerator - then in the trash and can not be diluted, as it thickens.)

26.
Something we digress. I bought strep pins, but they are complete with screws at the electric guitar solid body, and there is not a ride. Therefore, I will mount screws with nuts and washers, but the screw heads do not pass into the recess in the strep Pina. The solution is simple wrap screw tape so as not to damage the threads. Yes, the little blue was not, not veins Shui)))) is clamped in the chuck screwdriver and grind on file recorded in a vise.

27.
Two screws before and after.

28.
Well, here's one belt holder is in place. Wrapped on the screw and nut through the washer and Grover.

29.
it is on the other side.

30.
Second on the lower klёtse. Beech lining does not need to push Klets, then he does not pine And with the small veins, and it is bad. Guitar for more expensive it is made of solid wood.

31.
It is, from another angle.

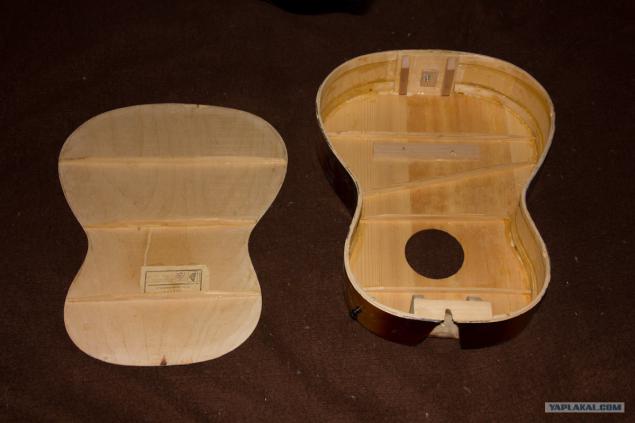
32.
Well, everything is fixed and the glue has dried. It remains one of the most important actions - stick back deck. But before that cleans remnants of the old glue - nothing should interfere with the gluing. And yes the photo shows the front deck of the spring - just curious can see what's inside the guitar. But I say, that it is the easiest option classics - Antonio Torres as it does not approve of) - there is a better arrangement of the edges, but significantly increases the cost of the guitar and increases man-hours of production. Speakers on metal strings has a more powerful spring located the letter X for the load on the deck on nylon average 40-50 kg, also on metal and 80 limit. Then the race a little perёd and say that I plan another big post: I'm just in the remaking of classical acoustics another guitar. (For those who do not still do not understand the difference Classical guitar neck a string nylon - metal for her murder because tears deck breaks klёtsy leading arc and screw neck. And the acoustics it is a concert, usually, but not always, a narrow neck and metal strings. Nylon does not pose such because the sound will quiet them deaf, they do not rock the reinforced deck - not enough tension.)

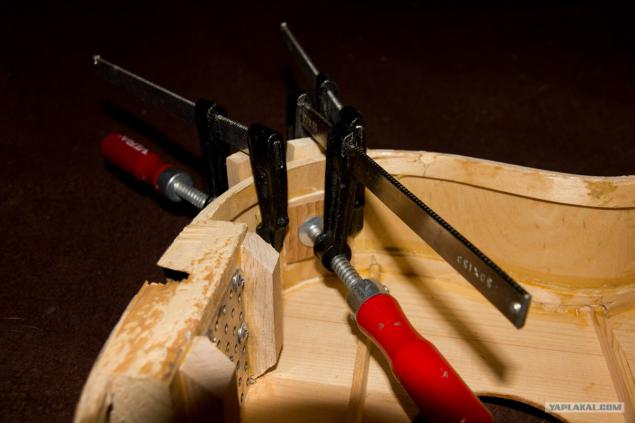
33.
For fixing glue will use clamps, but in order not to promyat thin wood deck and evenly distribute the load will lay a plate of plywood on the one hand pasted cork backing for laminate. They shall enclose in place klёtsev gluing.

34.
On the perimeter will be put here such clips. Made of studs M6 blind nuts and washers sheep. Sami clamps made from chopped and drilled cuttings shovels. The idea is not mine - podglyadel honestly one of the sites on the subject, but slightly improved design - made excavation and pasted cork lining in the recess.

35.
The process of gluing. So I leave for a couple of days to grab stronger.

36.
Remove the clips and clamps. Guitar asks edge.

37.
For some reasons, and the lack of available materials I will not do edging of wood and epoxy filled with consistency like plasticine. I paste on a path which will edge protective film and flexible izolenotoy. And yes, again on Feng Shui is not - not blue.

38.
I take a moment epoksilin - price / quality / strength for me. The recesses are filled and forms. I am waiting for curing. 15-20 minutes is already hard, a few hours later as a stone, a file you can remove the excess, the film [ censorship i>] does not give time to scratch the paint.

39.
Grind fine sandpaper and remove the tape. It turns out like this. For those interested: yes firmly, there does not fall off, maintaining a decent shots.

40.
Again the contour paste tape.

41.
Take acrylics universal light and water resistant.

42.
And we put something like this without leaving smudges and marks bristle brush.

43.
It turns out like this.

44.
We are waiting for drying - a couple of hours is enough. And removes the tape. - Result in the photo.

45.
Cracks and peeling edge pour glue.

46.
Like this. Do not forget to remove the excess glue and topped up as a new drying.

47.
Remove and so almost dumps inlay rosette. The paper comes off easily.

48.
Remains of the scraping blade and align fine sandpaper to clean wood.

49.
Pure wood and glued around the outlet edge of the contour sizing tape.

50.
Kant pass medium sandpaper. First remove the old paint bad powers, and secondly creates a matte surface that is best for the new paint hooked.

51.
Apply the paint to the deck.

52.
And on the edge. And while put aside the drum guitar.

53.
And we take over the fretboard. More specifically for the new top nut. I decided not to izgolyatsya and bought a synthetic bone - the best option for small money. Neck Width standard because there were no problems as I had a very old guitar. There is already a vulture than a new classical but noticeably wider than the speaker. And had to be cut from the bone nut, precisely because of the dense part of the horn, and the smell, I can tell you that even if this operation.

54.
Clear the seat of the old adhesive to clean. Apply new. Tsentruem nut. Edges slightly in favor of the neck neck - it's not scary. And press down until the glue dries. Then, a thin needle files eat through the guide groove strings to the desired depth, the main thing is not to overdo it, and that will hurt the open string for the frets and will bounce. Then we have to change the nut again.

55.
Once again I show a dead mechanics.

56.
And on the other hand. Remove it and send in the trash where it is the place.

57.
The new kit. Not advertising). When selecting a new size, it is important to know. The distance between the two extreme stud shafts. A total of 3 types. 60, 70 and 80. The last no longer do, and if you change this, you're out of luck. There are two choices: buy the first mechanic where each peg it separately under the head of classical guitar with slits or score on the glue tubes and solid-wood peresverlit holes. The second option is more time consuming, but not a single mechanic can always be found. I recommend to pay attention to the material shafts - from plastic to refrain. But we were lucky, we have a guitar is not the time of the dinosaurs, and we just went on the size of 70 mm. Peresverlivaem holes for new mechanics and put on the new screws from the kit. Trying not to put, even if they look impressive. Usually they break staying in a tree for the flush and despicable hat falls off.

58.
Set neck in place. With strings wise and decided not to take simple D`addario classic nylon (again not advertising, and personal preferences). Cheaper strings take themselves to the detriment of the same - more on this guitar did not make sense. For those who are not in the subject sinenkaja little trick - a turntable for Strings. It helps rapidly spinning pegs to pull the strings, we can without it but -4y third string you curse everything (seasoned web guitarists does not apply - it is too tough)

59.
Already delivered mechanics. But it's not all. It is necessary to scroll through the idle a few turns to shake off metal dust, cause quite a bit grafitki and scroll through a few revolutions. So it will spin smoothly without failures and jerks and last longer. Of course I can dust and tipped, but all still require lubrication mechanic in this case is far from hi-end.

60.
Cleans dirt from modal pads and polish themselves to a pure brilliance frets and lower brass nut on the bridge - everything should be clean. We start to put strings. The slots on the nut, it is desirable to rub pencil lead fatter. Under the wound strings with a metal can grafitki little, just a little bit. Again, this is not required, but the same nut will last a little longer.

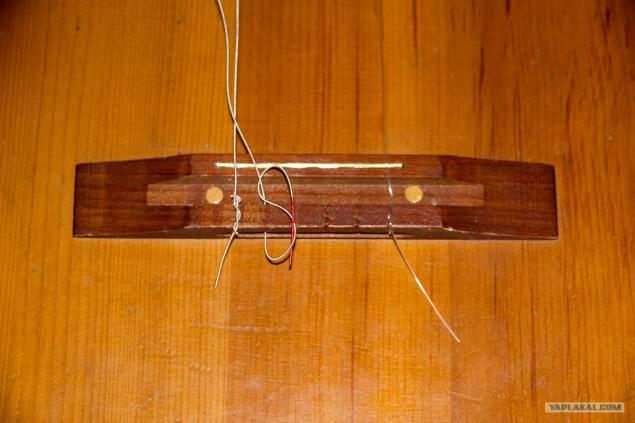
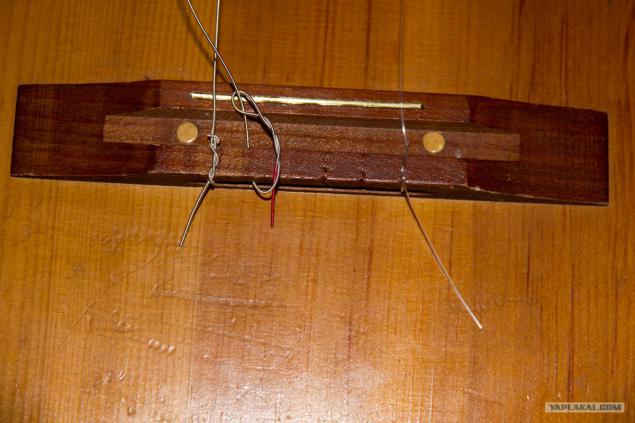
61.
Knit strings. Some think a couple of knots tightened and regulations - but no! It makes a special loop. Hammers made only on the metal strings, and as already wrote here they do not give. Now run across those who will shout and how the Soviet guitar -on which was metal. Yes, standing, but not a good life - becoming, what was in there, but in fact a mockery metal kept only expensive guitar like Leningradka and the like in the other parts vultures or pull up the lower bridge or worse bolt neck broke out Klets with a piece of front deck. Who cares then show how it should be. Many people have noticed that the tips of colored strings is fishechki D`addario. - Not beauty - is marking the thickness of the string, for a quick installation - convenient.
And so again: the string is threaded through the hole bridge

62.
Two: the plant loop.

63.
Three: threaded twice.

64.
And delays.

65.
We stretch it all the strings gradually increasing tension alternately all along the way and do not forget to adjust the screw in the heel of the neck height above the modal overlay. And We build them on the tuner. And give guitar night stand then again We build - you need to take the form of nylon and tension, and he needed a little stretch. That's why you can not put the old string re - operation will crawl and guitar crap. Well, the last shtrishok - to taste bite tails strings).
Posted in [mergetime] 1391893152 [/ mergetime]
Inspiration drew on many resources, but mostly
here:
crashguitars.ru
and then:
mastergitar.com
The authors of all the websites that have helped me with their materials many thanks for the information
poleznuiyu Thank you for your attention, you can still kicking!)

Source:
Tags
See also
5 Best hackers
Walk on the basis of nuclear missiles
How to make the best Cuban cigars
Federal Highway Lena
How to get rid of beer belly
Spaceship inside (31 pics + 1 video)