How shocked the entrance (10 photos)
 Bashny.Net
The average entrance in the Russian building - not the most beautiful place, it's a well-known fact =) And it is good that most of us spends a lot of time =) The one who smokes are more likely to spend time in the stairwell and behold here it is ...

Author: Of course, it would be best to give up smoking, but on this I'm still working =) And while I'm working on it, I'm nothing to prevent the same time decorating the door by the stairs - where one can not see it but the same accident smokers and concierge, which periodically comes to sweep the floor. Correctly it? =)
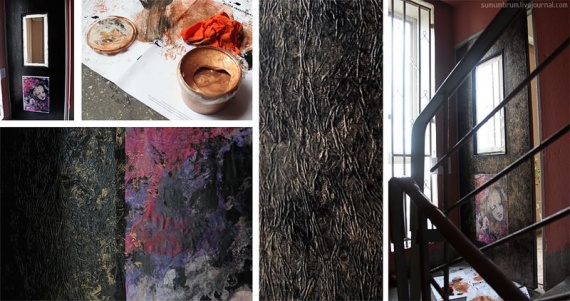
As shown in the first picture, for starters, I cut with a knife drips of paint and other strange bulge in the door. Ideally, then it would be necessary to use sandpaper, but shkurit whole door to a smooth state I simply would not have enough strength or patience. So I decided to go the other way - to do the door is not smooth, but rough and textured =)
The most simple of what came into my head - take the texture wallpaper.
Wide wallpaper for painting, of which there is now a huge range of shops - the best option for the doors. You will have no problems with joints, paint, you can choose any color and not smelly, in general, I advise. I personally suffered from the usual paper roll. Well, it happened =)
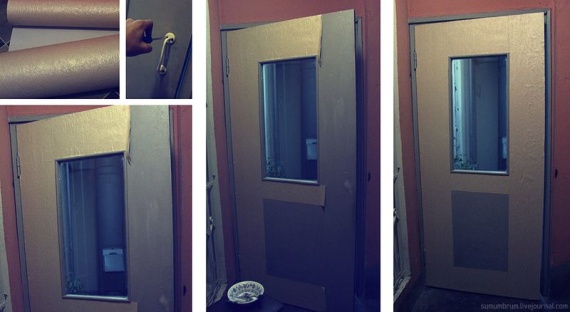
* unscrew the pen, glue
Bubbles at first - this is normal. Then, as the drying of wallpaper, bubbles disappear:
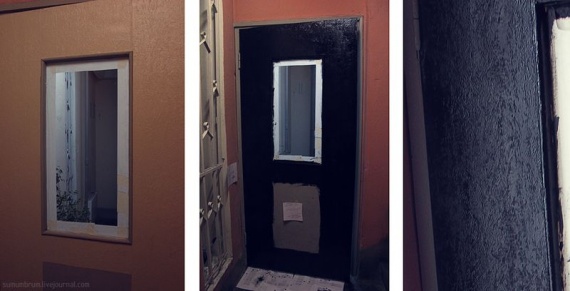
Once the wallpaper dry, all the bubbles are gone, and I was convinced that all adhered tightly, I has stuck masking tape glass and painted all black. In any case, left a note for the neighbors, and she went to engage in chief until the paint dries - Painting for the door!
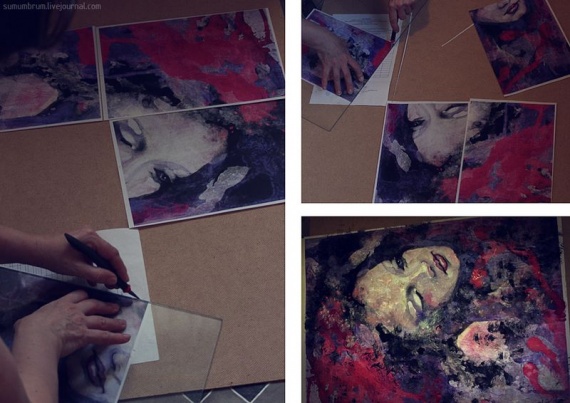
So how did I - never do =)) I printed a picture on your home printer parts - four pieces of A4 =)) But I personally like and then draw on it from above (originally my picture) - a masked seams. Additionally, the picture itself I had a - textured such easy and pleasant to further slap =)
But I would suggest an easier way - to go to the nearest photo and color printing of any book you liked pictures on the A2 format. I have next to the house is placed within 300 rubles. Naturally, it does not print on canvas and prints on plain paper. The picture can then be covered with transparent varnish for wood, pre-glued on thick drawing paper - which I did:
When the paint has dried in the picture, I taped it to the door and proceeded to the next stage - I have decided to emphasize the texture of wallpaper:
For this I needed a damp cloth and a bronze paint. Rag Mnemonic every way to her was a lot of wrinkles, take in a crumpled cloth in the form of a hand and gently smear paint (not a lot), and then light patting movements around the door. It turns out, as in the photo above. I deliberately slightly & quot; I climbed & quot; the picture. I have it then a little further elaborated colors and lachila again.
While this dries, you can do other important decorative element - picture frame needed! For the door to the staircase, I bought a cheap foam moldings:
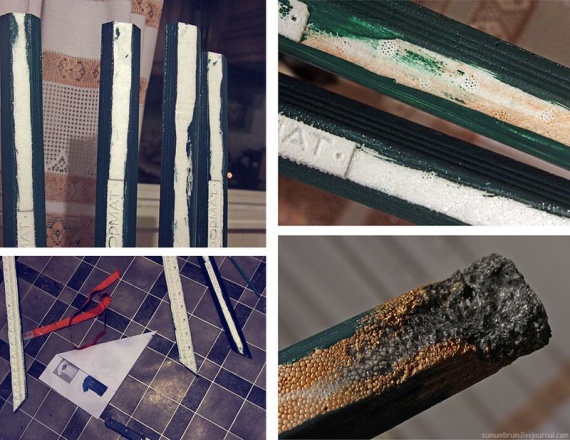
On the reverse side, I painted the edge of the plinth in advance because when the & quot; molding & quot; It will be glued to the surface, Podlazov side brush and paint over these areas is clearly not very comfortable.
The biggest confusion here - this is what you need to cut the edges of each element of our & quot; frame & quot; exactly 45 degrees. If there is a special corner of the house, can be folded piece of paper as shown in the photo above - here the desired angle. Try as closely as possible to respect it, otherwise, when you stick your frame, the corners (in the joints) will be a huge gap.
I want to warn, when suddenly someone does not know - the material (such as foam or polyurethane foam) does not maintain any inks and adhesives - only water-based paint (acrylic), and a special adhesive (similar to a thick white filler). In the fourth photograph shows how paint from a container corroded plinth - left & quot; char & quot; Area =)) So, foam plinus become a frame for the picture:
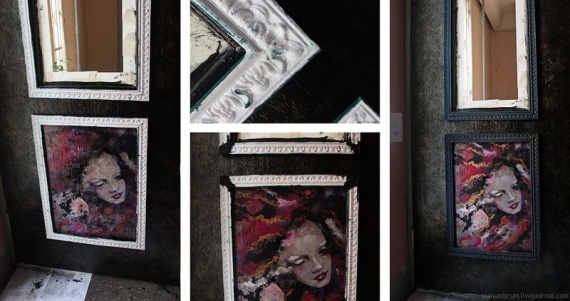
Cracks in the corners I has covered the same special adhesive that sticks to the frame. Then I paint over dark paint the corners separately - thin brush. And then, a dark color painted over the rest.
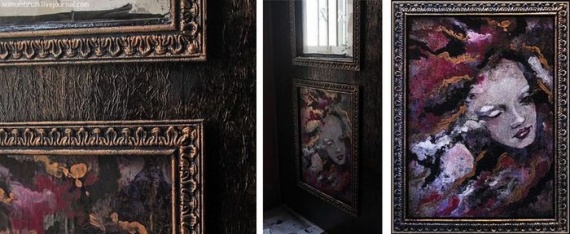
The final stage - gild frame. I did it as well with a damp cloth and mint bronze acrylic paint:

In the picture, I also added a bit of gold, something to correct it, and once again Polace. The same paint I covered and frames (the varnish is not corroded by the foam). Voila:
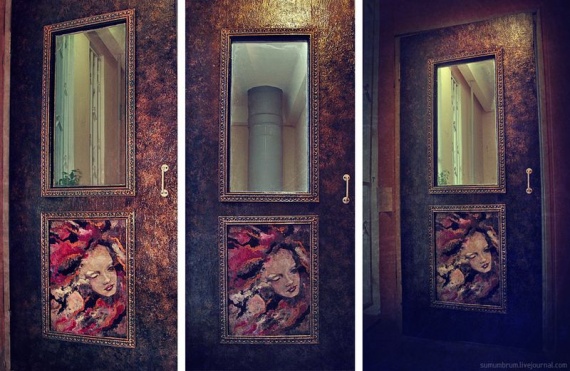
Here's now my door (with a view of the garbage disposal) =)
Source: master-klass.livejournal.com


Author: Of course, it would be best to give up smoking, but on this I'm still working =) And while I'm working on it, I'm nothing to prevent the same time decorating the door by the stairs - where one can not see it but the same accident smokers and concierge, which periodically comes to sweep the floor. Correctly it? =)
As shown in the first picture, for starters, I cut with a knife drips of paint and other strange bulge in the door. Ideally, then it would be necessary to use sandpaper, but shkurit whole door to a smooth state I simply would not have enough strength or patience. So I decided to go the other way - to do the door is not smooth, but rough and textured =)
The most simple of what came into my head - take the texture wallpaper.
Wide wallpaper for painting, of which there is now a huge range of shops - the best option for the doors. You will have no problems with joints, paint, you can choose any color and not smelly, in general, I advise. I personally suffered from the usual paper roll. Well, it happened =)

* unscrew the pen, glue
Bubbles at first - this is normal. Then, as the drying of wallpaper, bubbles disappear:

Once the wallpaper dry, all the bubbles are gone, and I was convinced that all adhered tightly, I has stuck masking tape glass and painted all black. In any case, left a note for the neighbors, and she went to engage in chief until the paint dries - Painting for the door!
So how did I - never do =)) I printed a picture on your home printer parts - four pieces of A4 =)) But I personally like and then draw on it from above (originally my picture) - a masked seams. Additionally, the picture itself I had a - textured such easy and pleasant to further slap =)
But I would suggest an easier way - to go to the nearest photo and color printing of any book you liked pictures on the A2 format. I have next to the house is placed within 300 rubles. Naturally, it does not print on canvas and prints on plain paper. The picture can then be covered with transparent varnish for wood, pre-glued on thick drawing paper - which I did:

When the paint has dried in the picture, I taped it to the door and proceeded to the next stage - I have decided to emphasize the texture of wallpaper:

For this I needed a damp cloth and a bronze paint. Rag Mnemonic every way to her was a lot of wrinkles, take in a crumpled cloth in the form of a hand and gently smear paint (not a lot), and then light patting movements around the door. It turns out, as in the photo above. I deliberately slightly & quot; I climbed & quot; the picture. I have it then a little further elaborated colors and lachila again.
While this dries, you can do other important decorative element - picture frame needed! For the door to the staircase, I bought a cheap foam moldings:

On the reverse side, I painted the edge of the plinth in advance because when the & quot; molding & quot; It will be glued to the surface, Podlazov side brush and paint over these areas is clearly not very comfortable.
The biggest confusion here - this is what you need to cut the edges of each element of our & quot; frame & quot; exactly 45 degrees. If there is a special corner of the house, can be folded piece of paper as shown in the photo above - here the desired angle. Try as closely as possible to respect it, otherwise, when you stick your frame, the corners (in the joints) will be a huge gap.
I want to warn, when suddenly someone does not know - the material (such as foam or polyurethane foam) does not maintain any inks and adhesives - only water-based paint (acrylic), and a special adhesive (similar to a thick white filler). In the fourth photograph shows how paint from a container corroded plinth - left & quot; char & quot; Area =)) So, foam plinus become a frame for the picture:

Cracks in the corners I has covered the same special adhesive that sticks to the frame. Then I paint over dark paint the corners separately - thin brush. And then, a dark color painted over the rest.
The final stage - gild frame. I did it as well with a damp cloth and mint bronze acrylic paint:

In the picture, I also added a bit of gold, something to correct it, and once again Polace. The same paint I covered and frames (the varnish is not corroded by the foam). Voila:

Here's now my door (with a view of the garbage disposal) =)
Source: master-klass.livejournal.com
Tags
See also
How We Troll Moscow City Duma (39 pics + 1 video)
The house of your dreams - "not like everyone else"
It becomes immediately clear in which country it was made photo;)
Video shocking the entire internet !!!
Energy-efficient house in Minsk
How to escape from the trap of news and stop worrying about what does not concern us
Office Vkontakte (43 photos)
Cruel experiments in the history of psychology (7 photos)
"I am a happy man. I have an older brother"