The windmill with their hands or how to get the light with the wind
 Bashny.Net
The principle of operation of wind turbinesPrinciple of operation in all versions of wind turbines are the same. In the process of rotation of the blades formed by three physical effects: lifting, impulsive and inhibitory forces. The resulting impact of these forces the stator moving and rotor stationary part of the generator starts to generate a magnetic field and electric current moving through the wires.
Embodiments of wind turbines a large number, they differ not only power, but also its appearance. The structure of most wind turbines include: generator, blades, inverter, multiplier. The inverter is used to convert the resulting charge in DC. The multiplier is a gear box, which is designed to increase the number of revolutions of the shaft. Install reducers not all of the wind turbines, mostly only large and powerful wind.

Three-phase alternating current is formed due to the rotation of the rotor. The received energy is routed through the controller to the battery. Further, the inverter converts the current and makes it stable, in this form it can serve to power household appliances or lighting.
How to make a vertical wind turbine typeto Produce wind turbine can independently at home. First you need to determine the type of wind turbine. Depending on their design of wind turbines are:
Assemble the rotorto assemble the rotor, please purchase the:
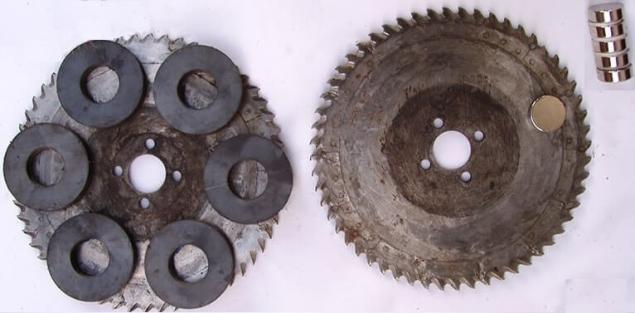
Instead of metal disks, you can use saw blades of the correct size. On one disc are placed 6 neodymium magnets, alternating their polarity, the angle between them must be 60 degrees for a diameter of 165 mm.
On the second disk on the same principle a ferrite ring magnets.
So the magnets are not moved during operation of the wind turbines, they need at least half pour the epoxy.
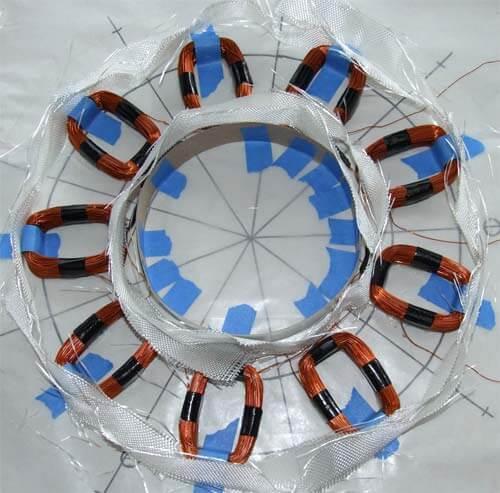
We make the stator, you must First wind the 9 coils of 60 turns, this is done using enameled copper wire of 1 mm diameter.
Next, solder the coil between the first coil end of the fourth, the fourth with the seventh. The second phase is similarly connected through two coils, solder only start with the second coil. Connecting the third phase begins with the third coil.
Plywood is made form, it is placed parchment paper on top of which lay a piece of fiberglass and coil.

All this is filled with epoxy resin. After 24 hours from the mold is removed the finished stator.
The Assembly of the generator, All generator parts ready, it remains only to collect.
The generator will be attached to the bracket with the hub using the studs. Detailed look at the build process.
Stages of Assembly of the generator:
The order of mounting of all parts more details are presented in the diagram below:

1 — coupling; 2 — a support of the blades; 3 — upper rotor; 4 — magnet; 5 — bushing; 6 — stator; 7 — the lower part of the rotor; 8 — nut; 9 — stud; 10 — hub; 11 — axis; 12 — bracket for fixing the stator
Make the bladesthe Blades can be manufactured from wood, fiberglass and other materials. Faster and easier this part of the wind turbine to the interior of sewer PVC pipe. It is better to use tube orange as they have good density and not afraid of direct sunlight.
For the vertical wind turbine you will need 4 blades out of PVC pipe and 2 orthogonal (curved) blades of galvanized sheet. This design allows to rotate the wind turbine even in low wind speeds of 2-3 m per second. Take foot segments of PVC pipe and cut them lengthwise into 2 equal parts. Tin cut out circles the size of future blades and fasten them with bolts at the edges of the pipe.
To produce orthogonal blades, you will need a standard galvanized sheet steel with a thickness of 0.75 mm. First metal shears cut two segments of size 1x0,4 m, and four segments in the form of droplets. Then cuts the steel to bend and the edges to attach segments "drop."
Attach the blades in a circle on the frame, it can be welded from square profile tube 20x20 and 25x25. Frame dimensions and spacing of the blades can be seen in the diagram below:
The Assembly design of the wind turbineFrom the water pipes of different diameters welded mast, its height depends on terrain, where will be located the wind turbine, and the conditions of its operation, but in any case it should be above the roof of the house.
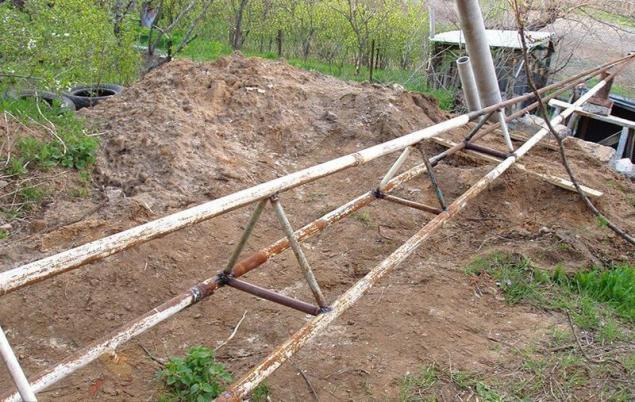
In advance, under the sectional mast need to prepare a three-point reinforced Foundation. To ready the mast on the ground is screwed onto the generator. Further, the generator is attached by bolts to the frame with blades. The mast with the windmill attached to the Foundation by means of two hinged supports and through winch is raised to a vertical position. After lifting the mast the third pillar with the bolt screwed to the base of the windmill. Additionally, the mast should be fixed with stretching.
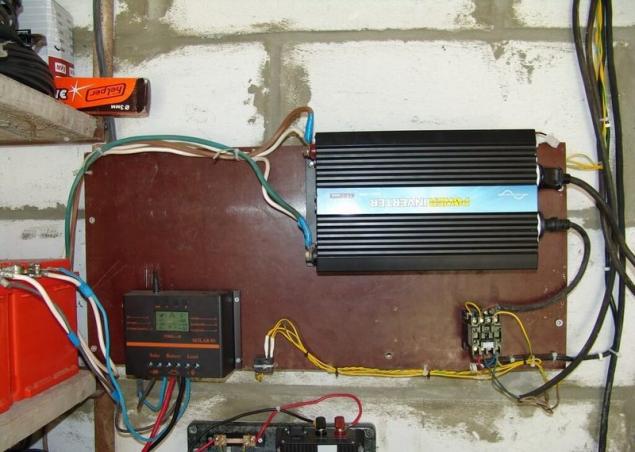
The electrical partof the wind Turbine will produce 3-phase alternating current. By using bridge rectifier consisting of 6 diodes, to convert it to DC.
This gives you the ability to charge the battery at 12 V To control battery charging and preventing overcharge using standard relay vehicle charging PP-380.
To the battery connect the inverter, which allows you to convert 12 V DC To 220 V AC, 50 Hz.
The result of the wind turbine: calculation of the efficiencytests of the wind turbine at different wind speeds showed the following results:
P. S. And remember, only by changing their consumption — together we change the world! ©
Source: www.rmnt.ru/story/electrical/937236.htm
Embodiments of wind turbines a large number, they differ not only power, but also its appearance. The structure of most wind turbines include: generator, blades, inverter, multiplier. The inverter is used to convert the resulting charge in DC. The multiplier is a gear box, which is designed to increase the number of revolutions of the shaft. Install reducers not all of the wind turbines, mostly only large and powerful wind.

Three-phase alternating current is formed due to the rotation of the rotor. The received energy is routed through the controller to the battery. Further, the inverter converts the current and makes it stable, in this form it can serve to power household appliances or lighting.
How to make a vertical wind turbine typeto Produce wind turbine can independently at home. First you need to determine the type of wind turbine. Depending on their design of wind turbines are:
- with a vertical axis of rotation: a Darrieus rotor, savonius wind turbine;
- with a horizontal axis of rotation parallel or perpendicular to the flow of the wind.
Assemble the rotorto assemble the rotor, please purchase the:
- 6 neodymium magnets D30хH10 mm;
- 6, a ferrite ring magnets D72xd32xh15 mm;
- 2 metal disc D230хH5 mm;
- epoxy or glue.

Instead of metal disks, you can use saw blades of the correct size. On one disc are placed 6 neodymium magnets, alternating their polarity, the angle between them must be 60 degrees for a diameter of 165 mm.

On the second disk on the same principle a ferrite ring magnets.

So the magnets are not moved during operation of the wind turbines, they need at least half pour the epoxy.
We make the stator, you must First wind the 9 coils of 60 turns, this is done using enameled copper wire of 1 mm diameter.
Next, solder the coil between the first coil end of the fourth, the fourth with the seventh. The second phase is similarly connected through two coils, solder only start with the second coil. Connecting the third phase begins with the third coil.

Plywood is made form, it is placed parchment paper on top of which lay a piece of fiberglass and coil.

All this is filled with epoxy resin. After 24 hours from the mold is removed the finished stator.

The Assembly of the generator, All generator parts ready, it remains only to collect.
The generator will be attached to the bracket with the hub using the studs. Detailed look at the build process.
Stages of Assembly of the generator:
- in the upper rotor is done 4 holes threaded for studs. They are necessary to ensure that the rotor gently "sat down" on its seat;
- in the stator is done 4 holes for the mounting bracket;
- on fit bottom bracket rotor magnets up, it also drilled 4 holes to screw in to the studs;
- on the bottom put the rotor stator;
- placed on top of the second rotor magnets down. All of this is fixed between itself and the bracket to the hub by studs and nuts.
The order of mounting of all parts more details are presented in the diagram below:

1 — coupling; 2 — a support of the blades; 3 — upper rotor; 4 — magnet; 5 — bushing; 6 — stator; 7 — the lower part of the rotor; 8 — nut; 9 — stud; 10 — hub; 11 — axis; 12 — bracket for fixing the stator
Make the bladesthe Blades can be manufactured from wood, fiberglass and other materials. Faster and easier this part of the wind turbine to the interior of sewer PVC pipe. It is better to use tube orange as they have good density and not afraid of direct sunlight.
For the vertical wind turbine you will need 4 blades out of PVC pipe and 2 orthogonal (curved) blades of galvanized sheet. This design allows to rotate the wind turbine even in low wind speeds of 2-3 m per second. Take foot segments of PVC pipe and cut them lengthwise into 2 equal parts. Tin cut out circles the size of future blades and fasten them with bolts at the edges of the pipe.
To produce orthogonal blades, you will need a standard galvanized sheet steel with a thickness of 0.75 mm. First metal shears cut two segments of size 1x0,4 m, and four segments in the form of droplets. Then cuts the steel to bend and the edges to attach segments "drop."
Attach the blades in a circle on the frame, it can be welded from square profile tube 20x20 and 25x25. Frame dimensions and spacing of the blades can be seen in the diagram below:

The Assembly design of the wind turbineFrom the water pipes of different diameters welded mast, its height depends on terrain, where will be located the wind turbine, and the conditions of its operation, but in any case it should be above the roof of the house.

In advance, under the sectional mast need to prepare a three-point reinforced Foundation. To ready the mast on the ground is screwed onto the generator. Further, the generator is attached by bolts to the frame with blades. The mast with the windmill attached to the Foundation by means of two hinged supports and through winch is raised to a vertical position. After lifting the mast the third pillar with the bolt screwed to the base of the windmill. Additionally, the mast should be fixed with stretching.
The electrical partof the wind Turbine will produce 3-phase alternating current. By using bridge rectifier consisting of 6 diodes, to convert it to DC.

This gives you the ability to charge the battery at 12 V To control battery charging and preventing overcharge using standard relay vehicle charging PP-380.
To the battery connect the inverter, which allows you to convert 12 V DC To 220 V AC, 50 Hz.

The result of the wind turbine: calculation of the efficiencytests of the wind turbine at different wind speeds showed the following results:
- at a wind speed of 5 m/s get 60 rpm — 7 and 2.3 A = 16 W;
- at a wind speed of 10.6 m/s we get about 120 rpm — 13 and 3.4 A = 44 W;
- at a speed of 15.3 m/s to approximately 180 rpm In 15 and 5.1 A = 76.5 W;
- at a wind speed of 18 m/s we get 240 rpm, 18 & 9 = 162 watts.
P. S. And remember, only by changing their consumption — together we change the world! ©
Source: www.rmnt.ru/story/electrical/937236.htm
Tags
See also
Heat pumps for heating houses with their own hands
Utilities for Manhattan or live in America
Freedom Atlanta or how the babies neck fold
Professional smoker with their hands
10 rules that will save the life of a motorcyclist
The future is here to eat or how we perceive progress: for the 5th anniversary of the pessimistic post
The dangerous depression, or How to get rid of the nagging
First, live as it will. Then as you want
4R, or How to live without harming Nature
Caviar urchin with aspirin, or as treated in Japan