The original edible gifts with your own hands
 Bashny.Net
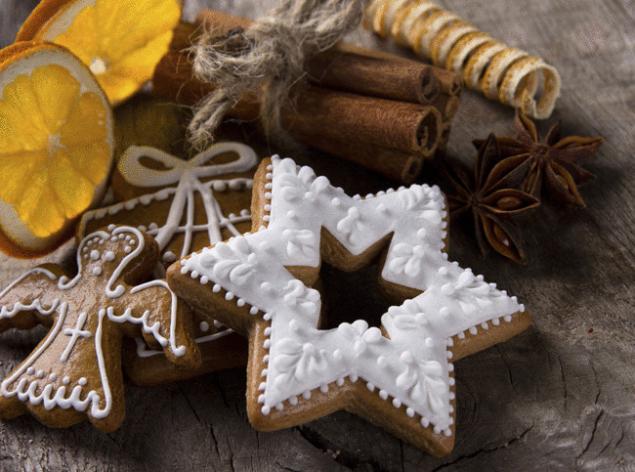
Edible gifts. Photo: thinkstockphotos.com
The new year is not far off. What to give? Give edible gifts in edible packaging. This is an original, outside the box, and most importantly delicious.
In design there is a direction – food-design (food style). It relates and carving (carved vegetables), and cooking gifts. But if the carving is suitable only for vegetables, culinary gifts everyone can do with minimal costs and of the products available!
As the gifts and packing them can be made of dough, fresh and dried vegetables and fruits, herbs, nuts and seafood, cheese, baked bread and even sugar.
In the New year, edible gifts will be out of competition, as the hostess of the coming year – the Sheep loves handwork and home cooking.
1. Openwork bowl with colored noodles
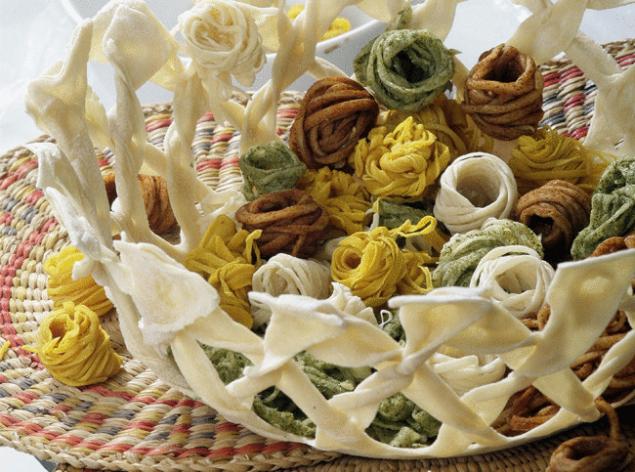
Bowl with colored noodles. Photo: Olga Voronova
The dough is an ideal material to create a delicious packaging for your gifts. To do the packaging test is easy, on the contrary, very exciting. Here, as well as cooking traditional recipes, practically does not need any special equipment. Enough to have some suitable molds, foil, cutting Board and rolling pin, 1-2 shaped knife, a culinary brush and a cheese grater. Of course, great if you have some special tools for carving test, "knives and decorators", culinary syringes and devices for making noodles. But you can successfully do without them.
RECIPE OPENWORK VASE OF NOODLES
What you need:
1 tbsp. flour
1 egg
1/4 Cup water
bowl
foil
large plate
How to cook openwork vase of noodles:
1. From flour, eggs and water zamesit dough, roll it into a thin layer and put it on a plate.
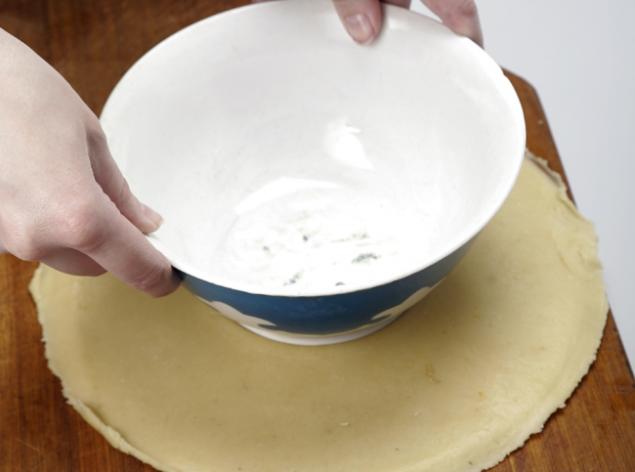
Roll out the dough and put it on a plate. Photo: Olga Voronova
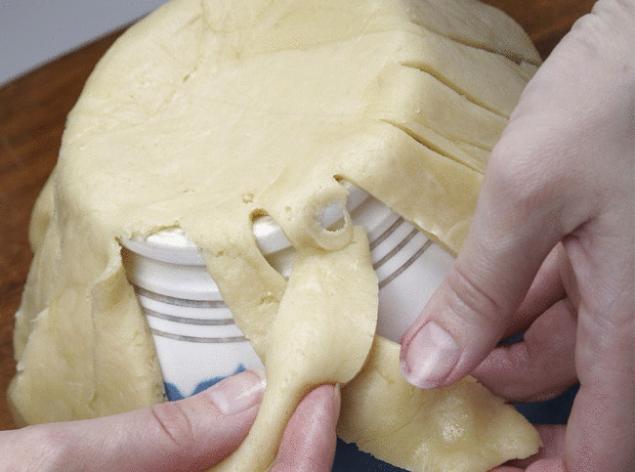
2. Cut a circle in the form of plates. Put on this round bowl.
3. Carefully use sharp knife to cut remaining dough into strips 1-2 cm wide
4. Flip the bowl and put the dough cut into strips.
5. Consistently take two strips, twist them and pin the cross on the walls of the bowl.
6. Dry "vase" in the oven.
Cut the dough into strips and twist together. Photo: Olga Voronova
7. A bowl you can make color, e.g., pink. To do this, tint the dough with carrot juice.
RECIPE FOR HOMEMADE COLORED NOODLES
What you need:
2 tbsp. flour
2 eggs
1/2 Cup water
turmeric
spicy dried herbs
paprika
How to make homemade colored noodles:
1. Of flour, eggs and water zamesit dough. Divide it into 4 equal parts. The first part of the test will not stain and the rest painted. To obtain the yellow, use turmeric, green dried, shredded greens, red – paprika.
2. Each piece of dough roll out into a thin layer, sprinkle with flour and cut into strands of thin noodles using a special "wheel".
3. Take 3-4 strands of noodles and roll them into a ball.
4. To fill the "glomeruli" noodles laced "vase".
Knitted handbag cheese with homemade potato biscuits
Cheese is the best material to create a fashionable gift wrapping, and of course the gifts! When working with cheese requires a minimum of tools. As a rule, is ordinary table knives of different sizes, shaped molds to cut, foil, food foil, wooden skewers. Melt cheese in the oven, and ovens. That's all! You may need knitting needles or hook.
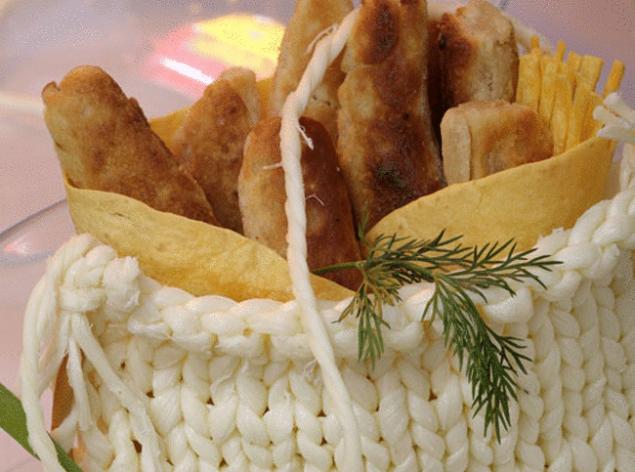
Cheese bag of homemade potato biscuits
RECIPE, BAGS OF CHEESE
What you need:
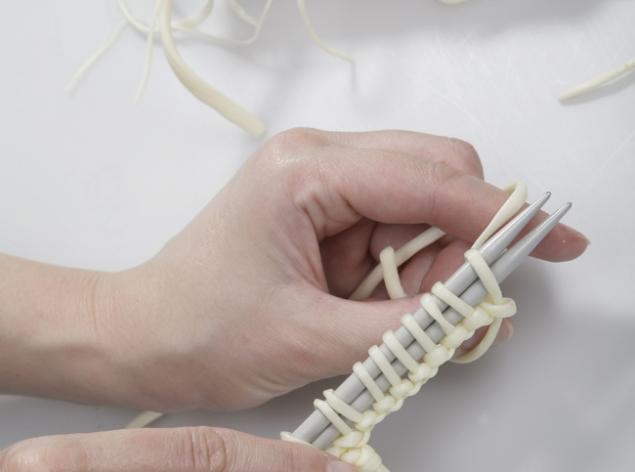
2-3 packages of cheese "Chechil"
knitting needles No. 6, 7 or 8
How to make a handbag out of cheese:
1. Dial on the spokes of the desired number of loops of cheese, based on the desired size of the purse.
Cheese "Chechil" tie the vase. Photo: Olga Voronova
2. Knit cloth handbag front stitch, alternating front and purl rows.
3. Bonding the side seams of the pouches of cheese threads, and handle the twist of the two strands of cheese in the form of a cord.
4. To attach the handle to the purse with knots, the ends of the cheese strands fluff up to make "brushes".
You can associate a handbag with a more complex pattern and ornament using cheese "Chechil" two colors: plain white and smoked. The larger the needles, the more expressive will the texture of the knitting.
RECIPE for HOMEMADE POTATO BISCUITS What you need:
150 g flour
200 g mashed potatoes
100 g grated cheese
50 g of grated carrots
2 eggs
1 tsp. salt
corn flakes for breading
vegetable oil – for frying
How to cook homemade potato cookies:
1. Fold mashed potatoes, cheese and carrots in a bowl and season with salt. Enter one egg, add flour. Mix well and knead the dough.
2. Divide the mass into small pieces and form flat wedges.
3. Corn flakes lightly, chop, the breading should not be too small.
4. Each block dipped in beaten egg and roll in cornmeal breading.
5. Fry the potato sticks in vegetable oil.
Painted tray of dough with chocolate dishes Baked from dough set – a great Christmas gift! Here elegant Cup, tiny spoon and tray luxurious, painted with chocolate. All together it is incredibly delicious, "designer" cakes. This "service" will be a festive table decoration and a gift that will make a splash.

Baked from dough set
RECIPE PAINTED TRAY
What you need:
200 g flour
50 g of sour cream 20% fat
100 g sugar
50 g margarine
1/4 tsp.
1/2 bar of dark chocolate
a ceramic or metal tray
foil
special stencil "handy Art"
sponge
honey
How to make painted tray:
1. In the flour put the sugar, soda, margarine and sour cream. Knead the dough. Roll it into a ball and place in the fridge for 20 minutes.
2. Roll the dough into a thin layer.
3. Wrap the tray with foil and stick it outside test. Bake for 15-20 minutes at 200°C. allow to cool to room temperature and separate the "tray".

For the chocolate tray need a special stencil. Photo: Olga Voronova
4. Cut from stencil square frame, the bounding pattern.
5. Grease the reverse side of the stencil honey. Put the stencil on the tray, coated side down and lightly press.
6. Moisten the sponge with the chocolate gently and lightly "fill" the chocolate into the holes of the stencil.
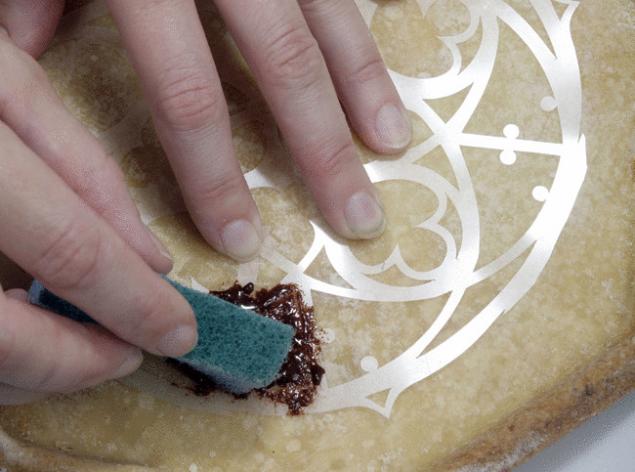
Moisten the sponge in the chocolate and put it on the dough. Photo: Olga Voronova
7. To put a painted "tray" for 10 minutes in the refrigerator.
RECIPE FOR CHOCOLATE CUPS AND SPOONS
What you need:
150 g flour
40 g sour cream 20% fat
80 g sugar
40 g margarine
soda – at the tip of a knife
1/2 bar of dark chocolate
small ceramic bowl
coffee spoon
foil
vegetable oil
How to make chocolate Cup and spoon:
1. From flour, sugar, margarine, sour cream and soda knead the dough. Cooling and roll out into a thin layer.
2. Take a small ceramic or glass bowl, wrap it with foil and lightly grease with vegetable oil.
3. Prepared a bowl to stick round the outside of the dough. Mold the dough a little "pen" next to a "Cup" and attach it to the side of the bowl.
4. Place "Cup" in a preheated 200°C oven for 20 minutes.
5. A spoon bake on the same technology.
6. Gently with a brush to cover the external part of the "cups" with chocolate, you do the same thing with a spoon. Put a Cup and spoon for 10 minutes in the refrigerator.
7. On a painted tray to put the "Cup" chocolate and fill it with any cream, decorate the top "cap" of the marshmallow. A spoon to put on the tray.
Source: domashniy.ru/
Tags
See also
How to celebrate New Year and stay healthy
Preparing for the New Year and Christmas
New Year: the most interesting facts
Festive Christmas tree
Happy New Year and Merry Christmas!
13 ways to make Christmas toys with their hands
iPad with their own hands for $ 125
The best New Year's ball with their hands
iPad with their own hands