Antique furniture - antique painting with their hands
 Bashny.Net
How to make stylish antique furniture with their hands out sturdy and practical, but hopelessly outdated, outmoded piece of furniture? See photos and read step-by-step description of the painting of antique furniture that is made for readers Arina, Dubious. Arina found the use of their creative abilities, creating from scratch the company is upcycling — the art restoration of old things, including furniture. As for the antique furniture with their hands, I want to emphasize that we are not talking about some beautiful oak buffet Victorian or valuable the polished table in the style of art Deco. If you are lucky enough to own such things, you should not even try to turn this expensive antique furniture in home-grown, shabby chic. Their restoration, if necessary, is left to professionals. Here we are talking about old-fashioned furniture of mass production of 50-80s years of the last century, many of which are still gathering dust in the cottages, attics or garages: scary, but still pretty strong, inherited from parents and grandparents, like throw a pity, and kept at it a lot... Simple furniture made from cheap pine or even particleboard and veneer. With this furniture and you can experiment in creative impulse, to spoil it is not a pity, and with some share of luck it is possible to achieve interesting results.
Step 1. Preparing for the aging of furniture (painted antique) pull handle furniture and other fittings. If the furniture is polished, remove the polishing with a special compound from the hardware store, observing all the safety rules and the instructions on the package. If the furniture is painted, the old paint should be processed until smooth with sandpaper (unless it contradicts your main idea, see the effects of painting antique below). If the furniture was not painted, it is necessary to remove fine sandpaper the top layer of dirt, grease, and everything else that over the years of use came to the surface of the furniture (use a respirator for respiratory protection against dust, and ventilate well). All the dust should be well cleaned pylesos of the corners, then wipe the furniture with a damp cloth and allow it to dry. If wood surface is too greasy, wash the furniture with soap and water and allow it to dry. Putty furniture we do not need. The idea of the project just as the antiquated effect, (mild) deterioration of furniture, so the surface defects of wood we want to enhance, not cover up with putty. For aging of wood and painting furniture antique Arina recommends the use of a special chalk paint for home creative projects(such are available under the brands Autentico, Annie Sloan, etc.). Chalky paint effect antique furniture are manufactured in a wide range of fashionable blurry (as if burned out from time to time) shades. Chalk paint can be used on different surfaces (including clay and even plastic!), in this case, no preliminary surface treatment is generally not required. If you don't have chalk paint, use normal Matt paint for walls and ceilings for homes, water based (NOT for bathrooms and kitchens!) from any hardware store. When you use a paint better pre-primed wood surface with a water soluble primer (primer). Universal (2 in 1) primer prevents the seepage of natural oils from the tree to the main surface of the paint and promotes better adhesion of paint to the surface of the furniture. Painting furniture antique is better to use a paint roller instead of a brush. Prior to the start of work, protect the surrounding space with plastic film, even better to work on the street. Step 2. The main colouring of antique furniture , Start painting furniture antique with back (invisible) side. So you can get hand, to understand how much you need to take a paint roller and maybe you even want to adjust the hue of the paint itself. Next, move to the front side of the piece of furniture, applying paint in broad strokes, without leaving streaks. Before applying the second coat of paint (if necessary, see below) check that there are no stains (stains should be possible to fix with sandpaper, and then work through the additional layer of paint). Between coats of paint on the furniture hold the roller in water, so it does not dry out. A second coat of paint apply when the first is completely dry (this is important!). The drying time of paint depends on the environmental conditions (humidity and temperature) and can range from 1 to 5 hours. Step 3. Effects antique ‘aging furniture’ How many layers of paint you will have to pay depends on your chosen style. For ‘simple’ view, the effect of roughness and decrepit, or to paint a gleam picture of the tree, one layer will be enough. For a more traditional, smooth look of the furniture, walk through the first layer of paint fine sandpaper, remove dust with a brush and then apply a second coat of paint.
Source: countrysideliving.net/blog/2014/03/furniture-upcycling/

Step 1. Preparing for the aging of furniture (painted antique) pull handle furniture and other fittings. If the furniture is polished, remove the polishing with a special compound from the hardware store, observing all the safety rules and the instructions on the package. If the furniture is painted, the old paint should be processed until smooth with sandpaper (unless it contradicts your main idea, see the effects of painting antique below). If the furniture was not painted, it is necessary to remove fine sandpaper the top layer of dirt, grease, and everything else that over the years of use came to the surface of the furniture (use a respirator for respiratory protection against dust, and ventilate well). All the dust should be well cleaned pylesos of the corners, then wipe the furniture with a damp cloth and allow it to dry. If wood surface is too greasy, wash the furniture with soap and water and allow it to dry. Putty furniture we do not need. The idea of the project just as the antiquated effect, (mild) deterioration of furniture, so the surface defects of wood we want to enhance, not cover up with putty. For aging of wood and painting furniture antique Arina recommends the use of a special chalk paint for home creative projects(such are available under the brands Autentico, Annie Sloan, etc.). Chalky paint effect antique furniture are manufactured in a wide range of fashionable blurry (as if burned out from time to time) shades. Chalk paint can be used on different surfaces (including clay and even plastic!), in this case, no preliminary surface treatment is generally not required. If you don't have chalk paint, use normal Matt paint for walls and ceilings for homes, water based (NOT for bathrooms and kitchens!) from any hardware store. When you use a paint better pre-primed wood surface with a water soluble primer (primer). Universal (2 in 1) primer prevents the seepage of natural oils from the tree to the main surface of the paint and promotes better adhesion of paint to the surface of the furniture. Painting furniture antique is better to use a paint roller instead of a brush. Prior to the start of work, protect the surrounding space with plastic film, even better to work on the street. Step 2. The main colouring of antique furniture , Start painting furniture antique with back (invisible) side. So you can get hand, to understand how much you need to take a paint roller and maybe you even want to adjust the hue of the paint itself. Next, move to the front side of the piece of furniture, applying paint in broad strokes, without leaving streaks. Before applying the second coat of paint (if necessary, see below) check that there are no stains (stains should be possible to fix with sandpaper, and then work through the additional layer of paint). Between coats of paint on the furniture hold the roller in water, so it does not dry out. A second coat of paint apply when the first is completely dry (this is important!). The drying time of paint depends on the environmental conditions (humidity and temperature) and can range from 1 to 5 hours. Step 3. Effects antique ‘aging furniture’ How many layers of paint you will have to pay depends on your chosen style. For ‘simple’ view, the effect of roughness and decrepit, or to paint a gleam picture of the tree, one layer will be enough. For a more traditional, smooth look of the furniture, walk through the first layer of paint fine sandpaper, remove dust with a brush and then apply a second coat of paint.
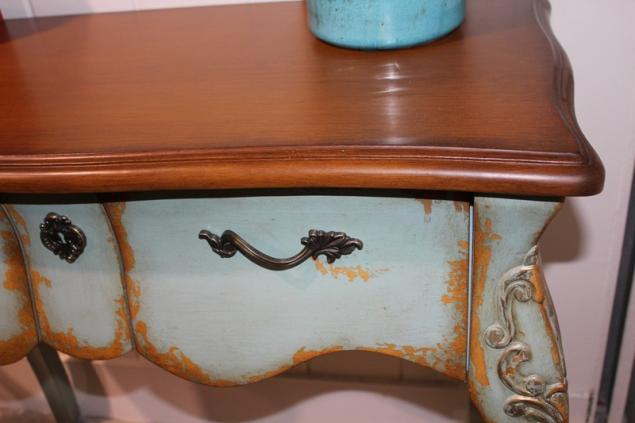
- The effect of Bartoli, obsharpannosti. After you paint take a small nazhdachku and start to scrub the paint in those places where it naturally wears out (in the corners and on ridged surfaces, around handles). Do it until, until you reach the desired degree of oldness: up to primer, to the ‘naked’ wood, etc can Now easily go sandpaper over the entire surface of the furniture.
- The effect of bleed-through of old paint. After applying two layers of primary colors, light touch, apply a dry brush in the right places paint a different color (good use of contrasting colors, see photos of blue chairs, where ‘Peeps’ paint the colors of cream). This technique is called ‘dry brush': on dry brush gaining a bit of paint, wipe the brush with a dry cloth and applied a thin layer of paint on previously painted surface. This technique works well for the effect of old paint, ingrained in the texture of the wood.
- The effect of polluted from time to time surface (see photo of the project Arina Cafe Dubos with an old window frame). This effect is achieved by the uneven application of dark wax in places where the furniture touched by hands. Read more about applying wax (mastic) read below.
- The effect of many layers of paint, roughly applied on top of one another. Paint is applied in several layers careless strokes in different directions, sandpaper between layers is not used. On the last layer of paint is applied transparent wax for protection and then dark wax for aged effect.
Source: countrysideliving.net/blog/2014/03/furniture-upcycling/
Tags
See also
How to build a terrace with his hands
How to make a decorative fireplace with his hands
How to make a home theater with your own hands
How to make a TREE of HAPPINESS with his own hands
Making the Case for a tablet with their hands
How to make a beautiful basket for linen with his own hands
How to make a wood chipper with your hands
How to make chair hammock with your own hands
How to make stove water heating with his own hands
How to make a wooden porch with their hands