Procedures with problematic tooth
 Bashny.Net
Interesting post, which in all colors dentists tell patients about the structure of the molars and answer to many exciting questions. I suggest to read the continuation under the cut, so be clear about the treatment procedure and the removal of teeth.

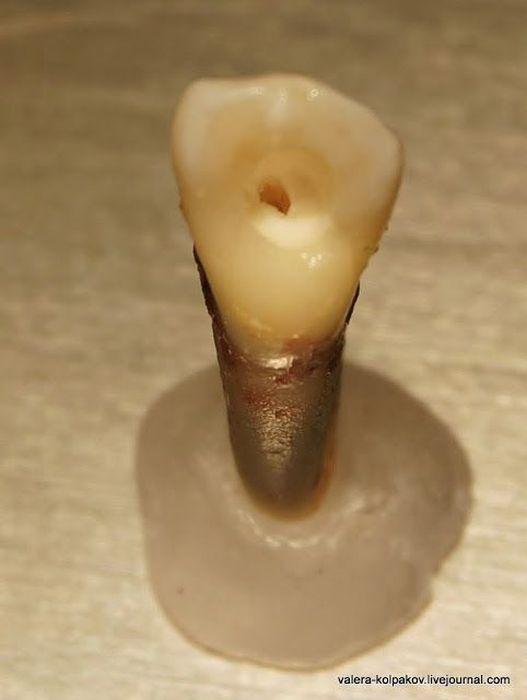
Meet - this is our present patient Tooth Klykovich tear. He ached inside nerve and appointed him to the dentist Kolpakov removal and nerve canal filling.

Anesthetized patient, and the time has come to get to the nerve. For this purpose, on the inner surface of the drill hole. At some point the drill falls inside the tooth. In our patient, the nerve is already dead, because he found himself a hole. If the nerve is still alive, he would bleed. If the channel was got the infection - there may leak pus.
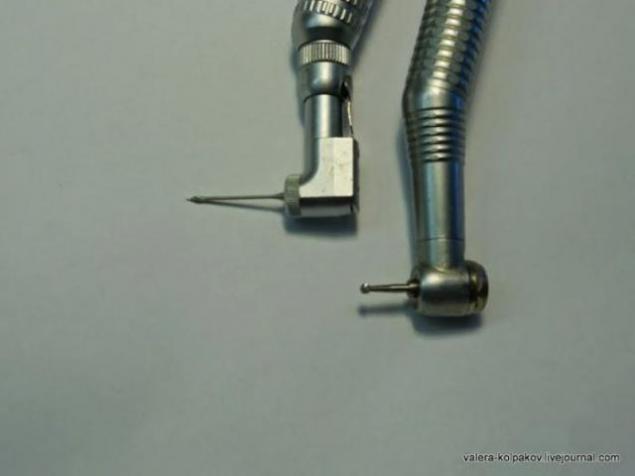
Holes are usually doing a round drill (right), and then the entrance to the channel is opened a little wider and make another funnel drill (left). Next, inspect the cave and see how it opens the channels. In this case there is only one, or perhaps five or six!
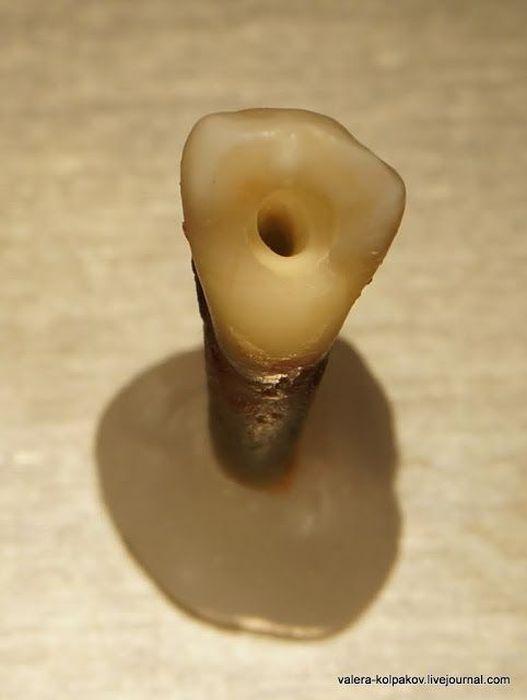
Entrance to the cave becomes uyutnenky, it will be easy to slide our tools.
Begin gently explore channel, introducing there a tool that is called endodontic file. The English word has another file and the value \ "file \" because the interior of the tooth and we'll clean \ "Files \". If the tooth was alive, I could use other tools that would first delete \ "nerve \". In fact, no nerves in the usual sense edakogo Kripen'ka worm - not there. And there's blood nozzle - dental pulp.
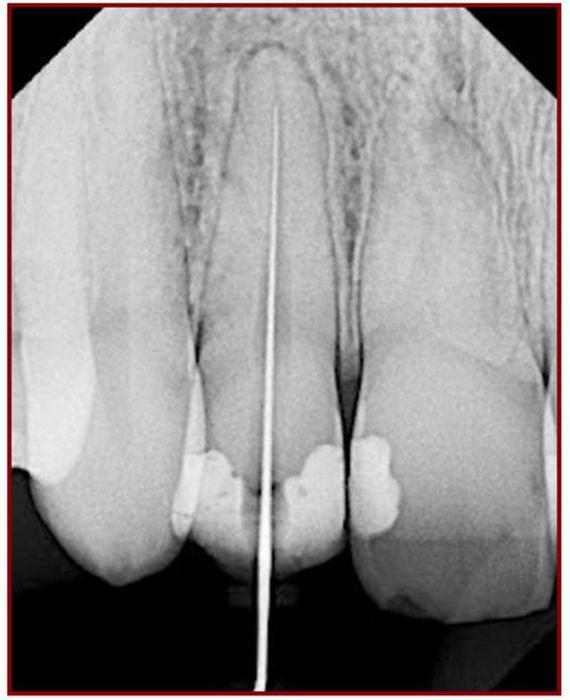
After \ "nerve \" removed our first task is to determine what is the length of the canal. Previously used radiographic method - in channel shoves file and take a picture, which was evident how deeply this file is separated from the crown.
More modern methods are based on measuring the electrical resistance, for instance, such a device. In the apparatus two wires - right hook on the end is hung at an angle cheeks. Left attached to the file, which is inserted in the tooth.
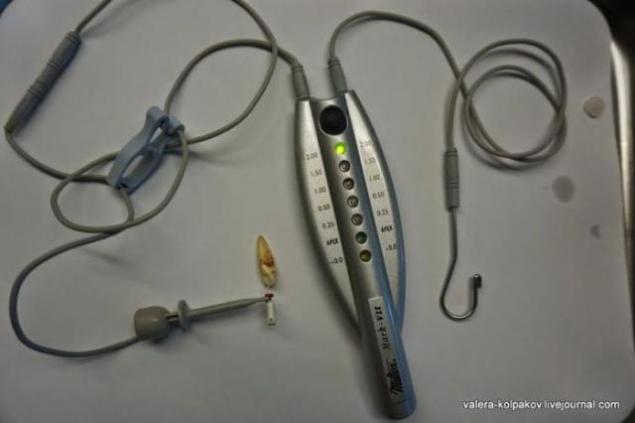
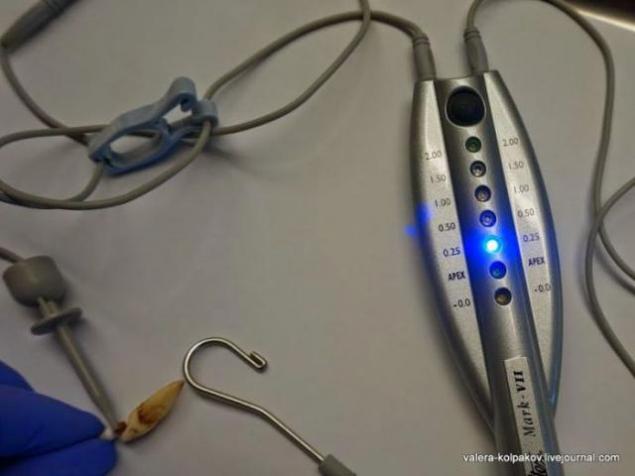
When the file begins to approach the outlet zelenenky light begins to move on the scale and illuminated with blue light - there were 2, 1.5, 1, 0.5, 0.25 mm to exit ... Priborchik starts beeping - the closer to the hole more often. If the file came out, the yellow light comes on and the whistle becomes permanent.
When our unit gave the go-ahead, the tip of the file has reached the outlet we stop and note the position of the rubber label, which slides on file. Then take out the file and measure the length from the tip of the file up to the mark.
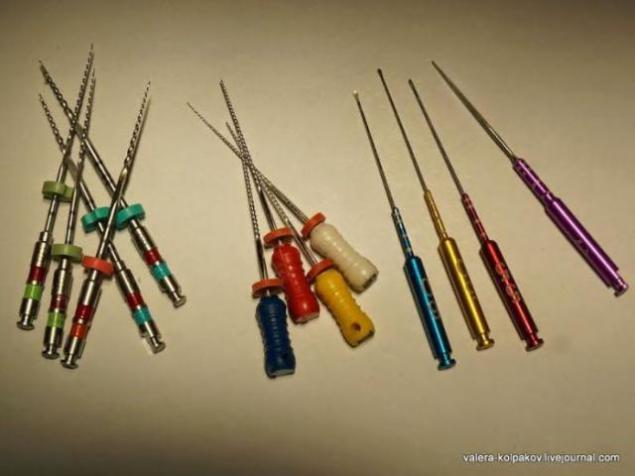
Now we know how far we need to put our tools and start cleaning stage and channel expansion. For this, there are a huge number of different techniques and tools that we analyze in detail will not. Basic tools are divided into manual - which have a handle and used his hands, and rotational - are inserted into the Drillers.
For example, some of the files that I use. In the center - manual, used mainly for research channels. Right - Rotational that handle only the crown area. These files are not very common among dentists, to me they like their safety. If the file is broken into a channel, it will break at the connection to a handle and is easily removed. I have a paranoid fear of breaking a file in the channel, because such files I love. Purple file (rightmost) and group files are left to give the final shape of the channels. The files usually have a special color coding, which depends on the diameter of the file.
Clean channel is accompanied by a variety of washes, designed to wash the chips, cut files and kill the germs that have settled in the channel. From thorough washing largely depends outcome. Often used bleach so that patients feel the pleasant smell.
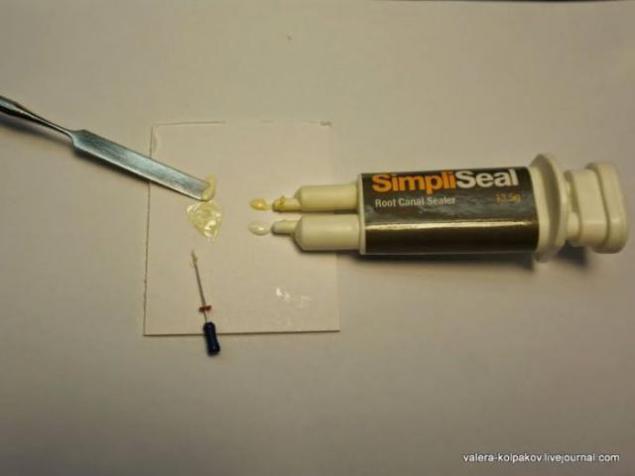
The channel is now ready to be filled filling material. First, it is dried with paper needles. Then the surface of the channel must be covered with putty, so it does not leak. Putties and there is great variety, the picture is one of my used. Of special syringe and squeezed the two components are mixed. The resulting paste clings file and placed inside the channel.
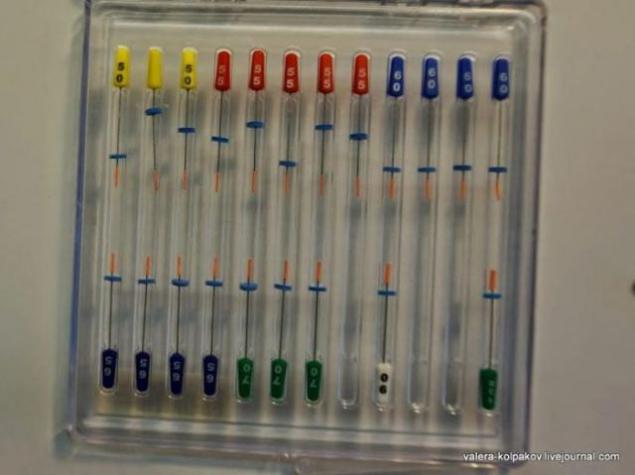
Then filling the space of the channel also has a variety of techniques and materials. Basically it percha - material such as rubber. Use or special cones, or liquid percha (hot or cold). I like to start filling with the area adjacent to the outlet. It is this area is very important because it is a gateway for infection inside the tooth. I use a special gutta-percha \ "plug \", which collapses into putty and introduce deep channel. The carrier then plugs easily unscrewed and discarded. Plugs just color coded by size.
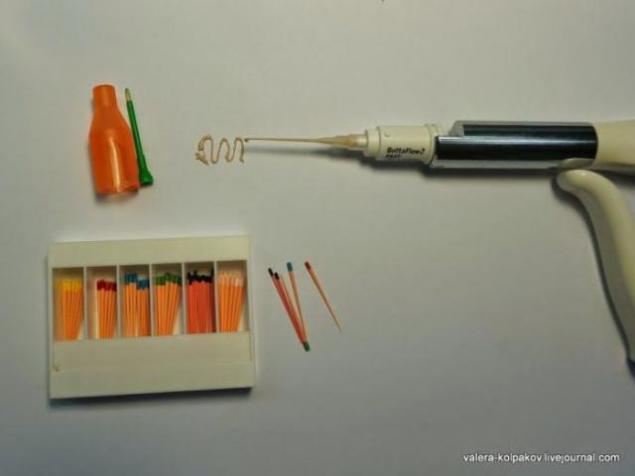
The remaining space in this case, the liquid will fill with cold gutta-percha, although in clinical situations more like warm gutta percha. This set has a gun, the capsule material and plastic tip.
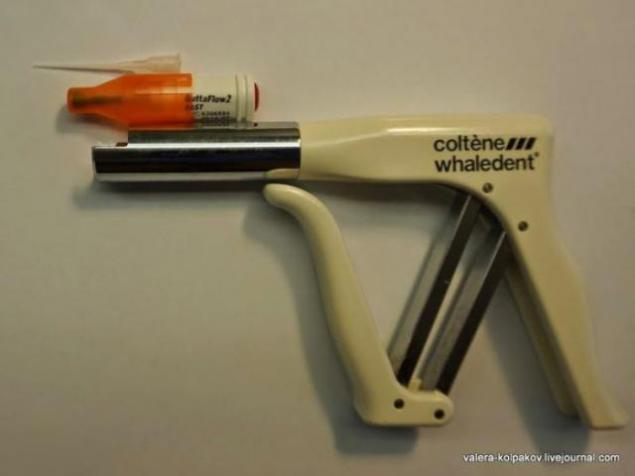
The capsule and mix the two components of the liquid material enters the cannula. In the lower left corner just for demonstration shows the different cones of gutta percha for other techniques. Same color coded by size.
After the remaining space is filled, the inside of the tooth is placed fleece and access is sealed with a temporary filling. Fleece keeps order, so you can quickly and easily get to the channel. The seal is placed temporary because before permanent filling is usually the doctor look like what is the result. It also happens that we have to open a channel on the new.
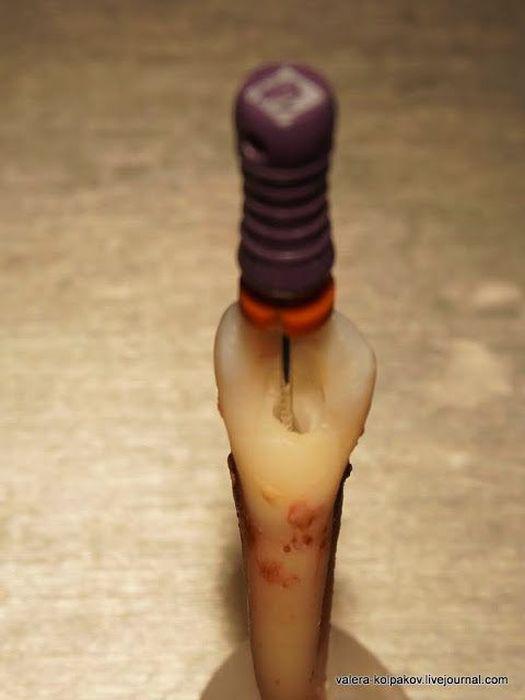
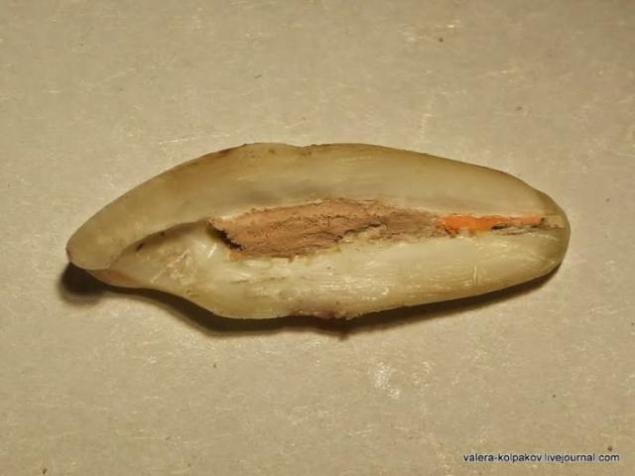
Let's do an autopsy of our patient and see what we've got.
The empty space on the left - our access to the inside of the tooth.
Orange stuff right - our cork. Bit does not reach the end of the tooth, because the outlet is funnel shaped. At the outlet of the white stuff - putty. Between the plug and the input - our percha, vykroshilas bit, because I potorpilsya with opening up the material has hardened completely.
In this procedure is completed. I did not go into the fine details and features so as not to spoil the overall picture.
Hence

Meet - this is our present patient Tooth Klykovich tear. He ached inside nerve and appointed him to the dentist Kolpakov removal and nerve canal filling.

Anesthetized patient, and the time has come to get to the nerve. For this purpose, on the inner surface of the drill hole. At some point the drill falls inside the tooth. In our patient, the nerve is already dead, because he found himself a hole. If the nerve is still alive, he would bleed. If the channel was got the infection - there may leak pus.

Holes are usually doing a round drill (right), and then the entrance to the channel is opened a little wider and make another funnel drill (left). Next, inspect the cave and see how it opens the channels. In this case there is only one, or perhaps five or six!

Entrance to the cave becomes uyutnenky, it will be easy to slide our tools.

Begin gently explore channel, introducing there a tool that is called endodontic file. The English word has another file and the value \ "file \" because the interior of the tooth and we'll clean \ "Files \". If the tooth was alive, I could use other tools that would first delete \ "nerve \". In fact, no nerves in the usual sense edakogo Kripen'ka worm - not there. And there's blood nozzle - dental pulp.

After \ "nerve \" removed our first task is to determine what is the length of the canal. Previously used radiographic method - in channel shoves file and take a picture, which was evident how deeply this file is separated from the crown.

More modern methods are based on measuring the electrical resistance, for instance, such a device. In the apparatus two wires - right hook on the end is hung at an angle cheeks. Left attached to the file, which is inserted in the tooth.

When the file begins to approach the outlet zelenenky light begins to move on the scale and illuminated with blue light - there were 2, 1.5, 1, 0.5, 0.25 mm to exit ... Priborchik starts beeping - the closer to the hole more often. If the file came out, the yellow light comes on and the whistle becomes permanent.

When our unit gave the go-ahead, the tip of the file has reached the outlet we stop and note the position of the rubber label, which slides on file. Then take out the file and measure the length from the tip of the file up to the mark.
Now we know how far we need to put our tools and start cleaning stage and channel expansion. For this, there are a huge number of different techniques and tools that we analyze in detail will not. Basic tools are divided into manual - which have a handle and used his hands, and rotational - are inserted into the Drillers.
For example, some of the files that I use. In the center - manual, used mainly for research channels. Right - Rotational that handle only the crown area. These files are not very common among dentists, to me they like their safety. If the file is broken into a channel, it will break at the connection to a handle and is easily removed. I have a paranoid fear of breaking a file in the channel, because such files I love. Purple file (rightmost) and group files are left to give the final shape of the channels. The files usually have a special color coding, which depends on the diameter of the file.

Clean channel is accompanied by a variety of washes, designed to wash the chips, cut files and kill the germs that have settled in the channel. From thorough washing largely depends outcome. Often used bleach so that patients feel the pleasant smell.
The channel is now ready to be filled filling material. First, it is dried with paper needles. Then the surface of the channel must be covered with putty, so it does not leak. Putties and there is great variety, the picture is one of my used. Of special syringe and squeezed the two components are mixed. The resulting paste clings file and placed inside the channel.

Then filling the space of the channel also has a variety of techniques and materials. Basically it percha - material such as rubber. Use or special cones, or liquid percha (hot or cold). I like to start filling with the area adjacent to the outlet. It is this area is very important because it is a gateway for infection inside the tooth. I use a special gutta-percha \ "plug \", which collapses into putty and introduce deep channel. The carrier then plugs easily unscrewed and discarded. Plugs just color coded by size.

The remaining space in this case, the liquid will fill with cold gutta-percha, although in clinical situations more like warm gutta percha. This set has a gun, the capsule material and plastic tip.

The capsule and mix the two components of the liquid material enters the cannula. In the lower left corner just for demonstration shows the different cones of gutta percha for other techniques. Same color coded by size.

After the remaining space is filled, the inside of the tooth is placed fleece and access is sealed with a temporary filling. Fleece keeps order, so you can quickly and easily get to the channel. The seal is placed temporary because before permanent filling is usually the doctor look like what is the result. It also happens that we have to open a channel on the new.
Let's do an autopsy of our patient and see what we've got.
The empty space on the left - our access to the inside of the tooth.
Orange stuff right - our cork. Bit does not reach the end of the tooth, because the outlet is funnel shaped. At the outlet of the white stuff - putty. Between the plug and the input - our percha, vykroshilas bit, because I potorpilsya with opening up the material has hardened completely.

In this procedure is completed. I did not go into the fine details and features so as not to spoil the overall picture.
Hence
Tags
See also
Guess the star
Stories of origin aphorisms
Someone voiced the famous Hollywood stars
In which movie to go to the movies?
Life in the Russian village of the tenth century
Hairpin gun: firearms mid-19th century
Evolution controllers for video game consoles
23 new books are definitely worth reading to your children
André Aleman: Wisdom comes to us with age
10 interesting facts that you should know about black holes