Kraft motokofrov
 Bashny.Net
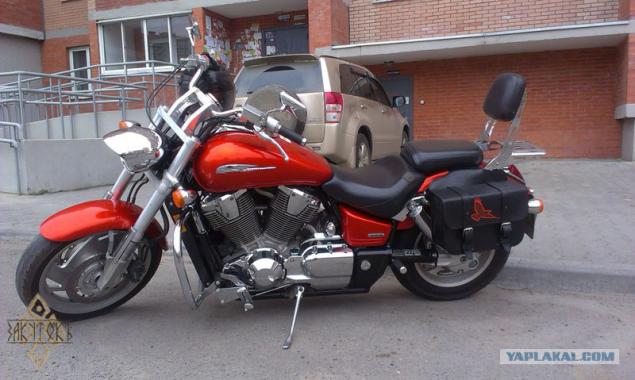
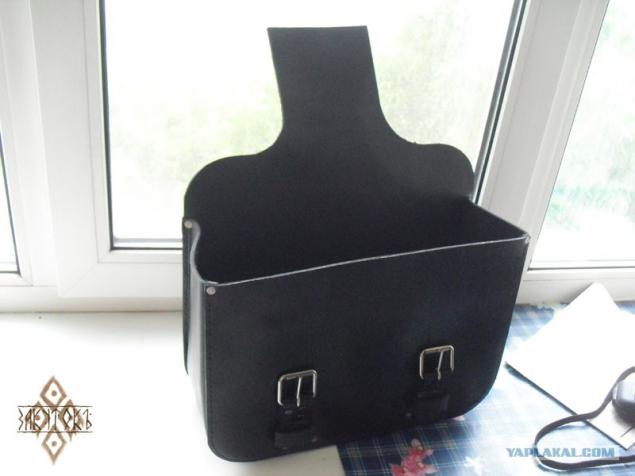
Hello everyone Yapovtsam! My name is Vladimir, I do tannery trade. This time was a very interesting order - saddlebags on a motorcycle and decided again gash tutorial how to do it.
Generally motokofry done in different ways from different materials. My customer wanted them to be from a clean skin without internal skeleton. Because black was chosen Shore 3, 2 mm. In protsesste I cherished the thought that a good idea to do byloby of saddlery Cheprak - it tougher. But I decided to pre-waxing trunks, so moisture is not absorbed because I took Shore. After waxing rigidity is at the proper level.
35 photos
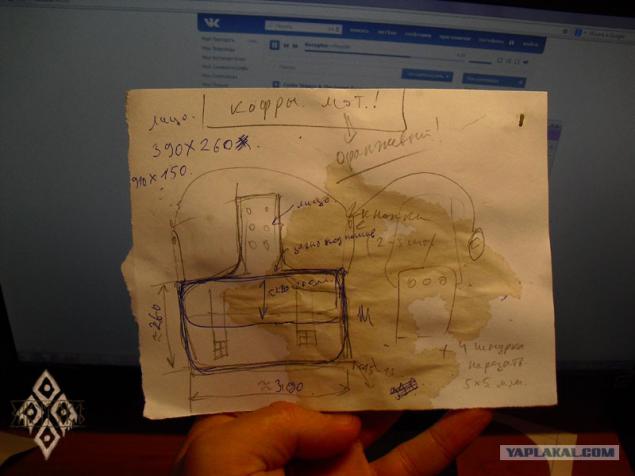
1) Here is my sketch. This, of course, zalet, but I was happy with everything - informative and do not care for the spilled coffee.
2) Since the tutorial idea came to me after the start of work on the wardrobe trunks - the whole process of the pattern, cutting and painting skin I safely profukannyh. In principle, there are all elementary, everyone knows how to cut and cut tissue or even what a crap, so do not bother at this stage, the more detail is painted in the previous my post (forum2/topic548056.html?hl= ). P.S. All the patterns made from preshpona or very hard cardboard, so it was exactly.
2 (2)
2 (3)
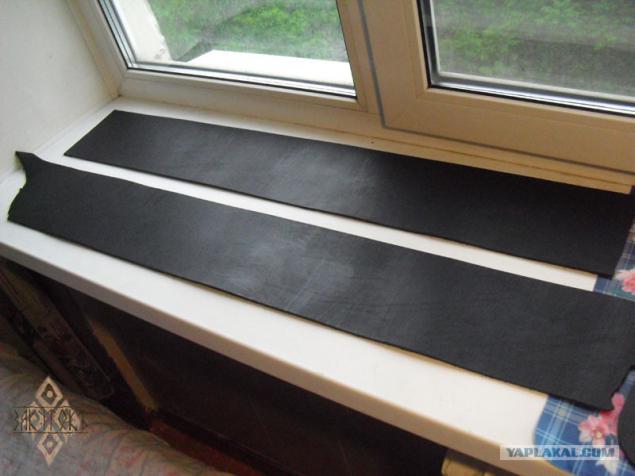
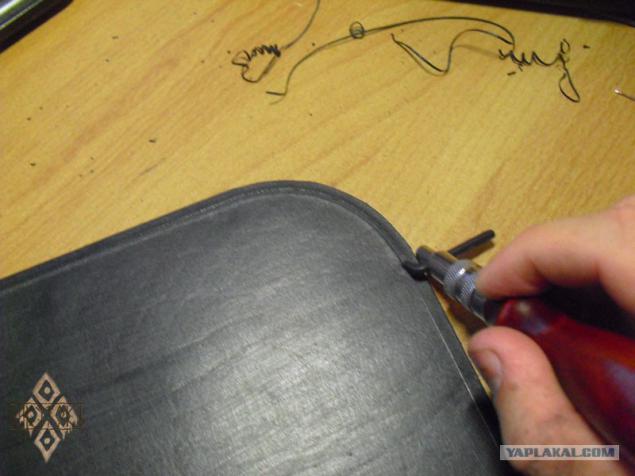
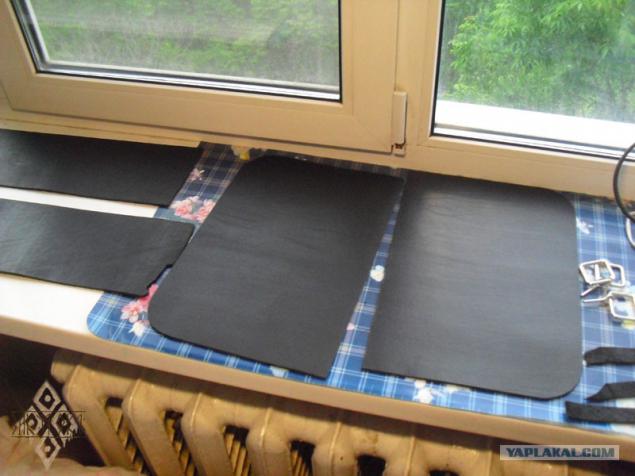
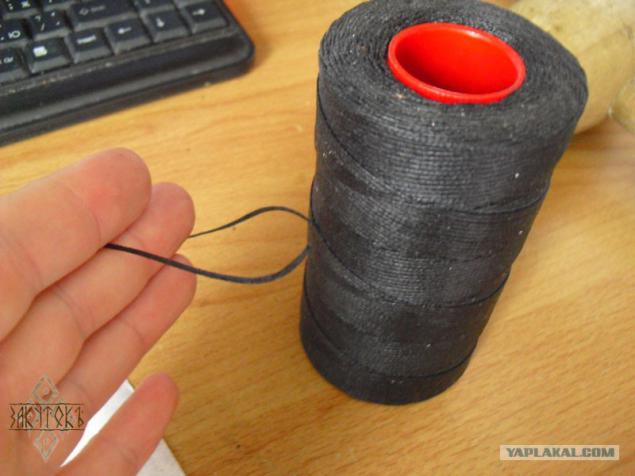
3) So, we have almost all the patterns except the valve, which is made from the skin of another, because stupidly did not have the desired black blinders. On valves I'm comin same Shore, only red color, which will figure in the form of a raven. To sew exactly trunk, which is essentially a big bag you need to pre-punch holes for seam buduyuschy. We strongly recommend to get kanavkorezom and cut them millimeter by a thread groove - so she had never peretetsya seam and looks much smoother and more effective. Generally special pen markings made on the skin and then erased, but I do not, because yuzayu simple pencil hard, but he is a reptile is not erased. In short, to mark up the seam, cut groove.
4) Next, on the back of patterns put labels not to mix what was happening to sew. It's time to punch holes at the seam. Here the main principle - the holes should be the same number and a symmetrical arrangement on sewn together patterns. If the punch at random - at the end of the seam golovnyak come out in the form of extra holes that could not be hidden, and the sheer asymmetry of the cross-linked bags. In the first coffer I got golovnyak mean extra holes, which I inadvertently almost broke. If struck - climbed to asymmetry in the form of hardened centimeters - catches the eye immediately, so be careful. Chinese masters all surfaces to be bonded to the first point and then sew.
4 (2)
4 (3)
4 (4)
4 (5)
4 (6)
4 (7)
4 (8)
4 (9)
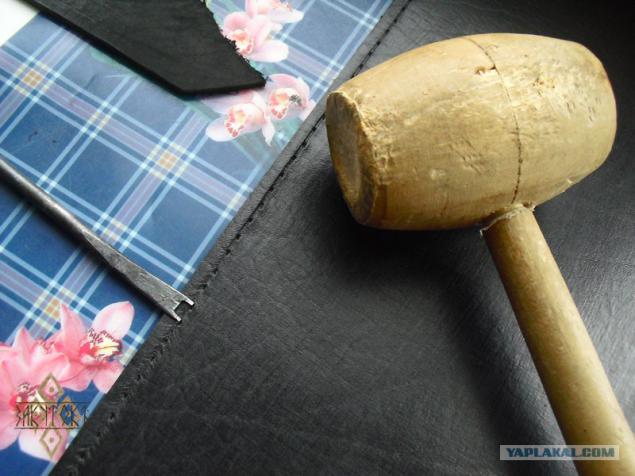
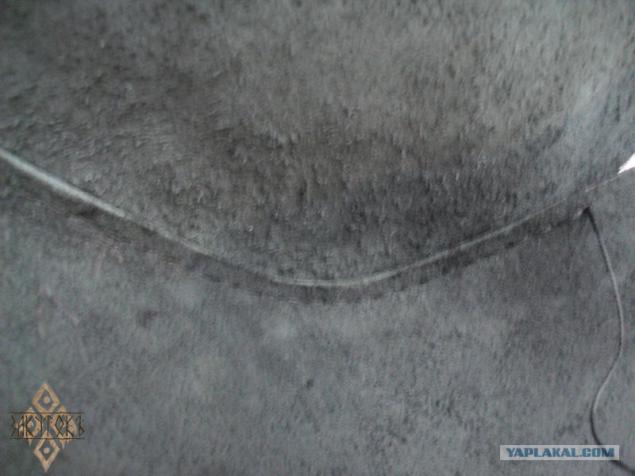
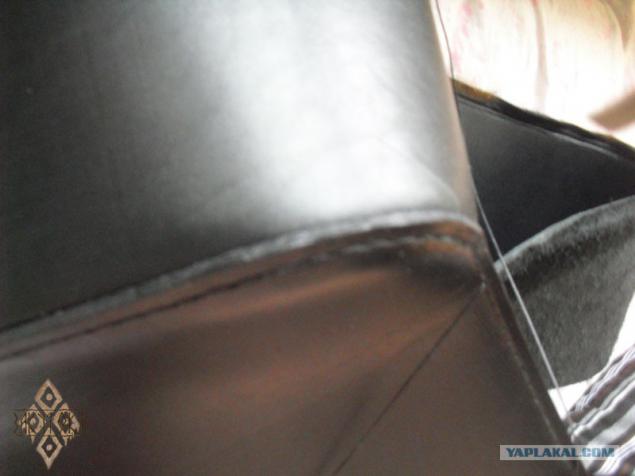
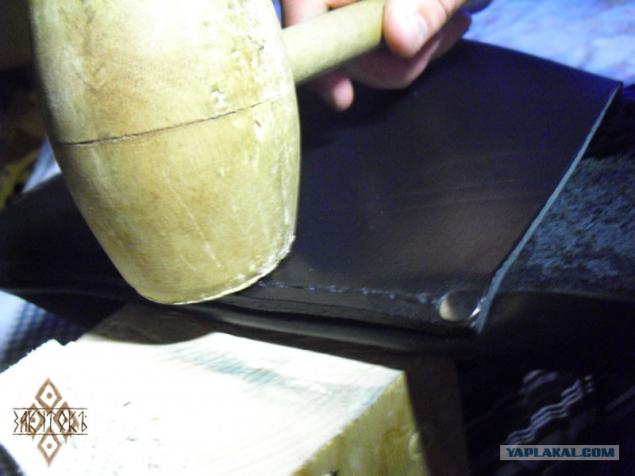
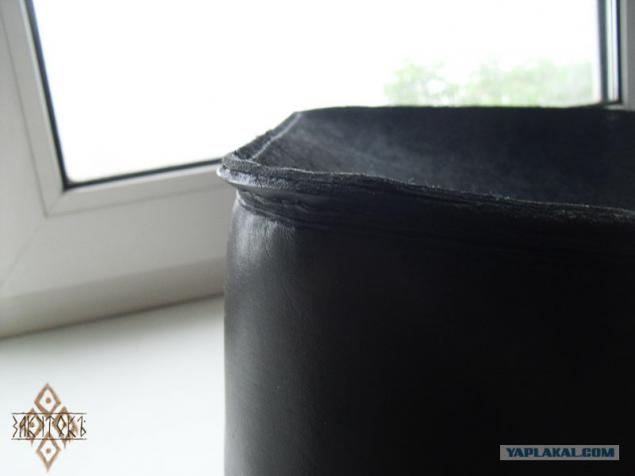
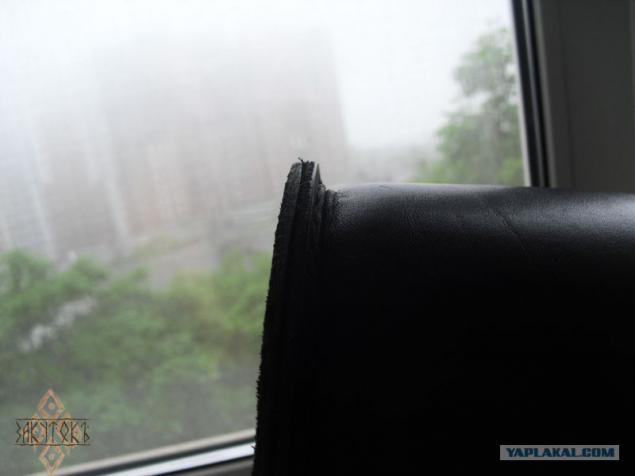
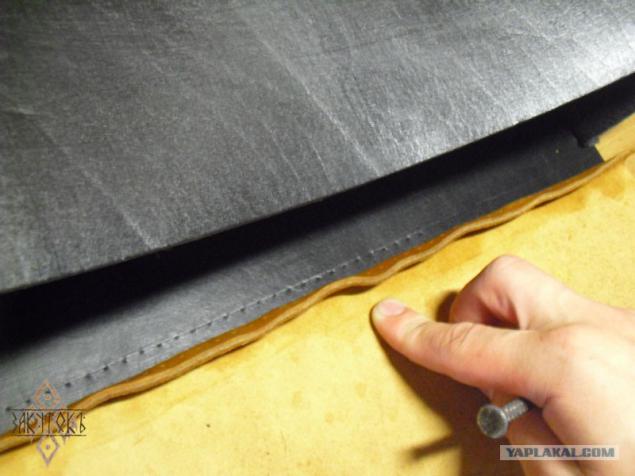
5) Begin to sew the bottom of the coffer to its front wall. On good it would be worth just trim the edges and round, but I do not have the right tool, so just do clean cut and paint it. That is exactly what did porugomu because it has fastened the buckle, and in the case of cant alter easier and faster. All seams are two needles, one hand towards the other. Thread synthetic, woven + waxed, 1mm in diameter. IMPORTANT: Before sewing the front wall coffer it is necessary to mark and to break all the seams and holes, as well as all the necessary grooves cut at the folds on the piece of skin that will be the bottom (and immediately bend in the right places Kiyanochka neatly). Because then it will be a rare crap.
As a result, we have just such a figovinu. Immediately after stitching go to the bathroom, damp scrapings (back side of the skin) and some water akkratnenko hammer rattles, as shown in the photo. As a result, we have distinct angles of 90 degrees in the seam. And pleases the eye and excluded abrasions and other close up, as in the photo below the old coffer, whose joints are not bent (torn thread and dissolved seam torn undermining all ..).
Posted in [mergetime] 1374047547 [/ mergetime]
6) Now I'm doing the exact same workpiece by a second trunk. In good need to be immediately zavoschit outer wall until it is sewn back, so then do not fret too much. Perhaps these borrowings. Wax in this case, you have a lot, will not cease until the skin to absorb it. This is to give zheskosti and watertight skin because Shor very mild grade and holds a rather bad shape. The process of waxing and makeup prefer to keep a secret, do not blame me. Who's supposed to - the zaguglit. By the way, voschu from inner side, so that the person in this case is painted.

7) While the hands with calluses break from sewing to receive the rear wall of the trunk and with the aid of old motosumok levels and customize mounting a motorcycle owner, at the same time once we shall cut the laces to their kremleniya to the frame. Laces take the same skin as the trunks and a couple of minutes cut into shnurorezom. I punched holes in the right places for future lacing.
7 (2)
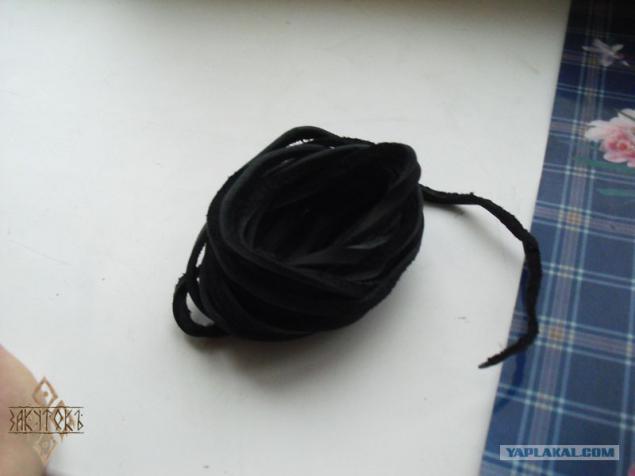
7 (3)
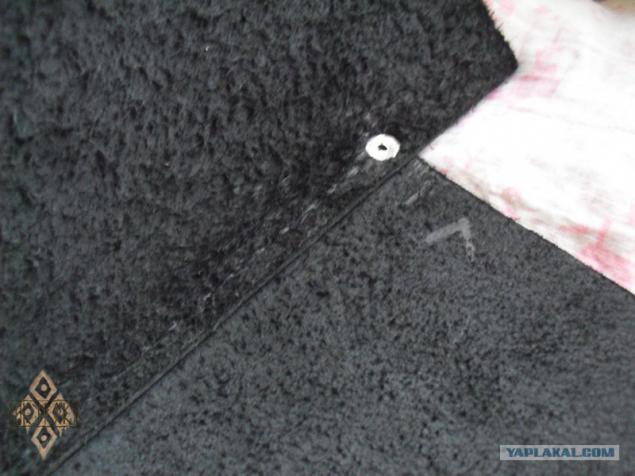
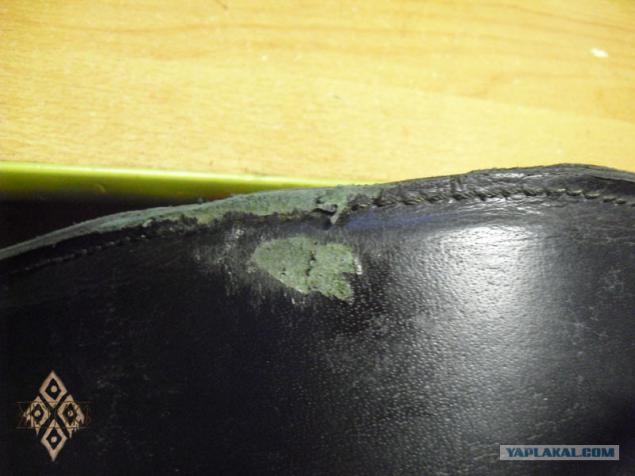
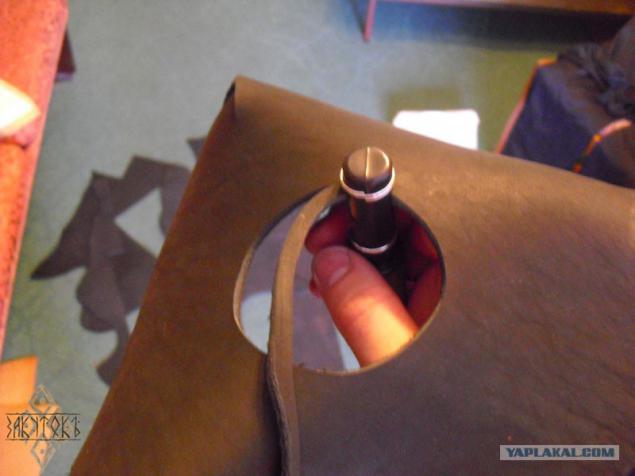
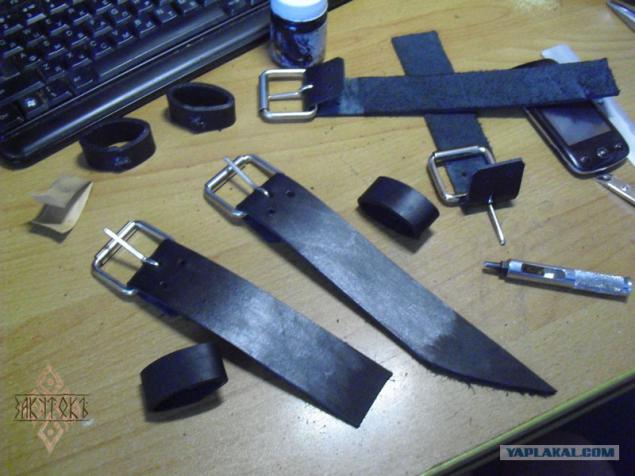
8) In parallel, the two preceding paragraphs start slowly mounting straps and buckles to make cut. Nothing complicated. And immediately strengthened them to carry case. Mounted in this case, buckle riveting called holniteny. This little thing is brutally saves time and effort, looks impressive, but loves to slide off the anvil and get close up on the photo. Treatment - a rip this infection, trying not to break with the skin or whack with a hammer and forget. Minus - it looks neochen. Ostalos trim excess from the bottom and you can sew the back wall. ps: to sew the back wall on it is necessary to punch holes for attachment to the frame of the bike. I forgot to do it - so I will agonize already sewn to the wall.
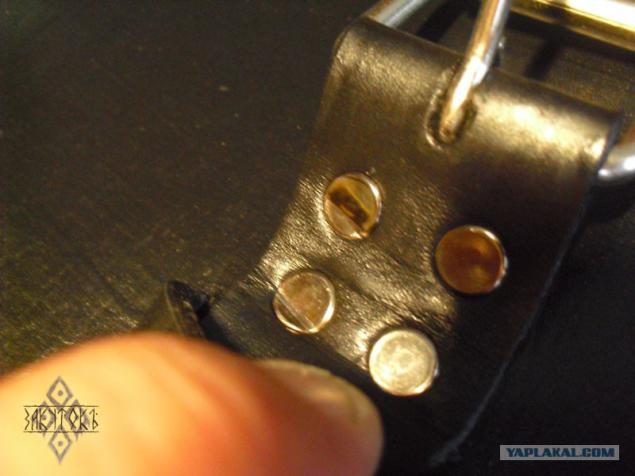
8 (2)
8 (3)
8 (4)
8 (5)
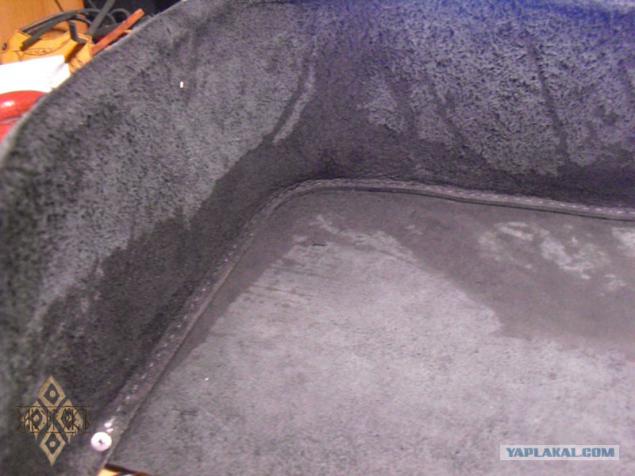
9) Sew the back wall, tapped hammer folds (generously pour the outside groove and place inside the coffer fold water to the skin was stretched and plastic) that all was smooth and beautiful. While the first trunk dries sews second. Voschu bottom and back wall coffers.
9 (2)
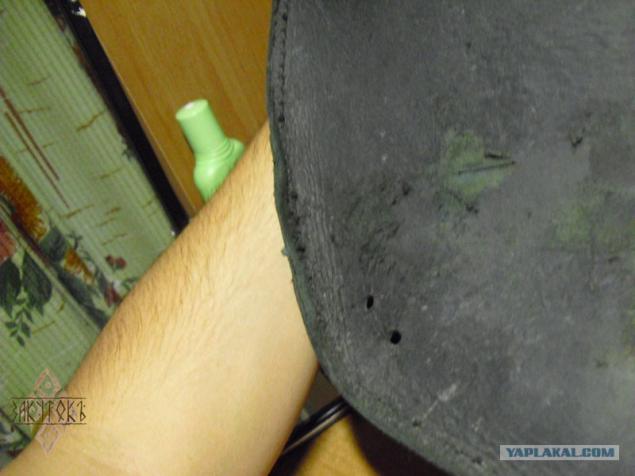
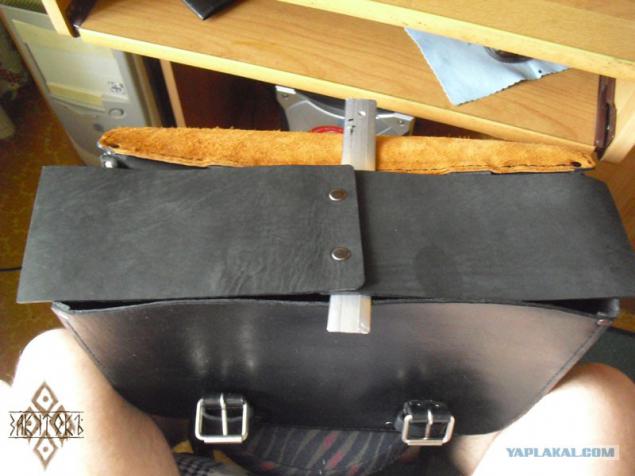
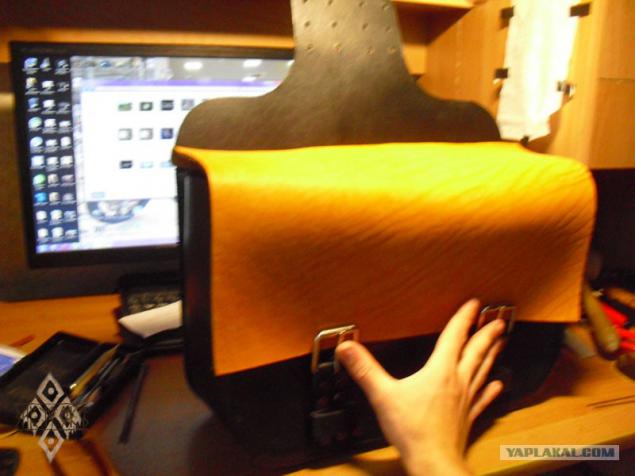
10) Now is the time to cut out and put on a riveting internal valve on the buttons in order to pits of the coffer does not fall through the cracks between the contents of the main valve and the walls of the coffer.
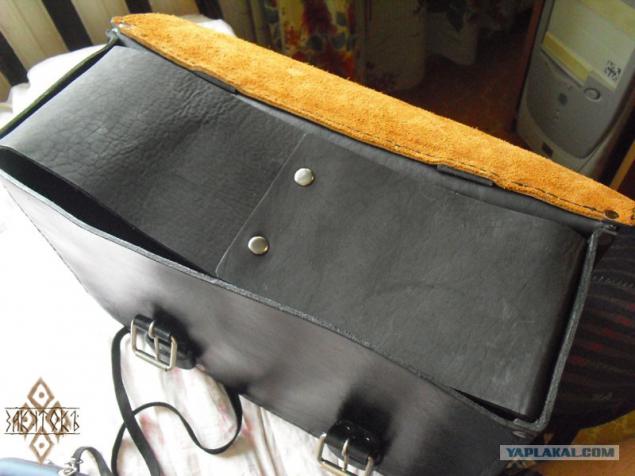
10 (2)
11) cut out valves on both the coffer, mark the seams - decorative (immediately sews) for attachment to the coffer. Nanoshu drawing cautery. I paint first drawing, then everything else is neat. You're zavoschit and sew to the coffer.

11 (2)
11 (3)
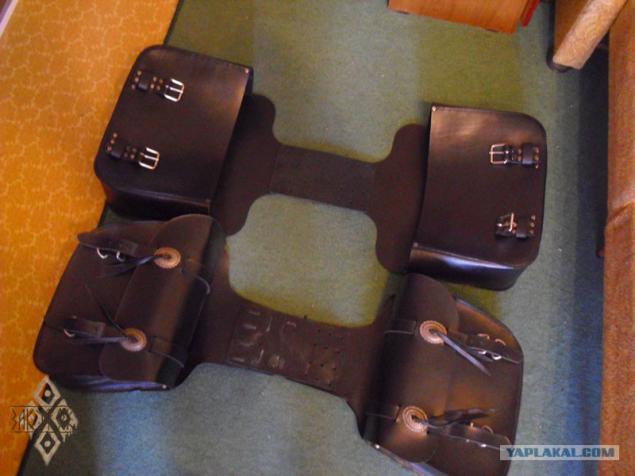
12) is cut, cut, paint, decorative sewn belts (not like a cut, the firmware looks better and stronger)
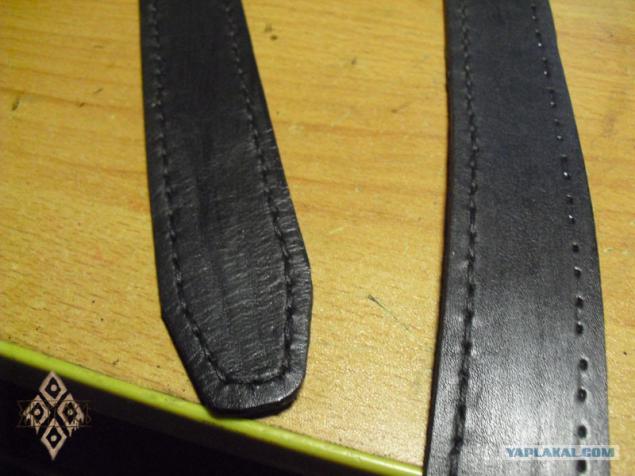
12 (2)
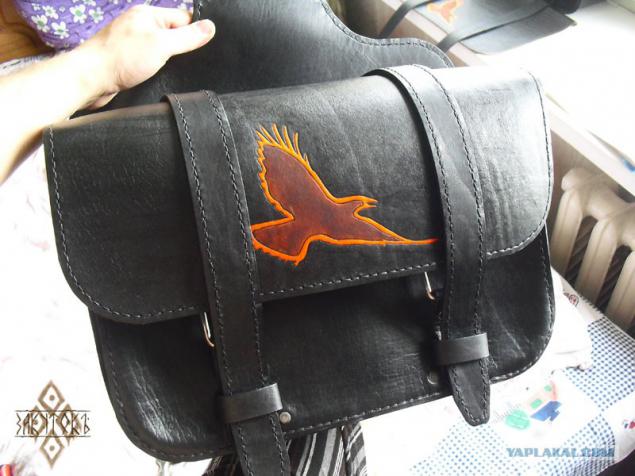
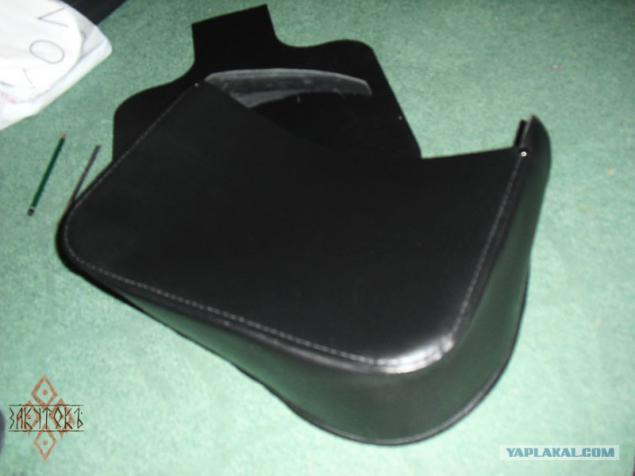
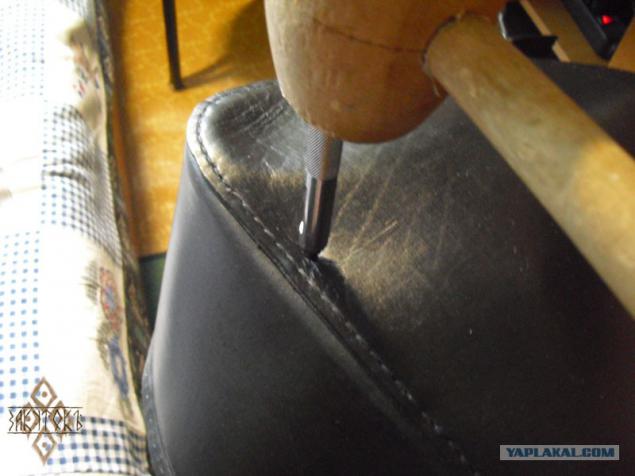
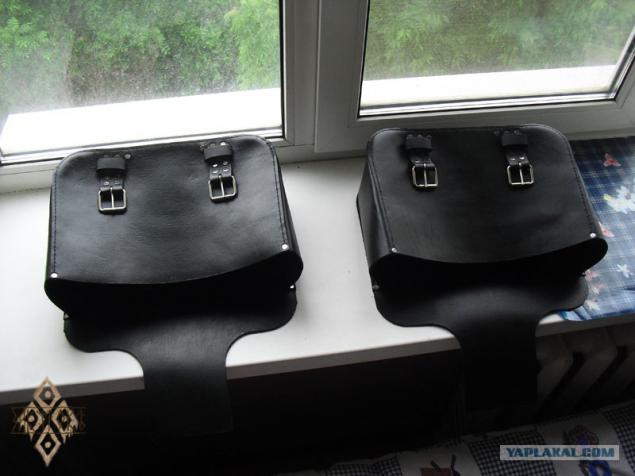
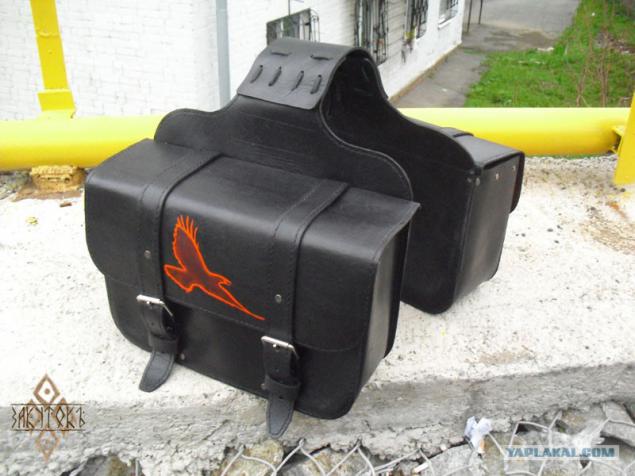
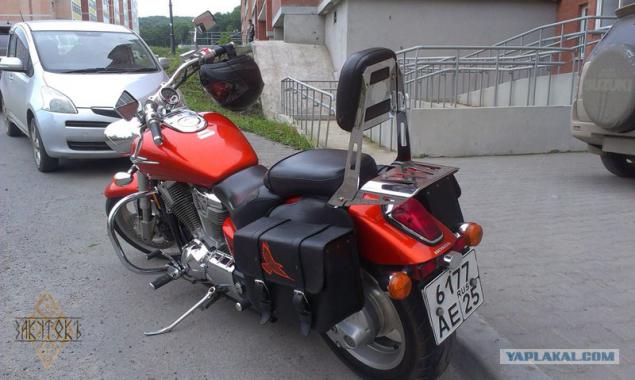
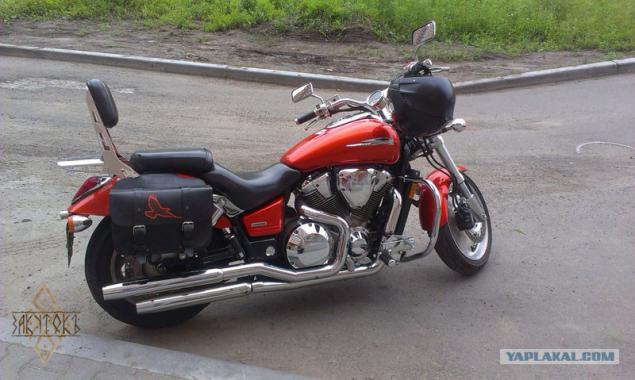
13) .Well, and most finish treatment of the edges with the aid of PVA glue and paint nazhdachki. Shnurorezom cut into six braids of the same blinders 5mm section for mounting coffers each other and to the Motu, and simultaneously burns the label in a prominent meste.Kofry ready, that's how they look at Motyka.
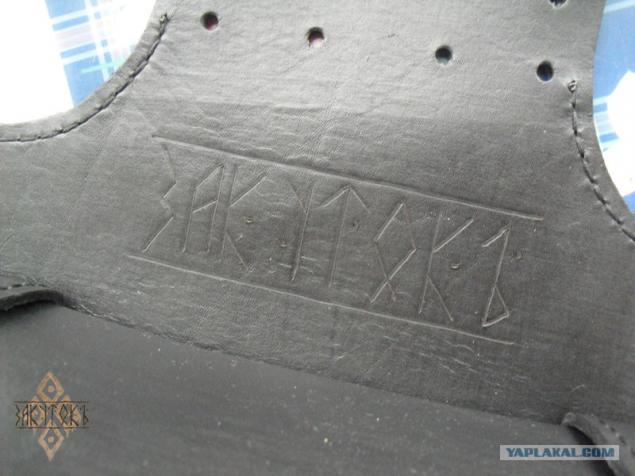
13 (2)

13 (3)
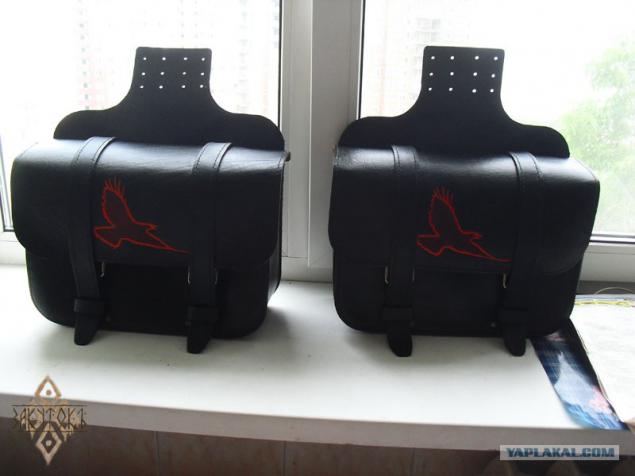
13 (4)
14) And in the end I want to say all- work with your hands! You can not even imagine how interesting and exciting! The pleasure of the rave reviews the customer with your offspring in hand at all indescribable. =)
15

latest photos
Source:
Generally motokofry done in different ways from different materials. My customer wanted them to be from a clean skin without internal skeleton. Because black was chosen Shore 3, 2 mm. In protsesste I cherished the thought that a good idea to do byloby of saddlery Cheprak - it tougher. But I decided to pre-waxing trunks, so moisture is not absorbed because I took Shore. After waxing rigidity is at the proper level.
35 photos

1) Here is my sketch. This, of course, zalet, but I was happy with everything - informative and do not care for the spilled coffee.

2) Since the tutorial idea came to me after the start of work on the wardrobe trunks - the whole process of the pattern, cutting and painting skin I safely profukannyh. In principle, there are all elementary, everyone knows how to cut and cut tissue or even what a crap, so do not bother at this stage, the more detail is painted in the previous my post (forum2/topic548056.html?hl= ). P.S. All the patterns made from preshpona or very hard cardboard, so it was exactly.

2 (2)

2 (3)

3) So, we have almost all the patterns except the valve, which is made from the skin of another, because stupidly did not have the desired black blinders. On valves I'm comin same Shore, only red color, which will figure in the form of a raven. To sew exactly trunk, which is essentially a big bag you need to pre-punch holes for seam buduyuschy. We strongly recommend to get kanavkorezom and cut them millimeter by a thread groove - so she had never peretetsya seam and looks much smoother and more effective. Generally special pen markings made on the skin and then erased, but I do not, because yuzayu simple pencil hard, but he is a reptile is not erased. In short, to mark up the seam, cut groove.

4) Next, on the back of patterns put labels not to mix what was happening to sew. It's time to punch holes at the seam. Here the main principle - the holes should be the same number and a symmetrical arrangement on sewn together patterns. If the punch at random - at the end of the seam golovnyak come out in the form of extra holes that could not be hidden, and the sheer asymmetry of the cross-linked bags. In the first coffer I got golovnyak mean extra holes, which I inadvertently almost broke. If struck - climbed to asymmetry in the form of hardened centimeters - catches the eye immediately, so be careful. Chinese masters all surfaces to be bonded to the first point and then sew.

4 (2)

4 (3)

4 (4)

4 (5)

4 (6)

4 (7)

4 (8)

4 (9)

5) Begin to sew the bottom of the coffer to its front wall. On good it would be worth just trim the edges and round, but I do not have the right tool, so just do clean cut and paint it. That is exactly what did porugomu because it has fastened the buckle, and in the case of cant alter easier and faster. All seams are two needles, one hand towards the other. Thread synthetic, woven + waxed, 1mm in diameter. IMPORTANT: Before sewing the front wall coffer it is necessary to mark and to break all the seams and holes, as well as all the necessary grooves cut at the folds on the piece of skin that will be the bottom (and immediately bend in the right places Kiyanochka neatly). Because then it will be a rare crap.
As a result, we have just such a figovinu. Immediately after stitching go to the bathroom, damp scrapings (back side of the skin) and some water akkratnenko hammer rattles, as shown in the photo. As a result, we have distinct angles of 90 degrees in the seam. And pleases the eye and excluded abrasions and other close up, as in the photo below the old coffer, whose joints are not bent (torn thread and dissolved seam torn undermining all ..).
Posted in [mergetime] 1374047547 [/ mergetime]
6) Now I'm doing the exact same workpiece by a second trunk. In good need to be immediately zavoschit outer wall until it is sewn back, so then do not fret too much. Perhaps these borrowings. Wax in this case, you have a lot, will not cease until the skin to absorb it. This is to give zheskosti and watertight skin because Shor very mild grade and holds a rather bad shape. The process of waxing and makeup prefer to keep a secret, do not blame me. Who's supposed to - the zaguglit. By the way, voschu from inner side, so that the person in this case is painted.

7) While the hands with calluses break from sewing to receive the rear wall of the trunk and with the aid of old motosumok levels and customize mounting a motorcycle owner, at the same time once we shall cut the laces to their kremleniya to the frame. Laces take the same skin as the trunks and a couple of minutes cut into shnurorezom. I punched holes in the right places for future lacing.

7 (2)

7 (3)

8) In parallel, the two preceding paragraphs start slowly mounting straps and buckles to make cut. Nothing complicated. And immediately strengthened them to carry case. Mounted in this case, buckle riveting called holniteny. This little thing is brutally saves time and effort, looks impressive, but loves to slide off the anvil and get close up on the photo. Treatment - a rip this infection, trying not to break with the skin or whack with a hammer and forget. Minus - it looks neochen. Ostalos trim excess from the bottom and you can sew the back wall. ps: to sew the back wall on it is necessary to punch holes for attachment to the frame of the bike. I forgot to do it - so I will agonize already sewn to the wall.

8 (2)

8 (3)

8 (4)

8 (5)

9) Sew the back wall, tapped hammer folds (generously pour the outside groove and place inside the coffer fold water to the skin was stretched and plastic) that all was smooth and beautiful. While the first trunk dries sews second. Voschu bottom and back wall coffers.

9 (2)

10) Now is the time to cut out and put on a riveting internal valve on the buttons in order to pits of the coffer does not fall through the cracks between the contents of the main valve and the walls of the coffer.

10 (2)

11) cut out valves on both the coffer, mark the seams - decorative (immediately sews) for attachment to the coffer. Nanoshu drawing cautery. I paint first drawing, then everything else is neat. You're zavoschit and sew to the coffer.

11 (2)

11 (3)

12) is cut, cut, paint, decorative sewn belts (not like a cut, the firmware looks better and stronger)

12 (2)

13) .Well, and most finish treatment of the edges with the aid of PVA glue and paint nazhdachki. Shnurorezom cut into six braids of the same blinders 5mm section for mounting coffers each other and to the Motu, and simultaneously burns the label in a prominent meste.Kofry ready, that's how they look at Motyka.

13 (2)

13 (3)

13 (4)

14) And in the end I want to say all- work with your hands! You can not even imagine how interesting and exciting! The pleasure of the rave reviews the customer with your offspring in hand at all indescribable. =)

15

latest photos

Source:
Tags
See also
Dollhouse with their hands
North Korea (48 photos + text)
There is a country - Andorra
Kircher against Leonardo da Vinci (27 photo + letter)
17 intriguing films that make smash his head on the plot
Travel in Uzbekistan
Funny rubber duck for bathroom (20 photos)
Voynich manuscript. The Manchurian Candidate
Putting it in one evening Virtual Reality helmet with his own hands, with HD picture and head tracking